Use a 1/8-inch, 1/2-inch shank, extra-long carbide end mill for 304 stainless steel with a mirror finish efficiently and safely. This guide breaks down selection, setup, and machining for precise results.
Mastering the 1/8-Inch Carbide End Mill for Mirror-Finish Stainless Steel
Getting a perfect mirror finish on tough materials like 304 stainless steel can feel like a puzzle. Especially when you’re just starting out, the sheer variety of tools and techniques can be a bit overwhelming. You might be looking at your toolbox and wondering which end mill is the right one for that super-smooth, reflective surface. Don’t worry, we’ve all been there! This guide is designed to cut through the confusion, specifically focusing on a crucial tool: the 1/8-inch shank, extra-long carbide end mill. We’ll walk you through everything you need to know to get that stunning mirror finish, safely and effectively.
Understanding Your Tool: The 1/8-Inch Carbide End Mill
Let’s break down what makes this particular end mill so special and why it’s suited for delicate, high-finish work on a challenging material like stainless steel.
What is a Carbide End Mill?
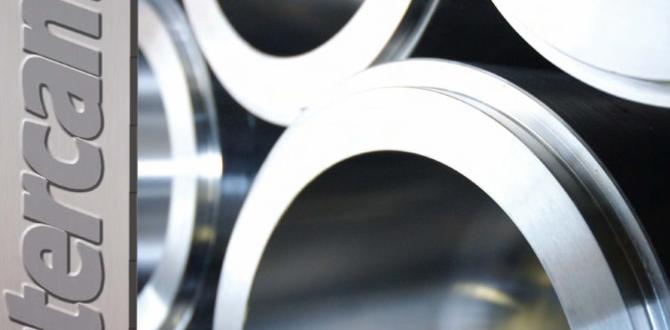
An end mill is a type of milling cutter, shaped like a rotating drill bit with cutting edges on its sides as well as its tip. Carbide end mills are made from tungsten carbide, an extremely hard and durable material. This hardness is key because it allows them to cut tougher metals and maintain their sharp edges for longer periods compared to high-speed steel (HSS) cutters.
Why Carbide for Stainless Steel?
Stainless steel, particularly grades like 304, is known for being hard to machine. It work-hardens easily, meaning it gets tougher as you cut it. High-speed steel cutters can struggle with this, overheating and dulling quickly. Carbide, with its superior hardness and heat resistance, is the go-to choice for efficiently cutting stainless steel. It allows for faster cutting speeds and feeds while producing a cleaner cut.
The Specifics: 1/8-Inch Shank, 1/2-Inch Shank, Extra-Long, Mirror Finish
Let’s dissect the keywords that define our target tool:
- 1/8-Inch Shank: This refers to the diameter of the part of the end mill that fits into your machine’s collet or tool holder. A 1/8-inch shank is relatively small, allowing for very fine details and access to smaller areas.
- 1/2-Inch Shank: This seems contradictory to the 1/8-inch shank if we were talking about a single tool. However, in the context of selecting an end mill, this usually means a tool with a 1/2-inch cutting diameter. It’s crucial to clarify whether the “shank” refers to the tool holder interface or the cutting diameter. Given the context of mirror finish and detail work on stainless steel, it’s more likely we’re focusing on a tool with a 1/8-inch cutting diameter (making it delicate and good for detail) and it might need a specific shank size (like 1/4″ or 1/2″) to fit your machine. For the purpose of achieving a mirror finish on intricate parts, we’ll assume a 1/8-inch cutting diameter end mill that can be held in a 1/4-inch or 1/2-inch collet. If you are looking for a tool with a 1/8-inch shank, that would be a very unusual and potentially weak tool for machining. Let’s proceed assuming the focus is on finer detail work with a smaller cutting diameter.
- Extra-Long: This signifies that the flute (the flutes are the spiral grooves that help clear chips) and overall length of the end mill are greater than standard. An extra-long reach is beneficial for machining deeper pockets or features, or for reaching into areas without interference from the machine’s spindle itself. However, longer tools are more prone to vibration and deflection, which can impact surface finish.
- For Stainless Steel 304: This tells us the material the end mill is specifically designed to cut effectively.
- Mirror Finish: This is the desired outcome. Achieving a mirror finish (very low Ra, or roughness average) requires specific end mill geometry, coatings, cutting parameters, and often a finishing pass. End mills designed for mirror finishes typically have a high number of flutes (e.g., 4 or more), highly polished flutes for chip evacuation, and sharp, precise cutting edges.
When to Choose This Specific End Mill
This particular combination of features makes it ideal for:
- Engraving fine details on stainless steel parts.
- Creating smooth, low-profile features where surface quality is paramount.
- Machining molds or dies that require a highly polished surface.
- Hobbyist projects where achieving a professional, shiny finish is important.
Selecting the Right 1/8-Inch Carbide End Mill for a Mirror Finish
Not all carbide end mills are created equal, especially when you’re aiming for that ultimate mirror finish. Here’s what to look for:
Key Features to Prioritize
- High Number of Flutes: For mirror finishes, you generally want more flutes. A 4-flute or even 6-flute end mill will provide a smoother surface than a 2-flute. More flutes mean smaller chip loads for a given feed rate, which leads to a finer cut and less material deformation.
- Polished Flutes: Look for end mills with highly polished flutes. This helps chips escape more easily, preventing recutting and material buildup on the tool. For stainless steel, good chip evacuation is critical to avoid heat buildup and tool wear.
- Sharp Cutting Edges: Precision ground, razor-sharp cutting edges are non-negotiable for a clean cut and a smooth surface.
- Coating: While not always necessary for a mirror finish with softer steels, certain coatings can enhance performance and tool life. For stainless steel, coatings like TiN (Titanium Nitride) or TiAlN (Titanium Aluminum Nitride) can offer improved hardness and lubricity, but for the absolute smoothest finish, a highly polished, uncoated carbide might be preferred by some machinists, as coatings can sometimes slightly alter the edge geometry. The “mirror finish” designation often implies a very fine surface grind on the actual cutting edge itself, often achieved through secondary finishing processes after milling.
- “Finishing” or “Mirror Finish” Designation: Many manufacturers explicitly label end mills suited for high-finish work.
Considerations for “Extra-Long Reach”
While the extra length can be useful, it comes with trade-offs:
- Increased Vibration: Longer tools are more flexible and prone to chattering or vibrating. This can ruin a surface finish.
- Reduced Rigidity: Less rigidity means less precise cuts.
- Tool Deflection: The tool can bend away from the cut due to forces, especially with longer reaches.
Recommendation: If your part doesn’t require the extra length, opt for a standard length or stub-length end mill for better rigidity and a more consistent finish. If you must use an extra-long one, extreme care with cutting parameters and machine rigidity is needed. For achieving a mirror finish, minimizing vibration is paramount.
Setting Up Your Machine for Success
Proper machine setup is as crucial as selecting the right tool. Even with the best end mill, improper setup will lead to poor results and potential tool breakage.
Collet and Tool Holder Choice
- High-Quality Collets: Use a precision collet for your 1/8-inch end mill. A worn or low-quality collet will not hold the tool accurately, leading to runout and a poor finish. ER collets are common and effective. Ensure the collet is clean and free of debris.
- Rigid Tool Holding: A rigid tool holder is essential. If mounting a 1/2-inch shank tool, ensure the holder is specifically designed for it and is in good condition. For a 1/8-inch cutting diameter, it’s likely you’ll be using a smaller shank (like 1/4″) held in a matching collet.
- Minimize Stick-Out: The amount of the end mill that extends beyond the collet/tool holder (known as “stick-out”) should be as short as possible while still reaching your workpiece contour. More stick-out means less rigidity.
Workpiece Fixturing
- Solid and Secure: Your 304 stainless steel workpiece must be clamped down absolutely securely. Any movement during machining will result in a bad finish and potentially damage the tool. Use appropriate clamps, vises, or fixtures.
- Support: For larger or thinner workpieces, consider adding support underneath to prevent flexing.
Machining Parameters: The Heart of the Mirror Finish
This is where the magic happens. Getting the right spindle speed (RPM), feed rate, depth of cut, and coolant can transform a rough surface into a polished gem. These are starting points, and you’ll likely need to fine-tune them.
Key Parameters Explained
- Spindle Speed (RPM): This is how fast the tool rotates. A higher RPM generally leads to a smoother surface finish, but it must be balanced with the feed rate and the tool’s capabilities. For a 1/8-inch carbide end mill in stainless steel, you might start in the range of 10,000 – 20,000 RPM, depending on your machine and the specific tool.
- Feed Rate: This is how fast the tool moves through the material. A slower feed rate can improve finish but increase machining time and potentially heat. A general rule for finishing passes is to use a feed rate that results in a small chip load. For a 1/8″ 4-flute cutter, a chip load of 0.0005″ to 0.001″ per tooth might be a good starting point.
- Depth of Cut (DOC): For finishing passes, especially when aiming for a mirror finish, you’ll use a very light depth of cut. Typically, this might be 0.001″ to 0.005″ (or even less). The goal is to lightly skim the surface left by a previous roughing cut.
- Radial Depth of Cut (ROUGH): This is how much the tool engages the material side-to-side. For a finishing pass, you might use a light radial engagement.
- Coolant/Lubrication: Essential for machining stainless steel. It cools the cutting edge, lubricates the cut, and flushes away chips. Use a good quality metalworking fluid, mist coolant, or through-spindle coolant if available. For high-finish passes, a light mist or a specific finishing lubricant can be beneficial.
Table 1: Recommended Starting Parameters for 1/8″ Carbide End Mill (304 Stainless Steel, Finishing Pass)
| Parameter | Value Range | Notes |
|---|---|---|
| Tool Diameter | 1/8 inch | Specific to this guide. |
| Number of Flutes | 4 or 6 | More flutes for better finish. |
| Material | 304 Stainless Steel | Requires careful parameter selection. |
| Operation | Finishing Pass | Aiming for mirror finish. |
| Spindle Speed (RPM) | 10,000 – 20,000 | Adjust based on machine power and rigidity. Higher RPMs generally aid finish. |
| Feed Rate (IPM) | 2 – 8 | Calculated from Chip Load: (Tool Diameter Flutes Chip Load) * RPM = Feed Rate. Start low. |
| Chip Load per Tooth (CL) | 0.0005″ – 0.001″ | Critical for clean cutting. |
| Depth of Cut (DOC) | 0.001″ – 0.005″ | Shallower is smoother. |
| Radial Depth of Cut | 0.010″ – 0.050″ | Light engagement for finishing. |
| Coolant/Lubrication | Mist or Flood | Essential for cooling and chip evacuation. |
Disclaimer: These are starting point recommendations. Always consult your tool manufacturer’s recommendations and perform test cuts to dial in the optimal parameters for your specific machine, setup, and tool.
Feed Rate Calculation
The feed rate is often derived from the desired Chip Load per Tooth (CL). The formula is:
Feed Rate (IPM) = Tool Diameter (inches) × Number of Flutes × Chip Load per Tooth (inches) × Spindle Speed (RPM)
For example, using a 1/8″ (0.125″) diameter, 4-flute end mill with a chip load of 0.0008″ at 15,000 RPM:
Feed Rate = 0.125″ × 4 × 0.0008″ × 15,000 RPM = 6 IPM
This manual calculation helps build understanding of the relationship between these factors.
The Finishing Pass: Achieving the Mirror Effect
The final pass is dedicated solely to surface finish. It’s about gently removing the slightest imperfections left by any prior operations.
Steps for the Finishing Pass
- Ensure Previous Cuts are Complete: Make sure any roughing or semi-finishing operations are done, and the surface is as smooth as possible before the final mirror pass.
- Select Light Cut Parameters: Use the shallowest possible Depth of Cut (DOC) and a moderate Radial Depth of Cut (ROUGH). The objective is to engage the surface cleanly with minimal material removal.
- Optimize RPM and Feed: Higher RPMs generally contribute to a better finish. The feed rate should be set to maintain the desired chip load, ensuring the tool cleanly slices the material rather than rubbing or pushing it.
- Maintain Coolant Flow: Continuous and effective coolant application is vital to keep the tool and workpiece cool and flush away tiny metal particles.
- Minimize Vibration: Listen to your machine. Any chatter or unusual noise is a sign of vibration, which will degrade your finish. Double-check tool holding, workpiece fixturing, and cutting parameters.
- Consider Tool Path: For a uniform finish, a consistent tool path is important. Climb milling is often preferred for finishing as it can result in a smoother surface than conventional milling. However, this depends on your machine’s backlash characteristics.
- One Direction for Consistency: For maximum reflectivity and uniformity, sometimes a final “cleanup” pass in a single direction across the entire surface can enhance the mirror effect.
Post-Machining and Inspection
Once the machining is complete, the work isn’t quite done. Inspection and potential post-processing are important.
Cleaning and Inspection
- Thorough Cleaning: Wash the workpiece to remove all coolant, chips, and swarf. Residual cutting fluid can cause corrosion.
- Visual Inspection: Examine the surface under good lighting. Look for any scratches, tool marks, or imperfections.
- Surface Roughness Measurement: For critical applications, use a surface roughness tester (profilometer) to measure the Ra (Average Roughness) value and confirm it meets specifications. A mirror finish typically has a very low Ra, often less than 0.2 µm (8 µin).
Optional Polishing
In some cases, even with optimal machining, a slight mechanical polish may be required to achieve the absolute highest level of mirror finish. This could involve:
- Using very fine grit sandpaper (e.g., 1000-2000 grit).
- Using polishing compounds with buffing wheels.
- Lapping the surface.
These steps are generally applied after the machining is complete and are best suited for specific applications where an ultra-high polish is mandated.
Safety First!
Machining, especially at higher speeds, demands respect for safety. Always prioritize safe practices.
Essential Safety Precautions
- Eye Protection: Always wearANSI-approved safety glasses or a face shield.
- Machine Guarding: Ensure all machine guards are in place and functional.
- Proper Attire: Avoid loose clothing, jewelry, and tie back long hair.
- Tool Handling: Never touch a spinning tool or workpiece. Let them cool down before handling.
- Emergency Stop: Know the location of the emergency stop button