A 3 jaw chuck for lathe is a vital workholding tool that securely grips cylindrical or polygonal workpieces, enabling precise rotation for turning, threading, and facing operations. This guide simplifies choosing, mounting, and using one to boost your machining projects.
Hey there, fellow makers and aspiring machinists! Daniel Bates here from Lathe Hub. If you’ve just gotten your hands on a metal lathe or are looking to get more out of yours, you’ve probably heard about the humble yet mighty 3 jaw chuck. It’s the workhorse that holds your workpiece steady while your lathe does its magic. Sometimes, getting it all set up can feel a bit daunting, especially when you’re just starting out. But don’t worry! I’m here to break down everything you need to know about 3 jaw chucks in a way that’s easy to understand. We’ll cover what they are, why they’re so essential, how to pick the right one, and most importantly, how to mount and use it safely and effectively. Get ready to boost your confidence and your projects!
What Exactly is a 3 Jaw Chuck and Why is it “Genius”?
Imagine you’re trying to spin a pencil perfectly on its end to draw a circle. It wobbles, it’s hard to control, and the result is usually messy. A lathe is designed for precise rotation, but you need a way to hold that pencil (or, you know, metal or wood) securely and centered. That’s where the 3 jaw chuck comes in. It’s a precision tool that clamps onto your workpiece, ensuring it spins perfectly true on the lathe’s axis.
The “genius” part of a 3 jaw chuck lies in its simplicity and effectiveness. It uses three hardened jaws that move in unison, driven by a scroll plate and a pinion gear mechanism. When you turn the keys, all three jaws move in or out at the exact same rate. This means it can grip round objects (like bar stock) and even somewhat irregular shapes (like hex stock) with remarkable concentricity. They are also self-centering, meaning whatever you clamp will be naturally centered relative to the lathe’s spindle axis, which is a huge time-saver and accuracy booster for beginners.

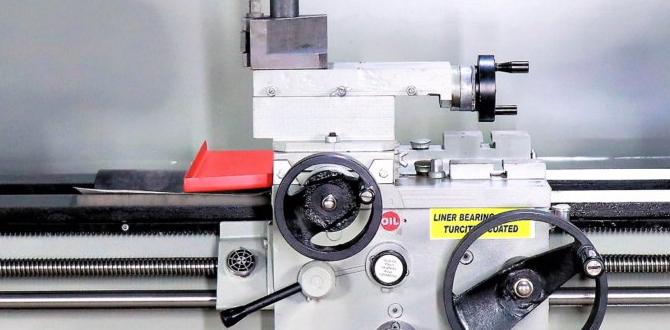
A typical 3 jaw chuck, ready to grip your workpiece.
Key Benefits of a 3 Jaw Chuck:
- Self-Centering: Grips workpieces quickly and accurately without manual adjustments for centering.
- Versatility: Works well with round, hex, and even some square stock.
- Speed: Much faster to load and unload workpieces compared to other workholding methods.
- Security: Provides a strong, reliable grip for most machining operations.
- Accuracy: Achieves excellent concentricity, crucial for precision parts.
Choosing the Right 3 Jaw Chuck for Your Lathe
With the variety of lathes out there, picking the right 3 jaw chuck can seem a bit overwhelming. But it really comes down to a few key factors that ensure a good fit and performance. Getting this right means your chuck will mount securely, and your lathe will operate safely and effectively.
1. Back Mounting Style: The Crucial Connection
This is the MOST important factor. The chuck needs to mount directly and securely to your lathe’s spindle. There are several common mounting styles:
- Threaded Mount: The chuck has internal threads that screw directly onto a threaded spindle nose. You need to match the thread size and pitch exactly (e.g., 1-8 UNC, 2-12 UNF). Common on smaller, older, or hobbyist lathes.
- Cam Lock ( hoặc D1-Camlock): These are more common on larger, industrial, or more precise lathes. The chuck has a flat backplate with T-slots. The lathe spindle nose has corresponding studs and locking cams. The chuck is pushed onto the spindle, and cams are turned to lock it. There are various D-sizes (D1-4, D1-6, D1-8, etc.), so you need to match your lathe’s spindle nose size.
- A2 Mount: Similar to cam lock but uses specialized taper pins and threaded studs for a very precise and rigid connection. Also comes in various sizes (A2-4, A2-5, A2-6, A2-8, etc.). This is very common on modern, high-precision lathes.
- Threaded Adapter: Sometimes, you might have a lathe with a spindle that isn’t directly compatible with standard chucks. In this case, you might use an adapter plate that mounts to your spindle and then provides the correct threaded or flange interface for the chuck. This is less ideal for rigidity but can be a solution.
Action Tip: Check your lathe’s manual or measure your spindle nose. Look for threading details or the diameter and bolt circle of your spindle flange. If unsure, contact your lathe manufacturer or a reputable tooling supplier for help.
2. Chuck Diameter: Size Matters for Your Workpiece
The diameter of the chuck itself needs to be appropriate for the size of your lathe and the workpieces you’ll be machining. A chuck that’s too large for a small lathe is unwieldy and can be dangerous. A chuck that’s too small might not be able to hold the larger workpieces your lathe is capable of handling.
- Small Lathes (Benchtop): Typically use chucks ranging from 3 to 6 inches (75mm to 150mm).
- Medium Lathes: Often equipped with 6 to 10-inch (150mm to 250mm) chucks.
- Large Industrial Lathes: Can use chucks from 12 inches (300mm) up to 30 inches (750mm) or even larger.
General Rule: The chuck diameter should ideally be around one-third to one-half of the swing of your lathe (the maximum diameter of workpiece that can pass over the bed). Again, consult your lathe’s manual for recommendations.
3. Jaw Configuration: Standard vs. Reversible
Most 3 jaw chucks come with a set of “hard jaws” (which are usually somewhat softer than the chuck body itself). These hard jaws can often be modified (scrolled or serrated) to precisely match the shape of your workpiece for maximum grip, especially for irregularly shaped items.
- Standard Jaws: These grip from the outside or inside of a workpiece.
- Reversible Jaws: These jaws can be flipped over. One side typically grips internally, and the other grips externally. This adds immense versatility. For beginners, reversible jaws are highly recommended as they offer more options with just one set of jaws.
4. Precision & Accuracy: For Delicate Work
Chuck accuracy is usually specified by the manufacturer. It tells you how much runout (wobble) to expect when the chuck is properly mounted and a workpiece is clamped. For most beginner projects, standard precision is fine. If you’re working on very high-tolerance parts, you might look for “precision” or “toolroom” grade chucks, which are more expensive but offer much tighter tolerances.
5. Brand and Build Quality
Like any tool, quality varies. Reputable brands often use better materials and have tighter manufacturing tolerances, leading to a longer lifespan and better performance. For a first chuck, it’s worth investing in a decent quality one from a known manufacturer. Brands like Jacobs, Bison, Bison-Bison, and Pratt-Burnerd are well-regarded in the machining world. Avoid extremely cheap, unbranded chucks if possible, as they can be frustratingly inaccurate or unreliable.
Mounting Your 3 Jaw Chuck: A Step-by-Step Process
Mounting a chuck is a critical step that, when done correctly, ensures safety and accuracy. Always follow the specific instructions for your lathe and chuck. If you’re ever unsure, it’s better to ask an experienced machinist or consult your manuals. Safety first!
Tools You’ll Likely Need:
- Your 3 jaw chuck (with jaws installed, usually in the inward-most position)
- Chuck key (the correct size for your chuck)
- Clean rags
- A soft mallet (rubber or plastic)
- Gloves
- Safety glasses (always!)
- Thread cleaning file or brass brush (for threaded mounts)
- Torque wrench (optional, for specific thread mounts)
The Mounting Procedure:
- Safety First: Ensure the lathe is completely powered off and the spindle cannot move. Wear your safety glasses.
- Prepare the Chuck: Make sure the jaws are fully retracted inwards. This makes the chuck smaller and easier to maneuver. Use the chuck key to tighten the jaws all the way in. Some chucks might require you to partially loosen the jaws for mounting – check your manual.
- Clean the Spindle Nose and Chuck Mount: This is crucial for a good fit and centering.
- For Threaded Mounts: Inspect the spindle threads and the chuck’s internal threads. Remove any dirt, debris, or old lubricant. For very clean threads, a thread file can gently clean up any minor imperfections. A brass brush or clean rag is usually sufficient. Apply a thin layer of appropriate machine lubricant to the threads.
- For Cam Lock or A2 Mounts: Ensure the spindle nose and the chuck’s backplate mating surfaces are perfectly clean and free of any nicks or debris. Ensure the cam lock studs (if applicable) are clean.
- Position the Chuck: Carefully lift and position the chuck onto the lathe spindle. 3 jaw chucks can be surprisingly heavy, so be mindful of your back!
- For Threaded Mounts: Gently align the chuck’s internal threads with the spindle threads. Start rotating the chuck clockwise by hand to thread it onto the spindle. It should thread on smoothly. If it feels tight or cross-threads, stop immediately, back it off, and re-align. Never force it.
- For Cam Lock or A2 Mounts: Align the chuck’s backplate with the spindle nose. Push the chuck firmly onto the spindle nose so it’s seated flat against the mounting surface.
- Secure the Chuck:
- For Threaded Mounts: Once threaded on, you’ll need to tighten it against the spindle shoulder. This is often done by tightening the chuck key in the drive slots. Many threaded chucks have specific drive slots that are used for tightening against the spindle face. Tighten firmly, but avoid excessive force that could damage the threads. Some chucks require a specific amount of force; check your manual. For very precise mounting, some machinists mark the chuck and spindle, then use a torque wrench on a specific mounting screw if provided.
- For Cam Lock Mounts: Once seated, push the chuck firmly against the spindle nose. Then, insert the chuck key into each cam lock in sequence. Turn each cam lock clockwise (usually) until it stops firmly. This pulls the chuck tight against the spindle. Work sequentially through the cams, ensuring even pressure.
- For A2 Mounts: This uses drawbars or specialized mounting bolts that pass through the chuck and thread into the spindle flange. Follow your specific lathe and chuck mounting procedure, which usually involves tightening these bolts in a specific sequence to achieve precise alignment.
- Gently Tap (Optional, but often recommended): For threaded and cam-lock mounts, some machinists like to give the chuck body a few light taps with a soft mallet around its circumference. This can help seat the chuck more firmly against the spindle shoulder, improving accuracy.
- Final Check: Ensure the chuck is securely fastened and doesn’t wiggle. Give it a gentle shake. If it feels loose, repeat the mounting steps.
Important Note on Chuck Keys: Many chuck keys are designed to break if too much force is applied. This is a safety feature to prevent damage to the chuck or lathe. Never use a chuck key that doesn’t fit properly, and never use a pipe extension on the key unless absolutely necessary and you know what you’re doing.
Using Your 3 Jaw Chuck Safely and Effectively
Now that your chuck is mounted, let’s talk about how to use it to hold your workpieces securely and accurately. Safety and good practice are key here to get the best results from your lathe.
1. Installing and Removing Jaws (for Reversible Jaws)
Most 3 jaw chucks have jaws that can be removed and reversed. This allows them to grip either on the outside diameter (OD) or the inside diameter (ID) of a workpiece.
- Locate Key Slots: Each jaw has one or two key slots.
- Loosen Jaws: Use the chuck key to loosen the jaws until they are almost completely out of the chuck body.
- Remove Jaws: Carefully pull each jaw straight out from its respective T-slot. Note their position (e.g., Jaw 1, Jaw 2, Jaw 3).
- Reverse and Reinstall: Flip the jaw over to the desired gripping orientation (OD or ID). With the jaws fully retracted, insert them back into their corresponding numbered slots. Ensure they slide in smoothly.
- Tighten Jaws: Use the chuck key to tighten the jaws onto the chuck body.
- Seat Jaws: Once all jaws are installed and tightened, use the chuck key to tighten the jaws equally into the chuck body. Then, tighten them firmly. For best accuracy, some recommend slightly loosening each jaw and then re-tightening it firmly – this helps “seat” them properly.
2. Chucking a Workpiece: Step-by-Step
Chucking is the process of gripping your workpiece. Proper chucking is vital for accuracy and safety.
- Select the Correct Jaw Orientation: Based on whether you need to grip the OD or ID of your workpiece, ensure the jaws are installed in the correct orientation.
- Retract Jaws: Use the chuck key to retract the jaws sufficiently so that your workpiece can freely enter the chuck.
- Position Workpiece: Carefully place the workpiece into the chuck jaws. For OD gripping, rest it against the internal faces of the jaws. For ID gripping, place the workpiece inside the jaws.
- Advance Jaws: Use the chuck key to advance the jaws until they make contact with the workpiece.
- Rough Grip: Advance each jaw a few turns at a time, working in a triangular pattern (e.g., turn Jaw 1, then Jaw 2, then Jaw 3, then back to Jaw 1, etc.). This ensures the jaws move evenly.
- Check Centering (Initial): If you have a dial indicator, you can touch it to the workpiece as you tighten. As the jaws make contact, you’ll usually see the runout. The self-centering nature of the 3 jaw chuck will help it find the center.
- Firm Grip: Continue tightening the jaws incrementally, using the 1-2-3 pattern, until the workpiece is held securely. The amount of force depends on your workpiece material, size, and the machining operation. For light cuts, a firm hand-tight grip is often enough. For heavy cuts or when machining over the chuck jaws, you’ll need a very strong grip.
- Confirm Runout: Once you believe it’s tight enough, use a dial indicator to measure the runout at the end of the workpiece that will be machined. Aim for minimal runout (often less than 0.001″ for general work). If the runout is too high, you may need to loosen the jaws, reposition the workpiece slightly if needed, and re-chuck.
- Check Security: Give the workpiece a firm push and twist by hand to ensure it’s not going to slip.

Carefully placing and gripping a workpiece.
3. Machining Considerations
- Deeper Gripping: For long workpieces, ensure the jaws are gripping deep enough onto the material to provide a stable hold. Avoid gripping only on a small lip if possible.
- Overhang: If your workpiece extends far out from the chuck, it can cause vibration and deflection, reducing accuracy. Support long workpieces with a tailstock center or a steady rest if possible.
- Machining Jaws: For critical or repetitive work, skilled machinists often machine the chuck jaws themselves to perfectly match the diameter or shape of their workpiece. This significantly improves accuracy and grip. This requires advanced skills and a separate process.
- Chuck Obstructions: