A 1/4 inch carbide end mill is a fantastic tool for cutting steel, offering precision and durability. For tool steel, especially D2, look for a stub length designed for harder materials and consider dry cutting techniques to manage heat and extend tool life, making complex cuts achievable even for beginners.
Hey there, fellow makers and metal enthusiasts! Daniel Bates here from Lathe Hub, where we love making machining accessible for everyone. Today, we’re diving into a super handy tool: the humble, yet powerful, 1/4 inch carbide end mill. If you’ve ever looked at cutting steel, especially tougher stuff like D2, and thought, “This looks complicated,” you’re not alone. But with the right guidance and the right end mill, it’s totally doable. We’re going to demystify these little wonders and show you how they can make your steel-cutting projects a whole lot easier, sharper, and more successful. Get ready to learn how to tackle tool steel with confidence!
Carbide End Mill 1/4 Inch: Your Secret Weapon for Steel
When it comes to machining steel, especially the hard stuff like D2 tool steel, having the right cutting tool is absolutely crucial. Enter the 1/4 inch carbide end mill. These little powerhouses are engineered to handle tough materials, and understanding how to choose and use them effectively can be a game-changer for your workshop projects.
Why Carbide? The Material Advantage
Carbide, specifically tungsten carbide, is a composite material known for its incredible hardness and wear resistance. This makes it far superior to High-Speed Steel (HSS) when it comes to cutting harder metals. Think of it like this: HSS tools can get hot and lose their edge relatively quickly when working with tough steels. Carbide, on the other hand, can withstand higher temperatures and maintain its sharpness for much longer. This means you can cut faster, deeper, and for longer periods without worrying about tool failure or a dulling edge that’s just pushing the material around.
The 1/4 Inch Shank: Versatility in Size
The 1/4 inch shank is a common size that fits a wide variety of milling machines, both manual and CNC. It offers a good balance between rigidity and the ability to get into tighter spaces. For those working with smaller projects, prototype parts, or detailed milling operations, this size is often ideal. It’s maneuverable, and when paired with the hardness of carbide, it becomes a surprisingly capable tool for intricate work.
Choosing the Right 1/4 Inch Carbide End Mill for Tool Steel
Not all carbide end mills are created equal, especially when you’re targeting demanding materials like D2 tool steel. Here’s what to look for to maximize your success:
Key Features to Consider:
Material Coating: Some carbide end mills come with specialized coatings (like TiN, TiAlN, or ZrN) that further enhance their performance by reducing friction, increasing heat resistance, and improving tool life. For tool steel, a black or dark coating often indicates a more robust coating suitable for harder metals.
Number of Flutes: This refers to the number of cutting edges on the end mill.
2 Flutes: Generally preferred for slotting and profiling, as they provide good chip clearance. This is often a good choice when dealing with tougher materials where chip evacuation is critical.
3 or 4 Flutes: Better for general-purpose milling and achieving a smoother surface finish. However, for really sticky or hard materials like D2, too many flutes can lead to chip recutting and tool breakage if chip clearance isn’t managed well. For D2, two or three flutes are often a sweet spot.
End Mill Geometry:
Square End: The most common type, with a flat cutting face. Good for general machining, squaring up surfaces, and cutting slots.
Ball End: Has a rounded tip. Used for creating fillets, contouring, and 3D milling.
Corner Radius: A square end mill with a small radius at the corners. This adds strength to the cutting edge and helps prevent chipping, which is beneficial for tougher materials.
Stub Length vs. Standard Length: For cutting hard steels, a stub length end mill is often recommended. These have a shorter flute length than standard end mills, which increases rigidity and reduces the chance of chatter or breakage. This is particularly important when you’re applying significant cutting forces to D2 steel.
Tool Steel Specificity: Some end mills are explicitly designed for machining hardened steels. They often have unique flute geometries, specialized carbide grades, and coatings optimized for these challenging applications.
Stub Length for Tool Steel D2 – Why It Matters
When machining D2 tool steel, you’re dealing with a material that’s notoriously hard and can be abrasive. Using a stub-length end mill with a 1/4 inch shank is a smart move for several reasons:
Increased Rigidity: Shorter tools are stiffer. This means less deflection under load, leading to more accurate cuts and a reduced risk of the tool chipping or breaking.
Reduced Chatter: Chatter, that annoying vibration that ruins your surface finish and damages your tool, is less likely with a more rigid, shorter tool.
Better Chip Evacuation (Potentially): While shorter flutes mean less space for chips, the increased rigidity can help you maintain higher cutting speeds and feed rates, which in turn can help push chips out more effectively.
Considering you’ve mentioned “1/4 shank stub length for tool steel D2 dry cutting,” you’re already on the right track! This combination points towards a specialized tool designed for demanding, high-performance machining.
Dry Cutting and Tool Steel
The mention of “dry cutting” is also a key indicator. Tool steel, especially when hardened, generates a lot of heat during machining. While flood coolant is standard in many machining operations, for certain types of carbide tooling and specific materials like D2, dry cutting can be advantageous, or even necessary, for a few reasons:
Heat Management with Carbide: High-performance carbide tools can often handle high temperatures better than HSS. Sometimes, the heat generated can even contribute to a more efficient cutting action if it doesn’t exceed the material’s tempering point.
Avoiding Thermal Shock: Introducing coolant to a very hot tool can cause thermal shock, leading to cracks.
Chip Evacuation Benefits: With the right speeds and feeds, dry cutting can sometimes result in better chip evacuation, as coolant can sometimes pack chips in tight spaces.
Simplicity: For hobbyists or smaller shops, avoiding coolant systems can simplify setup and maintenance.
When dry cutting tool steel with a carbide end mill, it’s crucial to manage your cutting parameters (speed, feed, depth of cut) meticulously to prevent overheating. Air blast or mist mist coolant can be a good compromise, providing cooling and lubrication without the issues of flood coolant.
Step-by-Step Guide: Machining with a 1/4 Inch Carbide End Mill
Let’s get down to business. Here’s how you can approach milling with your 1/4 inch carbide end mill, focusing on tool steel. Remember, safety first! Always wear safety glasses and ensure your workpiece is securely clamped.
Step 1: Secure Your Workpiece
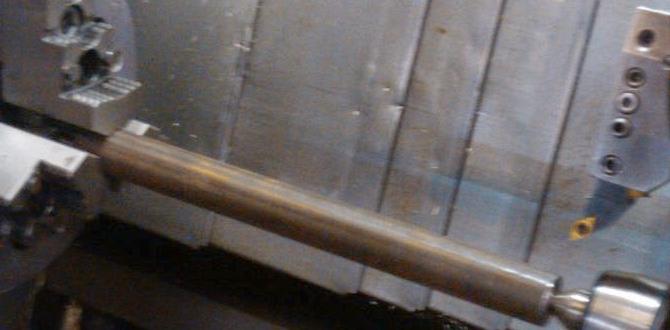
This is non-negotiable. Use a milling vise, clamps, or other appropriate fixturing to ensure your D2 tool steel workpiece is held absolutely rigid. Any movement during the cut can lead to broken tools, damaged workpieces, or worse.
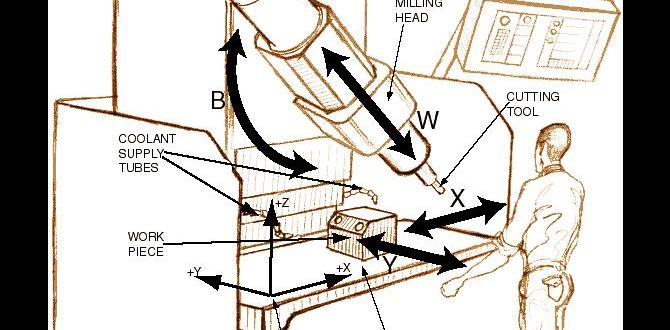
Step 2: Set Up Your Milling Machine
Tool Holder: Insert your 1/4 inch carbide end mill into a reputable tool holder. For CNC machines, a good quality collet chuck or side-lock holder is essential. For manual machines, a collet chuck provides the best runout.
Spindle Speed (RPM): This is critical. For hard steels like D2 with a 1/4 inch carbide end mill, you’ll typically run at relatively lower speeds compared to softer materials. A good starting point might be between 400-800 RPM, but this heavily depends on your specific machine, the end mill’s coating, and the exact hardness of your D2. Always consult the end mill manufacturer’s recommendations if available.
Feed Rate: This is how fast the tool moves into the material. Again, for D2, you’ll want a relatively slow and consistent feed rate to avoid shock loading. Start with something conservative, perhaps 0.001-0.003 inches per tooth (IPT). If your end mill has 2 flutes, your feed rate would be 2 x RPM x IPT. For example, at 500 RPM with 0.002 IPT, your feed rate would be 2 x 500 x 0.002 = 2 inches per minute.
Depth of Cut (DOC): For hard materials, shallower cuts are usually better. Start with a radial DOC (how much of the tool’s diameter is engaged) of around 25-50% of the tool diameter, and an axial DOC (how deep it cuts into the material) of no more than 0.050 inches, or even less for very hard conditions. You can always take more passes.
Step 3: Make Your First Cut
Plunge: If plunging straight into the material, set your plunge feed rate significantly slower than your XY feed rate to avoid shock.
Engage: Slowly advance the end mill into the material while the spindle is at speed. Listen to the cut. A smooth, consistent cutting sound is what you’re after. A high-pitched squeal or a rough, chattering sound indicates something is wrong – either your speed, feed, or depth of cut needs adjustment.
Chip Evacuation: Keep an eye on the chips. They should be breaking up nicely and being thrown clear of the cutting zone. If they are long, stringy, or packing up, you might need to adjust your feed rate (faster can help clear chips) or reduce your DOC/width of cut.
Step 4: Observe and Adjust
Heat: Even with dry cutting, the tool and workpiece will get warm. Touch the workpiece cautiously (never the tool!). If it’s too hot to touch comfortably, you may be cutting too aggressively.
Surface Finish: After the cut, examine the surface. It should be relatively smooth. Streaking, tearing, or rough patches indicate issues that need addressing.
Tool Wear: After your first few cuts, carefully inspect the cutting edges of your end mill. Excessive wear or chipping means your parameters might be too aggressive, or the end mill might not be suited for the material/operation.
Step 5: Take Additional Passes if Necessary
If you need to achieve a specific feature or dimension, take multiple shallow passes rather than one deep cut. This maintains control, reduces stress on the tool, and generally yields better results with hard materials. For example, to cut a slot 0.100 inches deep, take two passes of 0.050 inches.
Machining D2 Tool Steel: A Deeper Dive
D2 tool steel is a high-carbon, high-chromium air-hardening tool steel. It’s known for its excellent wear resistance, strength, and toughness, which makes it fantastic for cutting tools, dies, punches, and knives. However, these same properties make it challenging to machine.
Properties of D2 Tool Steel:
Hardness: Typically heat-treated to a Rockwell hardness of 58-62 HRC.
Wear Resistance: Very high due to its high carbon and chromium content.
Toughness: Good, but can be brittle in certain conditions if not properly heat-treated or machined.
Machinability: Considered poor to fair. It’s abrasive and work-hardens easily.
Best Practices for Machining D2:
Rigidity is Paramount: Use the most rigid setup possible. Minimize overhang on your tooling and workpiece.
Sharp Tools: Always use sharp, high-quality carbide end mills. Dull tools will only exacerbate work hardening and lead to tool failure.
Appropriate Speeds and Feeds: As discussed, lower speeds and controlled feed rates are key. Avoid rubbing.
Chip Formation Control: Aim for chips that are well-formed and easily evacuated.
Cooling/Lubrication: While dry cutting is an option with specific tooling, a good quality cutting fluid or mist coolant can significantly improve tool life and finish when machining D2, especially if you can’t manage heat solely through cutting parameters. For D2, lubricants like sulfurized petroleum or high-pressure synthetic cutting fluids are often recommended.
Avoid Work Hardening: Take light cuts. If you experience chatter, it usually means your setup isn’t rigid enough, or you’re taking too heavy a cut. Sometimes, a slight pecking motion with plunging can help break chips.
Consider Pre-Hardened Stock: If you are not heat-treating yourself, ensure you are buying D2 stock at your desired hardness. Machining D2 in its annealed state is much easier but requires subsequent heat treatment. Machining it in its hardened state is what we’ve been discussing, and it requires specialized tooling and techniques.
Tools and Accessories for a 1/4 Inch Carbide End Mill Setup
To get the most out of your 1/4 inch carbide end mill, especially when tackling tool steel, having the right supporting tools is essential.
Essential Tooling and Accessories:
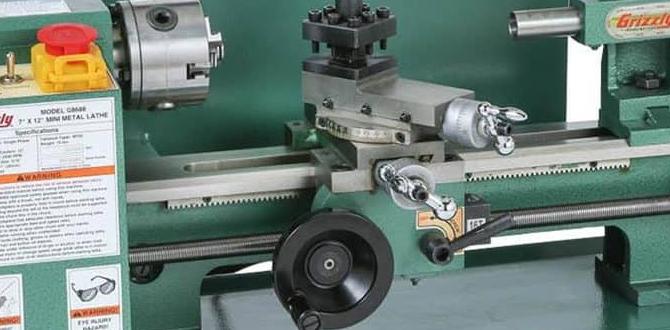
Milling Machine: A sturdy mill (manual or CNC) is obviously required.
Tool Holder: Collet chuck or side-lock holder specifically for 1/4 inch shank tools.
Collets: Precision collets for the 1/4 inch shank.
Milling Vise: A robust vise to securely hold your workpiece.
End Mill: Your selected 1/4 inch carbide end mill (2 or 3 flute, stub length, potentially coated and with a corner radius for D2).
Workholding Clamps: For securing smaller or irregularly shaped pieces.
Ruler/Caliper: For accurate measurement.
Safety Glasses/Face Shield: Non-negotiable for eye protection.
Hearing Protection: Milling machines can be noisy.
Chip Brush/Vacuum: For safely clearing chips.
Air Blast or Mist Coolant System (Optional but Recommended): For managing heat and chips, especially with D2.
Depth Micrometer or DRO (Digital Readout): For precise depth control.
Pros and Cons of Using a 1/4 Inch Carbide End Mill for Steel
Like any tool, there are advantages and disadvantages to consider.
Pros:
Hardness and Wear Resistance: Superior to HSS for machining tougher materials like D2.
Heat Tolerance: Can withstand higher temperatures, allowing for faster cutting speeds (when appropriate for the material).
Precision: Can produce very accurate and detailed features.
Versatility: Suitable for a wide range of operations, including slotting, profiling, pocketing, and contouring.
Durability: When used correctly, carbide end mills have a longer tool life than HSS.
Common Size: 1/4 inch shank fits many machines and offers good maneuverability.
Cons:
Brittleness: Carbide can chip or break if subjected to excessive shock, improper feed rates, or poor setup rigidity.
Cost: Generally more expensive than HSS end mills.
Requires Rigidity: Performance is highly dependent on a rigid machine, good tool holder, and secure workpiece.
Specific Machining Parameters: Machining hard steels requires meticulous attention to speeds, feeds, and depths of cut.
Chip Evacuation Challenges: With fewer flutes (for harder materials), chip packing can be an issue if not managed.
Troubleshooting Common Issues
Encountering problems is part of the learning process. Here are common issues and how to address them:
| Issue | Possible Cause | Solution |
| :—————- | :———————————————————————————- | :—————————————————————————————————————————————————————————————————————————————– |
|
Tool Breakage | Excessive feed rate, depth of cut too high, inadequate rigidity, worn tooling, chip buildup. | Reduce feed rate and/or depth of cut. Ensure workpiece and tool holder are rigidly secured. Check for tool wear; replace if necessary. Improve chip evacuation (e.g., use air blast, adjust feed). Consider a stub length end mill. |
| Poor Surface Finish | Dull tool, incorrect speed/feed, chatter, work hardening, chip recutting. | Use a sharp tool. Adjust spindle speed and feed rate (often a higher feed rate for a given RPM can produce a smoother finish if rigidity allows). Ensure rigidity throughout setup. Check for chip recutting and clear properly. |
| Chatter/Vibration | Lack of rigidity in machine, tool holder, or workpiece; worn tool; chip clogs. | Improve rigidity: use a shorter tool if possible, ensure tool holder is tight, workpiece clamped firmly, machine slides are tight. Reduce depth of cut. Ensure there’s no chip buildup. Try a different spindle speed (harmonic frequencies). |
| Work Hardening | Slow cutting speed, rubbing instead of cutting, inadequate lubrication/cooling. | Increase feed rate (if possible for material) to ensure a proper cutting action. Ensure the tool is sharp and not rubbing. Use appropriate coolant or lubricant. Take lighter passes. |
| Excessive Heat | Too high surface speed (SFM), too deep a cut, insufficient cooling/lubrication. | Reduce spindle speed (RPM). Reduce depth of cut. Ensure proper cooling and lubrication is being applied, or consider using an air blast. |
Resources for Further Learning
To further enhance your skills and understanding of machining, especially concerning tool steel and carbide tooling, I recommend exploring these authoritative resources:
[Machinery’s Handbook](https://www.amazon.com/Carbide-Tool-

| :—————- | :———————————————————————————- | :—————————————————————————————————————————————————————————————————————————————– |
|