Quick Summary
Achieve tight tolerance PMMa machining with a 1/8 inch carbide end mill and a 1/2 inch shank that’s extra long. This guide provides step-by-step instructions for selecting, setting up, and using this specific tool for precise results, ensuring your PMMa parts meet exact specifications.
Mastering PMMa Machining: Your Guide to 1/8 Inch Carbide End Mills
Hey there, workshop adventurers! Daniel Bates here, your go-to guy for all things lathes and milling. Today, we’re diving deep into a topic that might sound a little specific, but trust me, it’s crucial for anyone working with PMMa (Polymethyl methacrylate, also known as acrylic or Plexiglas) and aiming for those super-precise, tight tolerance parts. We’re talking about using a particular tool: a 1/8 inch carbide end mill with a 1/2 inch shank, especially when you need that “extra long” reach.
I know, I know. Sometimes, you just need a tool that does exactly what you need it to do, especially when dealing with delicate materials like PMMa. The wrong tool can lead to zippering, chipping, melting, or just plain inaccurate cuts. But don’t worry! Getting those perfect, tight tolerance finishes is totally achievable. We’re going to break down how to select the right end mill, set it up correctly on your mill, and run it for beautiful, precise PMMa parts. Stick around, and you’ll be machining with confidence in no time!
Why This Specific End Mill Matters for PMMa
PMMa is a fantastic material for many projects, from intricate enclosures to artistic pieces. However, it can be a bit tricky to machine. It’s prone to melting if too much heat is generated, and it can chip or crack if stressed improperly. This is where the right cutting tool comes into play, and for tight tolerance PMMa work, a 1/8 inch carbide end mill with a 1/2 inch shank, especially an extra-long version, offers some distinct advantages.
Carbide: This material is much harder and more heat-resistant than high-speed steel (HSS). For PMMa, this means it can maintain a sharp edge longer and handle higher cutting speeds without melting or deforming, crucial for clean cuts.
1/8 Inch Diameter: This small diameter is perfect for intricate details and thin features often found in tight tolerance PMMa parts. It allows for fine cutting paths and high levels of detail.
1/2 Inch Shank: A standard shank diameter, meaning it will fit most common collets and tool holders in your milling setup. This provides a good balance of rigidity and compatibility.
Extra Long Flute: This is where the “extra long” comes in. It’s often needed to reach deeper into a part or to machine features that are recessed. However, extra length can also introduce chatter or vibration if not handled correctly, which is something we’ll address.
Getting these specifications right is the first step to unlocking precise cuts in your PMMa projects.
Choosing the Right 1/8 Inch Carbide End Mill for PMMa
Not all end mills are created equal, especially when you’re chasing tight tolerances in PMMa. Here’s what to look for when selecting that perfect 1/8 inch, 1/2 inch shank, extra-long carbide end mill for your PMMa adventure.
Key Features to Consider:
Number of Flutes: For PMMa, you generally want end mills with fewer flutes.
2 Flutes: These are often the best choice for plastics like PMMa. They provide more chip clearance, which is vital to prevent melting and clogging. A single up-cut and a single down-cut spiral flute (a compression flute) is also excellent for PMMa as it pulls chips up and pushes them down, preventing burrs on both the top and bottom surfaces.
3 or 4 Flutes: While good for metals, these can sometimes pack chips more readily in softer plastics, leading to melting. If you use them, you’ll need to be extra careful with feed rates and cooling.
Helix Angle: A steeper helix angle (often 30-45 degrees) can help evacuate chips better and reduce cutting forces, which is beneficial for plastics.
Coating: While not always necessary for PMMa with carbide, certain coatings can further improve tool life and performance. However, for a beginner, a sharp, uncoated carbide end mill is often sufficient and easier to understand.
Material Quality: Look for reputable brands known for producing high-quality carbide tooling. Cheap end mills might seem like a bargain but can fail prematurely, leading to poor finishes or damaged workpieces.
Understanding “Extra Long”
The “extra long” designation refers to the overall length and/or the length of the cutting flutes. For PMMa, especially when machining deeper pockets or features, an extra-long end mill can be essential. However, it’s important to be aware of the trade-offs:
Increased Rigidity Requirement: Longer tools are less rigid. They have a higher tendency to deflect under cutting forces, leading to inaccuracies and potentially chatter.
Chatter and Vibration: This is the enemy of fine finishes. A longer tool is more susceptible to vibration. We’ll discuss ways to combat this later.
Pro Tip: If your design doesn’t absolutely require an extra-long end mill, opt for the shortest tool that can do the job. Rigidity is king for tight tolerances!
Where to Buy Quality End Mills
Finding reliable sources for your tooling is key. Here are a few places where you can often find quality machining tools:
Specialty Tooling Suppliers: Companies like McMaster-Carr, MSC Industrial Supply, and Grainger carry a wide range of end mills from various manufacturers.
Online Tool Retailers: Websites specializing in CNC or machining tools often have a good selection. Look for brands like Lakeshore Carbide, YG-1, or Kennametal.
Machinery Dealers: Often, the dealers who sell your milling machines also sell tooling.
Always check product reviews and specifications carefully.
Setting Up Your Milling Machine for Precision PMMa Cuts
A perfectly chosen end mill is only half the battle. Proper setup on your milling machine is critical for achieving those tight tolerances. Let’s get this right.
1. Secure the Workpiece (PMMa): Crucial First Step
PMMa needs to be held firmly but without excessive force that could crack it.
Clamps: Use clamp hold-downs that distribute pressure evenly. Avoid overtightening. Use soft jaws or protective material (like cardboard or felt) between the clamp and the PMMa to prevent marring.
Double-Sided Tape: For thinner PMMa sheets, sometimes a strong double-sided tape (like VHB tape) can work, especially if combined with a temporary adhesive jig or spoiler board.
Vacuum Fixturing: If you’re doing a lot of PMMa work, a vacuum table can be an excellent, non-marring way to hold parts securely.
Important: Ensure your PMMa is flat against the machine bed or fixture. Any rocking will lead to inconsistent depth of cut and poor tolerances.
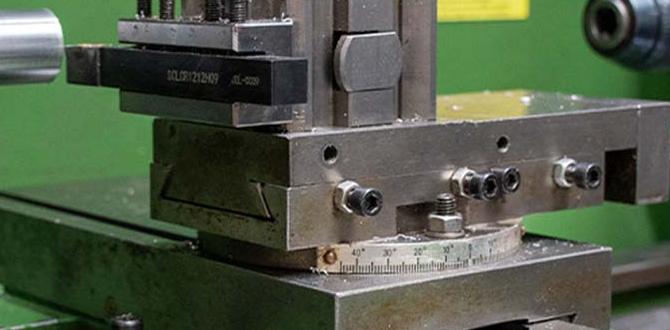
2. Installing the End Mill Correctly
This is straightforward but vital.
Collet Chuck: The best method for holding end mills, especially smaller ones, is a high-quality collet chuck. This provides excellent runout accuracy and grip.
Select the correct size collet for your 1/2 inch shank end mill.
Insert the end mill into the collet, ensuring it’s seated correctly.
Tighten the collet chuck according to the manufacturer’s instructions. Never overtighten.
Regular Collets: If you don’t have a chuck, use a high-quality collet. Ensure the collet is clean and free of debris.
Tool Holder: Avoid set-screw type tool holders for precision PMMa work if possible, as they can introduce runout.
Check for Runout: If your mill has a dial indicator, mount it and gently rotate the spindle by hand to check the runout of the end mill. Aim for less than 0.001 inches (0.025 mm) for tight tolerance work.
3. Setting the Z-Axis Zero Point
This is how your machine knows where the top of your material is.
Edge Finder or Probe: Use a mechanical edge finder or an electronic probe. Mount it in the spindle, and carefully bring the tip to the top surface of your PMMa. When the finder triggers or the probe registers contact, you’ve found your Z=0.
For an edge finder: Touch the edge of the PMMa with the PMMa finder’s tip. Move the quill down until the finder’s plunger moves off-center by its specified amount (usually 0.100″ for a 0.200″ diameter bar). Then, jog the machine along the X or Y axis by that specified amount away from that edge. Now, the center of your spindle is at the edge of your PMMa. If this is your Z=0 plane, set your Z DRO (Digital Readout) to zero.
For a probe: Carefully bring the probe tip down until it makes contact with the PMMa surface. The DRO will then indicate the Z coordinate of that surface. Set this as your Z=0 plane.
Touch Probe (for Z): A dedicated Z-axis touch probe is the most accurate way. Carefully lower it until it touches the PMMa surface. The DRO will show the exact Z height.
Crucial for Tight Tolerances: Be consistent. Make sure you are touching the exact same surface every time you set your zero.
Machining PMMa: Feeds, Speeds, and Techniques
Now for the fun part – actually cutting! For PMMa with a 1/8 inch carbide end mill, we need to be smart about our settings to get a clean, precise cut without melting or breaking the tool.
Feeds and Speeds – The Balancing Act
These are not hard-and-fast rules, as they depend on your specific machine, the exact PMMa alloy, and the rigidity of your setup. However, here are good starting points for a 1/8 inch, 2-flute carbide end mill.
Spindle Speed (RPM): Start relatively high. For PMMa, speeds between 10,000 to 20,000 RPM are common. Higher RPMs mean the tool cuts more material per revolution, reducing the time each cutting edge spends in contact with the material, which helps manage heat.
Feed Rate (IPM – Inches Per Minute): This is where you control material removal and heat build-up. For a 1/8 inch end mill, a good starting point is between 10 to 30 IPM.
Chip Load: A more advanced concept is chip load, which is the thickness of the chip being removed by each cutting edge. (Feed Rate / (RPM Number of Flutes)). Aim for a chip load around 0.002″ – 0.005″ for PMMa.
The Rule of Thumb: For plastics, it’s often better to cut faster and shallower. This means a higher feed rate relative to your spindle speed, producing smaller chips. This helps clear heat.
Machining Strategies for PMMa
Climb Milling vs. Conventional Milling:
Climb Milling: The end mill rotates in the same direction as its feed. This typically results in a smoother finish and less force on the workpiece. It’s also generally better at clearing chips. This is highly recommended for PMMa.
Conventional Milling: The end mill rotates against the direction of its feed. This creates more cutting force and can push chips into the cut, leading to melting. Avoid this where possible for PMMa.
On your CNC, this is usually set in your CAM software or by reversing your feed direction. On a manual mill, you’ll need to understand which way to push the handwheel to climb mill a given feature.
Depth of Cut (DOC): Don’t try to take too much material at once.
For finishing passes, very shallow cuts (0.005″ – 0.010″) are best.
For roughing, you might take deeper cuts, but always ensure chips are clearing well. A good starting point might be 0.050″ to 0.100″, but observe chip formation and adjust.
“Leads” or “Ramps”: Instead of plunging straight down, use a helical or linear ramp into the PMMa. This distributes the cutting load more gently. Many CAM packages have options for this (e.g., helical interpolation, ramping).
Cooling and Lubrication: While not always strictly necessary for PMMa with carbide, a little can go a long way.
Air Blast: A strong blast of compressed air directed at the cutting zone is often sufficient to keep chips from melting and sticking to the tool.
Mist Coolant: A light mist of coolant can help manage heat and lubricate the cut. Use a coolant specifically designed for plastics if possible, or a general-purpose flood coolant.
Avoid: Don’t flood PMMa with liquid coolant, as it can sometimes cause the plastic to craze (develop fine cracks).
Dealing with an Extra Long End Mill
The longer the tool, the more prone it is to vibration and deviation from a perfectly straight path.
Reduce Feed Rate: Slightly lower your feed rate when using an extra-long end mill. This reduces the cutting forces that cause deflection.
Increase Spindle Speed (if possible): Sometimes, a higher RPM can help “overpower” minor vibrations and keep chip load consistent.
Take Lighter Cuts: Reduce your depth of cut considerably when using a long tool. Focus on making multiple shallow passes.
Rigid Setup: Double-check that your workpiece, tool holder, and machine are all as rigid as possible. Any play will be amplified by the long tool.
Use a Ball End Mill (for pockets): If you are pocketing and using a long end mill, a ball end mill with a very small corner radius can sometimes be used to clear out large areas by making very shallow, high-speed passes. This is a more advanced technique.
Example Machining Parameters (Starting Point):
Material: PMMa (Acrylic)
Tool: 1/8″ 2-flute carbide end mill, 1/2″ shank, extra long flute
Spindle Speed (RPM): 15,000 RPM
Feed Rate (IPM): 20 IPM
Depth of Cut (DOC): 0.020″ per pass
Stepover (for profiling): 0.010″
Cutting Strategy: Climb milling, with an air blast for chip evacuation.
| Parameter | Value (Imperial) | Value (Metric) | Notes |
| :—————– | :———————————– | :———————————– | :—————————————————————- |
| Tool Diameter | 1/8 inch | 3.175 mm | Specific for detailed PMMa work. |
| Shank Diameter | 1/2 inch | 12.7 mm | Standard for most collets and holders. |
| Flute Count | 2 | 2 | Best for chip clearance in plastics. |
| Material | Carbide | Carbide | Hardness and heat resistance for clean cuts. |
| Spindle Speed | 15,000 RPM | 15,000 RPM | Helps manage heat; adjust based on performance. |
| Feed Rate | 20 IPM | 508 mm/min | Start conservatively; increase if chips are clean and small. |
| Depth of Cut | 0.020 inches | 0.508 mm | Shallow passes are key for PMMa. Adjust based on rigidity. |
| Chip Load | ~0.0033 inches (per flute) | ~0.084 mm (per flute) | Indicates small, manageable chips. |
| Coolant/Lube | Compressed Air Blast | Compressed Air Blast | Essential for chip evacuation and heat reduction. |
| Milling Type | Climb Milling | Climb Milling | Preferred for finish and chip evac. |
| Ramp Angle | 2-3 degrees (for plunging) | 2-3 degrees (for plunging) | Gentle entry to the material. |
Always perform a test cut on scrap material first! Observe the chips, listen for chatter, and check the finish. Adjust your settings based on what you see and hear.
Common Problems and Solutions for PMMa Machining
Even with the best setup, you might run into issues. Here’s how to troubleshoot.
Melting/Gummy Chips:
Cause: Not enough chip clearance, feed rate is too slow, or spindle speed is too low. The tool is rubbing rather than cutting.
Solution: Increase feed rate, increase spindle speed, use a tool with more chip clearance (like a 2-flute), or increase air blast. Consider a mist coolant.
Chipping or Zippering:
Cause: Tool is dull, feed rate is too fast, or