Carbide end mills with specific flute geometry are key to effectively clearing chips when cutting plywood, preventing clog-ups and ensuring clean, precise results for your projects.
Cutting plywood can be a challenging task, even with the right tools. One of the biggest headaches for beginners is dealing with sawdust and chip buildup. When your end mill gets clogged, it can lead to rough cuts, burnt edges, and even damage to your expensive plywood. It’s a frustrating problem that can stop your project dead in its tracks. But don’t worry! With the right knowledge about carbide end mills and their chip evacuation capabilities, you can overcome this common issue. We’re going to dive deep into what makes a carbide end mill great for plywood and how to use it effectively. You’ll learn exactly what to look for and how to achieve those smooth, chip-free cuts you’ve been aiming for.
Why Plywood Chip Evacuation is Tricky
Plywood, while versatile and readily available, presents unique machining challenges. Unlike solid wood, it’s made of multiple thin layers of veneer glued together. This layered structure, combined with adhesives, can be abrasive and prone to chipping and splintering. When you mill into plywood, especially with the wrong type of cutting tool, the small wood particles and glue dust generated don’t just fall away. They tend to pack themselves tightly into the flutes of the end mill.
This packing, known as chip welding or chip clogging, is a big problem for a few reasons:
Increased Heat: When chips can’t escape, they rub against the cutting edges and the workpiece, generating excessive heat. This can burn the wood, leading to ugly scorch marks that are difficult to remove.
Poor Surface Finish: A clogged end mill can’t cut cleanly. Instead, it can tear, rip, and push the wood, resulting in a rough, fuzzy surface that requires extensive sanding.
Tool Damage: The excessive heat and force from packed chips can dull your end mill quickly, or even cause it to break. This means you’ll be replacing tools more often, which is costly.
Reduced Accuracy: When the end mill isn’t cutting freely, it can grab or deflect, leading to inaccurate dimensions and poor-quality cuts.
The goal of efficient chip evacuation is to ensure that as the end mill cuts, the generated debris is immediately removed from the cutting zone. This allows the sharp edges of the tool to make clean contact with the material, preventing heat buildup and producing a superior finish.
Understanding Carbide End Mills for Plywood
When we talk about cutting tools for plywood, especially those that excel at chip evacuation, we’re usually talking about carbide end mills. Let’s break down what makes them suitable and what specific features to look for.
What is a Carbide End Mill?
An end mill is a type of milling cutter, basically a rotating cutting tool with cutting edges on its periphery and tip. They are used in milling machines and CNC machines to cut keyways, slots, profiles, and perform other machining operations.
Carbide, or more specifically, Tungsten Carbide, is an extremely hard and dense material. End mills made from carbide are significantly harder and more wear-resistant than those made from High-Speed Steel (HSS). This hardness means they can:
Cut harder materials.
Cut at higher speeds.
Retain their sharpness longer.
Withstand higher temperatures without deforming.
For abrasive materials like plywood, carbide’s durability is a huge advantage.
Key Features for Plywood Chip Evacuation
Not all carbide end mills are created equal when it comes to cutting plywood and evacuating chips. Here are the crucial features you need to consider:
1. Number of Flutes: This is perhaps the most critical factor. Flutes are the spiral grooves that run up the cutting part of the end mill.
2-Flute End Mills: These are generally the best choice for cutting wood and wood-like materials, including plywood. With fewer flutes, there’s more open space between them. This extra space, or “gullet,” provides a larger void for chips to collect and be carried away from the cutting area. They are also less prone to clogging in gummy, soft materials.
4-Flute End Mills: While excellent for many metal cutting applications where a smoother finish is desired and chip loads are managed differently, 4-flute end mills have less space between flutes. This can make them more prone to packing up with soft wood chips, leading to overheating and poor evacuation. They can work in some situations, but generally, for pure plywood cutting, 2-flutes are preferred.
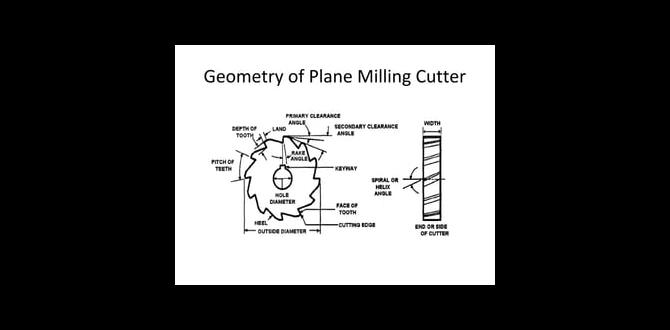
2. Flute Geometry (Helix Angle): The steepness of the spiral flutes affects how efficiently chips are lifted out of the cut.
High Helix Angle (e.g., 30-45 degrees): End mills with a steeper helix angle are designed to “screw” chips out of the cut more effectively. This “up-cut” action lifts chips away from the bottom of the cut. For plywood, a higher helix angle generally contributes to better chip evacuation.
Low Helix Angle (e.g., 15-30 degrees): These tools tend to have more of a scraping action and are less aggressive at lifting chips.
3. Up-Cut, Down-Cut, or Compression: This refers to the direction the flutes cut relative to the workpiece.
Up-Cut (Spiral): As mentioned, these lift chips away. They are excellent for clearing chips from a slot or pocket. This is typically what you want for plywood chip evacuation.
Down-Cut (Reverse Spiral): These push chips down into the cut. They are great for “climbs cutting” the top surface and leaving a very clean finish on the top edge because they hold the material down. However, they can pack chips at the bottom of a pocket or slot.
Compression Bits: These combine an up-cut and a down-cut spiral on the same bit. The down-cut portion at the top cuts and holds the surface, preventing tear-out, while the up-cut portion at the bottom clears chips. They are fantastic for getting a clean top edge and good chip clearance from the bottom, making them a strong contender for plywood. However, they can be more expensive and may require careful feed rate adjustments.
4. Coating: While not always essential for plywood, certain coatings can improve performance.
Uncoated: Perfectly functional for many plywood applications.
Titanium Nitride (TiN) or Zirconium Nitride (ZrN): These are common hard coatings that can offer a slight improvement in wear resistance and reduce friction, which can indirectly help with chip flow. However, they are less critical for plywood than for tougher metals.
5. Material of the End Mill: As we discussed, Carbide is the material of choice for plywood due to its hardness and heat resistance.
6. Specific Design for Composites/Wood: Some end mills are specifically designed for cutting composite materials or wood. These often feature more aggressive geometries, larger gullets, and polished flutes for better chip flow.
The Ideal Carbide End Mill for Plywood Chip Evacuation
Based on the above, the ideal carbide end mill for proven plywood chip evacuation would likely be:
A 2-flute, up-cut end mill.
With a high helix angle (around 30 degrees or more).
Possibly a compression bit if clean top edges are paramount and tear-out is a major concern.
Made of solid carbide.
With highly polished flutes to reduce friction and aid chip release.
A common and highly effective option to search for, echoing your prompt, is a “carbide end mill 1/8 inch 1/2 shank extra long for plywood chip evacuation.” Let’s break down why these specific dimensions are often sought after:
1/8 inch diameter: This is a popular size for detailed work, smaller pockets, and lighter cuts, making it versatile for many CNC router applications.
1/2 inch shank: This provides a very rigid connection to your collet or tool holder, reducing runout and vibration, which is crucial for clean cuts. A larger shank also means it can be held deeper without chatter.
Extra Long: This usually refers to the flute length. An extra-long flute can be beneficial for cutting deeper pockets or through thicker materials in a single pass, but it can also increase deflection if not used cautiously. For chip evacuation, a slightly longer flute can sometimes help clear chips further up the tool. However, for most standard plywood applications for hobbyists, a standard flute length might be more rigid and controllable. When “extra long” is specified alongside plywood chip evacuation, it often implies a design that prioritizes chip clearance even in deeper cuts.
Practical Settings and Techniques for Plywood
Beyond having the right tool, your cutting settings and methodology play a huge role in successful chip evacuation.
Feed Rate and Spindle Speed (RPM): The Dance of Chip Load
This is where many beginners get tripped up. Getting the right balance between how fast your router spins (Spindle Speed, RPM) and how fast you push the material through the cutter (Feed Rate, IPM – Inches Per Minute) is critical for achieving the correct “chip load.”
Chip Load: This is the thickness of the material that each cutting edge of the end mill removes with each revolution. It’s not something you directly set, but rather the result of your spindle speed and feed rate.
`Chip Load = (Feed Rate) / (Spindle Speed Number of Flutes)`
Why Chip Load Matters:
Too small chip load: This causes the tool to rub rather than cut efficiently. It generates excessive heat, burns the material, and leads to poor chip evacuation because the chips are too small and dusty to be effectively carried away. This is often called “plowing.”
Too large chip load: This can overload the cutting edge, leading to tear-out, excessive force, potential tool breakage, and a rough finish.
Optimal chip load: This ensures each flute takes a sufficient bite, effectively clearing chips and producing a clean cut without stressing the tool or material.
For plywood, you generally want a chip load that is substantial enough to create distinct chips, not fine dust. This usually means a slightly higher feed rate relative to spindle speed compared to some hard metals, or using a spindle speed that works well with your machine and material.
General Guidelines for Plywood (using a 2-flute carbide end mill):
Spindle Speed (RPM): This depends heavily on your machine. For typical hobby CNC routers, this might range from 12,000 to 24,000 RPM. Start on the lower end if unsure.
Feed Rate (IPM): This will vary based on the diameter of your end mill and the type/thickness of plywood. For a 1/8″ end mill in 1/2″ plywood, you might start in the range of 30-80 IPM.
Depth of Cut (DOC): For rough cuts or pocketing, you’ll want to take multiple passes rather than trying to plunge too deep in one go. A conservative DOC for a 1/8″ bit might be 1/8″ to 1/4″. For the final finishing pass, a much shallower DOC (e.g., 0.010″ – 0.030″) will yield the best surface finish.
Example Calculation:
Let’s say you’re using a 2-flute, 1/8″ carbide end mill at 18,000 RPM and want to achieve a chip load of 0.003 inches per tooth.
Your target feed rate: `Feed Rate = Chip Load Spindle Speed Number of Flutes`
`Feed Rate = 0.003 in/tooth 18,000 RPM 2 flutes = 108 IPM`
This is a starting point. You’ll need to listen to your machine, observe the chips, and check your cut quality.
Air Blast and Dust Collection
Even with the best end mill, airflow is your best friend for chip evacuation.
Air Blast: A stream of compressed air directed at the cutting zone can make a massive difference. It blows chips away from the end mill flutes and out of the pocket or slot as they are generated. Many CNC routers have fittings for air blast nozzles that can be mounted to the router collet or spindle housing.
Dust Shoe and Vacuum: A dust shoe attached to your router or spindle is essential. It encloses the cutting area and connects to a powerful vacuum system. This not only collects dust for a cleaner working environment (and better health!) but also helps draw chips away from the cut. A good dust collection system can significantly aid chip evacuation by pulling chips out of the gullets as they are lifted by the flutes.
Cutting Strategies
Pocketing Strategy: When milling pockets, use an “on-center” or “climb” milling strategy if your software allows.
Conventional Milling: The cutter moves against the direction of chip flow. This tends to push material down and can generate more heat, leading to poorer chip evacuation.
Climb Milling: The cutter moves with the direction of chip flow. This generally results in less heat, cleaner cuts, and better chip evacuation because the chips are being pulled along with the rotation. For plywood, climb milling with a 2-flute up-cut bit is often superior.
Stepover: The distance the end mill moves sideways for each pass. For a shallower DOC, you can use a larger stepover. For a deeper DOC, reduce the stepover to ensure the flutes can properly clear chips.
Tab Placement: When cutting parts out, leave small tabs to hold the piece in place. Plan these tabs so they don’t interfere with chip evacuation in critical areas.
Choosing Your Carbide End Mill: A Comparison
Let’s look at some common types of end mills and how they fare for plywood chip evacuation.
| End Mill Type | Description | Pros for Plywood Chip Evacuation | Cons for Plywood Chip Evacuation | Best Use Case for Plywood |
| :—————————– | :—————————————————————————- | :————————————————————- | :————————————————————- | :———————————————————— |
| 2-Flute Up-Cut Spiral | Standard design with two cutting edges that spiral upwards. | Excellent chip clearance due to large gullets and up-cut action. | Can sometimes leave a slightly fuzzy top edge if feed settings aren’t perfect. | General-purpose cutting, pocketing, profiling, and dadoes. |
| 2-Flute Down-Cut Spiral | Two cutting edges spiral downwards. | Holds material down effectively, cleaner top edge. | Poor chip evacuation in pockets/slots, can clog easily. | Surface profiling where top edge finish is critical AND chips can escape. |
| 2-Flute Compression Bit | Combines up-cut and down-cut spirals. | Excellent chip evacuation from the bottom, clean top surface. | Can be more expensive, requires careful feed adjustments. | High-quality cutouts where both top edge finish and chip clearance are vital. |
| 4-Flute Up-Cut Spiral | Four cutting edges spiral upwards. | Smoother finish than 2-flute in some materials. | Smaller gullets can lead to chip packing and clogging in plywood. | When cutting softer woods or if a smoother finish is prioritized over maximum chip clearance. |
| Straight Flute End Mill | No spiral, straight cutting edges. | Can be useful for some plunging operations. | Very poor chip evacuation, prone to clogging. | Generally not recommended for plywood cutting operations. |
Recommendation for Plywood: For the best balance of chip evacuation and cutting performance, a 2-flute up-cut spiral carbide end mill is usually the go-to choice. If you find your top edges are getting a bit rough and want a cleaner finish without resorting to extensive sanding, a 2-flute compression bit is an excellent upgrade.
When to Consider Specific Dimensions
Let’s revisit the “carbide end mill 1/8 inch 1/2 shank extra long for plywood chip evacuation” because it highlights important considerations:
Cutting 1/8″ Plywood: If you’re often working with thinner plywood sheets or creating intricate designs, a 1/8″ diameter bit is ideal. Its small size allows for fine details and tight corners.
Half-Inch Shank: A 1/2″ shank offers superior rigidity compared to smaller shanks (like 1/4″). This means less wobble, less vibration, and a more stable cut. For precise work, especially in CNC applications, a rigid tool holder and shank are vital for preventing chatter marks.
Extra Long Flutes: This can be a double-edged sword.
Benefit: Allows you to cut deeper pockets in one pass or reach into areas that standard length bits can’t. If your plywood is thicker than usual and you need to cut it in one pass, an extra-long flute might be necessary. Good flute design on these bits often includes optimized high-volume flutes to still manage chips.
Caution: Longer tools are more prone to deflection and vibration. If you’re not cutting extremely deep, a standard flute length bit will be more rigid and easier to control, often leading to a better finish and less risk of breakages. For chip evacuation specifically, a shorter flute with aggressive spiral and large gullet might be equally or more effective if you’re not cutting deep.
When choosing your extra-long bit, pay close attention to its flute length versus overall length. Sometimes “extra long” refers to the flute part, other times the total reach. Ensure the flute length matches your cutting depth needs and re-evaluate your feed rates and depths of cut to compensate for the increased leverage and potential for deflection.
Maintenance and Tool Life
Even the best carbide end mill needs care.
Keep them clean: After each