A 1/8 inch carbide end mill is perfect for cutting brass, offering precision and a smooth finish with the right settings. Choose a stub length for strength and a low runout option for accuracy to get the best results in your project.
Working with metal, especially brass, can feel a bit intimidating when you’re starting out. You might be wondering which tools are best and how to get a clean cut without any fuss. One common challenge is finding the right cutter for small, detailed work. That’s where a 1/8 inch carbide end mill really shines. It’s ideal for brass because it gives you control and accuracy. In this guide, we’ll walk through everything you need to know to use this specific tool effectively and safely. We’ll cover what to look for, how to set it up, and some tips to make your brass cutting projects a breeze.
Why a 1/8 Inch Carbide End Mill for Brass?
When you’re diving into projects involving brass, you’ll quickly realize that tool selection makes a big difference. Brass is a softer metal than steel, but it can still be a bit gummy and tricky to machine if you don’t have the right tools and techniques. This is where a 1/8 inch carbide end mill becomes your best friend, especially for detailed work.
The Advantages of Carbide
Carbide, or tungsten carbide, is a super-hard man-made material. It’s way harder than high-speed steel (HSS), which is what many standard cutting tools are made from. This hardness gives carbide end mills some significant advantages:
- Durability: They last much longer, even when cutting tough materials.
- Heat Resistance: They can handle higher cutting speeds and temperatures without getting dull.
- Edge Retention: They stay sharp for a lot longer, meaning more consistent cuts.
- Precision: Their hardness helps them maintain a sharp edge for precise work.
For softer metals like brass, carbide might seem like overkill, but its ability to hold an edge and resist the tendency of brass to “gum up” makes it a superior choice for achieving a clean, smooth finish. You’ll get much better results with less effort compared to HSS in many situations.
The Magic of the 1/8 Inch Size
The 1/8 inch diameter is incredibly useful for a few reasons:
- Detail Work: It’s perfect for creating small features, intricate designs, text, or cutting out small parts.
- Maneuverability: Smaller end mills can get into tight spaces and corners that larger ones can’t reach.
- Lower Cutting Forces: A smaller diameter means less material is being removed at any given moment, which reduces the stress on the tool and your machine.
- Less Vibration: Smaller tools often lead to less chatter and vibration, resulting in smoother surfaces.
When combined with the benefits of carbide, a 1/8 inch carbide end mill provides a powerful yet precise tool for a wide range of brass machining tasks.
Key Features to Look For: Beyond Diameter
While “1/8 inch carbide end mill” is the starting point, there are a few other crucial features that will impact your success when cutting brass. Paying attention to these details will help you avoid frustration and achieve professional-looking results.
Stub Length vs. Standard Length
End mills come in different lengths, and for brass machining, especially with a smaller diameter like 1/8 inch, a stub length or a “short flute” end mill is often preferred. Here’s why:
- Increased Rigidity: Stub length end mills have shorter flutes (the spiral cutting edges) and a thicker shank. This makes them much more rigid and less prone to deflection or bending.
- Reduced Vibration: With less flex, there’s less chatter, leading to a smoother surface finish.
- Better for Brass: Brass can be a bit “gummy,” and a more rigid tool cuts cleanly and resists getting clogged up in the flutes.
While standard length end mills can work, stub length offers a significant advantage in stability for this application.
Number of Flutes
The number of cutting edges (flutes) on an end mill affects chip evacuation and the finish quality. For machining softer, gummy metals like brass, you generally want fewer flutes to allow for better chip clearance.
- 2-Flute End Mills: These are excellent for softer metals like brass and aluminum. The two large, open flutes provide ample space for chips to escape, preventing the tool from getting clogged and leading to a cleaner cut with less risk of tool breakage.
- 3-Flute End Mills: These can also work well and offer a slightly better surface finish than 2-flute mills because they take smaller chip loads. They are a good compromise if you need a balance between chip evacuation and finish.
- 4-Flute End Mills: Generally best for harder materials where you want a smoother finish with smaller chip loads. They can sometimes struggle with chip evacuation in soft, gummy metals like brass and are more prone to clogging.
For 1/8 inch brass cutting, a 2-flute stub length end mill is often the go-to choice. A 3-flute can also be a fine option depending on your specific machine and desired finish.
Coating
Many carbide end mills come with coatings to improve performance. For brass, coatings aren’t always strictly necessary, but some can offer benefits:
- Uncoated: Perfectly fine for brass and often the most cost-effective option.
- ZrN (Zirconium Nitride): A golden-colored coating that is common for machining aluminum and brass. It helps reduce friction and prevents material buildup.
- TiCN (Titanium Carbonitride): A harder, gray/black coating that offers good wear resistance. It can work for brass but might be overkill and could potentially increase friction slightly compared to ZrN or uncoated.
For most 1/8 inch brass applications, an uncoated or ZrN-coated end mill will serve you very well and are generally recommended.
Low Runout
Runout refers to how accurately the cutting tool runs true in the collet or holder. High runout means the tool wobbles slightly as it spins. This is a critical factor for precision machining.
- What is Runout?: Imagine a perfectly centered pencil spinning in your hand. Now imagine it’s slightly bent – that wobble is runout.
- Why it Matters: Low runout is essential for achieving tight tolerances, a smooth surface finish, and maximizing tool life. When a tool wobbles, it takes uneven cuts, leading to chatter, poor finish, and premature wear on the cutting edges.
- For Brass: Even though brass is soft, achieving a precise and clean cut requires the tool to spin as perfectly as possible around its axis. A low runout end mill ensures each flute engages the material consistently.
Look for end mills specified with “low runout” for critical applications. This typically means the runout is significantly less than that of a standard end mill, often within 0.0002 to 0.0005 inches (or 5 to 12 microns).
Setting Up for Success: Your Machine & Tool Holder
Using a high-quality 1/8 inch carbide end mill is only half the battle. The other half is ensuring your machine and the way you hold the tool are up to the task. This is especially true when aiming for precision and a good finish on materials like brass.
The Collet Chuck: Your Best Friend
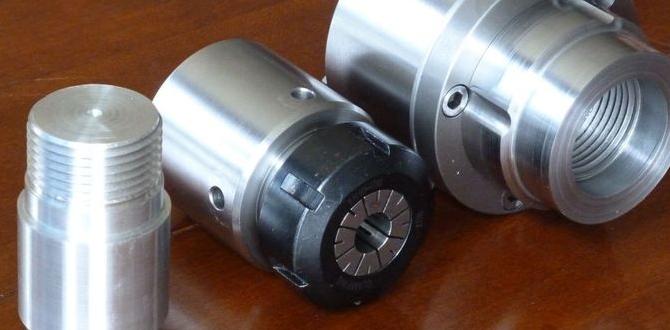
To achieve low runout, the way you hold the end mill in your milling machine is paramount. The most effective method for precision work is using a collet chuck system.
- What is a Collet?: A collet is a precision-engineered sleeve that clamps around the shank of a tool (like an end mill). When you tighten a nut on the collet chuck, it constricts the collet, gripping the tool shank evenly and centrally.
- Why Use a Collet Chuck?:
- Minimal Runout: A good quality collet chuck system can achieve very low runout (as low as 0.0002 inches or less). This is crucial for precise cuts and a good surface finish.
- Secure Grip: Collets provide uniform gripping force around the tool shank, reducing the chance of the tool slipping.
- Vibration Damping: The design of a collet can help absorb some vibration.
- Choosing Collets: For a 1/8 inch end mill, you’ll need a collet that specifically fits its shank diameter. Collet sets usually come in common sizes. Ensure the collet is clean and free of debris before inserting the end mill and tightening.
Avoid using a drill chuck ( Jacobs chuck) to hold end mills if precision is important. Drill chucks are designed for round drill bits and have much higher runout, which will significantly degrade your cutting performance and finish.
Machine Spindle Condition
The condition of your milling machine’s spindle is also vital. A spindle with worn bearings can introduce runout even when using a good collet chuck. Listen for any unusual noises, check for excessive play in the spindle, and ensure it spins smoothly. Regular maintenance of your milling machine is key to achieving accurate results.
Machining Brass: Speeds, Feeds, and Techniques
Now that you have your ideal 1/8 inch carbide end mill and a solid setup, it’s time to talk about the actual cutting process. Brass, while soft, requires specific speeds and feeds to machine cleanly without issues.
Understanding Speeds & Feeds
These two terms are fundamental to machining, and getting them right is key to tool life and finish quality.
- Spindle Speed (RPM): This is how fast your milling machine’s spindle rotates. It’s measured in revolutions per minute (RPM).
- Feed Rate: This is how fast the tool moves through the material. It’s often expressed in inches per minute (IPM) or millimeters per minute (mm/min). It can also be thought of as chip load, which is the thickness of the material removed by each tooth of the end mill.
Generally, softer metals like brass benefit from higher spindle speeds and moderate feed rates. This helps the carbide edge cut efficiently rather than rubbing, which can lead to melting or gumming.
Recommended Speeds and Feeds for 1/8 Inch Carbide End Mill in Brass
Finding exact numbers can be tricky as it depends on the specific alloy of brass, the rigidity of your setup, and the exact geometry of your end mill. However, here are some good starting points:
| Tool Type | Material | Spindle Speed (RPM) | Feed Rate (IPM) | Chip Load per Tooth (inches) |
|---|---|---|---|---|
| 1/8″ 2-Flute Carbide End Mill (Stub Length) | Brass (e.g., 360 Brass Alloy) | 6,000 – 12,000+ RPM (depending on machine capability) | 8 – 20 IPM | 0.0005″ – 0.0007″ |
| 1/8″ 3-Flute Carbide End Mill (Stub Length) | Brass (e.g., 360 Brass Alloy) | 6,000 – 12,000+ RPM | 10 – 24 IPM | 0.0005″ – 0.0007″ |
Important Considerations:
- Start Conservatively: Always start with the lower end of the recommended speeds and feeds, especially on your first cut. Listen to the machine and observe the chip formation.
- Chip Load is Key: For optimal performance and tool life, aim for a consistent chip load. Too small a chip load leads to rubbing and tool wear; too large a chip load can overload the tool or the machine. A chip load of 0.0005″ to 0.0007″ per tooth is a good target for this size tool in brass.
- Machine Capability: Ensure your milling machine can achieve and maintain these spindle speeds reliably. Many hobbyist machines may top out lower, so adjust accordingly.
- Coolant/Lubrication: While not always mandatory for brass with carbide, a light mist of cutting fluid or even WD-40 can help with chip evacuation and finish. Avoid flood coolant if possible, as it can make chip buildup worse in small flutes.
You can find comprehensive machining calculators online that can help you dial in speeds and feeds for specific materials and tools. For example, Shars’ Speeds & Feeds Calculator is a useful resource for getting base calculations.
Climb Milling vs. Conventional Milling
The direction your end mill rotates relative to the feed direction matters.
- Conventional Milling: The tool rotates against the direction of feed. This is the older, more traditional method. It tends to push the workpiece away from the cutter, which can be good for holding thin parts but can lead to less precise cuts and a rougher finish due to the tool “climbing” out of the cut.
- Climb Milling: The tool rotates in the same direction as the feed. The cutting edges engage the material at the top of the cut and move downwards. This results in a smaller chip load per tooth, a cleaner cut, less tool wear, and a superior surface finish. For brass, and especially with a stable setup (like a CNC mill or a rigid manual mill with zero backlash), climb milling is generally preferred.
Note: Climb milling requires a machine with minimal backlash in its feed screws or a CNC control that can manage the feed precisely. If your manual mill has significant play, conventional milling might be safer to prevent the tool from digging in uncontrollably.
Achieving a Good Surface Finish
For brass, a good surface finish is highly desirable and achievable with a 1/8 inch carbide end mill.
- Feathered Passes: When finishing a pocket or edge, take a final pass that is very light in depth (e.g., 0.001″ to 0.002″). This “wipes” away any minor imperfections and leaves a mirror-like surface.
- Correct Speeds & Feeds: As mentioned, ensure your chip load is appropriate.
- Tool Condition: A sharp, high-quality end mill is non-negotiable for a good finish.
- Climb Milling: Often yields the best surface finishes.
- Workpiece Clamping: Ensure your brass is securely held. Any movement can lead to a poor finish. For thin parts, consider using a vacuum chuck or double-sided tape in addition to mechanical clamps where appropriate.
Step-by-Step: Cutting Brass with Your 1/8 Inch End Mill
Let’s put it all together with a practical, step-by-step guide. We’ll assume you’re using a milling machine, whether manual or CNC, and have your brass workpiece properly secured.
Step 1: Prepare Your Workpiece and Machine
- Secure the Brass: Mount your brass stock firmly in a vise or onto your machine table using appropriate clamps. Ensure it cannot move during machining. For small parts, consider holding it on a fixture or even using strong double-sided tape if appropriate for your project and machine.
- Clean the Machine: Make sure your machine table, vise, and spindle are clean and free from chips or debris.
- Install the End Mill: Insert your 1/8 inch carbide end mill into a clean collet. Tighten the collet in your collet chuck. Secure the chuck into the milling machine’s spindle. Ensure it’s tightened properly.
Step 2: Set Up Your Cutting Parameters
- Determine Speeds and Feeds: Based on the recommendations above and your machine’s capabilities, dial in your desired spindle speed (RPM) and feed rate (IPM).
- Set Z-Axis Zero: Carefully bring the tip of the end mill down to the top surface of your brass workpiece. Set your Z-axis DRO (Digital Readout) to zero, or program it for CNC.
Step 3: Perform Your First Cut
- Initiate Spindle: Start your spindle rotating at the programmed RPM.
- Engage the Material: Move the workpiece or spindle to begin the cut. For depth of cut, start conservatively. A good starting point for a 1/8 inch end mill in brass might be a depth of cut of 0.050″ to 0.