A 1/8 inch carbide end mill, especially an extra-long one like those with a 10mm shank, is a brilliant solution for minimizing deflection. This specialized tool helps achieve cleaner cuts and greater accuracy in delicate materials like fiberglass, making it a must-have for hobbyists and professionals alike.
Ever found yourself frustrated by delicate cuts that go wonky, especially when working with materials like fiberglass on your mill? It’s a common problem! When your cutting tool flexes even a tiny bit, it can ruin a precise job. That pesky tool deflection can lead to rough surfaces, inaccurate dimensions, and a whole lot of wasted material. But don’t worry, there’s a smart, simple tool out there that can make a huge difference. We’re talking about a specific type of carbide end mill that’s designed to tackle this very issue head-on. Get ready to learn how this “genius tool” can elevate your machining game.
The Magic of the 1/8 Inch Carbide End Mill for Minimizing Deflection
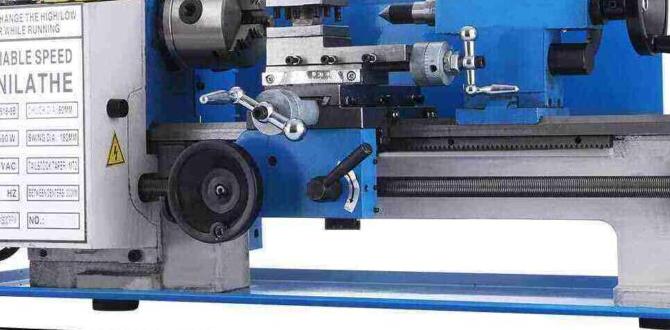
When you’re working with a CNC mill or even a manual milling machine, the way your cutting tool interacts with the material is key. For delicate tasks or when you need extreme precision, tool deflection can be a real headache. It’s basically when the cutting tool bends or flexes away from its intended path during the cut. This can happen for various reasons, like feed rate, spindle speed, tool length, and the material you’re cutting.
Now, imagine trying to make a really fine detail cut on something like fiberglass. This material can be tricky – it’s strong but can also be brittle and prone to splintering or chipping if cut incorrectly. If your standard end mill bends even slightly, that beautiful intricate design you were aiming for might end up looking more like a spiderweb after it’s done.
This is where the humble, yet mighty, 1/8 inch carbide end mill steps in. But not just any 1/8 inch end mill. We’re talking about specific variations, often designed with precision and rigidity in mind. The “genius” part often comes down to its construction and how it’s intended to be used. We’ll dive into why this particular size and material are so effective and what features to look for.
What Exactly is an End Mill?
Before we get too far, let’s quickly define what an end mill is. Think of it as a specialized cutting tool used in milling machines. Unlike a drill bit, which is designed to cut downwards into material, an end mill can cut sideways, plunge downwards, and create complex shapes. They have flutes (the spiral grooves) that carry chips away from the cutting area.
Why Carbide?
The material of the end mill plays a huge role in its performance. While High-Speed Steel (HSS) is common, carbide is generally superior for many applications, especially when dealing with harder materials or requiring faster cutting speeds. Carbide is harder and more brittle than HSS, meaning it can withstand higher temperatures and pressures. This makes it ideal for precise, aggressive cuts without losing its edge as quickly. For minimizing deflection, the inherent rigidity of carbide is a significant advantage.
Why 1/8 Inch?
The 1/8-inch diameter is a sweet spot for many intricate or detailed milling operations. It’s small enough to get into tight spaces for fine features, yet substantial enough for many typical hobbyist or prototyping tasks. When you need to create small radii, engrave fine lines, or mill out small pockets, a 1/8 inch end mill is often the go-to.
The “Genius” Factor: Minimizing Deflection Explained
So, how does a 1/8 inch carbide end mill specifically “minimize deflection”? It’s a combination of factors, but often, this type of end mill possesses key characteristics:
Shorter Overall Length (Relative to Cutting Edge): While we often think of “extra long” shank tools, for minimizing deflection, a tool where the flute length is substantial but the overall overhang from the collet is minimized is key. A shorter, stouter tool is inherently more rigid.
Number of Flutes: Tools with more flutes (like 3 or 4 flutes in carbide) can provide a smoother finish and handle chips better in some materials. For very delicate work to minimize vibration and chatter that contribute to deflection, sometimes a 2-flute end mill is preferred for better chip evacuation, allowing for faster, more controlled cuts.
Helix Angle: A steeper helix angle can sometimes lead to more aggressive cutting and better chip evacuation, which can indirectly help manage forces that cause deflection.
Coating: Special coatings on carbide end mills can further enhance their performance, reducing friction and heat, allowing for smoother cuts.
Stiff Shank (like 10mm): This is where the “10mm shank” comes into play. A larger shank diameter provides more rigidity. When you reduce the cutting diameter to 1/8 inch (approx. 3.175mm), but maintain a beefier shank like 10mm (which is almost 3x the cutting diameter!), the tool becomes significantly less prone to bending. This is especially true for “extra long” shank tools where the length of the cutting flute is extended, but a larger shank keeps the overall flex to a minimum.
Let’s look at how different end mill features contribute to deflection:
| Feature | Impact on Deflection | Beginner Takeaway |
|---|---|---|
| Tool Diameter | Smaller diameter tools are more prone to deflection. | A smaller cut requires more rigidity for accuracy. |
| Tool Length (Flute Length & Overall) | Longer tools, especially the flute length, increase leverage and are less rigid. | The less the tool sticks out, the less it can bend. |
| Shank Diameter | Larger shank diameter increases rigidity and resistance to bending. | A thicker “handle” on the tool makes it harder to bend. |
| Material (Carbide vs. HSS) | Carbide is much stiffer and more rigid than High-Speed Steel. | Carbide is the tougher, more rigid choice for precision. |
| Number of Flutes | More flutes can chatter more in some materials if not set correctly, leading to deflection. Fewer flutes (2) can offer better chip clearance, enabling faster, smoother cuts. | Sometimes, fewer flutes are better for a smoother finish and less vibration. |
| Cut Force & Feed Rate | Aggressive cuts and fast feed rates generate more force, leading to greater deflection. | Go slow and steady, especially on delicate materials. |
When is a 1/8 Inch Carbide End Mill Your Best Friend?
This specific type of tool shines in applications where precision and a clean finish are paramount, and materials might be delicate or challenging.
Ideal Applications:
Fine Detail Engraving: Creating intricate designs on parts.
Protoyping Small Parts: When dimensional accuracy is critical for testing fit and function.
Working with Plastics and Composites: Materials like fiberglass, acrylic, and certain foams can be prone to melting or chipping. A rigid carbide end mill helps avoid this.
Pocketing Small Features: Milling out small, precise cavities for components.
Texturing Surfaces: Achieving specific surface finishes or patterns.
Trimming and Finishing: Cleaning up edges of cut parts.
Model Making and Miniatures: Where every fraction of a millimeter counts.
Think about a hobbyist building a detailed RC car chassis from sheet fiberglass, or an engineer prototyping a small sensor housing. The ability of a properly chosen 1/8 inch carbide end mill to maintain its shape under load is what makes these projects achievable with beautiful, accurate results.
Materials it Excels With:
Fiberglass and Composites: As mentioned, this is a prime use case. The rigidity prevents splintering and chipping that can occur with less rigid tools.
Acrylics and Plastics: Minimizes melting and “snapping” by allowing for a clean, efficient cut.
Aluminum: For detailed work on aluminum parts.
Soft Woods: While wood is different from metal, a carbide end mill can still offer sharper, cleaner cuts than some wood-specific bits IF used correctly at appropriate speeds.
Foams and Waxes: For detailed sculpting or mold making.
Choosing the Right 1/8 Inch Carbide End Mill: What to Look For
Not all 1/8 inch carbide end mills are created equal, especially when minimizing deflection is the goal. Here are some key features to consider:
1. Shank Diameter: The “Extra Long” Advantage
You might see descriptions like “1/8 inch carbide end mill, 10mm shank.” This is a crucial detail. While the cutting diameter is 1/8 inch (around 3.175mm), the shank – the part that grips into your collet or tool holder – is 10mm (about 0.39 inches). This significantly larger shank diameter compared to the cutting diameter provides immense rigidity. It’s like using a thick, strong support for a thin cutting edge. This feature is a direct countermeasure to deflection because it reduces the leverage that can bend the tool.
2. Flute Count
2 Flutes: Often preferred for finishing passes, slotting, and working with softer materials or those that produce long, stringy chips (like aluminum). The larger flute space allows for better chip evacuation, which can help prevent the tool from binding and deflecting. For delicate materials like fiberglass, a 2-flute can often shear cleanly.
3 or 4 Flutes: Typically used for more aggressive plunging and side milling in harder materials. While a 4-flute can provide a smoother finish, in some situations, the chip evacuation might be more restricted, potentially leading to chatter and deflection issues if not managed perfectly.
For minimizing deflection in tricky materials, a 2-flute often offers a cleaner cutting action.
3. Coating
While not always necessary for hobbyists, tool coatings can enhance performance.
Uncoated Bright: Good for general-purpose work.
TiN (Titanium Nitride): A common gold-colored coating, increases hardness and lubricity, extending tool life and improving performance in many common materials.
TiCN (Titanium Carbonitride): Blackish-gray, harder than TiN, good for abrasive materials.
AlTiN (Aluminum Titanium Nitride): Purple/black, excellent for high-temperature applications, often used for milling steels and superalloys.
For fiberglass and plastics, an uncoated or TiN coated end mill is usually sufficient. The primary goal here is rigidity, not necessarily extreme heat resistance.
4. End Geometry
Square End: The most common type. Used for milling flat surfaces, pockets, and contours.
Corner Radius: Features a rounded corner for increased strength and to prevent chipping of the end mill’s corners. This is excellent for creating fillets or avoiding sharp edges that can be stress points. A small radius (e.g., 0.010″ or 0.020″) can significantly increase the robustness of the end mill.
Ball Nose: Has a hemispherical tip, used for 3D contouring and creating spherical shapes.
For general precision work where deflection is a concern, a square end or a square end with a small corner radius is usually best.
5. Material to Machine
If you’re primarily working with fiberglass or plastics, you might look for end mills specifically designed for these materials. They are often optimized for chip evacuation and preventing melting. The increased rigidity of a 1/8 inch carbide end mill with a larger shank is beneficial across the board for delicate materials.
How to Maximize the Tool’s Performance and Minimize Deflection
Having the right tool is only half the battle. How you use it makes a massive difference. Here are some tips for getting the best results with your 1/8 inch carbide end mill, especially when tackling deflection-prone materials.
1. Secure Your Workpiece Properly
This might seem obvious, but a workpiece that shifts even slightly during cutting will mimic tool deflection.
Use appropriate clamps: Ensure your workpiece is firmly held down without obstructing the tool path. For thin materials like fiberglass sheets, multiple clamps might be needed.
Consider double-sided tape: For very thin or delicate pieces, industrial-strength double-sided tape can provide a secure bond to a spoilboard or backing plate, in addition to minimal clamping.
Use a vise: For small parts, a good quality milling vise is essential.
2. Set Your Cutting Parameters Wisely
This is where experience comes in, but here are some beginner-friendly guidelines:
Start Slow with Feed Rate: For delicate materials, begin with a conservative feed rate. This is how fast the tool moves through the material. A slower feed rate reduces the cutting force, lessening the chance of deflection. You can often increase it once you see how the material is reacting.
Spindle Speed (RPM): The optimal RPM depends on the material and the end mill. Too slow can lead to rubbing and melting; too fast can lead to chatter. For many plastics and composites with carbide, speeds can be quite high, but it’s always best to check manufacturer recommendations or start conservatively.
Depth of Cut (DOC): This is crucial! Take light, shallow passes. Instead of trying to mill out a pocket in one go, take multiple passes, each removing only a small amount of material. For a 1/8 inch end mill, a DOC of 0.010″ to 0.030″ (0.25mm to 0.75mm) might be a good starting point, depending on the material and your machine’s rigidity. This significantly reduces the load on the tool.
Stepover: This is how much the tool moves sideways for each pass when milling a larger area. A smaller stepover will result in a smoother finish but take longer. A larger stepover might be faster but can increase chatter. Aim for a balance. For finishing, a small stepover is often preferred.
3. Use Proper Tool Holding
Clean Collets and Holders: Ensure your collet and tool holder are immaculately clean. Debris can cause runout (wobble), which is detrimental to precision and can exacerbate deflection.
Don’t Over-Tighten: While you want a secure grip, over-tightening a collet can actually distort it and cause more runout. Follow the manufacturer’s recommended tightening procedure for your collet system.
Minimize Overhang: As much as possible, keep the amount of end mill sticking out of the collet to a minimum. This is where an “extra long” shank might seem counterintuitive, but if the tool is designed with a significantly larger shank (like 10mm) for its length, the overall rigidity can still be better than a shorter tool with a smaller shank. The goal is the shortest practical distance from the collet to the cutting edge.
4. Consider Climb Milling vs. Conventional Milling
Conventional Milling: The tool rotates against the feed direction. This tends to lift the material but is generally more stable and forgiving for beginners.
Climb Milling: The tool rotates with the feed direction. This can produce a smoother finish and reduce cutting forces, which can help minimize deflection. However, it requires a rigid machine with minimal backlash and can be more prone to chatter if not set up perfectly. For very delicate materials, stick with conventional milling until you are very comfortable.
5. Use Coolant or Lubricant (When Appropriate)
For some materials, like aluminum, a coolant or lubricant is essential to prevent the tool from loading up with chips and to keep temperatures down. For fiberglass and plastics, air blast or a mist coolant can help clear chips and prevent melting. Always check recommendations for the specific material you are machining.
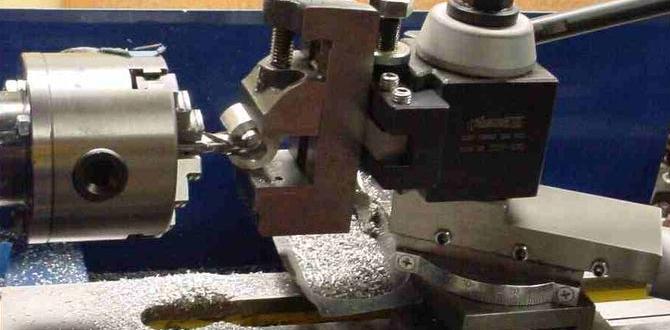
Example Workflow: Milling a Small Fiberglass Bracket
Let’s walk through a hypothetical scenario to see how this all comes together. You want to mill a small custom bracket out of 1/8 inch thick fiberglass sheet.
Objective: Mill a precise bracket shape from a piece of 1/8″ thick fiberglass.
Challenges: Fiberglass can splinter easily, and the thin material might flex. Precision is needed for fitting other components.
Tool: 1/8 inch carbide end mill with a 10mm shank and 2 flutes. Preferably with a small corner radius.
Steps:
1. Prepare the Material: Cut a rough outline of your bracket from a larger sheet of fiberglass.
2. Secure the Workpiece: Mount the rough-cut fiberglass to your milling machine table. Use a wasteboard underneath. Clamp it firmly using clamps that don’t interfere with the tool path. Consider using a few drops of strong double-sided tape for extra security.
3. Set Up the Machine:
Insert the 1/8 inch carbide end mill into a clean 1/8 inch collet within a rigid collet chuck or tool holder in your milling machine. Ensure minimal tool overhang.
Set your Z-zero to the surface of the fiberglass for the first cut.
4. Program or Manually Control Tool Paths:
Outline: Create toolpaths to cut out the perimeter of your bracket.
Pockets/Features: If your bracket has any small pockets or holes, program those as well.
5. Program Cutting Parameters:
Feed Rate: Start conservatively, perhaps around 10-15 inches per minute (IPM) or 250-380 mm/min.
Spindle Speed: For fiberglass, a common range might be 10,000 – 2