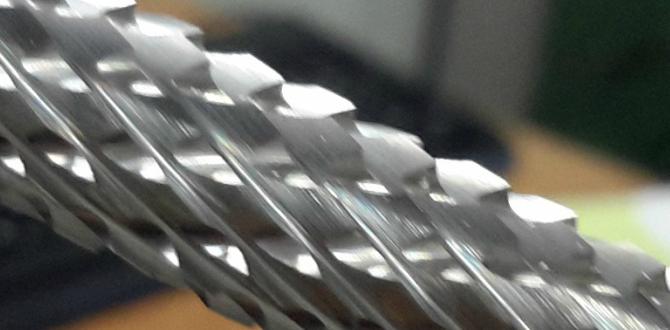
Carbide end mills are a brilliant and effective solution for machining Inconel, offering superior hardness and heat resistance essential for this challenging aerospace alloy. They provide the precision and durability needed for even complex Inconel cuts.
Machining Inconel can feel like wrestling with a super-tough, heat-generating monster. This aerospace-grade alloy is incredibly strong and resistant to extreme temperatures, which is fantastic for its intended use but makes it a real headache for machinists. Standard tooling often struggles, leading to premature wear, poor surface finishes, and frustratingly slow progress. You might find yourself wondering if there’s a better way to tackle this notoriously difficult material. Well, get ready for some good news! There’s a cutting tool that’s specifically designed to handle materials like Inconel with remarkable efficiency and precision: the carbide end mill. In this guide, we’ll dive into why carbide is your best friend when it comes to Inconel and how to use it effectively.
Why is Inconel So Difficult to Machine?
Before we talk about the solution, let’s quickly understand why Inconel gives so many machinists a tough time. Inconel alloys, like Inconel 625, are nickel-based superalloys. They offer exceptional strength at high temperatures, corrosion resistance, and toughness. These very properties make them incredibly challenging to machine:
- High Strength and Hardness: Inconel is, simply put, very hard. This means it resists the cutting action of a tool, requiring more force and generating more heat.
- Work Hardening: As you cut into Inconel, the material immediately around the cut can become even harder. This phenomenon, called work hardening, further increases the cutting forces and tool wear.
- Low Thermal Conductivity: Inconel doesn’t dissipate heat very well. This means the heat generated during machining gets concentrated right at the cutting edge of your tool, leading to rapid tool failure if not managed.
- Gummy Nature: Some nickel alloys can be a bit “gummy,” meaning they tend to stick to the cutting tool rather than cleanly shearing away. This can lead to built-up edge (BUE) on the tool, affecting surface finish and cutting performance.
These combined factors mean that using the wrong tooling or machining parameters can lead to excessively fast tool wear, poor part quality, and significant downtime. It’s a recipe for frustration for any machinist, especially those new to working with exotic alloys.
Introducing the Hero: The Carbide End Mill
This is where our star player, the carbide end mill, steps in. Tungsten carbide, the material used to make these end mills, is renowned for its incredible hardness and wear resistance. It’s significantly harder and more rigid than high-speed steel (HSS), which is a common material for other types of end mills. This superior hardness is exactly what’s needed to effectively cut through tough materials like Inconel.
Think of it this way: you wouldn’t try to cut through a steel bar with a plastic knife, would you? Similarly, you need a tool that’s harder and stronger than the material you’re trying to shape. Carbide’s inherent properties make it the ideal candidate for machining superalloys.
Key Advantages of Carbide End Mills for Inconel:
- Superior Hardness: Carbide is second only to diamond in hardness, meaning it can maintain its cutting edge sharpness longer when encountering hard materials like Inconel.
- High Heat Resistance: Carbide can withstand much higher temperatures than HSS without losing its hardness. This is crucial for Inconel machining, where heat buildup is a major concern.
- Rigidity: Carbide is a very rigid material. This means end mills made from carbide are less likely to flex or chatter during a cut, leading to more accurate dimensions and better surface finishes.
- Increased Cutting Speeds: Due to their hardness and heat resistance, carbide end mills often allow for faster cutting speeds compared to HSS tools, significantly reducing machining time.
- Longer Tool Life: When used correctly, carbide end mills can last much longer in demanding applications like Inconel machining than their HSS counterparts.
Choosing the Right Carbide End Mill for Inconel
Not all carbide end mills are created equal, especially when you’re dealing with a beast like Inconel. Here’s what you should look for:
Material Considerations:
When machining Inconel, you’ll typically want to look for end mills made from sub-micron or micro-grain carbide. These fine-grained carbides offer an excellent balance of hardness and toughness, resisting chipping while maintaining a sharp edge. Cobalt content also plays a role; higher cobalt content generally increases toughness but slightly reduces hardness.
Geometry and Design Features
The design of the end mill is just as important as the material it’s made from. For Inconel, consider these features:
- Number of Flutes: For Inconel, it’s often recommended to use end mills with fewer flutes. A 2-flute or 3-flute end mill is generally preferred over a 4-flute. Fewer flutes provide more chip clearance, which is vital for removing the tough, stringy chips produced by Inconel. This helps prevent chip recutting and reduces the risk of tool breakage.
- Helix Angle: A higher helix angle (e.g., 30-45 degrees) can help shear the material more effectively and reduce cutting forces. It also aids in chip evacuation.
- Coatings: This is a critical factor. For Inconel, coatings designed for high-temperature alloys are essential. Common and effective coatings include:
- TiAlN (Titanium Aluminum Nitride): Excellent for high-temperature applications, offering good wear resistance and thermal stability. It forms a protective aluminum oxide layer at high temperatures, further enhancing its performance.
- AlCrN (Aluminum Chromium Nitride) or TiSiN (Titanium Silicon Nitride): These advanced coatings provide even higher thermal stability and oxidation resistance than TiAlN, making them superb choices for extreme machining conditions like Inconel.
- Corner Radius or Chamfer: To improve tool life and prevent chipping on the corners, end mills often feature a small corner radius or a chamfer. For Inconel, a slight radius or chamfer can help distribute stress and reduce the likelihood of the corner breaking off. Avoid sharp, square corners unless the specific application demands it and you have robust workholding and machining parameters.
- Shank Type: Ensure the shank is designed for secure holding, like a Weldon flat or a plain shank with a set screw groove, to prevent the tool from slipping under heavy cutting loads.
Size and Length
For general-purpose Inconel machining, you’ll often find yourself using smaller diameter end mills for detailed work or larger ones for pocketing. The keyword “carbide end mill 1/8 inch 3/8 shank extra long for inconel 625 mql friendly” gives us a specific example. Let’s break that down:
- 1/8 inch: This refers to the diameter of the cutting end of the mill. A smaller diameter is good for detailed contouring or small features.
- 3/8 inch shank: This is the diameter of the tool shank that fits into your milling machine’s collet or holder.
- Extra long: This implies the tool has an extended reach, allowing you to machine deeper features or parts with larger Z-axis travel. Be cautious with extra-long tools, as they can be more prone to vibration and deflection.
- For Inconel 625: This indicates the tool is specifically designed or recommended for this particular superalloy.
- MQL friendly: This means the tool is designed to work well with Minimum Quantity Lubrication (MQL) systems. MQL uses a fine mist of coolant and air to lubricate and cool the cutting zone, which is highly beneficial for Inconel.
When selecting “extra long” tools, always consider the rigidity of your setup. A longer reach means more potential for deflection and vibration, which can negatively impact surface finish and tool life. Start with conservative machining parameters when using extended tools.
Setting Up for Success: Machining Parameters
This is where many beginners stumble. Machining Inconel requires a different approach than mild steel. The goal is to achieve a free-cutting action with optimal chip formation and efficient heat management. This often means slower spindle speeds and faster feed rates than you might initially expect, along with a robust coolant strategy.
Speed and Feed Rates: The Balancing Act
Finding the right speed and feed is crucial. Too slow a spindle speed or too fast a feed can cause the tool to rub, generating excessive heat and leading to rapid wear. Too fast a spindle speed or too slow a feed can lead to chip recutting and tool breakage.
Here’s a general guideline, but always consult the end mill manufacturer’s recommendations and be prepared to experiment:
- Spindle Speed (RPM): For Inconel, you’ll typically be in the lower range. For a 1/8-inch carbide end mill, you might start around 150-400 SFM (Surface Feet per Minute). Convert this to RPM using the formula: RPM = (SFM 3.82) / Diameter (in inches).
- For a 1/8″ (0.125″) cutter at 200 SFM: RPM = (200 3.82) / 0.125 = 6112 RPM.
- This is a starting point. You might adjust this based on the specific carbide grade, coating, and the manufacturer’s data for Inconel.
- Feed Rate (IPM – Inches Per Minute): The feed rate needs to be aggressive enough to ensure each tooth takes a proper chip. This is where the “gummy” nature of Inconel can be tricky. A common starting point for a 2-flute carbide end mill in Inconel might be around 0.0005 to 0.0015 inches per tooth.
- IPM = Feed per Tooth Number of Flutes RPM
- For our 1/8″ cutter at 6112 RPM with a 2-flute, if we start with 0.0008″ per tooth: IPM = 0.0008 2 6112 = 9779.2 IPM. This might seem very high, but it’s crucial to maintain a good chip load to prevent rubbing. Again, this is highly dependent on the tool and material. You’ll need to do the calculation based on the manufacturer’s recommended feed per tooth.
- Depth of Cut (DOC) and Width of Cut (WOC): For Inconel, it’s usually best to use lower radial and axial depths of cut to manage heat and cutting forces.
- Radial Depth of Cut (WOC): Start conservatively, maybe 10-25% of the cutter diameter for full slotting, or up to 50% for profiling.
- Axial Depth of Cut (DOC): This depends on the application, but generally, taking shallower passes is better. For a 1/8″ cutter, perhaps 0.060″ to 0.125″ (or even less) per pass to start.
Always use a chip load calculator from your tool manufacturer! These resources are invaluable.
Coolant and Lubrication: The Lifeline
Effective coolant and lubrication are non-negotiable when machining Inconel. The primary goals are:
- Cooling: To prevent the carbide from overheating and losing its edge, and to manage the heat in the workpiece.
- Lubrication: To reduce friction between the cutting edge and the workpiece, allowing for a smoother cut and better surface finish.
- Chip Evacuation: To wash chips away from the cutting zone, preventing recutting and buildup.
For Inconel, consider these options:
- Minimum Quantity Lubrication (MQL): As mentioned earlier, MQL is excellent for Inconel. It delivers a fine mist of oil mixed with air directly to the cutting zone. This provides both cooling and lubrication with minimal fluid usage. Many modern carbide end mills are designed to be MQL-friendly, often featuring through-spindle coolant ports that can be adapted for MQL.
- Through-Spindle Coolant: High-pressure through-spindle coolant is very effective, especially if it directly hits the cutting zone. This helps break chips and cool the cutting edge.
- Flood Coolant: Traditional flood coolant can work, but ensure it’s a high-quality coolant formulated for difficult-to-machine alloys. You’ll need a strong flow rate directly at the cutting zone.
- Lubricants: In some niche situations, or for very specific cutting operations, specialized paste lubricants might be used, but MQL or through-spindle coolant are generally preferred for most milling applications on Inconel.
The “MQL friendly” designation on your end mill is a strong indicator that this technology will significantly improve your machining experience with Inconel.
Toolholding and Machine Rigidity
This is often overlooked but is paramount for success, especially with smaller diameter, extra-long tools. A strong, rigid setup prevents vibration and deflection, which are enemies of fine-grained carbide and tough alloys.
- Collet Chucks: Use high-quality collet chucks (e.g., ER collets in a precision holder) for the best runout and gripping force. Avoid standard drill chucks for milling operations, as they offer poor runout and are not designed for the lateral forces of milling.
- Balanced Tooling: Ensure your end mill and holder assembly is balanced for high-speed operation if your machine is capable of higher RPMs. Unbalanced tooling will cause vibration, leading to poor finish and tool breakage.
- Machine Rigidity: A stiff milling machine with no play in the axes is essential. Older or worn machines may struggle with the cutting forces of Inconel, even with carbide.
- Shortest Possible Stick-out: For any tool, especially extra-long ones, minimize the amount of tool sticking out of the holder. This improves rigidity and reduces deflection.
Step-by-Step Guide: Machining Inconel with Carbide End Mills (Beginner’s Approach)
Let’s walk through a common scenario: machining a simple pocket or slot in Inconel 625 using our example 1/8-inch carbide end mill with an extended reach and 3/8-inch shank, designed for MQL.
1. Preparation is Key: Know Your Material and Tool
- Identify the Inconel Grade: Ensure you know the exact Inconel alloy (e.g., 625, 718).
- Consult Tool Manufacturer Data: Find the recommended speeds, feeds, and depths of cut for your specific carbide end mill on Inconel. This is your primary reference. If “extra long” is a factor, look for specific advice on those parameters.
- Review Material Safety Data Sheet (MSDS): Understand any specific handling or safety requirements for Inconel.
2. Machine Setup: Rigidity and Coolant
- Secure Workholding: Clamp your Inconel workpiece extremely securely. Use a vise with hardened jaws, or mill fixtures if you’re doing production runs. Ensure the Inconel is supported to prevent vibration.
- Install Tool Holder: Use a high-quality collet chuck or end mill holder. Insert the end mill, ensuring it’s seated properly, and tighten securely. Keep the tool stick-out to the absolute minimum required for the operation.
- Set Up Coolant: If using MQL, ensure the nozzle is perfectly positioned to spray the mist directly at the point where the cutting edge enters the material. If using through-spindle coolant, confirm the output is directed at the cut. For flood, ensure a strong flow.
3. Program and Toolpath (or Manual Operation)
- CAM Software: If using CAM, ensure it’s set up for high-performance milling of alloys and uses appropriate strategies like trochoidal milling for pockets to maintain a consistent chip load and tool engagement angle. Select a 2-flute or 3-flute carbide end mill of the correct size.
- Manual Machining: If operating manually, you’ll be controlling the feed and spindle speed. It’s often better to start with a slightly slower feed and then increase it until you hear and feel the tool cutting cleanly.
4. Initial Cutting Parameters: Start Conservatively
- Spindle Speed: Set your spindle to the RPM calculated from the manufacturer’s recommended SFM.
- Feed Rate: Set your feed rate based on the manufacturer’s recommended chip load per tooth. Remember: IPM = Feed per Tooth Num Flutes RPM.
- Depth of Cut (Axial): Start shallow. For a 1/8″ end mill, try 0.060″ to 0.10