
A carbide end mill, especially a 1/8 inch with a 6mm shank and reduced neck, is crucial and highly effective for precisely cutting brass. Its sharpness, hardness, and design minimize chatter and ensure clean finishes, making it ideal for tight tolerance work on this softer metal.
Working with brass on your milling machine can be incredibly rewarding, offering a beautiful material for detailed projects. However, achieving those sharp details and smooth surfaces often requires the right cutting tool. Many beginners find brass can be a bit forgiving, but it can also gum up tools or lead to rough cuts if you’re not using the best equipment. One tool that truly shines when it comes to brass is the carbide end mill, particularly specific types designed for precision. Don’t let the term “end mill” intimidate you; think of it as a specialized drill bit that can also cut sideways. We’ll walk through why a carbide end mill is your secret weapon for brass and how to use it effectively. Get ready to unlock cleaner cuts and more intricate designs on your brass projects!
Why Carbide End Mills Are a Brass Cutting Game-Changer
When you’re ready to tackle brass with your milling machine, choosing the right end mill is paramount. While steel or even HSS (High-Speed Steel) end mills can cut brass, a carbide end mill offers distinct advantages that make it the go-to choice for serious hobbyists and professionals alike, especially for those seeking tight tolerances and excellent finishes.
The Superiority of Carbide
Carbide, or more specifically, tungsten carbide, is an incredibly hard and dense material. This hardness translates directly into cutting performance:
- Exceptional Hardness and Wear Resistance: Carbide is significantly harder than steel. This means it stays sharp for much longer, even when cutting abrasive materials like brass. For a beginner, this translates to fewer tool changes and more consistent results without the constant worry of a dulling edge.
- Higher Heat Resistance: Machining generates heat, and brass can soften and become “gummy” at higher temperatures, leading to poor cuts. Carbide’s superior heat resistance allows it to cut through brass efficiently without getting overly hot, maintaining its cutting edge and reducing the risk of melting or deforming the brass.
- Rigidity and Reduced Chatter: Carbide is also more rigid than HSS. In milling, rigidity is key to preventing vibration, or “chatter.” Chatter leads to rough surfaces and inaccurate dimensions. A rigid carbide end mill will cut more smoothly, giving you that sought-after professional finish on your brass parts.
Why Specific End Mill Designs Matter for Brass
Beyond just being “carbide,” the geometry of the end mill plays a huge role, especially for a material like brass. For brass, you’ll want to focus on end mills optimized for non-ferrous metals. Let’s look at a few key features, linking them to our specific focus keyword: “carbide end mill 1/8 inch 6mm shank reduced neck for brass tight tolerance.”
- 1/8 Inch Diameter: This size is incredibly versatile for detailed work. It allows for fine lines, small features, and intricate patterns commonly desired in brass crafting. For tight tolerance work, smaller diameters offer greater maneuverability and the ability to achieve very fine details.
- 6mm Shank: A 6mm shank is a standard size in many milling setups and provides a good balance of strength and compatibility with common collets and tool holders. It’s robust enough to handle moderate cutting forces without deflection.
- Reduced Neck: This is a critical feature for brass. A reduced neck, often seen on ball-nose or even some flat-end end mills, means the cutting flute area is slightly thinner than the shank near the tip. This design is beneficial because:
- Reduced Drag: It minimizes the amount of material the non-cutting shank has to rub or “drag” through, especially when performing plunging or shoulder cuts.
- Improved Chip Evacuation: By creating a narrower path, it can help chips move away from the cutting zone more freely, a common issue when machining softer metals like brass that tend to produce long, stringy chips.
- Clearance for Complex Geometries: A reduced neck can provide crucial clearance when milling inside corners or features where a full-diameter shank might otherwise interfere. This is vital for achieving those “tight tolerance” requirements.
- Ball-Nose vs. Flat-Nose: For brass, both can be useful.
- Ball-nose end mills are excellent for creating curved surfaces, 3D carving, and achieving a smooth volumetric finish. They’re fantastic for decorative engraving or creating smoothly transitioning shapes.
- Flat-nose end mills are better for creating sharp, square shoulders, pockets, and flat profiles. If your brass project involves precise geometric features, a flat-nose is the way to go. For tight tolerances, a sharp, well-maintained flat end is essential.
A “reduced neck” is often seen on ball-nose end mills to provide clearance during profile cuts, but it can also be a feature on specialized flat-nose end mills.
When selecting your end mill, look for descriptions that specifically mention compatibility with “non-ferrous metals” or “brass.” These will typically have sharper cutting edges and geometries designed to prevent material buildup.
Choosing the Right Carbide End Mill for Brass
With so many options available, picking the “right” carbide end mill for your brass project can seem daunting. Let’s break down the essential characteristics to look for, focusing on performance and ease of use for beginners.
Key Features to Consider
- Material Grade: While all carbide is hard, different grades exist. For general brass machining, a standard sub-micron or micro-grain carbide is usually sufficient. Avoid extremely fine grains if you’re worried about brittleness, unless extreme detail is your sole focus.
- Number of Flutes: This is crucial for brass.
- 2 Flutes: Generally the best choice for brass. The fewer flutes mean larger chip gullets (the space between the flutes), which are vital for evacuating the “gummy” chips that brass produces. This helps prevent material from sticking to the cutter and causing a poor finish or tool breakage.
- 3 Flutes: Can sometimes be used for brass at faster feed rates or with good chip management, but 2 flutes are usually safer and more forgiving for beginners.
- 4+ Flutes: These are typically designed for steel and other harder materials. They have smaller chip gullets and are prone to clogging with brass.
- Helix Angle: This refers to the angle of the flutes.
- Standard Helix (around 30 degrees): A good all-around choice.
- High Helix (45-60 degrees): Can provide a smoother shearing action and better chip evacuation, which can be beneficial for brass, but might be slightly less rigid.
- 0-Degree Helix (Straight Flutes): Less common for end mills but sometimes found. Best for very soft materials where you want a scraping cut. Usually not the primary choice for brass.
For brass, a moderate to high helix (30-45 degrees) is often a good balance.
- Coating: Many carbide end mills come with coatings. For brass, simpler is often better.
- Uncoated: Often excellent for brass. The natural properties of the carbide are usually sufficient.
- Bright Finish: This is essentially an uncoated, polished tool. Very good for non-ferrous materials.
- TiN (Titanium Nitride): A common, general-purpose coating. It adds a bit of hardness and reduces friction, which can be helpful for brass.
- AlTiN (Aluminum Titanium Nitride) or TiAlN: These coatings are excellent for high-temperature applications and harder metals. They can work for brass but might be overkill and aren’t always necessary.
For brass, an uncoated bright finish or TiN coating is usually ideal.
- End Type: As discussed, ball-nose for curves, flat-nose for square edges. Ensure the flat-nose has sharp, well-defined corners.
Optimizing for “Reduced Neck” and “Tight Tolerance”
When we talk about a “reduced neck” specifically for “tight tolerance” brass cutting, we’re looking for precision. This usually implies a tool that maintains excellent runout (how perfectly round and centered the rotation is) and has a well-ground cutting edge. The reduced neck is often a feature found on specialized tools designed for complex 3D contouring or when working in confined spaces within a brass part. If your project demands intricate internal details or very smooth blending between surfaces, a reduced neck end mill is a valuable addition to your toolkit.
A “carbide end mill 1/8 inch 6mm shank reduced neck for brass tight tolerance” would likely be a 2-flute, potentially with a higher helix angle and a bright or TiN coating, designed for optimal performance in brass where accuracy is key.
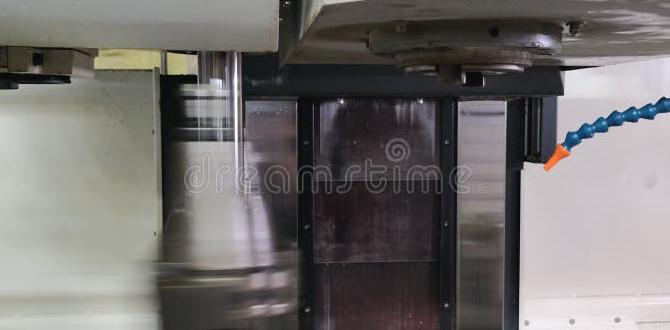
Setting Up Your Mill for Success with Brass
Once you’ve chosen your carbide end mill, the next critical step is setting up your milling machine correctly. This involves understanding cutting speeds, feed rates, and how to secure your workpiece. Getting these parameters right is as important as having a good tool when it comes to achieving those desired tight tolerances in brass.
Understanding Cutting Parameters: Speed and Feed
These two terms are fundamental in machining and are often confused. They dictate how the tool and workpiece interact.
- Cutting Speed (Surface Speed): This is the speed at which the cutting edge of the tool moves across the material. It’s usually measured in Surface Feet per Minute (SFM) or Surface Meters per Minute (SMM). For milling, you’ll often see this related to the Spindle Speed (RPM).
- Feed Rate: This is how fast the tool moves into the material or across its surface. It’s typically measured in Inches per Minute (IPM) or Millimeters per Minute (MM/min). Think of it as how much material is being removed with each rotation of the tool.
Recommended Speeds and Feeds for Brass
Brass is a relatively soft metal, so you can afford to use fairly high cutting speeds compared to steel. However, you don’t want to go so fast that you generate excessive heat or overwhelm the tool’s ability to cut cleanly. For a 1/8 inch 2-flute carbide end mill in brass, here are some starting points:
| Tool Diameter | Flutes | Material | Surface Speed (SFM) | Spindle Speed (RPM) | Chip Load (inch/flute) | Feed Rate (IPM) |
|---|---|---|---|---|---|---|
| 1/8 inch | 2 | Brass | 250 – 500 SFM | (Calculate Below) Approx. 7,600 – 15,300 RPM | 0.0005 – 0.0015 inches | (Calculate Below) Approx. 7.5 – 45 IPM |
| Brass (Deep Slotting) | 200 – 400 SFM | (Calculate Below) Approx. 6,100 – 12,200 RPM | 0.0004 – 0.001 inches | (Calculate Below) Approx. 5 – 25 IPM |
Calculating RPM:
RPM = (SFM 3.82) / Tool Diameter (inches)
Calculating Feed Rate:
Feed Rate (IPM) = Spindle Speed (RPM)
Important Note for Beginners: These are starting points! Always consult your end mill manufacturer’s recommendations if available. Factors like your specific machine rigidity, coolant usage, depth of cut, and the exact alloy of brass can influence the optimal settings. It’s much safer to start with slightly slower speeds and feeds and gradually increase them while listening to the machine and observing the chip formation.
You want to see small, clean chips, not fine dust or long, stringy ones. Dust indicates you’re rubbing, and stringy chips mean you’re feeding too fast or not evacuating chips properly.
Securing Your Workpiece (Workholding)
For brass, especially when aiming for tight tolerances, secure fixturing is non-negotiable. Any movement of the workpiece during machining will ruin fine details and compromise accuracy.
- Vise: A good quality milling vise is essential. Ensure it has parallel jaws and is accurately mounted to your machine’s table. For delicate brass parts, consider using soft jaws (made of aluminum, brass inserts, or plastic) within your vise to prevent marring the surface.
- Clamps: For larger or irregularly shaped parts, T-slot clamps can be used. Ensure they provide firm grip without distorting the workpiece.
- Double-Sided Tape / Fixturing Blocks: For very small or thin parts, strong industrial double-sided tape or custom-machined fixturing blocks can be effective alternatives.
Always ensure your workpiece is clean and free of debris before clamping. Use parallels or shims if needed to get your workpiece perfectly parallel to the machine’s travel axes. A well-clamped part is less likely to vibrate, leading to a better finish and more accurate cuts.
Plunge Feeding vs. Conventional Milling
When starting a cut, you have two main ways to approach the material:
- Plunge Feeding: The tool moves directly down into the material. This is usually done at a slower feed rate than the cutting feed rate. For brass, a 2-flute end mill is generally better for plunge feeding than a 4-flute due to its chip evacuation capabilities.
- Conventional Milling: The tool engages the material with an upward chip load (the tooth of the cutter moves against the direction of the feed). This is generally preferred for a cleaner cut and less tool wear.
- Climb Milling: The tool engages the material with a downward chip load (the tooth of the cutter moves in the same direction as the feed). This can result in a better finish and less force, but it requires a machine with no backlash in its feed mechanisms (especially the Z-axis for plunge cuts). For beginners or on machines with some play, conventional milling is often safer.
For plunge cuts into brass, ensure your feed rate is appropriate to avoid snapping your 1/8 inch end mill. A controlled plunge is key.
Techniques for Precision Brass Machining with Carbide End Mills
Achieving that “tight tolerance” with brass involves more than just selecting the right tool and setting up correctly. It’s about how you use the tool and manage the cutting process. Here are some techniques specifically beneficial for brass and for achieving high accuracy.
Managing Chip Evacuation
Brass can produce long, gummy chips that easily stick to the cutting flutes. This buildup leads to poor surface finish, increased friction, heat, and potential tool breakage. For a 1/8 inch 2-flute carbide end mill, chip evacuation is extra important.
- Use Compressed Air or Lubricant: A blast of compressed air directed at the cutting zone can help blow chips away. For more challenging cuts or deeper pockets, a specialized cutting fluid or a light oil can significantly improve chip flow and reduce friction. For brass, flood coolant isn’t usually necessary, but a mist coolant system or even a light application of a cutting paste can make a big difference. The machinist help guide on brass cutting fluids offers more detail on what works well.
- Shallow Depth of Cut (DOC) and Stepover: Instead of trying to remove a lot of material at once, take multiple passes.
- Depth of Cut (DOC): The amount the tool cuts into the material vertically per pass. For a 1/8 inch end mill, start with a DOC of around 0.5 times the tool diameter (i.e., 0.060 inches) and adjust based on performance.
- Stepover: The amount the tool moves sideways (X or Y axis) for each parallel pass. For a good finish, a smaller stepover (e.g., 20-40% of the tool diameter) is generally better.
Taking lighter cuts ensures the chips produced are smaller and easier to clear.
- Pecking (for Plunge Cuts): If you need to plunge deep into the brass, use a “pecking” cycle. This involves plunging a short distance, retracting the tool fully or partially to clear chips, then plunging again. Most CNC controllers have a built-in peck drilling or plunging cycle for this.
Achieving Smooth Surface Finishes
For those sought-after smooth surfaces and precise dimensions, consider these polishing techniques:
Related Posts


| Technique | Description | Best For |
|---|---|---|
| Finishing Pass |