A 1/8 inch carbide end mill is your go-to for precise work in tough materials like tool steel. Its small size and robust carbide construction offer excellent control and durability, making complex machining tasks achievable for beginners.
Hey makers! Daniel Bates here from Lathe Hub. Ever stared at a tiny piece of tool steel, wondering how on earth you’re going to shape it precisely? Or maybe you’ve struggled with tools that just can’t handle the job, leading to frustration and less-than-perfect results? You’re not alone! Working with harder materials can feel like a real challenge, especially when you’re just starting out. But I’ve got some good news: there’s a fantastic little tool that can make a world of difference. We’re talking about the 1/8 inch carbide end mill, a real champion for detailed work. Let’s dive into why this tiny titan is such a valuable asset in any workshop, especially when you need to tackle those tougher steels.
Why Choose a 1/8 Inch Carbide End Mill?
When you’re getting into the nitty-gritty of machining, especially with materials like D2 tool steel, the right cutting tool is everything. Think of it like picking the perfect paintbrush for a detailed portrait – you need something small, precise, and capable of handling whatever you throw at it. That’s where our 1/8 inch carbide end mill shines.
The Magic of Carbide
First off, let’s talk about carbide. Unlike traditional high-speed steel (HSS), carbide is a composite material made from metallic carbides. This makes it incredibly hard and resistant to wear and heat. Why does this matter to you?
Durability: Carbide end mills last much longer than HSS, especially when cutting harder materials. You’ll get more cuts, more projects, and less downtime changing tools.
Heat Resistance: Machining generates heat, and for many materials, excessive heat can ruin your workpiece or your tool. Carbide handles high temperatures exceptionally well, allowing for faster cutting speeds without compromising the tool or material.
Precision: Because carbide maintains its sharp edge and rigidity for so long, it allows for very precise cuts. This is crucial for those delicate operations where accuracy is paramount.
The Advantage of 1/8 Inch
Now, why specifically a 1/8 inch size? This small diameter opens up a world of possibilities for detailed work:
Intricate Details: Need to cut fine slots, engrave tiny patterns, or machine small internal features? A 1/8 inch end mill is perfect for these detailed tasks.
Tight Spaces: Many projects involve working in areas where larger tools just won’t fit. This small diameter allows you to reach those tight spots with ease.
Controlled Machining: For beginners, a smaller tool can often be less intimidating. It allows for slower, more controlled passes, helping you build confidence and learn the feel of the material without risking large errors.
Material Removal vs. Precision: While larger end mills are great for bulk material removal, a 1/8 inch tool is designed for precision and detail, making it ideal for finishing passes or working with smaller, delicate workpieces.
Tool Steel D2 and Chip Evacuation
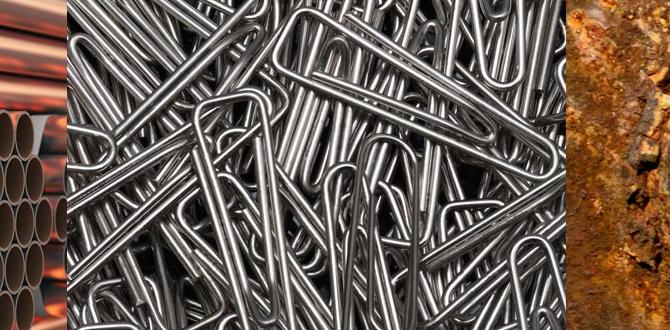
When you combine a 1/8 inch carbide end mill with a material like D2 tool steel, you’re stepping into the realm of challenging but rewarding machining. D2 is a high-carbon, high-chromium tool steel known for its excellent wear resistance and hardness. This means it’s tough to cut, and if you’re not careful, it can work-harden, making the job even harder.
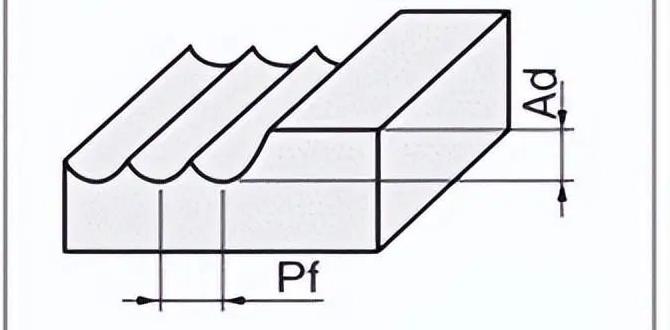
This is where the design of the end mill becomes critical, particularly its ability to manage chips. Effective chip evacuation is key to preventing tool breakage, overheating, and poor surface finish. A well-designed 1/8 inch carbide end mill for tool steel will feature specific flute geometry to help clear chips away from the cutting zone. Stub length variations are also beneficial here; a shorter flute length (“stub length”) often implies a more rigid tool with less tendency to chatter or deflect, leading to cleaner cuts and better chip control.
This combination – a small diameter, hard carbide material, and optimized flute design – makes this specific type of end mill a true elite tool for intricate work on tough steels.
Key Features of Your 1/8 Inch Carbide End Mill
Not all 1/8 inch carbide end mills are created equal. When you’re looking at this specialized tool, here are a few key features to keep an eye out for, especially when targeting materials like tool steel:
Flute Count and Geometry
2-Flute: Often preferred for aluminum and softer materials due to better chip clearance. For harder materials like tool steel, they can work if speeds and feeds are carefully managed, focusing on getting chips out quickly.
4-Flute: Generally better for harder materials like tool steel. They provide more cutting edges, which can distribute the cutting load and heat more effectively. However, chip evacuation can be more challenging, so speeds and feeds need to be dialed in carefully. For D2 tool steel, 4 flutes often offer a good balance of rigidity and cutting performance.
Chip Breakers: Some end mills have special “chip breaker” grooves or serrations on the cutting edges. These help to break up long, stringy chips into smaller, more manageable pieces, which is crucial for preventing chip recutting and improving evacuation, especially in tough, gummy materials.
Helix Angle
The helix angle (the angle of the flutes around the tool) influences how the tool cuts and evacuates chips.
Standard Helix (30 degrees): A good all-around choice.
High Helix (45 degrees or more): Can offer better chip evacuation and a smoother cutting action, which is beneficial for harder materials. However, high helix tools can be less rigid.
Variable Helix: Some advanced end mills use a variable helix angle to suppress vibration and chatter, leading to a better surface finish, particularly important for precision work.
Coatings
For machining tough materials like tool steel, coatings are essential. They add a layer of hardness and reduce friction, extending tool life and improving performance.
Uncoated: Basic, suitable for softer materials or very light cuts on harder ones.
TiN (Titanium Nitride): A common, general-purpose coating that adds hardness and lubricity. Good for general machining.
TiCN (Titanium Carbonitride): Harder than TiN, offering better abrasion resistance and performance on harder materials.
AlTiN (Aluminum Titanium Nitride): Excellent for high-temperature applications and hard materials like stainless steels and tool steels. It forms a passive aluminum oxide layer at high temperatures, protecting the tool. This is often the best choice for D2 tool steel.
ZrN (Zirconium Nitride): Offers good lubricity and is often used for non-ferrous materials, but some variants are good for steels as well.
End Cut Type
This refers to whether the end of the end mill comes to a sharp point (ball nose), a flat bottom (square end), or a specific corner radius.
Square End: The most common type, used for general milling, slotting, and profiling.
Corner Radius: Has a small radius at the corner to strengthen the cutting edges and prevent chipping, while also allowing for fillets instead of sharp internal corners.
Ball Nose: Creates a rounded profile, ideal for 3D contouring and general machining where corner fillets are desired.
Shank Type (Stub Length)
You mentioned “stub length” in your query. A stub length end mill is shorter than a standard end mill of the same diameter.
Rigidity: The primary advantage of a stub length is increased rigidity. A shorter flute length means less overhang, reducing chatter, deflection, and the chance of breakage. This is especially important when cutting hard materials or when taking heavier cuts.
Accessibility: Can sometimes be easier to hold in certain tool holders.
For your task of machining D2 tool steel with a 1/8 inch end mill, I’d highly recommend looking for a 4-flute square or corner radius end mill with an AlTiN coating and a stub length. These features are designed to handle the demands of tough, hard materials.
How to Use Your 1/8 Inch Carbide End Mill Safely and Effectively
Picking the right tool is only half the battle. Knowing how to use it properly is key to success and, most importantly, your safety. Let’s break down the process for using your 1/8 inch carbide end mill, using D2 tool steel as our example material.
Preparation is Key
Before you even think about spinning that end mill, take these steps:
1. Secure Your Workpiece: This is non-negotiable. Use a milling vise, clamps, or a fixturing system that can hold your D2 tool steel workpiece firmly. Any movement can lead to tool breakage, workpiece damage, or a dangerous situation. Ensure the workpiece is squared up or positioned correctly for your intended cuts.
2. Mount the End Mill Correctly:
Collet Chuck: The best method is to use a high-quality collet chuck designed for milling. Select the correct size collet for your 1/8 inch shank (e.g., a 1/8 inch collet).
Set Screw Holder: If using a set screw holder, ensure it’s a good quality one with a hardened screw that won’t mar the shank excessively. Keep the set screw away from any cutting edges if possible.
Pro Tip: Always clean the collet, the collet nut, and the end mill shank before inserting. Any debris can cause runout (wobble), drastically reducing tool life and accuracy.
3. Set Your Zero Point (Work Zeros): Accurately determine the top surface of your workpiece (Z-axis zero) and the sides for X and Y axes. A digital readout (DRO) or CNC control is invaluable here.
4. Check Machine Rigidity: Ensure your milling machine is in good condition. Loose ways, worn spindle bearings, or a wobbly quill can cause problems, especially with small, delicate tools.
Speeds and Feeds: The Delicate Balance
This is where many beginners struggle. Finding the right balance of spindle speed (RPM) and feed rate (how fast the tool moves through the material) is crucial for carbide tools, especially in hard materials. Carbide tools generally run at higher RPMs than HSS but require lower feed rates.
General Guidelines for 1/8 Inch Carbide End Mill in D2 Tool Steel:
Spindle Speed (RPM): For a 1/8 inch (0.125 inch) carbide end mill in D2 tool steel, you’re likely looking in the range of 1,500 to 4,000 RPM. This will vary greatly depending on the exact coating, the brand, the specific D2 alloy if known, and your machine’s capabilities.
Forcing it: If you have a really rigid machine with a good spindle, you might push towards the higher end.
Lower end: If your machine is less rigid or you’re nervous, start at the lower end.
Feed Rate (IPM or mm/min): This is about how much material you’re removing per revolution of the spindle. For a 1/8 inch carbide tool in D2, you’re talking about very light chip loads. Think 0.0005 to 0.0015 inches per tooth (IPT).
Calculate Feed Rate: If you have a 4-flute end mill, you’d multiply the chip load by the number of flutes:
At 0.001 IPT: 0.001 inch/tooth 4 teeth = 0.004 inches per revolution (IPR).
To get Inches Per Minute (IPM): 0.004 IPR RPM. So, at 2000 RPM, this would be 0.004 2000 = 8 IPM.
Start Light: Always start with a conservative feed rate. You can always increase it if the cut is too light and the chips are too fine (looking like dust instead of small chips).
Where to Find More Specific Data:
It’s always best to consult the end mill manufacturer’s recommendations. Look for their carbide cutting data charts. Websites like that of the National Institute of Standards and Technology (NIST) offer a wealth of information on machining standards which can be a starting point, although specific tool recommendations are best from the manufacturer. Many tool manufacturers also have online calculators.
The Cutting Process: Step-by-Step Milling
Let’s assume you’re doing a simple slotting operation.
1. Engage the Spindle: Turn on your spindle to the calculated RPM.
2. Plunge (If Necessary): If you need to plunge the tool straight down, do it very slowly. Use a slight angled plunge or a helical interpolation (a spiral path into the material) if your machine supports it, as this is much easier on the tool and the chips. For D2, plunge cutting straight down is generally discouraged unless absolutely necessary and done very slowly.
3. Begin Milling:
Climb Milling (Down Milling): This is generally preferred for harder materials and when using carbide. The cutter rotates in the same direction as the feed. This results in a thinner chip at the start of the cut and a thicker chip at the end, putting less shock on the tool. Always ensure your machine has zero backlash in the feed screws, or use a CNC.
Conventional Milling (Up Milling): The cutter rotates against the direction of the feed. This creates a thicker chip at the start, which can be harder on the tool.
Initiate the Cut: Move the tool into your workpiece at the calculated feed rate. For slotting, you’ll feed across the surface.
4. Coolant and Lubrication: For carbide and D2 steel, a good quality cutting fluid or coolant is highly recommended.
Direct the stream at the point where the tool enters the material to help flush chips and cool the cutting edge.
Flood coolant systems are ideal. If you don’t have one, a spray mister or a manually applied lubricant can help.
5. Monitor the Cut: Listen to the sound of the cut. A smooth, consistent hum is good. A high-pitched squeal or loud chattering indicates problems – likely incorrect speeds/feeds, workpiece movement, or tool wear. Watch the chips. Are they small and consistent, or are they dusty, stringy, or smoky? Dusty chips often mean you’re feeding too slowly or the RPM is too high for the depth of cut. Smoky chips mean you’re likely rubbing, overheating, or feeding too fast.
6. Depth of Cut (DOC): For a 1/8 inch end mill in D2 tool steel, your radial depth of cut (how much of the tool’s diameter is engaged sideways) should be relatively shallow, and your axial depth of cut (how deep you’re cutting vertically) should also be conservative.
Roughing: You might take a DOC of 0.020″ to 0.050″.
Finishing: For a good surface finish, you might take a light finishing pass of 0.005″ to 0.010″ with an optimized high-speed pass.
Stub Length Advantage: The rigidity of a stub length tool allows you to push the depth of cut slightly more than you could with a longer tool, but still, be conservative with D2.
Chip Evacuation: The Unsung Hero
As mentioned, chip evacuation is critical.
Flute Design: Ensure you’ve chosen an end mill with good flute design for chip clearance.
Air Blast/Coolant: Use a blast of compressed air or a strong stream of coolant to blow chips out of the flutes and the cutting area.
Peck Drilling: If plunging deeply, use a “peck” cycle where the tool plunges a short distance, retracts to clear chips, and then plunges again. This is vital for preventing chip buildup at the bottom of a hole or deep slot.
Common Issues and How to Solve Them
Even with the best tools and preparation, challenges can arise. Here’s how to troubleshoot common problems when milling with a 1/8 inch carbide end mill.
Problem 1: Tool Breakage
This is the most frustrating issue. Why does it happen?
Reasons:
Chips are not clearing: This is huge. Chips build up, jam the flutes, and the tool breaks under the load.
Feed Rate Too High: Trying to cut too much material too fast.
Workpiece Movement: The material shifts during the cut.
Runout: The tool isn’t perfectly centered in the spindle.
Deflection: The tool or workpiece is bending too much.
Incorrect Speeds: Wrong RPM for the feed rate.
Plunge Cutting: Plunging straight into hard material without care.
Solutions:
Improve Chip Evacuation: Use more coolant/air, try a different flute count, or adjust feed/speed to create smaller chips.
Slow Down Feed: Gradually reduce your feed rate.
Secure Workpiece: Double-check all clamping.
Improve Tool Holding: Use a high-quality collet chuck. Check your spindle for play.
Reduce Depth of Cut: Take shallower cuts, both radially and axially.
Optimize Speeds: Consult manufacturer charts. Try slightly higher RPM with a lower feed rate.
Helical Interpolation:** If plunging, learn to use helical interpolation.