A 1/8 inch carbide end mill on tool steel can achieve a brilliant, mirror-like finish when used correctly. Understanding the right speeds, feeds, and techniques is key to unlocking its full potential for your projects.
Hey there, fellow makers and tinkerers! Daniel Bates from Lathe Hub here. Ever stare at a piece of tool steel and wish you could get that super smooth, almost glassy finish? It’s totally achievable, and often, the humble 1/8 inch carbide end mill is your secret weapon. But getting that “brilliant” finish isn’t always straightforward, especially for newcomers. You might find your results a bit rough, or maybe you’re worried about damaging your workpiece or your tool. Don’t sweat it! We’re going to walk through exactly how to get that dazzling mirror finish, step-by-step, so it’s simple and confidence-boosting.
Mastering the 1/8 Inch Carbide End Mill for Brilliant Tool Steel Finishes
So, you’ve got a shiny new 1/8 inch carbide end mill, and you’re eager to dive into working with tool steel. Fantastic! This small but mighty tool can produce incredible results, giving your projects that professional, high-end look. But achieving a “brilliant” or mirror finish on tough materials like tool steel requires a bit of know-how. It’s not just about sticking the end mill in your machine and hitting go.
Think of it like this: you wouldn’t try to paint a masterpiece with stiff, dried-out brushes, right? Your tools and how you use them matter. The same goes for machining. Tool steel is… well, it’s tool steel. It’s designed to be hard, durable, and resist wear. That’s great for making tools, but it means it can be a bit stubborn when you want to get a super smooth surface.
The good news? With the right approach, your 1/8 inch carbide end mill is perfectly capable of giving you that dazzling, professional finish. We’ll cover everything you need to know, from understanding your tooling to setting your machine up just right. By the end of this, you’ll be feeling confident and ready to tackle your next project with precision and shine!
Why a 1/8 Inch Carbide End Mill for Tool Steel?
Why this specific tool for this specific job? It’s a question many beginners ask, and it’s a great one to start with.
Size Matters: The 1/8 inch (or 3mm) diameter is incredibly versatile. It can get into small features, create fine details, and is manageable for many beginner milling setups. Plus, a “reduced neck” on some of these tools means the shank is slightly thinner just behind the cutting flutes. This is a game-changer because it prevents the shank from accidentally hitting the workpiece in tighter corners, allowing for deeper cuts or cleaner paths.
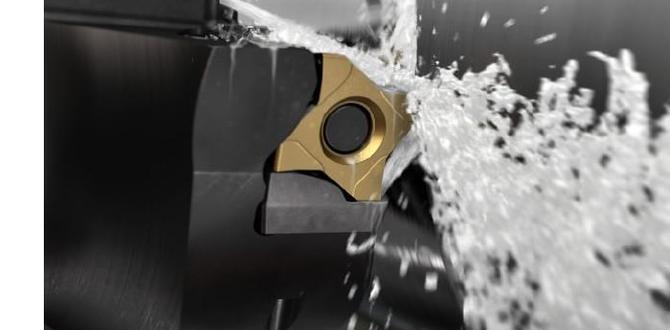
Carbide’s Strength: Carbide (Tungsten Carbide) is exceptionally hard and can withstand higher temperatures than High-Speed Steel (HSS). Tool steels are often hardened, meaning they are already very hard. Trying to mill them with HSS can lead to rapid tool wear, heat buildup, and a poor finish. Carbide’s hardness and heat resistance make it the superior choice for milling hardened or high-alloy steels.
Precision and Finish: When used correctly, carbide end mills are excellent for achieving fine surface finishes. They cut cleanly and can hold tight tolerances, which is crucial for that brilliant, mirror-like polish you’re aiming for.
What You’ll Need: Your Essential Toolkit
Before we get our hands dirty, let’s make sure you have the right gear. Think of this as your “getting started” checklist.
The Star of the Show: 1/8 Inch Carbide End Mill: Crucially, look for one designed for harder materials like tool steel. Often, these will have specific coatings (like TiAlN or TiN) that help with heat resistance and wear. A “reduced neck” feature is highly recommended for this application, as mentioned.
A Sturdy Milling Machine: Whether it’s a small benchtop mill or a larger industrial machine, it needs to be rigid. Rigidity is key to preventing vibrations, which are the enemy of a good surface finish.
A Reliable Collet or Tool Holder: A good quality ER collet chuck or a CAT/BT tool holder system will ensure your end mill is held securely and runs true (meaning it doesn’t wobble). For a small 1/8 inch end mill, an ER11 or ER20 collet system is common and works well.
Clamping System: You need to securely hold your piece of tool steel. This could be a vise, clamps, or fixture plates. Make absolutely sure your workpiece won’t move during machining.
Coolant/Lubricant: Machining steel, especially hardened steel, generates heat. A good cutting fluid or lubricant is essential to keep the tool cool, lubricate the cut, and help clear chips away. For tool steel, a synthetic or semi-synthetic coolant is often a good choice. You could also consider a specialized milling paste.
Safety Gear: This is non-negotiable! Safety glasses or a full face shield, hearing protection, and appropriate work gloves are a must.
Understanding Tool Steel and Finishing
Tool steels are a broad category of carbon and alloy steels known for their toughness, wear resistance, and ability to hold a cutting edge. They are often heat-treated to achieve these properties, which makes them harder but also more challenging to machine.
When we talk about a “brilliant” or “mirror” finish, we’re aiming for a surface finish value (often measured in Ra, or Roughness Average) that is very low. This means minimizing microscopic peaks and valleys on the surface. Achieving this on tool steel with a small end mill involves:
Minimizing Chip Welds: Tool steel can be prone to “chip welding,” where the removed material sticks to the cutting edge of your end mill. This leads to a rougher finish and can even damage the tool. Proper coolant and cutting parameters help prevent this.
Controlling Cutting Forces: Small end mills, especially 1/8 inch ones, have limited rigidity. High cutting forces can cause deflection, chatter (vibrations), and poor surface quality.
Achieving Smooth Chip Evacuation: Chips need to be cleared away effectively from the cutting zone. If they build up, they can recut, ruin the finish, and overheat the tool.
The Step-by-Step Guide to a Brilliant Finish
Let’s get practical! Here’s a breakdown of how to use your 1/8 inch carbide end mill to get that amazing finish on tool steel.
Step 1: Prepare Your Workpiece and Machine Setup
1. Securely Mount the Workpiece: Use a sturdy vise or appropriate clamping. Ensure the part is flat and won’t lift or shift. If you’re milling a surface, ensure that surface is perfectly flat against your vise jaws or fixture.
2. Install the End Mill: Insert your clean 1/8 inch carbide end mill into a quality collet. Tighten the collet securely to prevent slippage. Ensure the collet and holder are clean.
3. Set Your Z-Axis Zero: This is crucial for accurate depth control. Use an edge finder, a touch probe, or a piece of paper to find your workpiece’s top surface. Set your machine’s Z-axis to zero at this point.
Step 2: Determine Your Cutting Parameters (Speeds and Feeds)
This is where the magic happens, and it’s often the trickiest part for beginners. For tool steel, you generally need relatively high spindle speeds and manageable feed rates.
Spindle Speed (RPM): Carbide tools love to spin fast. For a 1/8 inch carbide end mill cutting tool steel, you might start in the range of 5,000 to 10,000 RPM. The exact speed depends on the specific grade of tool steel, the end mill’s length of cut, and your machine’s capabilities. Always check the manufacturer’s recommendations for your specific end mill if available.
Feed Rate (IPM or mm/min): This is how fast the tool moves into the material. For a good finish, you generally want a fine chip load. Chip load is the thickness of the material removed by each cutting edge per revolution. For a 1/8 inch carbide end mill, a chip load of 0.0005 to 0.001 inches per tooth (IPT) is a good starting point.
Calculating Feed Rate: If you have a 2-flute end mill and you want a chip load of 0.0008 IPT:
Feed Rate = Spindle Speed (RPM) × Number of Flutes × Chip Load (IPT)
Feed Rate = 8000 RPM × 2 flutes × 0.0008 IPT = 12.8 inches per minute (IPM)
Modern CNC machines often have built-in calculators, but understanding the basics helps. For manual machines, you’ll be controlling the handwheel, and these numbers guide how quickly you should advance.
Depth of Cut (DOC): For finishing passes, especially on small tools and hard materials, you want a very shallow depth of cut. For a brilliant finish, try a DOC of 0.001 to 0.005 inches (0.025 to 0.127 mm). This light cut is what polishes the surface.
Width of Cut (WOC): For slotting, aim for a WOC that’s less than half the diameter of the end mill (e.g., 0.050″ to 0.060″ for a 1/8″ end mill). For contouring or profiling, you can often use a larger WOC, but for the absolute best finish, a slight overlap (e.g., 50%) is often used.
Important Note: These are starting points. You may need to adjust based on what you hear and see.
Step 3: Apply Coolant/Lubrication
This is absolutely critical for tool steel.
Flood Coolant: If your machine has a flood coolant system, use it! Ensure a steady stream is directed at the cutting zone.
Mist Coolant: A mist system is another good option, providing both cooling and lubrication.
Cutting Fluid/Paste: On machines without automated coolant, you’ll need to apply it manually. Use a brush or a squirt bottle to apply liberally to the cutting area. Don’t let the tool run dry! This prevents overheating, reduces friction, and helps flush chips. A high-quality milling paste designed for steel can be very effective.
Step 4: Perform the Cutting Passes
This is generally a two-step process: a roughing pass (if needed) and a finishing pass.
1. Roughing Pass (Optional, but recommended for material removal): If you need to remove a significant amount of material, perform a roughing pass first. Use a more aggressive depth of cut and a feed rate that your machine can handle comfortably. The goal here is to get close to your final dimension.
2. Finishing Pass: This is where you achieve the brilliant finish.
Set your Z-depth accurately slightly deeper than your last pass.
Use a very shallow Depth of Cut (DOC), as mentioned (0.001″ – 0.005″).
Ensure your Spindle Speed and Feed Rate are optimized for a smooth cut.
Use a climb milling strategy if possible. Climb milling (where the cutter rotates in the same direction as the feed) generally produces a better finish and puts less stress on the cutting edge compared to conventional milling. Most modern CNCs default to climb milling. On manual machines, ensure the backlash is taken up in your X or Y axis if using climb milling.
Let the finishing pass do its job. Don’t force it. Listen to the sound of the cut – it should be a smooth whirring, not a screeching or chattering sound. If you hear chatter, reduce feed rate or DOC slightly.
Step 5: Chip Evacuation and Inspection
Clear Chips: Ensure your coolant is effectively flushing chips away. If chips are packing up, your feed rate might be too high, or your DOC too deep for the coolant to keep up. You might need to pause and clear them manually (with the machine off, of course!).
Inspect Regularly: Periodically stop the machine to inspect the surface. Look for any signs of burning, chip welding on the tool, or uneven cutting.
Key Factors for a Brilliant Mirror Finish
Achieving that coveted mirror finish isn’t just about having the right tool; it’s about a combination of factors working in harmony.
Tool Sharpness and Quality: A dull or damaged end mill will never give you a good finish. Use a high-quality carbide end mill specifically designed for hardened steels.
Machine Rigidity: As mentioned, vibrations are your enemy. A wobbly machine or loose spindle will prevent that smooth, polished surface.
Coolant and Lubrication: Absolutely essential. It cools, lubricates, and helps clear chips. Without it, you’ll struggle to get a good finish on tool steel and risk damaging your tool.
Correct Speeds and Feeds: Too fast a feed rate or too deep a cut will lead to chatter and a poor finish. Too slow a feed rate can lead to rubbing and glazing, also not ideal.
Climb Milling: Generally preferred for finishing. It engages the cutter cleanly and reduces the risk of the cutter digging in causing chatter.
Tool Path Strategy: For a truly brilliant finish on a contoured surface, you might use a tool path with a high stepover (the distance between passes) for roughing and a much smaller stepover for the final finishing passes. For pocketing, ensuring a smooth ramp into the material is also important.
Post-Machining Surface Treatment (Advanced): Sometimes, even after a precise milling operation, a slight polish with a very fine abrasive (like a diamond paste on a felt wheel, with extreme care not to distort geometry) might be used for the ultimate mirror finish. However, a well-executed milling operation can often get you 95% of the way there.
Reduced Neck End Mills: A Closer Look
The “reduced neck” or “relief neck” feature on some end mills is a smart design for machining tight corners and achieving deeper cuts without the shank interfering.
When you’re machining a profile or a corner, the body of the end mill (the shank) can sometimes come into contact with the walls of the workpiece before the cutting flutes have finished their job. This is especially true when you need to get close to a specific feature.
A reduced neck end mill has a slightly smaller diameter shank just behind the cutting flutes. This extra clearance allows the end mill to reach into tighter areas and make cleaner cuts without the body of the tool rubbing against the material. For intricate work or when you need to mill close to adjacent surfaces, this feature is a game-changer for maintaining accuracy and achieving a good finish.
Applications of a Brilliant Finish on Tool Steel
Why go to all this trouble? What are the benefits of that dazzling finish?
Aesthetics: Let’s be honest, it just looks fantastic. It gives your project a professional, high-quality, and precisely engineered feel.
Reduced Friction: In applications where parts slide against each other, a smoother surface means less friction. This is crucial for moving parts in machinery, mechanical assemblies, and precision instruments.
Improved Wear Characteristics: A smoother surface can sometimes lead to better wear resistance, as there are fewer high points to initiate wear.
Corrosion Resistance: A very smooth, polished surface can be slightly more resistant to corrosion than a rougher one, as it offers fewer places for contaminants to adhere.
Cleanliness: For parts that need to be kept very clean (e.g., in food processing equipment or medical devices), a smooth surface is easier to clean and sterilize.
Common Challenges and How to Solve Them
Even with the best intentions, you might run into a few hiccups. Here’s how to troubleshoot:
| Problem | Possible Cause | Solution |
| :—————- | :———————————————- | :————————————————————————————————————————————————————————————————– |
| Chatter/Vibration | Machine rigidity low, WOC or DOC too high, dull tool, incorrect speed/feed | Increase DOC/WOC slightly (or decrease them significantly for finish), ensure tool is sharp and held securely, find the “sweet spot” in RPM/IPM, use climb milling, check machine for play. |
| Rough Surface | Chip welding, insufficient coolant, feeding too slow, tool wear | Increase coolant flow, ensure proper tool geometry (e.g., positive rake), slightly increase chip load or feed rate, use climb milling, ensure tool is sharp and clean. |
| Tool Breaking | Feed rate too high, DOC too high, inadequate support, plunging too aggressively | Significantly reduce feed rate and DOC, ensure workpiece is rigidly clamped, use proper plunging techniques (helix or helical ramping instead of straight plunge), use climb milling. |
| Workpiece Moving | Clamping not sufficient, cutting forces too high | Improve clamping strategy. Ensure vise jaws are clean and workpiece is seated firmly. Consider better fixturing for critical parts or harder steels. |
| Poor Chip Evacuation | Feed rate too high for coolant, flutes clogged | Reduce feed rate, increase coolant flow, consider a vacuum chip removal system or air blast, stop and clear chips manually (machine off!). |
Safety First, Always!
Remember, we’re working with powerful tools. Always prioritize safety.
Eye Protection: Wear safety glasses or a face shield any time you are near a running machine.
Hearing Protection: Milling can be loud. Protect your ears.
Gloves: Wear gloves when handling material, but never* wear loose gloves when operating the