For 1/8-inch carbide end mills cutting PMMA, superior chip evacuation is key to preventing melting and achieving clean cuts. Using tools with specific flute designs and appropriate speeds/feeds ensures smooth operation and excellent surface finish.
Working with PMMA (acrylic) on a milling machine can be a bit tricky, especially when using small tools like a 1/8-inch carbide end mill. One of the biggest headaches for beginners is dealing with chips that don’t clear out properly. When the chips get stuck, they can melt and weld themselves back onto the workpiece or the cutter. This leads to rough cuts, damaged tools, and a whole lot of frustration. Don’t worry, though! It’s a common challenge, and with the right approach, you can achieve smooth, clean cuts every time. We’ll walk through exactly what you need to know to get your 1/8-inch carbide end mill working perfectly with PMMA, focusing on how to make sure those pesky chips get evacuated effectively. Get ready to mill with confidence!
Why Chip Evacuation Matters with PMMA
PMMA, commonly known as acrylic, is a fantastic material for many projects. It’s clear, durable, and relatively easy to work with on a mill. However, it has a lower melting point compared to metals. This is where chip evacuation becomes really important. When you’re milling, the cutting tool removes material, creating chips. With PMMA, if these chips don’t get out of the way quickly, the friction from the spinning tool and the surrounding material can generate enough heat to melt the acrylic. This melted plastic can then gum up the flutes of your end mill, leading to a poor surface finish on your part and potentially breaking your tool.
A well-designed cutting process with good chip evacuation means the chips are thrown clear of the cutting zone before they have a chance to re-melt or cause issues. For a small tool like a 1/8-inch carbide end mill, this can be even more challenging because the flutes are smaller, and there’s less space for chips to travel. Fortunately, manufacturers have developed specific tool geometries and techniques to combat this. Understanding these can make a huge difference in your success when milling PMMA.
Understanding Your 1/8-Inch Carbide End Mill
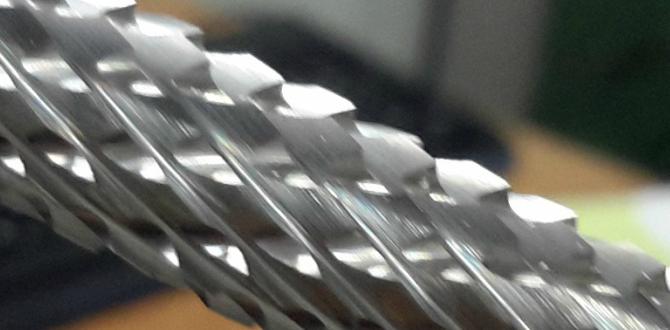
When we talk about a 1/8-inch carbide end mill, we’re referring to a cutting tool with a diameter of 1/8 inch made from tungsten carbide, a very hard and durable material. Carbide is excellent for machining many materials, including plastics like PMMA, because it can withstand higher cutting speeds and temperatures than high-speed steel (HSS). However, its brittle nature means it’s not as forgiving of shock or improper use.
For PMMA, the design of the end mill’s flutes is crucial. Flutes are the spiral grooves that run along the cutting tool; they help break up the chips and direct them away from the cutting edge. For plastics, especially those prone to melting like PMMA, you’ll often look for end mills with:
- High Helix Angle: A steeper spiral (higher helix angle) helps to “screw” the chips up and out of the cut more effectively.
- Polished Flutes: Smooth, polished flutes reduce friction and allow chips to slide out more easily, further preventing material build-up.
- Single or Double Flute Design: For softer plastics like PMMA, single or double-flute end mills are often preferred. They offer more chip clearance space than tools with more flutes. More flutes mean more cutting edges but also less room for chips to escape, which is problematic with melting materials.
- Specifically Designed for Plastics: Many manufacturers offer end mills specifically optimized for plastics. These often have a higher rake angle (the angle of the cutting edge) to slice through the material cleanly, reducing heat generation.
The keyword phrase “carbide end mill 1/8 inch 8mm shank extra long for PMMA chip evacuation” points to a very specific type of tool. An 8mm shank is standard, and the “extra long” designation suggests it might have a longer reach, which can sometimes affect rigidity but is useful for reaching deeper features. The key takeaway here is that the tool must be designed with PMMA’s properties in mind, prioritizing chip evacuation.
Key Factors for Proven PMMA Chip Evacuation
Achieving excellent chip evacuation with a 1/8-inch carbide end mill on PMMA involves a combination of tooling, machine settings, and operational techniques. It’s not just about having the right tool; it’s about how you use it. Here are the critical factors:
1. Tool Selection: The Right End Mill for the Job
As discussed, the flute geometry is paramount. For PMMA, look for end mills specifically labeled for plastics or with features that promote chip evacuation:
- Single-Flute or Double-Flute: These provide the best chip room.
- High Helix: This helps push chips out.
- Polished or Bright Finish: Reduces friction.
- Sharp Cutting Edges: Crucial for a clean cut.
Sometimes, end mills designed for aluminum also work well for plastics because they share some similar machining characteristics, particularly the need for good chip clearance.
2. Speeds and Feeds: Finding the Sweet Spot
This is arguably the most critical aspect. Setting the right spindle speed (RPM) and feed rate (how fast the tool moves through the material) balances cutting efficiency with heat management and chip formation.
- Spindle Speed (RPM): For PMMA and small carbide end mills, you generally want a higher spindle speed. This allows the tool to cut quickly, producing smaller chips that are easier to evacuate. A good starting point for a 1/8-inch end mill might be between 15,000 and 25,000 RPM, but always consult your end mill manufacturer’s recommendations or test cautiously.
- Feed Rate (IPM or mm/min): This needs to be matched to the spindle speed and the depth of cut. The goal is to remove material efficiently without overloading the tool or generating excessive heat. A higher feed rate, combined with a high RPM, creates small, manageable chips. Too slow a feed rate at high RPM can rub rather than cut, generating heat. Too fast a feed rate can overload the tool. For a 1/8-inch end mill in PMMA, you might start with a chip load per tooth of around 0.001″-0.002″. If your spindle speed is 20,000 RPM and you’re using a 2-flute end mill, your feed rate would be: 20,000 RPM 2 flutes 0.0015″ chip load/tooth = 60 inches per minute (IPM).
- Chip Load: This is the thickness of the chip being removed by each cutting edge. Maintaining an appropriate chip load is vital. If it’s too small, the tool rubs and heats up. If it’s too large, the tool can break or the material can deform.
It’s always best to start with conservative settings and slowly increase speed and feed until you get a clean cut with well-formed chips. Websites like Practical Machinist often have helpful discussions on specific material and tool combinations.
3. Depth of Cut (DOC) and Stepover
How much material you remove in a single pass makes a big difference.
- Depth of Cut (DOC): For PMMA, it’s generally recommended to use a relatively shallow depth of cut. This minimizes the amount of material the chips have to push through and reduces heat buildup. A DOC of 0.010″ to 0.040″ (0.25mm to 1mm) is often a good starting range for a 1/8-inch end mill, depending on the machine’s rigidity and the specific PMMA thickness.
- Stepover: This is the amount the tool moves over sideways in each pass. For finishing passes, a small stepover (e.g., 10-20% of the tool diameter) is used for a smooth surface. For roughing, a larger stepover might be acceptable, but always consider how it affects chip evacuation.
4. Coolant/Lubrication Strategy
While flood coolant is common in metal machining, it’s often overkill and can sometimes create a mess with plastics. For PMMA, a light mist of air or a specialized plastic machining coolant can be very effective. A strong blast of compressed air is often the simplest and most effective way to clear chips. The air blast helps keep the cutting zone cool and blows the chips away before they can melt.
You can set up an air blast nozzle connected to your shop air supply and position it to blow directly at the cutting area. This is highly recommended for plastics.
5. Climb Milling vs. Conventional Milling
The direction in which the cutter engages the material can impact chip formation and evacuation.
- Climb Milling: The cutter rotates in the same direction as the tool is feeding into the workpiece. This results in a thinning chip and generally leaves a cleaner surface finish. The chips tend to be pushed away from the cutter more effectively, aiding evacuation. This is usually the preferred method for plastics once you have confidence in your machine’s backlash settings.
- Conventional Milling: The cutter rotates against the direction of feed. This results in a thicker chip and can generate more heat.
For PMMA, climb milling is often the better choice for chip evacuation and finish. However, it requires a rigid machine with minimal backlash (the free play in the machine’s drive system) to prevent the tool from “chasing” the cut, which can lead to uneven depths and tool breakage.
Step-by-Step Guide: Milling PMMA with a 1/8-Inch Carbide End Mill
Let’s get you set up for a successful milling operation. Follow these steps to ensure good chip evacuation and a clean finish.
Step 1: Prepare Your Workpiece and Machine
- Secure the PMMA: Ensure your acrylic sheet is firmly clamped to the machine bed. Use a spoilboard if necessary to avoid damaging your machine table. Avoid over-tightening, as acrylic can crack.
- Zero the Machine: Accurately set your X, Y, and Z zero points.
- Set Router/Spindle Height: Make sure your tool is at the correct height for your Z zero.
Step 2: Select and Install the End Mill
- Choose a high-quality 1/8-inch carbide end mill designed for plastics, ideally with polished flutes and a single or double-flute configuration.
- Securely install the end mill in your machine’s collet, ensuring it’s fully seated and tightened properly.
Step 3: Set Cutting Parameters (Speeds & Feeds)
This is where your research and testing pay off. Here’s a general guideline, but always start conservatively and adjust based on results:
- Spindle Speed (RPM): Start high, e.g., 18,000 – 24,000 RPM.
- Feed Rate (IPM): Calculate based on your RPM and desired chip load. For a 2-flute end mill and a chip load of 0.0015″, if your RPM is 20,000, your feed rate would be ~60 IPM.
- Depth of Cut (DOC): Start shallow, e.g., 0.020″ (0.5mm).
- Stepover: For roughing, 0.050″ (1.25mm); for finishing, 0.015″ (0.38mm).
Consider using a “chip load calculator” online, which takes spindle speed, number of flutes, and desired chip load to give you a feed rate. Many CNC machine software packages also have built-in calculators.
Step 4: Set Up Chip Evacuation Aids
- Air Blast: Position a nozzle to blow compressed air directly at the cutting zone, pushing chips away and cooling the area.
- Vacuum: If possible, use a vacuum system to help pull chips away from the area. Some CNC systems have integrated dust collection that can be effective.
Step 5: Perform a Test Cut (Optional but Recommended)
Before cutting your final part, it’s a good idea to run a test cut on a scrap piece of PMMA. This allows you to:
- Observe chip formation: Are they small and easily cleared, or large and stringy?
- Listen to the cut: Is it smooth, or is there chatter or rubbing?
- Check the surface finish: Is it clean and shiny, or rough and melted?
Adjust your speeds, feeds, or depth of cut as needed based on the test results.
Step 6: Execute the Machining Program
- Start your CNC program.
- Watch and Listen: Pay close attention to the cutting process. If you notice excessive heat, smoke, or rough cutting noises, be prepared to pause or stop the program.
- Monitor Chip Evacuation: Ensure the air blast and/or vacuum are working effectively to clear chips.
Step 7: Finishing and Inspection
- Once the program is complete, allow the workpiece to cool slightly before removing it.
- Inspect the cut edges and surfaces for smoothness, signs of melting, or any damage.
- If the finish isn’t perfect, consider a finishing pass with slightly different parameters (e.g., shallower DOC, smaller stepover, slightly higher feed).
Recommended Tools and Resources
Choosing the right tools and having access to good information can save you a lot of time and frustration. Here are some recommendations:
End Mill Types for PMMA
When shopping for your 1/8-inch end mill, look for these specifications:
- Material: Carbide
- Diameter: 1/8 inch (or 3.175mm)
- Shank Diameter: Often 8mm or 1/4 inch.
- Flute Count: 1 or 2 flutes (optimal for plastics).
- Helix Angle: High helix (e.g., 35-45 degrees).
- Coating/Finish: Uncoated, polished, or bright finish is usually best. Some specialized plastic coatings can also work.
- Rake Angle: A positive rake angle is generally beneficial for plastics.
Helpful Accessories
- Air Blast Nozzle: Essential for chip evacuation.
- Vacuum System: Can supplement air blast or be used alone.
- Standoffs or Riser Blocks: Useful for elevating your workpiece slightly to improve chip clearance underneath.
- Collet System: Ensure you have a good quality collet or chuck for your spindle to hold the tiny 1/8-inch shank securely.
Online Resources
The machining community is a great place to learn. Here are some authoritative sources:
- National Institute of Standards and Technology (NIST): While not directly about end mills, NIST provides manufacturing standards and research that underpin machining best practices. Their work in metrology and materials science is foundational.
- Machinery’s Handbook: The absolute bible for machinists, containing tables, formulas, and general data for machining operations.
- Manufacturer Catalogs: Reputable end mill manufacturers (e.g., Lakeshore Carbide, Niagara Cutter, YG-1) often provide detailed specifications and sometimes cutting data recommendations for their tools.
- Online Forums: Websites like CNCZone and Practical Machinist are treasure troves of shared knowledge from experienced professionals.
Comparison: Single vs. Double Flute for PMMA
When dealing with a 1/8-inch end mill and PMMA, the choice between a single-flute and a double-flute design is often a key consideration for chip evacuation. Both have their advantages:
| Feature | Single-Flute End Mill | Double-Flute End Mill |
|---|---|---|
| Chip Clearance | Excellent. The large flute volume provides maximum space for chips to escape. | Good. Provides better chip clearance than tools with 3 or 4 flutes. |
| Material Removal Rate (MRR) | Can be limited by chip evacuation; you might not be able to push as much material as with a double flute at the same chip load per tooth. | Potentially Higher. With good chip evacuation, a double flute can remove more material per revolution because it has
Related Posts |