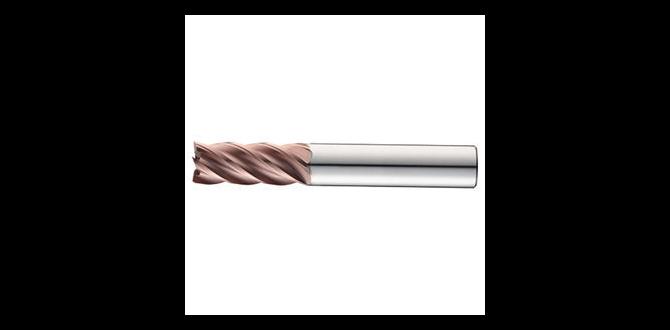
A 3/16 inch carbide end mill is crucial for working with tool steel because its hardness and heat resistance allow it to cut tough materials that would quickly dull or break less robust cutters. This specific size is perfect for detailed work and tight spaces when milling hardened steels.
Ever tried cutting into tool steel and watched your regular drill bit or end mill just… stop? It’s a common frustration for anyone starting out with metalworking. Tool steel is incredibly tough, designed to withstand wear and heat, which makes it great for tools but a real pain for your cutting bits. But don’t worry! There’s a hero in the workshop for this exact challenge: the 3/16 inch carbide end mill. It’s small, mighty, and exactly what you need to get the job done right. Let’s dive into why this little tool is so essential for tackling tool steel and how you can use it effectively.
Why a 3/16 Inch Carbide End Mill is Your Tool Steel Best Friend
When you’re working with materials like A2 tool steel, you need a cutting tool that’s as tough as the material itself. This is where carbide comes into play. Carbide, often tungsten carbide, is a compound that’s significantly harder and more rigid than high-speed steel (HSS). This makes it ideal for cutting harder metals.
The Magic of Carbide
Think of tool steel as a superhero. It’s strong and can handle extreme conditions. Your ordinary cutting tools are like regular people – they just can’t do the job effectively against such a powerful opponent. Carbide end mills, on the other hand, are like other superheroes. They have the strength and resilience needed to go toe-to-toe with tool steel.
- Extreme Hardness: Carbide is one of the hardest materials used for cutting tools. This means it can shear through tough materials like tool steel without deforming or becoming dull too quickly.
- Heat Resistance: Machining generates a lot of heat. Tool steel isn’t called “tool steel” for nothing; it’s made to resist heat. Carbide also excels at resisting high temperatures, which is crucial for maintaining its cutting edge during prolonged milling operations.
- Rigidity: A rigid tool means less chatter and vibration. This leads to cleaner cuts, better surface finishes, and longer tool life.
The 3/16 Inch Advantage
Now, why this specific 3/16 inch size? This is where versatility shines.
- Precision and Detail: A 3/16 inch end mill is small enough to get into tight spaces and create detailed features, such as slots, pockets, and chamfers, on your tool steel projects.
- Manageable Chip Load: For tougher materials like tool steel, a smaller diameter often allows for a more controlled chip load. This means you’re removing material efficiently without overloading the tool or the machine.
- Common Applications: This size is incredibly useful for creating keyways, small grooves, or engraving details that are common in tooling, jigs, and fixtures made from hardened steel.
When you combine the superior properties of carbide with the practical size of a 3/16 inch cutter, you get a tool that’s perfectly equipped for the demands of milling stainless steel and other hardened alloys found in tool steel.
Choosing the Right 3/16 Inch Carbide End Mill for Tool Steel
Not all carbide end mills are created equal, especially when you’re targeting something as demanding as tool steel. You’ll want to pay attention to a few key features.
Material and Coatings
For tool steel, the base material of the end mill is critical. Look for solid carbide. While there are also carbide-tipped end mills, for this application, a solid carbide end mill will generally offer better performance and chip evacuation, especially for smaller diameters.
Coatings play a huge role in extending tool life and improving performance. For milling tool steel, consider these:
- TiN (Titanium Nitride): A general-purpose coating that adds hardness and reduces friction. It’s a good starting point for many materials.
- TiAlN (Titanium Aluminum Nitride): This is a top choice for high-temperature applications and works exceptionally well on hardened steels and exotic alloys. It forms a protective aluminum oxide layer at high temperatures, providing excellent heat resistance.
- AlTiN (Aluminum Titanium Nitride): Similar to TiAlN, offering excellent performance in high-heat environments.
- ZrN (Zirconium Nitride): Offers improved lubricity and is good for sticky materials, though TiAlN/AlTiN are usually preferred for the extreme demands of tool steel.
For milling tool steel, especially with a 3/16 inch end mill where heat can build up quickly in the small cutting edges, a TiAlN or AlTiN coating is highly recommended.
Flute Design
The number of flutes and their geometry significantly impact how an end mill cuts.
- 2-Flute: These are excellent for profiling and slotting in hard materials and when dealing with materials that tend to clog. The larger chip gullets can help evacuate chips more effectively, reducing the risk of re-cutting chips which can lead to tool breakage. For tool steel, 2-flutes are often a great choice.
- 4-Flute: Generally used for finishing and for harder materials where rigidity is key. They can provide a better surface finish but may struggle with chip evacuation in softer or gummy materials. When milling hardened tool steel, a 4-flute can work well if you’re not taking deep cuts and have good coolant/lubrication.
- Center Cutting: Make sure your end mill is center-cutting. This means it has cutting edges on the tip, allowing you to plunge it straight down into the material to start a cut or create a pocket. This is essential for most milling operations.
Shank and Length
You’ve mentioned an “extra long” shank in your keywords. This is an important consideration for reach. While an extra-long shank can be useful for accessing deep features, it also introduces challenges:
- Reduced Rigidity: The longer the tool sticks out from the collet, the more it’s prone to vibration and deflection. This can lead to poor surface finish and even tool breakage, especially when cutting tough materials.
- Use of Collet Extensions: Sometimes, a stub-length or standard-length end mill used with a collet extension (like a Z-axis nut or specialized holder) can provide the necessary reach while maintaining better rigidity than a very long-reach end mill.
- For 3/16 inch: If you need extended reach for your 3/16 inch carbide end mill, ensure you have a very rigid setup and are prepared to take lighter cuts. For most general-purpose milling on tool steel, a standard length end mill with an appropriate sticking-out length (length of tool protruding from the collet) is usually more reliable.
A flat (square) end mill is standard for general milling. Ball nose end mills are for creating curved surfaces and 3D profiling, and radius end mills have a rounded corner for fillets.
Preparing Your Machine and Material
Before you even think about touching that tool steel with your new carbide end mill, proper preparation is key. This ensures safety, prevents damage to your workpiece and your machine, and helps you get the best possible results.
Workholding is Paramount
The most critical step is securely holding your workpiece. Tool steel is hard, and when you start cutting, forces are generated that can move or even eject the material. This is incredibly dangerous.
- Vise: A sturdy milling vise with hardened jaws is your best bet. Ensure the vise is clean and the jaws are in good condition. Position the workpiece as low as possible in the vise to minimize overhang and maximize stability.
- Clamps: If a vise isn’t suitable, use clamps. Strap clamps or toe clamps can be effective, but ensure they don’t interfere with the cutting path and are securely tightened.
- Fixtures: For repetitive tasks or complex shapes, custom fixtures are often used. These are designed to hold the part in a very specific orientation and with maximum support.
Always aim to have as much of the workpiece supported as possible. Avoid clamping only small edges if you can help it.
Coolant and Lubrication
Milling tool steel generates significant heat. Without adequate cooling, the end mill’s cutting edges can overheat, leading to premature wear, reduced performance, and potential breakage. The workpiece can also experience thermal expansion, affecting accuracy.
- Flood Coolant: If your milling machine is equipped with a flood coolant system, use it! It’s the most effective way to dissipate heat and flush chips away.
- Mist Coolant: A mist coolant system can also be effective. It sprays a fine mist of coolant and air onto the cutting zone.
- Cutting Fluid/Paste: For manual milling machines or when flood/mist systems aren’t available, use a specialized cutting fluid or paste designed for milling hardened steels. Apply it directly to the cutting zone. Remember, even with lubrication, you’ll likely need to manage heat by taking lighter cuts and allowing the material to cool periodically.
- Air Blast: A strong blast of compressed air can help clear chips and provide some cooling, but it’s generally less effective than liquid coolants for deep cuts or extended operations.
Choosing the right coolant is important. For tool steels and carbide, synthetic or semi-synthetic coolants are often recommended. You can learn more about coolant selection from resources like the Machinery Lubricants website.
Setting Up the Machine
This involves more than just clamping the part. It’s about setting up your machine for success.
- Tool Length Measurement: You need to accurately know the position of your end mill relative to your workpiece. Using a tool setter or carefully indicating the end mill to the part surface will ensure your Z-depth is correct.
- Spindle Speed (RPM) and Feed Rate: These are interlinked and crucial. For carbide cutters in tool steel, you’ll typically run at lower spindle speeds and controlled feed rates. (More on this below).
- Rigidity Check: Before full machining, give the machine a gentle nudge. Is there any play in the ways? Is the spindle tight? A rigid machine is non-negotiable for cutting hard materials.
Take your time. Rushing the setup is a sure way to encounter problems.
Milling With Your 3/16 Inch Carbide End Mill: The Process
Now for the exciting part! Getting your carbide end mill to dance with the tool steel. Remember, we’re aiming for clarity and safety.
Understanding Cutting Parameters (SFM & IPM)
This is often the most confusing part for beginners. You’ll hear terms like Surface Feet per Minute (SFM) for spindle speed and Inches per Minute (IPM) for feed rate.
- Surface Speed (SFM): This is the speed at which the cutting edge of the end mill moves across the material. Different materials and tool types have optimal SFM ranges. For carbide in hardened tool steel, you’ll often use lower SFM values than you would for softer aluminum or mild steel.
- Spindle Speed (RPM): This is directly related to SFM and the diameter of your end mill. The formula is: RPM = (SFM 3.82) / Diameter (in inches). For a 3/16 inch end mill cutting tool steel, starting SFM might be in the range of 100-300 SFM, depending on the specific steel, coating, and rigidity of your setup.
- Feed Rate (IPM): This is how fast the cutter advances into the material. It’s influenced by the chip load per tooth (CLPT) and the number of flutes. The formula is: IPM = CLPT Number of Flutes RPM.
- Chip Load Per Tooth (CLPT): This is the thickness of the chip each cutting edge removes. For tough materials like tool steel, you need to keep CLPT relatively small to avoid overloading the tool.
Key Takeaway: You’ll often need lower RPMs and controlled feed rates when working with tool steel and carbide. It’s about a precise, controlled cut, not high-speed aggression.
Recommended Cutting Parameters (Starting Points)
These are general guidelines to get you started. Always consult the end mill manufacturer’s recommendations if available, and be prepared to adjust. For a 3/16 inch solid carbide, 4-flute end mill with a TiAlN coating milling
untempered or lightly tempered tool steel (around 50-55 HRC):| Operation Type | Spindle Speed (RPM) | Feed Rate (IPM) | Depth of Cut (DOC) | Width of Cut (WOC) |
|---|---|---|---|---|
| Slotting/Pocketing | 500 – 1000 RPM | 3 – 6 IPM | 0.020″ – 0.050″ | 0.187″ (full width) |
| Profiling (Side Cutting) | 700 – 1200 RPM | 4 – 8 IPM | 0.050″ – 0.100″ | 0.050″ – 0.100″ (for climb milling) |
| Finishing Pass | 800 – 1500 RPM | 5 – 10 IPM | 0.005″ – 0.010″ | 0.020″ – 0.050″ |
Important Notes:
- Tempered vs. Untempered: These values are for tool steel after heat treatment. If you’re milling unhardened tool steel (which is much softer and easier to cut), you can use higher speeds and feeds.
- Climb Milling vs. Conventional Milling: Climb milling (where the cutter rotation direction matches the feed direction) often provides a better finish and lower cutting forces. Conventional milling is the opposite. For hard materials, climb milling can sometimes be more forgiving.
- Rigidity is Key: If your machine has play, or your tool stick-out is long, you must* reduce speeds and feeds.
- Listen and Look: Pay attention to the sound of the cut. A smooth hum is good. A chattering or squealing sound indicates a problem (too fast, too deep, dull tool). Watch the chips – they should be small, clean, and not glowing red.
For specific details on machining different types of tool steel, resources from organizations like the Association for Manufacturing Technology (AMTMA) or manufacturer data sheets are invaluable.
Step-by-Step Milling Procedure
Let’s walk through slotting a .250 inch wide slot 0.100 inch deep into a piece of A2 tool steel (hardened to about 58 HRC) using a 3/16 inch, 4-flute carbide end mill.
- Prepare the Machine: Ensure your machine is clean, lubricated, and has no noticeable play.
- Secure the Workpiece: Clamp your A2 tool steel securely in a milling vise. Use the lowest possible clamping position.
- Install the End Mill: Insert the 3/16 inch carbide end mill into a good quality collet and tighten it securely in the spindle. Ensure the length of the tool sticking out of the collet is minimized but sufficient to reach the desired depth.
- Set Up Coolant: Turn on your flood or mist coolant, or prepare your cutting fluid.
- Zero the Z-Axis: Use a tool setter or indicator to accurately set your Z-axis zero at the top surface of the workpiece.
- Program/Set the Cut:
- Spindle Speed: Set to around 700 RPM.
- Feed Rate: Set to around 5 IPM.
- Depth of Cut (DOC): Set to 0.050 inch for the first pass (half of your total depth).
- Width of Cut (WOC): Since you’re slotting, the WOC will dictate the slot width. Your 3/16 (0.1875) inch end mill won’t cut a full .250 inch slot in one pass without excessive side load. So, you’ll need to do this in multiple passes or combine slotting and profiling. For simplicity here, let’s assume we
Related Posts

Essential Lathe Power Requirements For Metal Cutting Tools
Top Wood Lathe Carbide Tools Review: Must-Have Picks!
Master Taper Turning: Lathe Collet System For Metal Lathes- There seems to be a significant mismatch between your requested blog topic (“how to cancel car wash subscription”) and your provided keywords related to machining tools (“carbide end mill 1/8 inch 3/8 shank reduced neck for aluminum 7075 heat resistant”). If you’d like me to generate an SEO blog title related to car wash subscriptions, please provide keywords relevant to that topic. If you’d like me to generate an SEO blog title related to carbide end mills, please confirm the main focus keyword for that topic.