Carbide end mills, especially the 3/16-inch size with a 1/2-inch shank, are excellent, cost-effective solutions for machining mild steel. They offer superior hardness, heat resistance, and achieve clean cuts, minimizing deflection for precise, smooth finishes in hobbyist and professional workshops.
Hey everyone, Daniel Bates here from Lathe Hub! Ever stared at a piece of mild steel, ready to mill, and wondered about the best tool for the job? It can be a bit overwhelming with all the options. But when it comes to getting clean, precise cuts in mild steel without a fuss, a 3/16-inch carbide end mill is often your best buddy. They’re tough, last a long time, and make machining steel much easier, even if you’re just getting started. We’ll walk through why this specific tool is so great for mild steel and how to use it effectively. Get ready to machine with confidence!
The Power of a 3/16-Inch Carbide End Mill for Mild Steel
When we talk about machining mild steel, we’re often looking for tools that can handle its toughness without breaking the bank or our patience. Mild steel, also known as low-carbon steel, is a popular choice for many projects because it’s relatively easy to work with. However, to get those clean slots, pockets, and contours, you need a cutting tool that’s up to the task. This is where the humble 3/16-inch carbide end mill shines, especially one with a sturdy 1/2-inch shank, often found in extra-long varieties designed to minimize deflection. Let’s break down why this combination is a winning formula for anyone working with mild steel.
Why Carbide? Unpacking the Material Advantage
Carbide, or tungsten carbide, is a composite material made from a mixture of tungsten carbide powder and a binder metal (usually cobalt). This combination results in a material that is incredibly hard and stiff, far more so than high-speed steel (HSS). Think of it like this: while HSS is like a tough work boot, carbide is more like a diamond-studded hammer. When it comes to cutting metal, this hardness translates into several key benefits:
- Superior Hardness: Carbide maintains its hardness at much higher temperatures than HSS. This means it can cut faster and handle more aggressive feeds without becoming dull or losing its edge.
- Heat Resistance: Machining generates heat. Carbide’s ability to withstand high temperatures allows it to cut through steel efficiently, reducing the risk of tool degradation and improving surface finish on your workpiece.
- Longer Tool Life: Because carbide is so hard and heat-resistant, carbide end mills generally last significantly longer than their HSS counterparts, especially when cutting harder materials like steel. This means fewer tool changes and less downtime.
- Better Wear Resistance: The tough nature of carbide also means it resists wear and chipping better, leading to more consistent performance over its lifespan.
For mild steel, which can be gummy and prone to grabbing, the inherent toughness of carbide provides a significant advantage. It can cut cleanly and efficiently, reducing the heat buildup that often plagues HSS tools in similar applications.
The Magic of 3/16 Inch: Precision and Versatility
The 3/16-inch diameter might seem small, but it’s a remarkably versatile size for many machining tasks, particularly in smaller workshops or for hobbyist projects. Here’s why this specific size is so useful:
- Detailed Work: A 3/16-inch end mill is perfect for creating finer details, smaller slots, and intricate shapes that larger tools simply can’t achieve.
- Access to Tight Spaces: It allows you to mill into corners and features that are inaccessible with wider tools.
- Material Removal Control: For softer materials like mild steel, a smaller diameter tool sometimes allows for more controlled material removal, reducing the risk of tool breakage or workpiece damage.
- Cost-Effectiveness: Smaller end mills are generally less expensive than their larger counterparts, making them an accessible option for beginners building their tool collection.
When paired with mild steel, a 3/16-inch carbide end mill offers a fantastic balance between precision and capability. You can create detailed work without needing an industrial-sized milling machine.
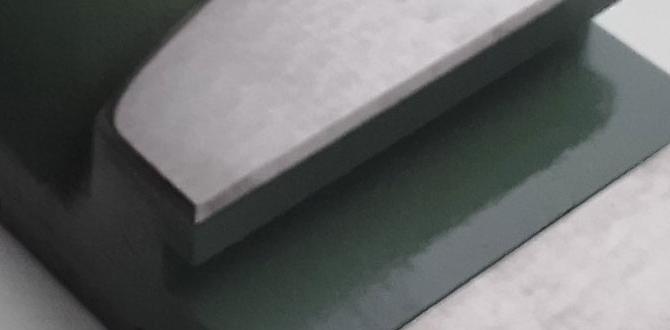
The 1/2-Inch Shank Advantage: Stability and Rigidity
The shank of an end mill is the part that holds it in the collet or tool holder. The diameter of the shank plays a crucial role in the tool’s stiffness and its ability to resist bending or deflection.
Why is a 1/2-inch shank often specified for a 3/16-inch end mill, especially when aiming to minimize deflection? A larger shank diameter provides significantly more rigidity. Compared to a 1/4-inch or 3/8-inch shank, a 1/2-inch shank offers:
- Increased Stiffness: A larger shank is inherently stiffer, meaning it’s less likely to bend or flex under cutting forces. This is critical when milling steel.
- Reduced Vibration: The increased rigidity helps dampen vibrations during the cut, leading to a smoother surface finish and better accuracy.
- Higher Feed Rates: With a more stable tool, you can often push your feed rates a bit harder, increasing productivity without sacrificing cut quality.
- Improved Accuracy: Less deflection means the tool stays on its intended path, resulting in more accurate dimensions on your part.
For those looking for specific performance, such as minimizing deflection when milling mild steel, opting for a 3/16-inch carbide end mill with a beefy 1/2-inch shank is a wise choice. It provides the necessary backbone for a stable and accurate cut.
“Extra Long” for Extra Benefits: Minimizing Deflection
The term “extra long” when referring to an end mill shank typically means the overall length of the fluted section is longer than standard. While the shank diameter is key for rigidity, the length of the flutes can also influence machining. However, in the context of minimizing deflection, the rigidity of the tool itself, often provided by a larger shank like 1/2-inch, is paramount. When manufacturers specify an “extra long” tool (referring to the fluted end projecting from the holder), it’s often designed to reach deeper into a workpiece. For a 3/16-inch end mill, the primary focus for minimizing deflection under load when cutting mild steel should be on the shank’s diameter and the overall rigidity of the tool mounting system (collet, holder, and spindle). A longer flute length can increase deflection if the tool is not adequately supported or if cutting forces are too high for the diameter.
The key takeaway here is that for tackling mild steel with a 3/16-inch end mill, a robust 1/2-inch shank is your primary defense against deflection. This ensures the cutting edge stays where you want it, producing clean, accurate results.
Choosing the Right 3/16-Inch Carbide End Mill
Not all 3/16-inch carbide end mills are created equal. To get the best results when machining mild steel, consider these factors:
Types of End Mills
End mills designed for steel generally have specific flute counts and geometries:
- Number of Flutes: For mild steel, a 2-flute or 3-flute end mill is often recommended.
- 2-Flute: Excellent for slotting and general-purpose milling. The larger flute gullet (space between flutes) allows for better chip evacuation, which is crucial for steel to prevent overheating and tool clogging. They are also good for plunging (drilling straight down).
- 3-Flute: Can offer a smoother finish and slightly higher feed rates than a 2-flute, as they provide a more continuous contact with the material. However, chip evacuation can be slightly more constrained.
- 4+ Flutes: Generally used for finishing operations in softer materials or for steels that are less prone to gummy behavior. They provide a very good surface finish but can clog easily in mild steel if chip clearance is poor.
- Coating: While not always necessary for mild steel, coatings like TiN (Titanium Nitride) or TiAlN (Titanium Aluminum Nitride) can further improve performance by reducing friction, increasing hardness, and extending tool life. For mild steel, a standard uncoated carbide end mill is often sufficient and more cost-effective.
- Corner Radius: Some end mills have a sharp corner, while others have a slight radius (fillet) at the cutting edge. A corner radius can add strength to the cutting edge and help break up chips, leading to a smoother cut and less stress on the tool. For general milling of mild steel, a square end mill (no radius) is fine, but a small radius (e.g., 0.010″ or 0.020″) can be beneficial.
Feed and Speed Considerations
Getting the feed rate (how fast the tool moves into the material) and spindle speed (how fast the tool spins) right is critical. These parameters are heavily influenced by your machine, the type of carbide used, and the rigidity of your setup. As a starting point for a 3/16-inch carbide end mill in mild steel:
- Spindle Speed (RPM): A good starting point for carbide in mild steel is often between 3,000 and 6,000 RPM. However, this can vary greatly. Lower speeds might be needed for less rigid machines, while higher speeds can be used with modern rigid setups and appropriate coolant.
- Feed Rate (IPM or mm/min): This depends on the depth of cut and the number of flutes. A general rule of thumb for a 3/16-inch 2-flute carbide end mill in mild steel might be around 5-10 inches per minute (IPM). The goal is to achieve “chip thinning” – where the chip thickness is about one-third of the tool radius – which leads to less heat and chatter. Manufacturer recommendations are your best guide.
- Depth of Cut (DOC): For general milling, take lighter depths of cut to start. A radial depth of cut (how much of the tool’s diameter is engaged radially) of about 25% of the tool diameter is common for general milling. For axial depth of cut (how deep the tool cuts into the material along its axis), start with 0.060″ to 0.120″ (1.5mm to 3mm).
Always consult the end mill manufacturer’s specifications for precise feed and speed recommendations. Websites like the Machinery Shop Tech Resource often provide valuable starting points for machining parameters.
Solid vs. Indexable
For a 3/16-inch carbide end mill, you’ll almost exclusively be looking at solid carbide tools. Indexable end mills (where you replace small carbide inserts) are typically available in much larger diameters.
How to Use Your 3/16-Inch Carbide End Mill on Mild Steel: A Step-by-Step Guide
Let’s get down to business! Machining mild steel with a 3/16-inch carbide end mill is straightforward if you follow these steps. Safety first, always!
What You’ll Need:
Before you start, gather your tools and safety gear:
- CNC Mill or Manual Milling Machine: Ensure it’s properly set up and in good working order.
- 3/16-Inch Carbide End Mill: Preferably with a 1/2-inch shank for rigidity. A 2-flute is a great starting point.
- Appropriate Collet and Holder: A high-quality collet chuck or end mill holder that matches your machine’s spindle taper and accepts a 1/2-inch shank.
- Workholding Device: Vise, clamps, or fixture to securely hold your workpiece.
- Mild Steel Workpiece: Cleaned and prepared.
- Coolant or Lubricant: Cutting fluid or a mist system is highly recommended for steel.
- Safety Glasses or Face Shield: Absolutely essential.
- Hearing Protection: For noisy operations.
- Shop Rags: For cleanup.
- Measuring Tools: Calipers, edge finder, dial indicator.
Step-by-Step Milling Process:
Let’s say you want to mill a simple slot or pocket in a block of mild steel.
- Set Up Your Machine:
- Ensure your milling machine is clean, and the spindle and ways are lubricated.
- Check that your power feed and speeds are functioning correctly.
- Secure Your Workpiece:
- Place your mild steel workpiece into a sturdy vise.
- Position the vise on the mill table so that the workpiece is parallel to the table travel.
- Tighten the vise jaws firmly, ensuring the workpiece is supported and won’t shift. Use parallels under the workpiece if necessary to provide a flat seating surface and to allow the vise jaws to clamp the full height of the part.
- Install the End Mill:
- Select the correct collet for your 1/2-inch shank end mill and insert it into your collet chuck or holder.
- Insert the 3/16-inch carbide end mill into the collet. Ensure it’s inserted sufficiently deep for secure clamping.
- Tighten the collet nut to securely grip the end mill.
- Mount the collet chuck/holder into the milling machine spindle.
- Zero Your Axes and Find Edges:
- Use your machine’s DRO (Digital Readout) or other positioning tools.
- Find one edge of your workpiece (e.g., the left edge) and zero your X-axis.
- Find another edge (e.g., the front edge) and zero your Y-axis.
- To find the Z-axis zero (your cutting depth reference):
- Mount an edge finder or a similar tool in the spindle.
- Bring the tool down to the top surface of your workpiece and find the edge in X and Y. Once centered, move the spindle down until the edge finder’s indicator aligns with its zero point as it contacts the workpiece surface.
- Alternatively, touch off the spindle directly onto the workpiece surface with a piece of paper or a feeler gauge, and note that Z-value.
- This top surface will be your Z=0 datum for now.
- Set Cutting Parameters:
- Based on the recommendations for your specific end mill and mild steel (refer to manufacturer data or the table below), set your spindle speed and feed rate.
- Calculate your depth of cut. For initial passes, shallower cuts are safer.
Here’s a typical starting point table for a 3/16-inch, 2-flute carbide end mill in mild steel (adjust based on your machine and coolant):
Operation Spindle Speed (RPM) Feed Rate (IPM) Axial Depth of Cut (in) Radial Depth of Cut (in) Notes Slotting/Pocketing (roughing) 3000 – 5000 5 – 10 0.060 – 0.120 ~0.075 (50% of diameter) Use coolant. Take lighter cuts if chattering occurs. Finishing Pass 4000 – 6000 3 – 8 0.010 – 0.020 0.020 – 0.040 Use coolant. Aim for a smooth surface finish. Remember, these are starting points. Listen to your machine and the cut.
- Apply Coolant:
- With the spindle running at your set speed, engage your coolant system. A flood coolant system or a mist system is ideal for steel. If using canned air or manual application, be prepared to reapply frequently.
- Make the First Pass:
-
Approach the workpiece carefully. Bring the rotating end mill down to your programmed Z-axis depth of cut. Ensure the spindle is running before it touches the material.
-
Using either power feed or manual feed (with care!), move the end mill into the material at your set feed rate and direction. For pockets and slots, conventional milling (climbing against the feed direction) is often safer for beginners, though climb milling (feed in the same direction as
-