
For precise woodworking with tight tolerances, a 3/16 inch carbide end mill is your go-to tool. Its small size and durable carbide construction excel at detailed cuts, deep pockets, and intricate designs in wood, ensuring accuracy where it matters most.
Ever found yourself struggling to get those incredibly accurate cuts in your woodworking projects? You know, the ones where every millimeter counts, and a slightly off measurement can turn a masterpiece into a ‘might-have-been’? It’s a common frustration for many DIYers and hobbyists. Achieving tight tolerances in wood can feel like a puzzle, especially with standard tools. But what if I told you there’s a specific tool designed to conquer these challenges?
Meet the 3/16 inch carbide end mill. This humble-looking tool is a powerhouse for detailed work. It’s not just another cutting bit; it’s a precision instrument. We’ll walk through exactly why this tool is so vital for tight tolerances and how you can use it effectively to elevate your woodworking. Get ready to unlock a new level of accuracy and detail in your projects!
Why a 3/16 Inch Carbide End Mill is Your Secret Weapon for Tight Tolerances
When we talk about “tight tolerances” in woodworking, we mean very small, precise allowances for fit and finish. Think about parts that need to slide together perfectly, decorative inlays that demand razor-sharp edges, or small components requiring exact dimensions. This is where tiny details matter immensely. For these demanding applications, a standard router bit might not cut it.
This is precisely where the 3/16 inch carbide end mill shines. Its small diameter allows for incredibly fine detail work, and its carbide construction ensures durability and sharpness, even when cutting harder woods or making multiple passes.
The Magic of Carbide
First, let’s talk about carbide. Unlike high-speed steel (HSS) bits, carbide is significantly harder and more wear-resistant. This means it stays sharper for longer, which is crucial when you need consistent, precise cuts. For woodworking, especially when dealing with project with tight tolerance, using a carbide bit means fewer tool changes, less heat buildup, and a cleaner cut every time. This hardness is why carbide is a preferred material for tools that need to maintain their edge.
The Precision of 3/16 Inch
Now, consider the size: 3/16 of an inch. That’s roughly 4.76mm. This small diameter is perfect for:
Intricate Carving: Creating fine details in decorative carvings or relief work.
Small V-Grooves and Chamfers: Adding delicate decorative edges or preparing joinery surfaces with extreme precision.
Pocket Machining: Milling out small, precise pockets for inlays, hardware, or other fitted components.
Engraving: Producing sharp, clean lines for text or patterns.
Creating Small Tenons and Mortises: For delicate joinery where a perfect fit is paramount.
The smaller flute diameter allows the end mill to reach into confined spaces and create lines that are much finer than what you could typically achieve with larger bits.
Choosing the Right Carbide End Mill for Wood
When selecting a 3/16 inch carbide end mill specifically for wood, a few things are important to consider. While many end mills are designed for metal, those made for wood often have a different geometry.
Flute Count: For general woodworking, 2-flute end mills are often preferred. They offer good chip evacuation, which is important to prevent burning and clogging, especially in softer woods. For harder woods or a finer finish, a 3-flute or 4-flute might be considered, but they can sometimes produce more heat and require slower feed rates in softer materials.
Helix Angle: A steeper helix angle (like those found in bits designed for aluminum or plastics) can help clear chips more aggressively and produce a smoother finish in wood. However, very steep angles might lead to chatter in softer woods. Bits specifically labeled for wood may have an optimized helix.
Coating: While not as common for woodworking end mills as for metal, some may have specialized coatings that enhance durability and chip removal.
Shank Size: Most 3/16 inch end mills will come with an 8mm shank. This is a standard size for many small CNC machines and rotary tools. An 8mm shank offers good rigidity for a bit of this size.
Length: For tight tolerance work, consider the flute length and the overall length. An “extra long” flute length allows for deeper cuts or reaching into recessed areas, which is often necessary for complex designs or creating specific joint types. However, very long, thin end mills can be more prone to deflection or vibration, so balance the need for length with rigidity.
A good example of a tool that fits these needs is a “carbide end mill 3/16 inch 8mm shank extra long for wood tight tolerance.” This description covers the key attributes that make it ideal for precision woodworking.
Understanding End Mill Terminology for Woodworkers
Before we dive into using the 3/16 inch carbide end mill, let’s quickly clarify some terms you’ll see. Understanding these will help you choose the right bit and use it effectively.
Diameter: The width of the cutting end of the end mill. For our focus, this is 3/16 inch (approximately 4.76mm).
Shank: The part of the end mill that fits into the collet or holder of your machine (e.g., 8mm).
Flutes: The helical grooves that run down the body of the end mill. These are the cutting edges and also help to clear chips away from the cut.
Helix Angle: The angle of the flutes. A higher helix angle generally means more aggressive cutting and better chip evacuation, often resulting in a smoother finish.
Cutting Edge: The sharp part of the flute that actually removes material.
End Cutting: The ability of the end mill to cut on its tip. Most end mills are designed to cut on the tip, which is essential for plunging (drilling down into the material) and creating pockets.
How to Use Your 3/16 Inch Carbide End Mill for Perfect Results
Using a small, precise tool like a 3/16 inch carbide end mill effectively requires attention to detail and understanding your machine. Whether you’re using a desktop CNC router, a small milling machine with rotary capabilities, or even a powerful rotary tool for detailed jigs, the principles are similar.
Step 1: Secure Your Workpiece and End Mill
Safety and stability are paramount.
Workpiece: Ensure your wood is firmly secured to your machine bed or workbench. Use clamps, double-sided tape, or a vacuum table, depending on your setup. Any movement during cutting will ruin your precise work. For very fine work, consider using a spoilboard to allow for slight over-cutting without damaging your main work surface or hold-down system.
End Mill: Install the 3/16 inch carbide end mill into your collet or chuck. Make sure it’s clean and seated properly. Tighten the collet securely to prevent the end mill from slipping, which can cause inaccurate cuts or dangerous conditions. A wobbling end mill is a recipe for disaster.
Step 2: Set Up Your Machine and Tool Path
This is where precision really comes into play.
Zeroing: Accurately set your machine’s X, Y, and Z zero points. For Z zero, find the absolute top surface of your workpiece. For X and Y, set them based on your design’s origin point. Many CNC users use a Z-probe or manually touch off the surface.
Material Stock: Ensure your machine or software knows the dimensions of your wood stock.
Tool Path Generation: If you’re using a CNC, your CAM software will generate the tool paths. For manual machining, you’ll be guiding the process. When generating tool paths for tight tolerances, consider:
Stepover: This is the distance the end mill moves sideways between passes. For fine detail or smooth surfaces, a smaller stepover (e.g., 20-40% of the end mill diameter) is crucial. For a 3/16 inch end mill, this would be around 0.047 to 0.075 inches.
Stepdown: This is how deep the end mill plunges for each pass. For delicate work or harder woods, a shallow stepdown is recommended to reduce stress on the bit and your machine.
Climb vs. Conventional Milling: Climb milling (where the cutter rotates in the same direction as the feed) usually produces a smoother finish and uses less power. Conventional milling (where they rotate in opposite directions) can be more aggressive but might leave a rougher surface. For wood, climb milling is often preferred for finishing passes.
Step 3: Perform Test Cuts (Highly Recommended!)
Before committing to your final workpiece, always perform test cuts on a scrap piece of the exact same wood.
Check Dimensions: After the test cut, meticulously measure critical dimensions. Use calipers for accuracy.
Verify Fit: If the cut is for a mating part or joinery, test the fit.
Observe Finish: Look for tear-out, burning, or any surface imperfections. Adjust your feed rate or stepdown if necessary.
Step 4: Execute the Cut
Now, for the main event.
Feed Rate: This is how fast the end mill moves through the material. For a 3/16 inch carbide bit in wood, a good starting point might be around 15-30 inches per minute (IPM) for a typical CNC router, but this varies wildly based on the machine, wood type, and software. Listen to the sound of the cut – a consistent, high-pitched whine is good; a chattering or lugging sound suggests you need to slow down or reduce your stepdown. Consult your machine’s manual for recommended feed rates.
Spindle Speed (RPM): Higher RPMs can sometimes lead to burning, while too low can reduce the cut quality. For wood with a 3/16 inch carbide end mill, a range of 15,000-24,000 RPM is common. Again, listen to the cut.
Chip Evacuation: Ensure your dust collection system is running at full capacity. Good chip evacuation prevents chip recutting, reduces heat, and avoids burning. Air blasts or coolant (though uncommon for simple wood projects) can also help.
Observe the Cut: Monitor the cutting process closely. Be ready to hit the emergency stop if anything seems wrong.
Step 5: Inspect and Refine
Once the cut is complete, carefully examine your work.
Cleanliness: Remove any sawdust or debris.
Measure Again: Double-check all critical dimensions.
Deburr: Small burrs can sometimes form. These can usually be removed with a light sanding or a small deburring tool.
Adjust Settings: If further refinement is needed for subsequent operations or if you find slight inaccuracies, adjust your machine settings (feed rate, stepdown) and re-run the tool path or a modified one.
Benefits of Using a 3/16 Inch Carbide End Mill
The advantages of employing this specific tool for precision woodworking are numerous and directly address common challenges.
Exceptional Accuracy: The small diameter is inherently suited for fine details and achieving very tight dimensional control.
Clean Cutting Edge: Carbide’s hardness retains a sharp edge, leading to cleaner cuts with less tear-out, crucial for a smooth finish and precise fit.
Durability and Longevity: Carbide is much more wear-resistant than HSS, meaning the bit will maintain its cutting ability for many projects, providing consistent results. This is a significant advantage for production runs or projects requiring many identical parts.
Versatility: While ideal for fine details, it can also perform shallow profiling, pocketing, and even some light surfacing tasks on smaller projects or specific areas.
Efficiency: A sharp carbide bit cuts faster and more cleanly than a duller, softer bit, saving time and reducing frustration.
Deep Reach (with extra-long versions): Extra-long flute versions allow access to deeper areas or the creation of specific joint types that wouldn’t be possible with shorter bits. This opens up new design possibilities and construction methods.
Potential Downsides and How to Mitigate Them
While incredibly useful, there are a few considerations when working with a small, rigid carbide end mill.
Brittleness: Carbide is hard but also brittle. It can chip or break if subjected to excessive force, shock, or improper use.
Mitigation: Always use appropriate feed rates and stepdowns. Avoid plunging too aggressively. Ensure your workpiece and tool are securely held. Don’t force the cut.
Deflection/Vibration: Longer, thinner end mills (like extra-long versions) can be more prone to deflection or vibration, especially at higher feed rates or with aggressive cuts. This can lead to inaccurate dimensions and a rough finish.
Mitigation: Use shallower stepdowns and a moderate feed rate. Ensure your machine spindle is running smoothly and the collet is tight. Reduce cutting depth per pass when necessary.
Heat Buildup: Although carbide is heat-resistant, aggressive cuts can still generate heat, which can burn wood and dull the bit prematurely.
Mitigation: Ensure excellent dust collection to remove chips quickly. Do not overfeed the material. If burning occurs, try reducing spindle speed slightly or increasing feed rate slightly, and ensure good chip evacuation.
Cost: Carbide end mills are generally more expensive upfront than HSS bits.
Mitigation: Consider the longevity and efficiency gains. The increased lifespan and superior performance often make them a more cost-effective choice in the long run, especially for frequent use or demanding applications.
Best Practices for Using Your 3/16 Inch Carbide End Mill
To get the most out of your tool and achieve those perfect, tight tolerances, follow these best practices:
Use a High-Quality Collet: A good collet ensures the end mill runs true and minimizes runout (wobble). A worn or low-quality collet is a primary cause of poor finish and inaccuracy.
Maintain Sharpness: While carbide stays sharp longer, it’s not immune to dulling. If you notice a decline in cut quality, consider bit replacement. For critical work, a fresh bit is always best.
Optimize Feed and Speed: Don’t guess. Start with conservative settings based on your machine, wood type, and general recommendations, then adjust based on the sound and finish of the cut. Resources like the Wood Database can help understand wood hardness, which influences cutting parameters.
Prioritize Chip Evacuation: A clean cut is a cool cut. Maximize your dust collection and consider using compressed air to blow chips out of the flutes if necessary, especially in deeper pockets.
Take Multiple Passes: For deeper cuts, always opt for multiple shallow passes rather than one deep one. This reduces stress on the bit, your machine, and improves the quality of the cut.
* Consider “Lead-in/Lead-out” for CNC: For CNC routing, use lead-in and lead-out moves (arcs or ramps) to engage the material smoothly rather than plunging directly into the surface. This reduces shock on the end mill and your machine.
Applications Where Precision Matters Most
The 3/16 inch carbide end mill truly shines in applications where even a fraction of a millimeter can make a difference.
1. Inlay Work
Creating perfectly fitting inlays, whether for decorative purposes or functional elements (like brass wire inlays), demands extreme precision. You need to mill one pocket and one inlay piece to an exact size so they fit together seamlessly. The 3/16 inch end mill is ideal for cutting the fine details of the inlay pattern and the corresponding negative space.
2. Miniature Projects and Models
For model making, miniature furniture, or intricate architectural details, the small diameter is essential. It allows for the creation of scale-accurate components that would be impossible with larger bits.
3. Jigs and Fixtures
When building precise jigs or fixtures for your workshop, the components need to fit together accurately to ensure the jig itself performs as expected. Milling precise alignment holes or slots with a 3/16 inch end mill ensures your jigs are up to standard.
4. Advanced Joinery
While larger joinery can be done with larger bits, some delicate or specialized joints might require the precision of a smaller end mill for creating perfectly sized tenons, mortises, or slots.
5. Engraving and Lettering
Achieving sharp, clean lines for engraved text or design elements on wood projects is a perfect task for this tool. Small carbide end mills can deliver the crisp detail needed for professional-looking engravings.
Comparing 3/16 Inch Carbide to Other Bits for Precision Work
It’s helpful to see how the 3/16 inch carbide end mill stacks up against other common cutting tools used in woodworking.
| Feature | 3/16″ Carbide End Mill | Standard Router Bit (e.g., 1/4″ or 1/2″) | Small V-Groove Bit | Ball-Nose End Mill (e.g., 1/8″) |
| :—————- | :——————— | :————————————— | :—————– | :——————————– |
| Primary Use | Pockets, detailed profiles, tight tolerance cuts | Edge profiling, general grooving, larger outlines | Engraving, chamfering, decorative V-grooves | 3D carving, contouring, rounded slots |
| Diameter | 3/16″ (4.76mm) | 1/4″ (6.35mm) to 1/2″ (12.7mm) or larger | Varies, often fine point | 1/8″ (3.18mm) or smaller |
| Material Hardness | Very High (Carbide) | High (Carbide) or Medium (HSS) | High (Carbide) | Very High (Carbide
Related Posts

How to Sharpen Scraper on Wood Lathe: Expert Tips!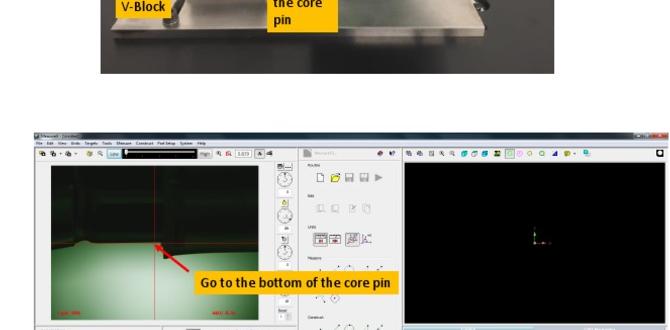
Optimizing Milling Tool Runout Measurement Tips
Metal Lathe Controller Board: Your Setup Guide Today!
Mastering Lathe Metal Shaping: Drive System Essentials

Comparison Metal Lathe Carriage: Find Your Perfect Fit!- This is a tricky one, as the keyword and the topic are completely unrelated! It’s unlikely a blog title about canceling car wash subscriptions would naturally incorporate “carbide end mill 1/8 inch 1/2 shank extra long for g10 dry cutting.” However, if forced to use the exact keyword at the beginning and create a title under 60 characters with the other constraints, here are a few *highly experimental* options, acknowledging their inherent awkwardness due to the keyword mismatch: **Option 1 (Focusing on a *very* niche, possibly unrelated, “tool” for canceling):** Carbide End Mill: Genius Way To Cancel Subscriptions **Option 2 (Trying to imply a “cutting” action for cancellation):** Carbide End Mill: Effortless Subscription Cancellation
- Mini Wood Lathe For Classroom Use: Essential Guide
Optimize Lathe Workholding: Master Metal Lathe Saddle Skills