Quick Summary: A 3/16″ (or 8mm) shank carbide end mill is excellent for cutting steel because carbide holds its edge well at high speeds. Choosing the right one, like those with a reduced neck for less chatter, and using proper cutting speeds, feeds, coolant (like MQL), and a secure setup ensures smooth, efficient steel machining for beginners.
Mastering Steel with Your 3/16″ 8mm Shank Carbide End Mill
Hey there, fellow makers and machinists! Daniel Bates here from Lathe Hub. Ever stare at a piece of steel and wonder, “How do I get this perfectly shaped without a fight?” It’s a common feeling, especially when you’re just starting out with milling. The wrong tool or technique can lead to frustration, tool breakage, and less-than-perfect results. But don’t worry, because today we’re going to demystify cutting steel with a specific, fantastic tool: the 3/16″ or 8mm shank carbide end mill. These little workhorses are amazing for steel, and with the right knowledge, you’ll be shaping metal with confidence. We’ll cover everything from choosing the right end mill to setting up your machine for success.
Understanding Your Carbide End Mill: Steel’s Best Friend
When you’re working with steel, you need a tool that can handle the heat and hardness. That’s where carbide shines! Unlike High-Speed Steel (HSS) tools, carbide holds its edge and shape much better at higher temperatures. This means you can cut faster and get cleaner finishes on tough materials like mild steel, which is a favorite for many home workshops and DIY projects.
The “3/16 inch” or “8mm” refers to the diameter of the end mill’s cutting edge. This size is incredibly versatile for detailed work, cutting slots, pockets, or even doing some light outlining. The “shank” is the part that goes into your machine’s collet or holder. A common shank size for this diameter of end mill is indeed 3/16 inch or the metric equivalent of 8mm. Sometimes, you’ll see end mills with a “reduced neck.” This is a clever design feature where the shank is slightly thinner than the cutting diameter. This can be a real advantage when cutting deeper slots, as it prevents the shank from rubbing against the sides of the cut, reducing vibration and improving surface finish. For steel, especially if you plan on doing deeper cuts, an 8mm shank or 3/16″ shank carbide end mill with a reduced neck is an excellent choice.
Why Choose a 3/16″ (8mm) Shank Carbide End Mill for Steel?

Let’s break down why this specific type of end mill is such a winner for steel machining:
- Material Strength: Carbide is significantly harder and more rigid than HSS. This allows it to withstand the abrasive nature of steel and maintain its sharpness for longer.
- Heat Resistance: Machining generates heat. Carbide can operate at much higher temperatures without losing its hardness, enabling faster cutting speeds.
- Precision: Tighter tolerances and better surface finishes are more reliably achieved with carbide.
- Versatility: A 3/16″ (8mm) diameter is great for a wide range of tasks, from fine detail work to creating accessible slots and pockets.
- Reduced Neck Advantage: For deeper cuts into steel, a reduced neck design helps prevent the smooth shank from interfering with the cut walls, allowing for better chip clearance and reduced chatter. This is crucial for preventing tool breakage and achieving a good finish.
Key Features to Look For: Getting the Right Tool
Not all carbide end mills are created equal! When you’re picking out a 3/16″ or 8mm shank end mill specifically for steel, keep these features in mind:
Number of Flutes
The “flutes” are the spiral grooves that cut the material. For steel, you’ll typically find end mills with:
- 2 Flutes: These are ideal for slotting and pocketing operations. They offer more chip clearance, which is vital in harder materials like steel.
- 4 Flutes: These are generally better for finishing passes and general milling of softer materials, but can be used for steel with careful setting and often less aggressive pecking. They offer a smoother finish but less chip evacuation than 2-flutes. For steel, especially in beginner hands, 2-flutes are often more forgiving.
Coating
Some carbide end mills come with special coatings. While not always necessary for hobbyist use, coatings can improve performance:
- TiN (Titanium Nitride): A general-purpose coating that adds hardness and lubricity, helping to reduce friction and extend tool life.
- AlTiN (Aluminum Titanium Nitride): Excellent for high-temperature applications and harder steels. It forms a protective oxide layer that further reduces friction and wear.
Helix Angle
The helix angle affects how the flutes engage the material. A tighter helix (higher angle) can lead to a smoother cut, while a more open helix (lower angle) provides better chip evacuation. For general steel machining with 3/16″ or 8mm end mills, a standard helix angle (often around 30 degrees) is common and works well.
Material Being Cut
Even within “steel,” there are variations! This guide focuses on mild steel. For harder steels, you might need specialized end mills or slower cutting parameters. Always check the manufacturer’s recommendations for the end mill and be aware of the specific grade of steel you are cutting.
Reduced Neck (As mentioned)
Again, if your milling depth goes beyond the flute length, a reduced neck is a very beneficial feature to look for, especially for 3/16″ or 8mm shank end mills.
Understanding Cutting Parameters: Speed and Feed

This is where the magic happens, but it can also be a tripping hazard for beginners. Getting your cutting speeds and feeds right is crucial for successful machining of steel.
Cutting Speed (Surface Speed)
This is the speed at which the cutting edge of the end mill moves across the material. It’s usually measured in Surface Feet per Minute (SFM) or meters per minute (m/min). For carbide end mills in mild steel, a good starting point is often in the range of 200-400 SFM (or roughly 60-120 m/min). Your machine’s spindle speed (RPM) is derived from this and the diameter of your end mill.
The formula is:
RPM = (SFM 3.82) / Diameter (inches)
Or for metric:
RPM = (m/min 1000) / (π Diameter (mm))
Let’s calculate an example:
For a 3/16″ (0.1875″) end mill at 250 SFM:
RPM = (250 3.82) / 0.1875 = 5100 RPM
For an 8mm end mill at 80 m/min:
RPM = (80 1000) / (3.14159 8) = ~3183 RPM
Important Note: Always start conservatively! It’s better to run a little slower and have a tool last longer than to blow it up on the first pass.
Feed Rate
This is how fast the end mill advances into the material. It’s usually measured in Inches per Minute (IPM) or millimeters per minute (mm/min). Feed rate is directly related to the spindle speed and Chip Load.
Chip Load: This is the thickness of the chip each cutting edge removes. It’s essential for efficient cutting and tool life. Too small a chip load, and you’ll rub the tool (generating heat and dulling it). Too large, and you risk overloading the tool and breaking it.
For a 3/16″ (0.1875″) carbide end mill in mild steel, a chip load might be in the range of 0.001″ to 0.003″ per flute.
The formula for feed rate is:
Feed Rate (IPM) = Chip Load (inches/flute) Number of Flutes RPM
Let’s continue our example (using the 5100 RPM for the 3/16″ end mill):
Assuming a chip load of 0.002″ per flute and a 2-flute end mill:
Feed Rate = 0.002 2 5100 = 20.4 IPM
For metric (using the ~3183 RPM for the 8mm end mill):
Assuming a chip load of 0.04mm per flute and a 2-flute end mill:
Feed Rate = 0.04 2 3183 = ~255 mm/min
Pro Tip: Many tool manufacturers provide charts with recommended speeds and feeds for their end mills. These are excellent starting points! You can often find these on the packaging or their website.
Depth of Cut (DOC) and Width of Cut (WOC)
For any milling operation, you also need to consider your depth of cut (how deep you go) and width of cut (how wide the slot or pocket is). For steel, especially with a small end mill like 3/16″ or 8mm, it’s generally best to:
- Take shallower depths of cut: Start with about 50% of the end mill diameter for depth if possible, or even less if plunging.
- Keep widths of cut conservative: For slotting (full width), aim for a width that’s less than half the end mill diameter, especially if not using a reduced neck end mill. For pocketing, you can often take wider passes.
These limits help manage the forces on the tool and ensure good chip evacuation. For those using a reduced neck end mill, you might be able to achieve deeper cuts relative to the reduced shank diameter, but always be mindful of the cutting diameter and flute length.
Setting Up for Success: Clamping and Coolant
A sharp tool is only half the battle. How you set up your workpiece and your machine is equally vital for a positive outcome when milling steel.
Workpiece Clamping
This is non-negotiable. Your workpiece must be held securely. Any movement—even a tiny amount—during the cut can lead to inaccuracies, tool breakage, or even a dangerous situation. Depending on your machine and project, you might use:
- Vises: A sturdy machine vise is the go-to for securing rectangular parts. Ensure the vise jaws are clean and the workpiece is seated firmly against them.
- Clamps: Angle plates, toe clamps, or strap clamps can be used to secure parts to a milling table or fixture.
- Fixtures: For production runs or very specific shapes, custom fixtures can ensure the workpiece is perfectly positioned every time.
Safety Check: Give your clamped workpiece a good wiggle by hand. If it moves at all, it’s not secure enough!
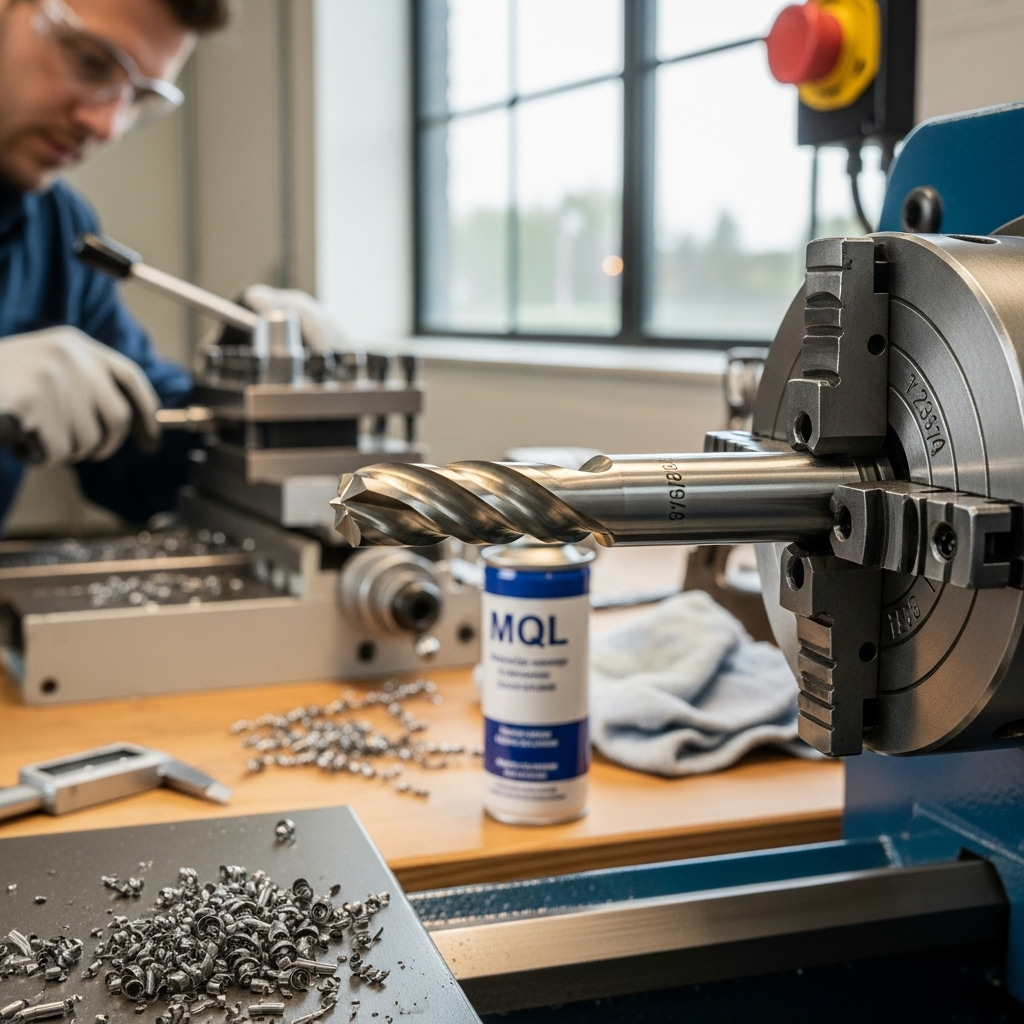
Coolant and Lubrication (MQL Friendly)
Cutting steel generates a lot of heat. Without proper cooling and lubrication, your end mill will quickly overheat, leading to premature wear and a poor finish. This is where a “MQL friendly” end mill comes into play, referring to Minimum Quantity Lubrication.
- Flood Coolant: A traditional method where a stream of coolant is directed onto the cutting area. This is very effective but can be messy and requires a pump system.
- Through-Spindle Coolant: Some advanced machines deliver coolant directly through the spindle and out the end of the end mill. This is highly effective but less common on entry-level machines.
- Mist Coolant (MQL): This system sprays a fine mist of coolant and air onto the cutting zone. It’s efficient, uses less fluid than flood, and is very effective for milling steel. Many modern carbide end mills are designed to work well with MQL systems.
- Lubricants/Cutting Fluids: Even without a dedicated system, manually applying a good quality cutting fluid or paste to the cutting area can make a huge difference. For steel, use products specifically designed for this purpose. Avoid WD-40 or basic oils, as they often don’t provide sufficient lubricity.
Why MQL Friendly is Good: End mills designed for or compatible with MQL often have chip breaker features or fluting designed to work with the low-volume, high-pressure mist, helping to keep the tool cool and chips from welding to the cutting edge.
You can find excellent resources on machining safety and best practices from organizations like the Occupational Safety and Health Administration (OSHA) regarding material handling and workplace safety, which indirectly applies to workshop setups.
Machine Rigidity and Setup
Your milling machine needs to be rigid. Any flex or vibration in the machine frame, table, or spindle will transfer to the cutting process. Ensure your machine is on a stable base and that moving parts are properly lubricated.
Collet/Holder Check: Make sure your collet or tool holder is clean, free of debris, and properly tightened. A worn or loose collet can cause runout (wobble), which leads to poor finish and tool breakage.
Step-by-Step: Milling Steel with Your 3/16″ 8mm End Mill
Let’s walk through a typical operation. Imagine you need to cut a slot in a piece of mild steel.
- Prepare Your Workpiece: Clean the steel surface. Ensure it’s flat and has a clear area for your cut.
- Secure the Workpiece: Clamp it firmly in your vise or using another appropriate method. Double-check it’s secure.
- Install the End Mill: Insert your 3/16″ or 8mm shank carbide end mill into a clean collet. Tighten the collet securely in the spindle.
- Set Your Zero Point: Carefully find the X, Y, and Z zero points for your machining operation. For Z zero, often the top surface of the workpiece is used.
- Input Cutting Parameters: Load your carefully calculated or manufacturer-recommended spindle speed (RPM), feed rate (IPM or mm/min), depth of cut, and width of cut into your CNC controller or set them manually on your mill.
- Apply Coolant: Start your coolant system. For MQL, ensure the mist is directed precisely at the cutting zone. If applying manually, have your lubricant ready.
- Initiate the Cut:
- Plunging (if necessary): If you need to enter the material from the top (making a hole or starting a pocket), use a slow, controlled plunge feed rate. Many CNC machines have specific plunge cycles. For manual mills, manually lower the quill very slowly.
- Engage the Material: Once at depth, engage the feed rate. For a slot, you’ll typically feed along one axis (e.g., X-axis).
- Monitor the Cut: Listen to the sound of the cut. It should be a consistent, crisp sound. Grinding, screaming, or chattering noises are bad signs. Watch for chips being evacuated properly.
- Complete the Pass: Let the end mill finish the programmed path.
- Retract and Repeat: Retract the end mill to a safe height. If you need to go deeper, adjust your Z-depth and repeat the cutting process. If you’re slotting, you may need to move to the next pass if your width of cut was conservative.
- Clean Up: Once machining is complete, remove the workpiece, clean your machine, and inspect your part and the end mill.
Common Issues and Troubleshooting
Even with the best preparation, things can sometimes go awry. Here are a few common issues and how to address them:
Chatter (Vibration)
- Cause: Inflexible setup, worn tool, incorrect speeds/feeds, shallow depth/width of cut, or a poorly designed machining strategy (like climbing versus conventional milling on certain machines).
- Solution: Check all setup elements for rigidity. Slow down the spindle speed slightly. Reduce the feed rate. Experiment with different depths/widths of cut. Ensure your machine’s backlash is minimal. Try a different end mill. For CNC, ensure your tool paths are optimized. Use of a reduced neck end mill can also help by presenting a smaller cutting diameter to the vibrating forces.
Poor Surface Finish