Transform your mild steel projects with a carbide end mill. This guide simplifies using a carbide end mill for effortless mild steel machining, ensuring impressive results even for beginners. Learn setup, cutting techniques, and tips for a smooth, professional finish.
Hey there, fellow makers! Daniel Bates, over from Lathe Hub, here. Ever felt like machining mild steel with an end mill is a wrestling match? You’re not alone. Many beginners find it tricky to get clean cuts without chatter, tool wear, or frustration. But what if I told you there’s a way to make it… dare I say, easy? It all comes down to having the right tool and knowing how to use it. We’re going to dive into how a carbide end mill, the right kind, can make machining mild steel feel almost effortless. Stick around, and I’ll show you exactly how to achieve those smooth, professional finishes you’ve been dreaming of!
Why Carbide is a Machining Game-Changer for Mild Steel
When you’re starting out in machining, choosing the right cutting tool can feel overwhelming. There are so many options! However, for mild steel, carbide end mills stand out. Why? Well, let’s break it down in simple terms.
Mild steel, while not as tough as some other metals, can still give softer tools a real run for their money. Tools made from high-speed steel (HSS) are good, but they can soften up quickly when you’re cutting at higher speeds or with deeper cuts. This leads to dull tools and rough finishes on your workpiece.
Carbide, on the other hand, is incredibly hard and can handle much higher temperatures. This means a carbide end mill can cut faster and last longer, even when tackling mild steel. It’s like switching from a butter knife to a chef’s knife – suddenly, slicing through the material becomes a whole lot cleaner and more efficient.
The Solid Benefits of Using Carbide for Mild Steel
There are several compelling reasons why a carbide end mill is the go-to choice for machining mild steel, especially for beginners looking for reliable results:
Superior Hardness: Carbide is significantly harder than HSS. This means it resists wear and maintains its sharp edge for much longer, even under demanding conditions.
High-Temperature Resistance: It can withstand higher cutting temperatures without losing its hardness. This allows for faster cutting speeds, which can drastically reduce machining time.
Better Surface Finish: Because carbide stays sharper for longer, it tends to produce a smoother, cleaner surface finish on your mild steel parts. Less chatter, fewer burrs – just cleaner cuts.
Increased Productivity: The ability to cut faster and the longer tool life mean you can get more parts done in less time. This is a huge plus for any workshop, big or small.
Versatility: While we’re focusing on mild steel, carbide end mills are also capable of machining a wide range of other materials.
It’s this combination of toughness and heat resistance that makes them ideal for making mild steel machining feel less like a battle and more like a precise operation.
Choosing the Right Carbide End Mill for Mild Steel
Not all carbide end mills are created equal, and picking the right one for mild steel is key to achieving that “effortless” feel. For beginners, focusing on a few key features will make your life much easier.
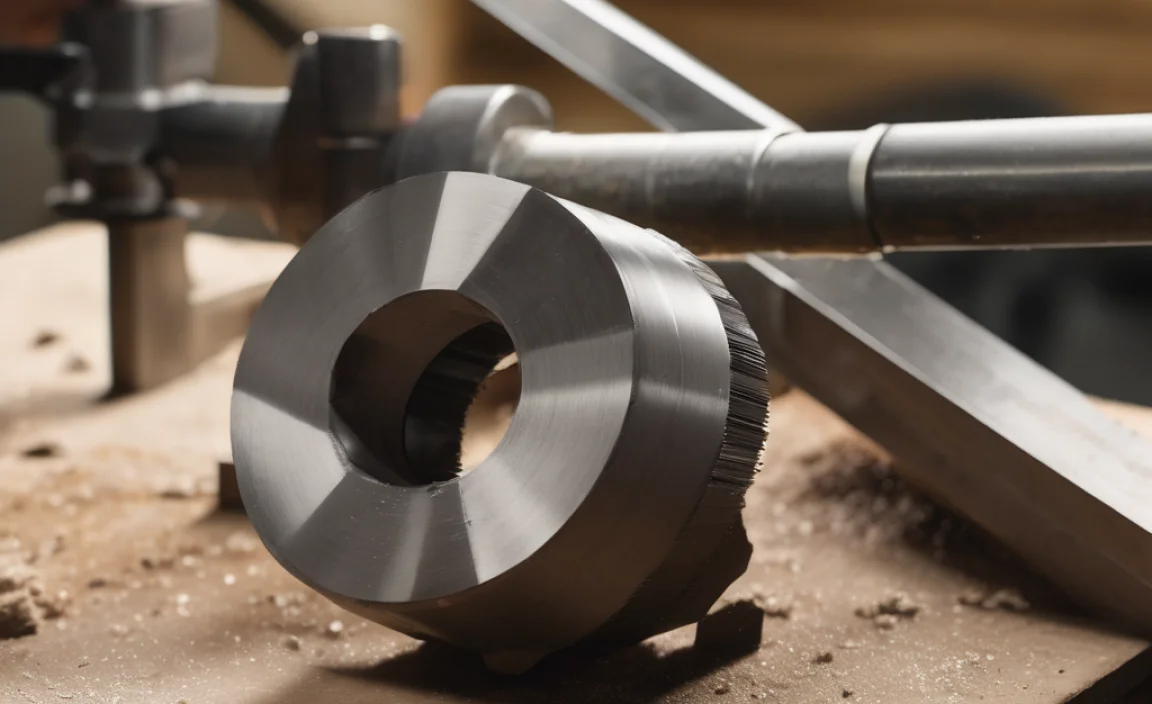
The most common type you’ll see is a two-flute (or two-cutting edge) end mill. These are fantastic for general-purpose milling in softer materials like mild steel. The extra chip clearance between the two flutes helps prevent chips from packing up in the cut, which is a common problem that can lead to tool breakage or poor finishes.
When you’re looking at specific end mills, you might see terms like “reduced neck.” What does that mean, and why is it helpful for mild steel? A reduced neck means the shank (the part that goes into your collet or holder) is slightly larger in diameter than the cutting flutes. This design helps prevent the tool from crashing into the workpiece if you need to machine deep pockets or slots without hitting the side walls. It’s a subtle feature, but it adds a layer of protection and flexibility.
“Carbide end mill 3/16 inch 8mm shank reduced neck for mild steel mql friendly“ – Let’s break this down.
Carbide End Mill: We know what this is – our workhorse!
3/16 inch: This refers to the diameter of the cutting flutes. It’s a versatile size for many common tasks.
8mm Shank: This is the diameter of the part that goes into your tool holder (often a collet chuck on a CNC or R8 collet on a manual mill). It’s a standard size.
Reduced Neck: As discussed, this provides extra clearance in deeper cuts.
MQL Friendly: This stands for Minimum Quantity Lubrication. It means the end mill is designed to work well with a mist coolant system, which is a very efficient way to cool and lubricate the cutting zone without flooding your machine. We’ll touch on coolant later!
For mild steel, aim for an uncoated carbide end mill. While coatings can be great for other materials or tougher steels, they can sometimes create more friction with mild steel and aren’t always necessary for this application. A good edge preparation (a slight chamfer or radius on the cutting edges) also helps in preventing chipping.
Setting Up Your Machine for Success
Getting your machine ready is just as important as choosing the tool. Even with the best carbide end mill, improper setup can lead to disappointing results. Here’s what you need to focus on:
1. Secure Your Workpiece Like a Pro
This is paramount for safety and accuracy. Your mild steel workpiece needs to be held firmly and without any chance of shifting.
Vise: For most beginner setups, a good quality milling vise is your best friend. Ensure it’s clean, the jaws are in good condition, and it’s securely bolted to your machine table. Always orient the vise so the clamping force is pulling the jaws closed, not pushing them outwards.
Clamps: If you’re machining a larger or irregularly shaped part, use clamps. Make sure the clamps are positioned to push the workpiece down and sideways into a solid stop, like the vise jaw or parallels. Never rely on just one clamp.
Parallels: Use parallels under your workpiece when clamping in a vise. This lifts the part slightly off the vise jaws, allowing the vise jaws to get a better grip and preventing them from hitting the table when you’re milling close to the vise. It also helps keep your milling operation from plunging into the vise itself.
2. Mount the End Mill Correctly
A secure tool holder is vital.
Collets/Holders: Use a clean collet or tool holder for your end mill. Any dirt or debris can cause imbalanced rotation (runout), leading to poor finish, chatter, and potential tool breakage. For an 8mm shank, you’ll need an 8mm collet.
Depth: Make sure the end mill is inserted deeply enough into the collet to provide good support, but not so deep that the flutes are obscured. Typically, you want about half to two-thirds of the shank held by the collet.
Torque: If using a milling chuck or collet system that requires tightening, ensure you tighten it sufficiently according to the manufacturer’s instructions. A loose end mill is incredibly dangerous.
3. Coolant and Lubrication: Your Cutting Zone’s Best Friend
Machining creates heat. For mild steel and carbide, managing this heat is crucial for tool life and finish.
MQL (Minimum Quantity Lubrication): If your end mill is MQL friendly, this is ideal. An MQL system delivers a fine mist of cutting fluid directly to the cutting zone. It cools the tool and workpiece, lubricates the cut, and helps evacuate chips. Many CNC machines can be fitted with MQL systems.
Flood Coolant: A more traditional method where a stream of coolant floods the cutting area. It’s very effective but can make a mess.
Sprays/Pastes: For manual machines or smaller operations, aerosol spray lubricants or lubricating pastes are good alternatives. Apply them directly to the cutting area as the tool begins to cut.
No Coolant? If you absolutely cannot use any coolant, you’ll need to slow down your cutting speeds and take lighter passes to prevent the tool from overheating. This will significantly reduce tool life and may compromise your finish.
External Resource: Learn more about the importance of coolant in machining from authoritative sources like Machinery’s Handbook (while not a direct environmental link due to its nature, it’s the definitive guide for machinists). Reputable machining supply sites like MSC Industrial Supply often have educational resources on tool selection and usage as well.
The Art of Cutting: Speeds, Feeds, and Techniques
This is where the magic happens! Knowing the right cutting parameters and how to approach the material will make all the difference.
Understanding Spindle Speed (RPM) and Feed Rate
Spindle Speed (RPM): This is how fast your end mill spins. For carbide on mild steel, you can generally run faster than with HSS. A good starting point for a 3/16″ carbide end mill on mild steel is often in the range of 9,000 to 15,000 RPM. However, this can vary based on the specific carbide grade, the milling machine’s rigidity, and whether you’re using coolant.
Feed Rate (IPM or mm/min): This is how fast the end mill advances into or through the material. It’s also often expressed as “chip load” – the thickness of the chip each cutting edge removes. For mild steel, you want a feed rate that’s fast enough to create a proper chip, not a rub. A good starting chip load for a 3/16″ carbide end mill might be around 0.001″ to 0.003″ per tooth.
Calculation Example: If your end mill has 2 flutes, you’re spinning at 10,000 RPM, and your desired chip load is 0.002″ per tooth, your feed rate would be: 2 flutes/revolution 10,000 RPM 0.002″/tooth = 40 inches per minute (40 IPM).
Key Milling Techniques for Smooth Cuts
Climb Milling vs. Conventional Milling:
Climb Milling: The tool rotates in the same direction as its feed into the material. This generally produces a better surface finish and puts less force on the tool. It’s often preferred for aluminum and mild steels when rigidity allows. The chips are cleared away from the cutting edge.
Conventional Milling: The tool rotates against the direction of its feed into the material. This creates more friction and tends to push the tool upward if not held down very securely. It can be more forgiving on very rigid machines or when dealing with backlash, but climb milling is generally better for achieving that “effortless” feel on mild steel.
For Beginners: If your machine has minimal backlash (play in the gears or screws), try climb milling. Your machine’s controller or manual likely has settings for this.
Stepover: This is how much you overlap your cutting passes when milling a wider surface or pocket. For a good finish, a smaller stepover (e.g., 20-40% of the tool diameter) is better than a large one.
Depth of Cut (DOC): Don’t try to take too much material off in a single pass.
Slotting: When milling a slot the full diameter of the end mill, the depth of cut should generally be no more than about 0.5 to 1 times the tool diameter.
Pocketing/Profiling: When milling around the outside of a part or into a pocket, you can often take a deeper cut, perhaps 1 to 2 times the tool diameter.
Always err on the side of caution: If you’re unsure, take lighter cuts. It’s better to do a few extra passes than to break your tool or damage your workpiece.
How to Ramp and Plunge
Ramping: Instead of plunging straight down, a ramp move is an angled entry into the material. This is much easier on the tool and produces less heat and wear. Many CAM software packages will automatically generate ramp moves for pockets. If you’re doing it manually, try to feed the tool into the material at a 45-degree angle or less.
Plunging: If you must plunge straight down, do so slowly. Use a feed rate that is significantly slower (often 10-25% of your typical feed rate) than your cutting feed rate. This reduces the force on the end of the tool. Some end mills are specifically designed for plunging, but it’s always a stress point for the tool.
Troubleshooting Common Mild Steel Machining Issues
Even with the right tools, things can sometimes go sideways. Here’s how to fix common problems:
The Dreaded Chatter
Chatter is that annoying vibration that creates a noisy, wavy surface finish. It’s often caused by:
Tooling: A dull end mill, a tool not held securely, or tool runout.
Machine Rigidity: A machine that isn’t stiff enough to handle the cutting forces.
Cutting Parameters: Incorrect speeds and feeds. Too fast a feed, or a depth of cut that’s too large for the tool’s rigidity.
Workholding: A loose workpiece or a flexible fixture.
Solution:
Ensure your end mill is sharp and securely held.
Check for runout in your spindle and tool holder.
Try a slightly higher spindle speed or a slower feed rate.
Reduce your depth of cut.
If on a CNC, experiment with entry/exit strategies like ramping.
Make sure your workpiece is clamped very securely.
Poor Surface Finish (Scalloping or Roughness)
This is often a symptom of other issues:
Tool Wear: The end mill is becoming dull.
Feed Marks: Taking too large a stepover.
Chip Recutting: Chips are getting stuck in the flutes and being re-cut, leading to a rough surface. This is common when not using enough coolant or if flute space is too small.
Solution:
Use a fresh, sharp end mill.
Reduce your stepover percentage.
Ensure adequate chip evacuation and cooling.
Try climb milling.
Tool Breakage
This is the most frustrating and potentially costly problem. It usually stems from:
Incorrect Parameters: Trying to take too deep a cut or feed too fast.
Chip Packing: Chips filling the flutes, causing the tool to bind.
Workpiece Movement: The part shifts in the vise during the cut.
Tool Deflection: The tool bends under cutting forces, leading to a deeper cut than intended by the machine, then snapping. This is more common with smaller diameter end mills.
Solution:
Always start with conservative speeds and feeds.
Ensure excellent chip evacuation and cooling.
Ramp into parts when possible.
Use a rigid setup for both the workpiece and the tool.
Consider a slightly larger diameter end mill if deflection is an issue for your part geometry.
Maintaining Your Carbide End Mill for Longevity
Even carbide end mills don’t last forever. Proper care will extend their life significantly.
Think of your carbide end mill like a precision tool that needs respect. They aren’t disposable, but they aren’t meant to last an eternity without maintenance or mindful use.
Cleaning is Key
After each use, give your end mill a thorough cleaning.
Deburr: Gently remove any aluminum or steel fragments that might be stuck on the cutting edges or in the flutes. A small brass brush or a wooden pick usually works well.
Wash: Use a degreaser or solvent to remove any cutting fluid residue, chips, or oils. This prevents corrosion and ensures the tool is ready for its next job.
Inspect: While cleaning, take a moment to visually inspect the cutting edges for any signs of wear, chipping, or dullness. If you see significant damage, it might be time to consider replacing it.
When to Replace Your End Mill
Knowing when a tool has reached the end of its usable life is important for consistent results and preventing failures.
Visible Wear: Look for wear land on the cutting edge – this appears as a shiny or flattened band along the edge of the flute.
Edge Chipping: Small pieces breaking off the cutting edge.
Loss of Sharpness: If you find yourself needing to increase the feed rate significantly just to get a clean cut, or if you experience increased chatter, it might be time for a new tool.
* Consistent Poor Finish: If you can’t achieve a good surface finish even after trying different parameters, the tool is likely worn out.
For basic machining tasks on mild steel, a good quality carbide end mill can often machine dozens or even hundreds of parts before needing replacement, especially with proper lubrication and care.
Best Practices Summary Table
Here’s a quick-reference table to keep the key takeaways in mind:
| Aspect | Recommendation for Mild Steel with Carbide End Mill | Why it Matters |
|---|---|---|
| End Mill Type | 2-flute, uncoated carbide (e.g., 3/16″ with 8mm
Related Posts |