Yes, you can easily extend your wood lathe’s bed! A DIY wood lathe bed extension is a smart, budget-friendly solution to turn longer pieces of wood. This guide shows you step-by-step how to build a sturdy and reliable extension, expanding your turning possibilities without buying a new lathe.
Ever dreamed of turning a grand, sweeping floor lamp base or a lengthy, elegant table leg? Sometimes, your trusty wood lathe just doesn’t have enough reach. The frustration of hitting the length limit on your workpiece can be a real creativity killer. But don’t let that stop you! You don’t need to shell out for a brand-new, longer lathe. There’s a clever, surprisingly simple DIY solution: a wood lathe bed extension. This guide will walk you through building one, step-by-step, so you can tackle those ambitious projects with confidence. We’ll cover everything from design to final assembly, making this project achievable even for beginners.
Why Extend Your Wood Lathe Bed?
There are several compelling reasons why a DIY wood lathe bed extension is a brilliant addition to your workshop. The primary driver is almost always capacity.
Your current lathe is fantastic for many projects, but sometimes a specific piece of wood is just a little too long. This can happen with things like:
- Long, turned table legs
- Chandelier arms or large decorative elements
- Oversized bowls or platters that require a longer blank
- Mirror or picture frames
- Sculptural pieces
Instead of cutting your wood down to fit, or worse, giving up on the project, a bed extension solves this problem elegantly. It essentially adds more usable length between your lathe’s headstock and tailstock.
Beyond just length, a bed extension can:
- Save Money: Building your own extension is significantly cheaper than purchasing a larger lathe.
- Increase Versatility: It makes your existing lathe a more adaptable tool, capable of a wider range of projects.
- Customization: You can build it to perfectly match your needs and available space.
- Learning Opportunity: It’s a great woodworking and basic fabrication project that enhances your shop skills.
Designing Your DIY Wood Lathe Bed Extension
A good design is key to a successful and safe extension. The goal is to create a rigid, stable structure that supports your workpiece and doesn’t introduce wobble or vibration.
Here are some key design considerations:
- Rigidity: This is paramount. The extension needs to be as sturdy as your lathe’s original bed. Any flex will lead to vibration, poor cuts, and potential safety hazards.
- Material: Steel is the preferred material for a truly rigid extension, especially for heavier lathes. However, a well-constructed hardwood extension can work for smaller, lighter-duty lathes. We’ll focus on a steel design as it offers the best performance.
- Attachment Method: How will it connect to your lathe? This needs to be secure and repeatable. Many DIY extensions bolt onto the existing lathe bed or use a clamping system.
- Length: How much extra length do you realistically need? More length can mean the structure is less rigid or requires more support.
- Tool Rest Support: Your tool rest needs to be able to move along the extension. Some designs incorporate a way to attach a secondary tool rest mount, or you might rely on clamps to hold the original rest if your lathe allows.
A common and effective design involves creating a steel “bed” that mirrors the profile of your lathe’s original bed and then connects to it securely. This steel bed is typically made from angle iron or square tubing, often with a flat steel plate on top for mounting.
Basic Design Concepts
Let’s consider a common approach using steel angle iron. This design aims to create a strong, box-like structure that slides onto or bolts to your existing lathe bed.
Components you might consider:
- Main Beams: Two parallel pieces of steel angle iron or square tubing that run the length of your extension.
- Cross Braces: Pieces connecting the main beams at intervals to add rigidity and provide mounting points.
- Attachment Plate/Brackets: A sturdy piece of steel plate or custom brackets that securely fasten the extension to your lathe’s bed.
- Tool Rest Mount: A way to support your tool rest. This could be a simple flat bar, a section of square tubing designed to accept your lathe’s tool rest post, or even a separate stand.
For this guide, we’ll detail a very common and effective DIY method using steel angle iron, designed to bolt securely to the outfeed side of a typical metal lathe bed, often found in smaller workshops. This method assumes your lathe bed has mounting holes or a profile that allows for a sturdy attachment.
Gathering Your Materials and Tools
Before you start cutting and welding (or bolting), gathering all your supplies is crucial. This ensures a smooth workflow and prevents frustrating interruptions.
Materials List:
- Steel Angle Iron: Choose a sturdy size, such as 1.5″ x 1.5″ x 1/8″ or 2″ x 2″ x 3/16″. The exact size depends on your lathe’s weight and the desired rigidity. You’ll need enough for two main rails and cross braces. Check the length of your existing lathe bed to determine how long you want your extension to be, and add a foot or two for good measure.
- Steel Flat Bar or Plate: About 3/16″ to 1/4″ thick. This will be used for the top surface where your tool rest will sit and potentially for mounting brackets.
- Steel Square Tubing (Optional): If your lathe’s tool rest post fits into square tubing, you’ll need a section of mild steel square tubing that matches.
- Bolts, Nuts, and Washers: High-strength steel bolts (e.g., Grade 5 or Grade 8) with corresponding nuts and lock washers. The size and length will depend on your lathe’s mounting holes and your design.
- Welding Rods/Wire: If you plan to weld.
- Paint/Primer: For rust protection after fabrication.
Essential Tools:
- Measuring Tape and Marking Tools: Steel ruler, scriber, chalk or permanent marker.
- Safety Gear: Safety glasses, hearing protection, welding helmet (if welding), sturdy work gloves, steel-toed boots. Never compromise on safety.
- Cutting Tools:
- Metal Cutting Saw: An abrasive chop saw, a horizontal bandsaw, or even a good quality angle grinder with cutting discs.
- Angle Grinder: For cleaning up edges, grinding welds, and fitting parts.
- Drilling Tools:
- Drill Press: Highly recommended for accurately drilling mounting holes in the steel.
- Metal Drill Bits: Various sizes for your bolt holes. Cobalt or titanium-coated bits are best for steel.
- Center Punch.
- Joining Tools:
- Welder: MIG or Stick welder if you are welding your components together.
- Clamps: Various C-clamps, bar clamps, or even specialized welding clamps to hold pieces securely during assembly and welding.
- Fastening Tools: Wrenches and socket set to match your bolts.
- Files: Metal files for deburring edges.
Important Note on Welding: If you’re not comfortable with welding, you can adapt this design to be fully bolted. This would involve fabricating more complex joint designs, potentially using flat plates and gussets, and ensuring all connections are extremely robust. For maximum rigidity and ease of construction if you’re equipped, welding is often preferred.
Step-by-Step: Building Your Wood Lathe Bed Extension
This guide outlines a robust steel bed extension that attaches to the side of your lathe. Always measure your specific lathe bed and its mounting points carefully before cutting.
Step 1: Measure Your Lathe and Plan the Attachment
This is the most critical step. You need to understand how your lathe bed is constructed and where you can securely attach the extension.
- Examine your lathe bed: Look for existing mounting holes, or identify a strong, flat surface where you can drill and tap new holes, or use U-bolts/clamps.
- Measure the bed’s profile: Note the height and width of the bed’s mounting surface.
- Determine alignment: The extension’s main rails must be perfectly parallel to your lathe’s ways (the guides the carriage moves on).
- Sketch your design: Draw a detailed plan including dimensions for the angle iron pieces, cross braces, and attachment brackets.
A common attachment method for many metal lathes involves bolting to bosses or through holes on the side of the bed. For example, if your lathe bed has a .375″ (or 3/8″) bolt hole pattern every 8 inches, you can design your extension to align with these.
Example Measurement Scenario:
Imagine your lathe bed has mounting holes spaced every 10 inches, 1.5 inches down from the top surface. You want an extension that adds 36 inches of length. You’ll need to design a support structure that aligns over these holes and provides a new, parallel bed surface at the correct height.
Step 2: Cut Your Steel Components
Using your chosen cutting tool (bandsaw, chop saw, or angle grinder), carefully cut all your steel pieces according to your plan. Accuracy here makes assembly much easier.
- Cut the two main angle iron rails to your desired total length (e.g., 36 inches).
- Cut your cross braces. These will typically be the width of your lathe bed plus the width of the outer angle iron rail, or designed to fit snugly between the two main rails.
- Cut any flat bar or plate pieces for your tool rest mount.
- Cut the pieces for your attachment brackets. These might be L-shaped brackets or simple plates designed to bridge your lathe bed and the new extension.
Tip: Deburr all cut edges with an angle grinder or file to remove sharp burrs. This is a safety necessity and ensures better fits.
Step 3: Fabricate the Main Extension Bed Structure
This is where your extension starts to take shape. We’ll build a basic rectangular frame first.
- Position the main rails: Lay your two main angle iron rails parallel to each other.
- Attach cross braces: Place your cross braces between the main rails at appropriate intervals. The number of cross braces depends on the length of your extension; usually, one near each end and one or two in the middle is sufficient for rigidity. Ensure the angle faces inwards or outwards consistently for a clean look and ease of attachment.
- Weld or Bolt the Frame:
- If Welding: Clamp the cross braces securely to the main rails. Weld all joints. Ensure strong, full penetration welds. You can weld from the inside or outside, or both for maximum strength.
- If Bolting: This requires more intricate fabrication. You might need to create overlapping joints with multiple bolt holes or use flat plates on the outside/inside of the joints to secure the angle iron together. Use at least two bolts per joint with lock washers.
The result should be a rigid, rectangular frame made from angle iron.
Example Frame Construction (Welded):
Two 36″ lengths of 2″x2″x1/8″ angle iron, spaced 6″ apart (outside to outside), with three 4″ cross braces (also 2″x2″x1/8″ angle iron) connecting them internally, one at each end and one in the middle. All welded securely.
Step 4: Create the Tool Rest Surface
Your tool rest needs a stable platform. A flat steel plate mounted on top of the angle iron frame works well.
- Measure and Cut: Cut a piece of steel flat bar or plate to span the top of your angle iron frame. It should be wide enough to comfortably accommodate your tool rest base. A width of 3-4 inches is usually good.
- Attach to Frame:
- If Welding: Position the flat bar centered on top of the angle iron frame and weld it in place along its full length on both sides.
- If Bolting: You’ll need to drill holes through the flat bar and the top flange of your angle iron frame. Use at least two bolts per segment of the flat bar for security. Lock washers are essential here.
Optional: Tool Rest Post Mount: If your lathe has a specific tool rest post, you might need to mount a piece of matching square tubing to the flat bar surface. Measure the size of your post and weld or bolt a corresponding section of square tubing onto the flat bar, ensuring it’s oriented correctly.
Step 5: Fabricate and Attach Mounting Brackets
This is how your extension connects to your lathe. This part is highly specific to your lathe model.
- Design Brackets: Based on your Step 1 measurements, create brackets that will bridge the gap between your lathe bed and the main extension structure. These could be simple L-shaped brackets welded to the extension frame, or separate pieces that bolt to both the lathe and the extension.
- Drill Mounting Holes:
- If your lathe has pre-drilled mounting holes, transfer these locations to your brackets. Drill accurately.
- If you are creating new mounting points on your lathe bed (use caution and consult your lathe’s manual or manufacturer), drill and tap holes. Alternatively, use U-bolts around the lathe bed if your design allows.
- Attach Brackets: Securely bolt the mounting brackets to your lathe bed. Then, attach the extension frame to these brackets. Use strong bolts, nuts, and plenty of lock washers.
Key Principle: The connection must be absolutely rigid. There should be no play or movement between the lathe bed and the extension.
For example: If your lathe bed has two 3/8″ holes on the side, spaced 10 inches apart, you might fabricate two steel L-brackets. Each L-bracket would have one leg welded to the side of your angle iron extension and the other leg extending towards the lathe. This second leg would have two 3/8″ holes to bolt to your lathe. Then, you’d align this entire assembly and through-bolt your extension to the lathe.
Step 6: Align and Secure
With the extension loosely attached, carefully align it to ensure the tool rest surface is perfectly parallel to your lathe’s ways.
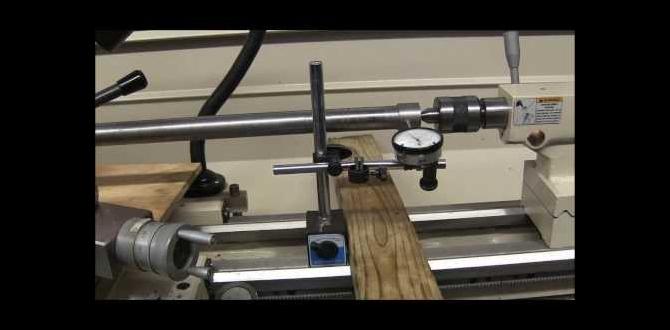
- Check Parallelism: Use a dial indicator or a straight edge to check that the tool rest surface of the extension is parallel to the lathe’s main ways. Adjust as needed.
- Tighten All Fasteners: Once perfectly aligned, thoroughly tighten all bolts on the mounting brackets and for the main frame if you bolted it.
- Test Fit Tool Rest: Mount your tool rest and check its movement along the entire length of the extension. Ensure it slides smoothly and locks securely.
Step 7: Finishing Touches
Protect your work and make it look great!
- Clean the Surface: Wipe down the entire structure to remove metal dust and grease.
- Prime and Paint: Apply a good quality metal primer, followed by one or two coats of durable metal paint (e.g., satin or gloss black). This will prevent rust and give your extension a professional look.
- Allow to Cure: Let the paint fully cure before subjecting the extension to heavy use.
Pros and Cons of a DIY Bed Extension
Like any project, there are advantages and disadvantages to building your own wood lathe bed extension. Weighing these will help you decide if it’s the right solution for you.
Pros:
- Cost-Effective: Significantly cheaper than buying a new, longer lathe.
- Increased Capacity: Allows you to turn much longer workpieces.
- Customization: Build to your exact specifications and needs.
- Skill Development: A rewarding project that teaches fabrication and precision.
- Enhanced Lathe Capability: Makes your current setup more versatile.
Cons:
- Fabrication Skill Required: Needs basic metalworking skills (cutting, drilling, and often welding).
- Potential for Vibration: If not built rigidly, it can introduce vibration.
- Attachment Complexity: Designing a secure and stable attachment to your specific lathe can be challenging.
- Aesthetics: A DIY extension might not have the polished look of a factory-made component.
- Weight: A steel extension adds significant weight to your lathe setup.