Quick Summary: A mini wood lathe is fantastic for crafting exquisite wooden jewelry. Learn how to choose the right lathe, essential tools, safety tips, and techniques for turning tiny, detailed pieces with confidence.
Making jewelry with a mini wood lathe might seem a bit daunting at first, especially if you’re new to woodworking. You see those beautifully turned pendants, rings, and beads, and wonder how on earth to achieve such precision on such a small scale. It’s a common challenge for hobbyists looking to add a unique, handmade touch to their creations. But don’t worry, with the right guidance, you can master this craft. This guide will walk you through everything you need to know, from picking your first lathe to shaping tiny masterpieces.
Why a Mini Wood Lathe is Perfect for Jewelry Making
When you think of a wood lathe, you might picture large, imposing machines capable of turning hefty furniture legs. However, the world of mini wood lathes offers a perfect sweet spot for detailed work, especially jewelry. These smaller, more manageable machines are designed for precision and control, making them ideal for working with small pieces of wood. They take up less space, are generally more affordable, and are much easier to get the hang of than their larger counterparts. This makes them an excellent entry point for anyone interested in creating intricate wooden jewelry.
Benefits of Using a Mini Lathe for Jewelry
- Accuracy and Control: Mini lathes excel at handling small workpieces, allowing for fine detail and precise cuts.
- Affordability: They are significantly less expensive than full-sized lathes, making them accessible to hobbyists.
- Space Saving: Their compact size is perfect for home workshops or smaller crafting spaces.
- Ease of Use: Simpler operation makes them beginner-friendly.
- Versatility: Beyond jewelry, they can be used for other small decorative woodturning projects like drone propellers or miniature finials.
Choosing Your First Mini Wood Lathe for Jewelry
Selecting the right mini wood lathe is crucial for a smooth and enjoyable jewelry-making experience. With several options on the market, it’s easy to feel overwhelmed. Focus on a few key features that will make a big difference when you’re working on tiny pieces.
Key Features to Look For:
- Motor Power: For jewelry, you don’t need a powerhouse. A motor between 0.5 to 1 HP is usually sufficient. More power can lead to less control with small, delicate materials.
- Swing (Bed Length and Diameter): The swing refers to the maximum diameter of a workpiece the lathe can accommodate. For jewelry, a small swing is perfectly fine, as you’ll be working with small bowls, rings, or beads. Look for something that can comfortably hold a 6-8 inch diameter workpiece. The bed length determines the longest piece you can turn; for jewelry, 12-18 inches is usually ample.
- Variable Speed Control: This is perhaps the most important feature. Being able to adjust the speed allows you to slow down for intricate cuts and speed up for sanding. Look for a lathe with a broad speed range, ideally from 500 RPM up to 3500 RPM or more.
- Headstock and Tailstock Tapers: Most mini lathes use Morse Taper #1 or #2. Ensure the headstock and tailstock have compatible tapers for accessories like live centers or spur drives.
- Build Quality: Even on a mini lathe, a sturdy cast-iron construction will reduce vibration and provide a more stable platform for precise work. Look for solid banjo (tool rest holder) and tailstock locking mechanisms.
Popular Mini Lathe Options (Examples)
While specific models change, here are types of mini lathes that are popular among beginners and jewelry makers. Always research current models and reviews before purchasing.
| Lathe Type | Typical Motor Power | Ideal For | Considerations |
|---|---|---|---|
| Benchtop Lathe (e.g., Jet 1014, Nova Saturn) | 0.5 – 1 HP | Small bowls, beads, pendants, rings | Compact, often has variable speed. Ensure good stability. |
| Larger Mini Lathes (e.g., Grizzly G0462, Rikon 70-105) | 1 – 1.5 HP | Slightly larger jewelry components, small spindles | More robust, wider swing and bed length, may require more space. |
Essential Tools and Accessories for Jewelry Making
Once you have your mini lathe, you’ll need the right tools to make beautiful jewelry. Don’t feel you need every chisel under the sun! Start with a few key items designed for small-scale work. Quality over quantity is key here.
Cutting Tools (Chisels)
For jewelry, you’ll be working with much smaller pieces and often denser or more delicate woods. This means you need smaller, sharper tools.
- Mini Spindle Gouge: These come in small sizes (e.g., 1/4″ or 3/8″) and are perfect for hollowing out small bowls, beads, and shaping intricate details. They are your workhorse for creating curves and coves.
- Mini Parting Tool: Essential for cutting off your finished jewelry piece from the waste block. Look for a narrow blade (e.g., 1/16″ or 1/8″) for clean cuts.
- Mini Skew Chisel: Useful for scraping cuts, adding fine details, and creating smooth surfaces on small items. A 1/4″ or 3/8″ skew is a good starting point.
- Scrapers (Hook Scrapers): Sometimes, especially with very small details or difficult grain, scrapers can offer a smooth finish without the risk of catching that a gouge might present. Hook scrapers are particularly good for hollowing out beads.
Other Must-Have Accessories
- Live Center: This fits into the tailstock and has a bearing that spins with your workpiece. It provides support and prevents friction, which is crucial for small, spun pieces.
- Drive Center (Spur Drive): This fits into the headstock and has sharp spurs that dig into the wood to drive it as the lathe turns. A small spur drive is necessary for starting your project.
- Faceplate: A small faceplate (e.g., 2-3 inches) allows you to mount flatter pieces of wood for turning, such as the initial blank for a pendant or a small bowl.
- Chuck: While more of an investment, a small scroll chuck designed for mini lathes is incredibly useful. It can grip both internally and externally, allowing you to turn the back of a bead or pendant after drilling a hole. Look for chucks with small jaws suitable for delicate work.
- Measuring Tools: A ruler or measuring tape, calipers (digital calipers are great for accuracy), and a small protractor can help you achieve symmetrical and precisely sized pieces.
- Dust Collection/Mask: Wood dust is a hazard. Even with small projects, a dust mask is essential. A shop vacuum connected to your lathe or a dedicated dust collector is highly recommended for a cleaner, safer workspace. You can learn more about workshop safety from the NIOSH Woodworking Safety guidelines.
Safety First: Essential Precautions for Mini Lathe Jewelry Making
Safety on any lathe is paramount, and working with small pieces doesn’t change that. In fact, the speed and size of jewelry making can sometimes lead to complacency, which is dangerous. Always prioritize safety to protect yourself and ensure your projects turn out well.
General Safety Guidelines:
- Read Your Lathe Manual: Seriously, don’t skip this. Understand your specific machine’s controls, limitations, and safety features.
- Wear Eye Protection: Always wear safety glasses or a full face shield. Wood chips can fly unexpectedly.
- Use a Dust Mask: Wood dust can irritate your lungs and cause long-term health problems. A good quality dust mask is non-negotiable.
- No Loose Clothing or Jewelry: Tie back long hair, remove dangling jewelry, and avoid loose sleeves or baggy shirts that can get caught by the spinning workpiece.
- Secure Your Workpiece Firmly: Double-check that your wood is securely mounted between centers or on the faceplate/chuck before turning the lathe on. A poorly secured piece can fly off, causing serious injury.
- Keep Tools Sharp: Dull tools require more force, increase the risk of catching, and produce a poorer finish. Learn how to sharpen your gouges and scrapers effectively.
- Stand in a Balanced Position: Keep your feet shoulder-width apart and avoid reaching across the lathe while it’s running.
- Turn Off the Lathe When Making Adjustments or Measuring: Never try to adjust tool rests, measure the workpiece, or make changes while the lathe is spinning.
- Start Slow: Begin turning at a lower speed and gradually increase it as needed. This allows you to feel the wood and make corrections before issues arise.
- Be Aware of Your Surroundings: Ensure your workspace is clean, well-lit, and free from distractions.
Specific Safety Tips for Jewelry Turning:
- Use Slow Speeds for Small Items: Tiny pieces can spin at very high, uncontrolled speeds if the lathe is set too high. Start slow, especially when roughing out or parting off.
- Use Appropriate Tool Rests: Ensure your tool rest is very close to the workpiece (usually no more than the thickness of a dime) to prevent tools from catching.
- Part Off Safely: When cutting off finished jewelry, use a very narrow parting tool and a slow speed. Gradually feed the tool in. Don’t stand directly in line with the spinning piece as you make the final cut.
- Consider a Remote On/Off Switch: For small lathes, a remote switch can allow you to be further from the immediate spinning area when starting or stopping, adding an extra layer of safety.
Step-by-Step: Turning Your First Wooden Jewelry Piece
Let’s get turning! This basic guide will walk you through creating a simple wooden bead or pendant. You can adapt these steps for many different jewelry designs.
Step 1: Material Selection and Preparation
Choose a dense hardwood that turns well and holds detail. Good options include:
- Maple
- Cherry
- Walnut
- Exotic hardwoods (like Bocote, Purpleheart – be sure to research their turning properties and safety)
Cut your chosen wood into small blocks or dowels. For a bead, a 1-inch cube or a short dowel of 1-inch diameter is common. For a pendant, a slightly larger block might be needed depending on your design. Ensure the ends are cut flat and square.
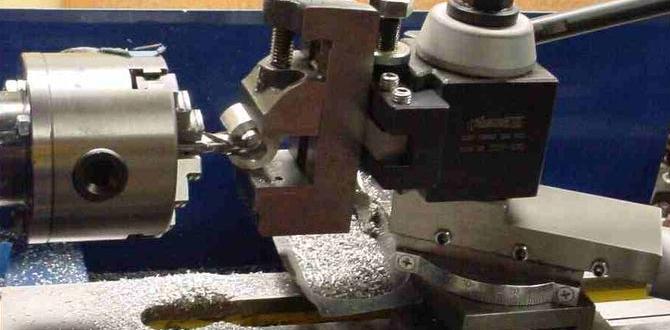
Step 2: Mounting the Workpiece
For a round bead:
- Mount a small spur drive (drive center) into the headstock.
- Mark the center of your wood block.
- Press the wood block onto the spurs of the drive center, ensuring it’s centered.
- Insert a live center into the tailstock.
- Extend the tailstock to meet the wood block’s end and firmly lock it in place. Apply slight tailstock pressure to hold the wood snug against the drive center.
For a pendant or flat-turning:
- Mount a small faceplate onto the headstock.
- Securely screw your wood block to the faceplate using appropriate screws. Ensure the wood is balanced on the faceplate.
- Insert a live center into the tailstock to support the outer edge of the piece.
Step 3: Roughing Out the Shape
Set your lathe speed to a moderate setting (e.g., 1000-1500 RPM for a 1-inch piece). Place your tool rest very close to the wood. Using your mini spindle gouge, start by rounding the corners of the block as it spins. Gradually remove material to create a basic cylindrical or desired outer shape.
Step 4: Shaping and Detailing
This is where your jewelry piece comes to life. Use your spindle gouge and skew chisel with light cuts to:
- Shape curves.
- Create tapers.
- Refine the overall form.
- For beads, you might use a small spindle gouge or a specialized bead-making tool to hollow out the center first, then shape the outside.
Remember to make very light cuts. For small, detailed work, scrapers can also be incredibly useful for achieving smooth surfaces and sharp details without the risk of catching.
Step 5: Creating Holes (for beads/pendants)
This is often best done off the lathe for safety and precision, especially for beads. If your piece is mounted on a faceplate or chuck, you can drill a hole through the center. If it’s between centers, you’ll need to remove it, drill the hole, and then re-mount it (perhaps in a chuck) to finish the outside.
- Turn off the lathe.
- Use a sharp bit appropriate for wood. A brad-point drill bit is good as it starts cleanly.
- Drill the hole through the center of your bead or pendant blank. For beads, ensure the hole is slightly larger than your desired stringing cord.
- Re-mount on the lathe if necessary and refine the shape around the hole.
Step 6: Sanding and Finishing
Once the shape is perfect, it’s time to sand. Turn off the lathe or use a very low speed for sanding.
- Start with a coarser grit sandpaper (e.g., 120-220 grit).
- Progress through finer grits (e.g., 320, 400, 600, even up to 1000 or higher for a glass-smooth finish).
- You can sand by hand or wrap sandpaper around a small block.
- Apply a finish – natural oils (like Tung oil or Danish oil), shellac, or a clear lacquer work well. Apply thin coats and buff. For durability, a wax finish can be applied over oil or shellac.
Step 7: Parting Off
With the piece finished and completely dry, it’s time to separate it from the drive center/faceplate.
- Move the tool rest to the outside edge of the workpiece, close to where you want to part it off.
- Select your narrow parting tool.
- Set the lathe to a slow speed (e.g., 500-800 RPM).
- Gently and slowly feed the parting tool into the wood. Make shallow cuts, moving the tool back and forth slightly to clear chips.
- As the cut gets deeper, you may need to apply slight tailstock pressure (if between centers) to prevent vibration.
- Continue cutting until the piece is free.
The end that was attached to the drive center/faceplate will likely need some cleanup on your workbench with sandpaper or a small file.
Advanced Techniques and Tips
As you gain confidence, you can explore more intricate jewelry designs. Here are some tips to elevate your work:
- Using Jars and Jigs: For turning rings, specialized jigs that hold ring blanks can be used with a scroll chuck.
- Multi-Wood Inlays: You can turn different colored woods together or create mosaic patterns. This often involves cutting precise shapes and gluing them together before turning.
- Drilling and Hollow-Out Techniques: For hollow beads or pendants, learn to use small gouges and scrapers to carefully hollow out the interior. A drill press is often used for the initial hole.
- Combining Wood with Other Materials: Wood can be beautifully combined with resin, metal bails, or even small gemstones.
- Experiment with Finishes: Explore different wood finishes to enhance color, provide protection, and create varying sheen levels.
Troubleshooting Common Issues
Even experienced woodturners run into problems. Here are a few common issues and how to tackle them when making jewelry:
| Problem | Likely Cause | Solution |
|---|---|---|
| Catching/Tearing of Wood | Dull tool; tool rest too far away; cutting too aggressively; poor wood quality. | Sharpen tools; move tool rest closer; use lighter cuts; try a different piece of wood. |