For beginners wanting to craft small wooden bowls, a mini wood lathe is an excellent, manageable, and affordable tool. This guide will show you exactly how to choose, set up, and use one to create beautiful, simple bowls with confidence and safety.
Turning small wooden bowls on a mini lathe might seem a little tricky at first, but it’s a wonderfully rewarding craft. Many beginners feel overwhelmed by the options or worry about making mistakes. Don’t let that stop you! This guide is designed to make the process clear and simple, from picking the right lathe to shaping your first beautiful bowl. We’ll walk through everything you need to know, step by step, so you can start turning your creative ideas into reality safely and successfully.
Why a Mini Wood Lathe is Perfect for Small Bowls
A mini wood lathe is a fantastic entry point into the world of woodturning, especially when your goal is to create small bowls, spindles, or other decorative items. Unlike their larger counterparts, mini lathes are compact, easier to store, and significantly more affordable. They also often have a gentler learning curve, making them ideal for those just starting out.
Here’s why a mini wood lathe shines for small bowl projects:
Space-Saving: Perfect for home workshops with limited room.
Affordability: A great way to get into woodturning without a huge investment.
Beginner-Friendly: Generally simpler to operate, with fewer complex controls.
Ideal for Small Projects: Designed to handle smaller workpieces like small bowls, pens, and spindles.
Lower Power Requirements: Usually plug into standard household outlets.
Key Features to Look for in a Mini Wood Lathe for Bowls
When you’re shopping for a mini wood lathe specifically for small bowls, a few features will make your life much easier and your turning experience safer and more enjoyable.
1. Motor Power: For small bowls, you don’t need a powerhouse. A motor between 1/2 HP and 1 HP is usually sufficient. More power can help with slightly larger or harder woods, but isn’t essential for most beginner bowl projects.
2. Bed Length & Swing: The bed length determines the longest workpiece you can turn. For small bowls, typically under 10-12 inches in diameter, a shorter bed is fine. The “swing” is the maximum diameter workpiece the lathe can accommodate. A swing of 8-12 inches is plenty for most small bowls.
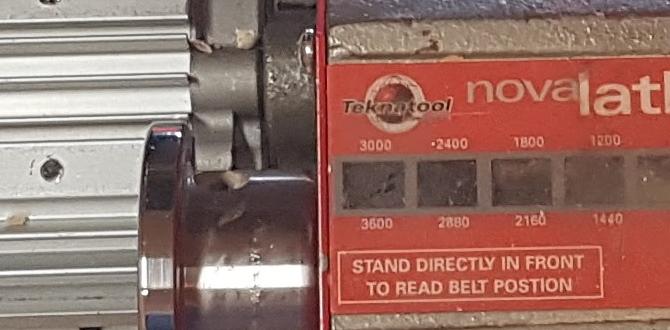
3. Variable Speed Control: This is a crucial feature! Being able to adjust the lathe’s speed on the fly is vital for safety and for achieving a good finish. Lower speeds are safer for roughing out and for beginners, while higher speeds are used for finishing. Look for a lathe with a wide speed range.
4. Headstock and Tailstock Taper: Most mini lathes use a Morse Taper (MT) system. MT1 or MT2 are common. This is important for securely attaching accessories like chucks and live centers.
5. Tool Rest: A sturdy and adjustable tool rest is essential for supporting your turning tools. Look for one that can be easily positioned around the workpiece.
6. Construction Quality: While mini lathes are budget-friendly, a solid cast-iron construction will minimize vibration, leading to smoother turning and a better finish.
Essential Tools and Accessories for Turning Small Bowls
Once you have your mini lathe, you’ll need a few key tools and accessories to start turning bowls. Don’t feel like you need to buy everything at once; start with the basics and add as you gain experience.
Turning Tools:
Spindle Gouge: Your workhorse for general shaping and hollowing. A 1/2-inch or 3/8-inch spindle gouge is a great starting point.
Roughing Gouge: Used to turn square stock into a round blank. A 1-inch roughing gouge is standard.
Scraper (Optional for Beginners): A flat-bladed tool used for smoothing, but often less forgiving than gouges for beginners.
Parting Tool: Used to cut off your finished piece from the blank.
Measuring and Marking Tools:
Calipers: For measuring the thickness of your bowl walls.
Pencil: To mark lines on your wood.
Safety Gear (Non-Negotiable!):
Safety Glasses or Face Shield: Protect your eyes from flying chips.
Dust Mask or Respirator: Wood dust can be harmful to your lungs.
Hearing Protection: Lathes can be noisy.
Appropriate Clothing: Avoid loose clothing, jewelry, or long hair that could get caught.
Chucks and Accessories:
Self-Centering Scroll Chuck: This is a significant investment but one of the most useful accessories for bowl turning. It securely grips the wood blank and allows you to reverse the piece for fine finishing and hollowing the base. For small bowls, a 2 or 3-inch chuck is usually sufficient.
Live Center: A pointed support that goes in the tailstock to steady the other end of the workpiece.
Drive Center: A spur-like tool that goes into the headstock to grip and turn the wood.
Faceplate: A flat disc that screws onto the headstock threads and allows you to attach wood blanks for bowl turning without a chuck. This is a good, budget-friendly option for simpler bowls.
Getting Started: Setting Up Your Mini Lathe Safely
Safety is paramount when operating any power tool, and a wood lathe is no exception. Before you even think about turning on the machine, ensure it’s set up correctly and you understand the safety procedures.
Step 1: Location, Location, Location
Place your mini lathe on a stable, level surface. A dedicated workbench or a sturdy cabinet is ideal. Avoid placing it on carpet or uneven flooring, as this can increase vibration and lead to inaccurate turning. Ensure there’s plenty of space around the lathe for you to work comfortably and safely. You’ll need room to stand, move your tools, and handle wood blanks.
Step 2: Electrical Check
Plug your lathe into a properly grounded electrical outlet. Most mini lathes use standard household plugs. If your workshop doesn’t have grounded outlets, consider consulting an electrician or using a suitable surge protector.
Step 3: Tool Rest Placement
Before you turn the lathe on, adjust the tool rest. It should be positioned close to the workpiece. The distance between the tool rest and the wood should be no more than the thickness of a pencil or a dime – just enough to allow the tool to slide freely, but no more. The rest should be slightly below the center line of the workpiece when turning spindles, and at or slightly below center for bowl turning.
Step 4: Understanding the Controls
Familiarize yourself with your lathe’s controls:
On/Off Switch: Easy enough!
Speed Control: This is usually a dial or belt-changing system. Understand the range and how to safely adjust it.
Headstock: Contains the motor and spindle that rotates the workpiece.
Tailstock: Provides support for the other end of the workpiece. It usually has a quill that can be moved in and out.
Step 5: Safety Gear On!
Put on your safety glasses or face shield, dust mask, and ear protection. Tie back long hair and remove any loose clothing or jewelry. Ensure your workspace is clean and free of tripping hazards.
Turning Your First Small Bowl: A Step-by-Step Guide
Now that your lathe is set up and you’re geared up, let’s get to the fun part: turning your first bowl! We’ll focus on a simple approach using a faceplate, which is a great starting point before investing in a chuck.
Step 1: Select and Prepare Your Wood Blank
Wood Choice: For beginners, a soft, straight-grained hardwood like poplar, basswood, or pine is ideal. They are easier to cut and less likely to cause tear-out. Avoid knotty or warped wood.
Cutting the Blank: Cut a rough disc from your wood. It doesn’t need to be perfectly round at this stage. Aim for a diameter slightly larger than your desired finished bowl. A thickness of 1-2 inches is good for small bowls.
Finding the Center: Mark the center of your disc. This is crucial for mounting it accurately.
Step 2: Mounting the Blank to the Faceplate
1. Attach the Faceplate: Screw the faceplate onto the headstock spindle of your lathe. Make sure it’s snug.
2. Marking Screw Locations: Place your wood blank against the faceplate. Use your pencil to mark where the screw holes of the faceplate will penetrate the wood. Usually, 3 or 4 screws are used.
3. Drilling Pilot Holes: Remove the wood blank and drill pilot holes at the marked locations. These holes should be slightly smaller than the diameter of your screws. This prevents the wood from splitting.
4. Securing the Blank: Re-position the wood blank against the faceplate. Drive appropriate wood screws through the faceplate’s holes and into the pilot holes you just drilled. Ensure the blank is securely fastened to the faceplate. Double-check that the screws are firmly holding the wood.
Step 3: Roughing Out the Blank
1. Mount the Assembly: With the wood blank securely fastened to the faceplate, mount the faceplate assembly onto the headstock of your lathe. Ensure it’s tight.
2. Position the Tailstock (Optional but Recommended): For added stability, especially with larger or slightly off-balance blanks, you can position the tailstock and use a live center to support the outer edge of the blank. Retract the tailstock quill and position the live center so it just touches the wood.
3. Setting the Speed: Start at a low speed. For a 6-inch blank, 600-800 RPM is a good starting point. The goal is to avoid vibration. If the wood wobbles excessively, stop immediately and re-secure it or use a lower speed.
4. Turning Round: Turn on the lathe. Using your roughing gouge, carefully begin to shape the outside of the blank into a cylinder. Work from the tailstock end towards the headstock. Don’t try to remove too much wood at once. Make gentle, sweeping cuts.
5. Establishing Bowl Shape: Once it’s roughly round, you can start to define the outside shape of your bowl. Leave a flat portion at the outer edge for mounting the chuck later, or for the recess if you plan to turn that side.
Step 4: Shaping the Outside of the Bowl
1. Tool Rest Position: Adjust the tool rest to be just below the center line of the rotating blank.
2. Gouge Techniques: Begin shaping the outer profile of your bowl using your spindle gouge. Start from the outer edge and work your way inwards, or vice-versa. Make smooth, continuous cuts.
3. Checking Depth: Periodically stop the lathe to check the thickness of the bowl walls. You want them to be relatively uniform.
4. Bevel Angle: Ensure you are using the bevel of the gouge against the wood. This allows the tool to glide smoothly and reduces the tendency to catch.
5. Smoothness: Once the basic shape is achieved, you can use the gouge with a lighter cut and a slightly higher speed (if comfortable) to smooth the exterior.
Step 5: Hollowing the Inside of the Bowl
This is where the bowl really starts to take shape.
1. Removing the Tailstock (if used): If you used a live center for initial roughing, you’ll need to remove it to access the inside.
2. Tool Rest Position: Reposition the tool rest so it’s slightly above the center line of the bowl’s interior. This angled position helps you get into the bowl.
3. Starting the Cut: Begin hollowing from the center outwards, or from the edge inwards. Use your spindle gouge. Again, use the bevel against the wood.
4. Making Sweeping Cuts: Make sweeping cuts, gradually deepening the bowl. Avoid trying to hog out large amounts of material. Take light, controlled passes.
5. Checking Wall Thickness: Constantly check the thickness of your bowl walls. It’s very easy to go too thin, so regular checks with calipers are crucial. Aim for even thickness throughout.
6. Creating a Recess (If not using a chuck): If you’re using a faceplate and plan to finish the rim, you’ll need to create a recess on the top rim of the bowl, where the faceplate screws are. This recess will be used to hold the bowl for finishing the inside face. Use a suitable tool to carve out this area, ensuring it’s clean and flat enough to accept jaws if you later use a chuck, or for friction to hold it.
Alternative: Using a Chuck for Hollowing
If you decide to invest in a chuck, the process for hollowing the inside becomes much easier and safer:
1. Reverse Mounting: After shaping the outside and creating a tenon (a protruding cylindrical section) on the rim, you would unmount the faceplate assembly. Mount your chuck to the headstock. Then, grip the tenon securely in the chuck’s jaws.
2. Hollowing with Chuck: Now you can use your gouge to hollow the inside. The chuck provides a very secure grip, allowing you to work with confidence. You can also reverse the bowl in the chuck to hollow out the base and finish the rim.
Step 6: Sanding and Finishing
1. Stopping the Lathe: Once the basic shape and hollowing are complete, stop the lathe.
2. Sanding: The best way to sand is often done while the lathe is turning at a relatively slow speed. Start with a coarser grit sandpaper (e.g., 80 or 120 grit) and work your way up to finer grits (e.g., 220, 320, 400+). Apply the sandpaper by hand, holding it against the rotating wood. Keep it moving to avoid creating flat spots.
3. Finishing: After sanding, clean off the dust. Apply your chosen finish. Popular options include:
Paste Wax: Easy to apply and gives a nice sheen.
Mineral Oil: Food-safe and simple, great for bowls intended for use with food.
Lacquer or Varnish: For a more durable, protective finish.
Always follow the manufacturer’s instructions for your finish.
Step 7: Removing the Bowl from the Lathe
1. Faceplate Finish: If you used a faceplate and created a recess, you can often remove the bowl by gently tapping the faceplate from the back. If it’s stuck, sometimes a rubber mallet can help. Be careful not to damage the rim of your bowl.
2. Chuck Finish: If you used a chuck, simply open the jaws to release the bowl.
3. Final Touches: You may need to clean up any tool marks or the hole left by the screws if using a faceplate. Alternatively, you can turn a foot on the base of the bowl and then re-mount it in a chuck to refine the base.
Tips for Bowl Turning Success
Start Simple: Don’t try to turn a complex shape for your first bowl. Master the basics of rounding, shaping, and hollowing.
Slow and Steady: Especially when learning, err on the side of slower speeds. It’s always easier to increase speed than to recover from a mistake.
Sharp Tools: Keep your turning tools sharp. Sharp tools cut cleanly, reduce effort, and are safer to use than dull tools. There are many sharpening systems available for woodturning tools.
Listen to Your Lathe: Pay attention to sounds. Unusual vibrations or noises can indicate a problem with your workpiece mounting or tool technique.
Embrace Imperfection: Especially with natural materials like wood, some imperfections are part of the charm. Don’t aim for factory perfection on your first few attempts.
Wood Movement: Wood is a natural material and can move with changes in humidity. Allow finished pieces to acclimate before final finishing if you notice warping.
Common Beginner Mistakes (And How to Avoid Them!)
| Mistake | Why It Happens | How to Avoid It |
| :—————————– | :———————————————— | :———————————————————————————————————————————————– |
| Catching the Tool | Not using the bevel, tool rest too far away, plunging too fast. | Always keep the bevel in contact with the wood. Ensure the tool rest is close. Make controlled, slicing cuts. Use slower speeds for roughing. |
| Hogging Out Too Much Wood | Trying to remove material too quickly. | Take shallow, controlled passes. Listen to the tool and the lathe. If it struggles, you’re removing too much. |
| Uneven Wall Thickness | Not checking regularly, inconsistent cutting. | Stop the lathe frequently to check wall thickness with calipers. Aim for relatively uniform thickness. |
| Workpiece Flying Off | Improper mounting, using too high a speed. | Double-check that your workpiece is securely mounted. Always start at the lowest speed and increase gradually. Use a faceplate or chuck correctly. |
| Poor Tool Support | Tool rest too far away, inconsistent angle. | Keep the tool rest close and reposition it as needed. Maintain a consistent angle, ensuring the bevel stays engaged. |
| Rushing the Process | Impatience, desire for quick results. | Woodturning is a process. Enjoy each step. Slow down, focus on technique, and celebrate small victories. |
Wood Lathe Safety Standards and Resources
Safe operation of your mini wood lathe is paramount. Adhering to safety guidelines will prevent accidents and ensure you can enjoy your hobby for years to come. Reputable organizations provide excellent resources for woodturning safety.
The [Occupational