Mastering the Screw Chuck for Your Lathe: A Beginner’s Essential Guide
Welcome to Lathe Hub! If you’re exploring the world of lathes, you’ve likely encountered the screw chuck. It’s a versatile tool, but getting it set up and used correctly can sometimes feel a bit tricky. Don’t worry! This guide is designed to demystify the screw chuck, making it simple and safe for you to use. We’ll walk through everything you need to know, from understanding what it is to using it confidently on your lathe. Get ready to unlock new possibilities in your projects!
A screw chuck for a lathe is a workholding device that screws onto the lathe’s spindle. It’s specifically designed for holding irregular or awkwardly shaped blanks, especially for woodturning. It allows you to securely mount items that can’t be easily spigoted or held by conventional chucks like three-jaw or four-jaw chucks. This guide will equip you with the knowledge to understand, select, and safely use a screw chuck, enhancing your turning capabilities for a wide range of projects.
What is a Screw Chuck for a Lathe?
Imagine you have a piece of wood – maybe a naturally shaped burl, a bowl blank with an odd profile, or a project that’s already been partially shaped and you need to access the back. Standard lathe chucks, which grip from the outside or inside, might not be the best fit. That’s where the screw chuck shines.
At its core, a screw chuck is a two-part device. The main body screws directly onto your lathe’s headstock spindle. Attached to this body is a strong, threaded screw. You then drive this screw into the center of your workpiece, effectively securing it to the chuck. This method is particularly popular in woodturning because it allows access to nearly the entire surface of the workpiece, making it ideal for finishing the back of bowls, creating intricate shapes, or working with materials that are difficult to grip otherwise.
The beauty of a screw chuck lies in its simplicity and its ability to hold non-standard shapes. It’s a vital piece of equipment for any turner looking to expand their repertoire beyond basic cylindrical forms. It offers a secure and reliable way to hold your material, allowing you to focus on the creative aspects of turning rather than worrying about your workpiece becoming loose.
Why Use a Screw Chuck?
The primary reason for using a screw chuck is its ability to hold workpieces that are challenging for other chucking methods. Let’s break down the key advantages:
- Holding Irregular Shapes: For natural edge bowls, burls, or found objects, a screw chuck provides a central mounting point where other chucks would struggle or be impossible to use.
- Full Access to the Back of the Work: When turning a bowl, for instance, you often need to turn it around to flatten the base and create a tenon or foot. A screw chuck allows you to achieve this by screwing it into the bottom of your already-formed bowl.
- Repurposing Projects: If you’ve turned a piece and need to add features or refine an area that’s now facing the spindle, the screw chuck can be invaluable.
- Cost-Effective for Specific Tasks: For certain operations, a screw chuck can be a more economical solution than investing in a large or specialized jaw set for a conventional chuck.
- Simplicity of Use: Once you understand the principle, using a screw chuck is straightforward and requires minimal setup with the right technique.
While it’s a fantastic tool, it’s important to note that screw chucks are generally best suited for relatively soft materials like wood. For heavy metalworking where extreme precision and grip strength are paramount, other chucks or workholding methods are typically preferred. However, for the woodturner or light metal hobbyist exploring unique shapes, it’s an indispensable accessory.
Types of Screw Chucks
Screw chucks come in a few variations, primarily differing in their screw size, thread pitch, and the diameter of the chuck body. The choice often depends on the size of the workpieces you intend to turn and the specifications of your lathe.
Here are the common types you’ll encounter:
- Standard Screw Chucks: These are the most common. They feature a threaded screw that protrudes from the face of the chuck body. The screw size and length are important considerations – a longer screw might be needed for thicker stock, and a larger diameter screw provides greater holding power.
- Combined Screw Chucks/Faceplates: Some chucks are designed with a removable screw, allowing them to be used as a faceplate when needed. This offers a bit more versatility.
- Specialty Screw Chucks: You might find chucks with features like stepped screws for easier penetration into different wood densities or those designed for specific lathe spindle threads.
When selecting a screw chuck, always ensure it has the correct spindle thread to match your lathe’s headstock. Manufacturers usually specify the thread size (e.g., 1 x 8 TPI or M33 x 3.5) for their chucks. It’s also crucial to consider the size of the screw itself. A larger screw thread (like 1 inch or larger) will provide more robust holding.
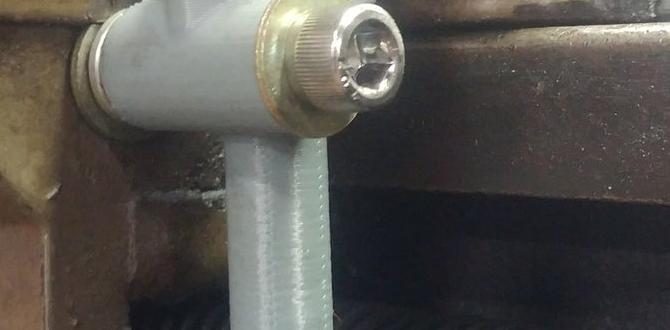
Key Components of a Screw Chuck
Understanding the parts helps in using it correctly:
- Chuck Body: This is the main part that screws onto the lathe spindle. It provides the stable mounting for the screw.
- Threaded Screw: This is the part that penetrates the workpiece. It’s typically a coarse-threaded screw for good grip in wood.
- Shaft/Mounting Point: The screw is usually mounted to the chuck body via a shaft or threaded hole.
- Flange/Face: The part of the chuck body that sits flush against the back of the workpiece.
Make sure the screw is well-greased and that the threads are clean for smooth operation and to prevent damage to both the chuck and your workpiece.
How to Select the Right Screw Chuck
Choosing the correct screw chuck involves a few key considerations to ensure safety, compatibility, and suitability for your projects.
1. Lathe Spindle Thread Compatibility
This is the absolute first thing to check. Your lathe’s headstock has a threaded spindle designed to accept chucks and faceplates. Screw chucks are manufactured with specific spindle threads. You must match the screw chuck’s thread to your lathe’s spindle thread.
Common spindle threads include:
- American Standard: 1-inch x 8 TPI (Threads Per Inch). This is very common on many mid-sized and larger lathes.
- Import Standard: Often 1.1/4-inch x 8 TPI, or a metric thread like M33 x 3.5.
- Smaller Lathes: May have smaller threads like 3/4 x 10 TPI or 5/8 x 18 TPI.
How to find your lathe’s spindle thread:
- Look at your lathe’s manual. It should specify the spindle thread.
- Measure the diameter of the spindle and count the number of threads in one inch.
- Look for markings on the spindle itself or on an existing chuck adapter.
If you’re unsure, consult your lathe manufacturer’s website or contact their support. Using an adapter can sometimes allow you to use chucks with different threads, but it’s always best to get a chuck that matches directly if possible to maintain rigidity and safety.
2. Screw Size and Type
The screw that drives into your workpiece is critical. Its size dictates its holding power and the size of the workpiece it can accommodate.
- Diameter: Larger diameter screws (e.g., 1 inch or more) offer stronger holding power. For very substantial workpieces, a larger screw is recommended.
- Length: A longer screw allows it to penetrate deeper into thicker stock, providing more secure mounting. Ensure the screw is long enough for your intended material thickness.
- Thread Pitch: Coarse threads are typical for woodturning as they bite into the material effectively.
- Pointed vs. Blunt: Some screws have a sharp point for easier starting, while others have a more blunted end. The sharp point can sometimes mar the center of the workpiece more if you’re not careful.
3. Chuck Body Diameter
The diameter of the chuck body itself is also a factor. A larger body can offer a broader seating surface and can sometimes accommodate larger screws. Consider the overall size and weight relative to your lathe’s capacity. For smaller lathes, a lighter-weight screw chuck is usually more appropriate.
4. Material of Workpiece
Screw chucks are primarily used for wood. Hardwoods generally hold screws better than softwoods. If you are attempting to use a screw chuck on very soft materials or certain types of plastic, you may need to reinforce the area where the screw will enter, perhaps with epoxy or inserts, to ensure a secure grip. For most metal applications that aren’t very specialized, you’ll likely need a more robust chuck.
5. Project Requirements
Think about what you want to achieve. If you’re turning bowls and need to access the base, a screw chuck is ideal. If you’re turning an odd-shaped log, it’s also a great choice. If you need very precise concentric mounting for multi-piece assemblies, you might lean towards a high-quality scroll chuck with specialized jaws.
Example Selection Table:
| Intended Use | Recommended Screw Chuck Features | Lathe Size |
|---|---|---|
| Small bowls, decorative items | Standard screw (e.g., 3/4 inch diameter), moderate length | Benchtop or smaller midi lathes |
| Medium to large bowls, natural edge work | Larger screw (e.g., 1 inch or more diameter), longer screw length | Full-sized wood lathes |
| Thick or irregular blanks | Longer screw length, potentially a larger diameter screw for stability | Full-sized wood lathes |
| Finishing the back of bowls | Screw size that provides a secure grip without damaging the finished interior | Any lathe, depending on bowl size |
How to Safely Mount and Use a Screw Chuck
Safety is paramount when using any lathe accessory, and the screw chuck is no exception. A properly mounted screw chuck allows for smooth, confident turning. Here’s a step-by-step guide:
Step 1: Prepare Your Workpiece
Target the Center: The screw needs to enter the workpiece as close to the geometric center as possible. If you’re working with a pre-turned piece or a roughly cut blank, mark the center point where the screw will enter. For very irregular shapes like burls, you might need to make a flat surface or at least a clear starting point for the screw.
Drill a Pilot Hole (Optional but Recommended): For denser woods or thicker blanks, drilling a pilot hole can make it easier to start the screw and ensure it goes in straight. The pilot hole should be slightly smaller than the diameter of the screw’s threads. Use a drill bit that matches the diameter of the screw’s core (the part without threads).
Consider Reinforcement: If you’re working with a less dense wood or a large, thin section where the screw might tear out, you can reinforce the entry point. One method is to use a strong wood glue mixed with sawdust to create a putty, or to drill a larger hole and insert a wooden dowel or plug, then drill the pilot hole into the plug. For extreme cases, metal inserts designed for this purpose are available.
Step 2: Prepare the Screw Chuck
Clean Threads: Ensure the threads on both the lathe spindle and the screw chuck body are clean and free of debris. A brush or clean rag works well. Apply a small amount of light machine grease or anti-seize compound to the spindle threads to prevent galling and ensure smooth screwing.
Inspect the Screw: Check the threaded screw on the chuck itself. Make sure it’s clean, straight, and free of damage. Apply a bit of grease to the screw threads for easier penetration into the workpiece.
Step 3: Mount the Screw Chuck to the Lathe
Spin On: Back the threaded screw on the chuck body almost all the way out, so it doesn’t interfere with mounting. Carefully thread the chuck body onto the lathe spindle by hand. Turn it clockwise until it is snug against the spindle shoulder. Be careful not to cross-thread.
Tighten with Spindle Lock (if applicable): Some lathes have a spindle lock. If yours does, engage it to prevent the spindle from rotating while you ensure the chuck is fully seated. If you don’t have a lock, you might need to use a wrench on a drive plate or spur drive if the chuck has flats for it, but generally, just hand-tight is sufficient for the initial mounting before threading the screw.
Ensure it’s Seated: The face of the chuck body should be flush against the spindle shoulder.
Step 4: Drive the Screw into the Workpiece
Position the Workpiece: Bring the workpiece up to the screw chuck. Align the center mark on your workpiece with the tip of the screw on the chuck. Ensure the chuck’s face is against the back of your workpiece.
Start Threading: Gently begin to turn the workpiece by hand, allowing the screw to bite into the material. As it starts to thread, you may need to rotate the lathe’s drive pulley by hand (with the power OFF and belt disengaged if possible) to help the screw penetrate. For thicker or harder materials, use a wrench or vise-grips on the chuck body (if it has flats) or on the spindle itself to turn the chuck, driving the screw in.
Safety First: Ensure the lathe is powered off and switched off at the wall. Rotate the headstock slowly by hand.
Depth of Penetration: Drive the screw in until the chuck body is firmly seated against the back of your workpiece. You want a secure hold, but avoid over-tightening to the point where you split the wood or strip the threads in the material. A good rule of thumb for wood is to have the screw penetrate about halfway to two-thirds of its total thread length.
Step 5: Secure the Workpiece to the Chuck
Final Tightening: Once the chuck is seated against the workpiece, you might need to give it a final snug-up. With the lathe power OFF, you can sometimes use a wrench on the chuck body flats (if present) or on the spindle flats, while holding the workpiece steady, to ensure the screw chuck is as tight as possible against the work. Rotate the lathe slowly by hand to check for any wobble or looseness.
A Note on Faceplates: If your screw chuck has a removable screw, you might use it as a faceplate. In this case, you’d use screws to attach the faceplate to your workpiece. This is different from the screw chuck’s primary function but is a related workholding method.
Step 6: Turn on the Lathe and Start Turning
Check Safety Guards: Ensure all guards are in place and that your lathe is in good working order. Wear your safety glasses!
Start Slow: Begin turning at a slow speed. Listen for any unusual noises and watch for any signs of vibration or instability. Gradually increase the speed as you gain confidence and confirm the workpiece is securely mounted. For larger or unbalanced pieces, it’s always best to start at a very low RPM and gradually increase as the piece becomes more balanced.
Use Tools Safely: Keep tool rests close to the work. Use sharp tools and make controlled cuts. Avoid digging in or applying excessive force that could stress the screw chuck’s hold.
Step 7: Removing the Workpiece
Power Off: Always turn off the lathe completely before attempting to remove the workpiece. Ensure the spindle has come to a complete stop.
Unscrew Carefully: You might need to use a wrench on the chuck body or spindle to unscrew the chuck from the workpiece. Turn the lathe (often by hand, or using a wrench on the spindle) counter-clockwise. The screw will back out of your workpiece.
Support the Workpiece: As the screw disengages, be prepared to support the workpiece so it doesn’t fall. You may need to pry it gently away from the chuck face.
Safety Best Practices for Screw Chucks
- Always wear safety glasses.
- Ensure the lathe is powered off and the spindle has stopped before mounting or removing the screw chuck and workpiece.
- Never exceed the workpiece or lathe’s recommended RPMs. Start slow and increase gradually.
- Inspect your workpiece for end grain integrity, knots, or cracks before mounting.
- Do not use a screw chuck for