A Tialn ball nose end mill with a 35-degree helix angle is essential for precise MDF plunge milling. Its unique geometry allows for clean, controlled vertical entry and efficient material removal, minimizing tear-out and producing smooth finishes for intricate designs often required in routing MDF projects.
MDF, or Medium-Density Fiberboard, is a fantastic material for all sorts of projects, from cabinet doors to intricate decorative pieces. When you’re working with CNC routers and need to create pockets, slots, or curved surfaces, especially by plunging straight down into the material, the right cutting tool makes all the difference. Trying to plunge mill MDF with a standard flat-bottomed end mill can lead to a lot of frustration – think chipped edges, torn fibers, and a messy finish. That’s where a specialized tool like the Tialn ball nose end mill with a 35-degree helix angle comes into its own.
Many makers encounter issues with surface quality and tool longevity when milling MDF. The fibrous nature of MDF can be unforgiving to standard cutting tools, leading to excessive wear and a rougher-than-desired cut. But fear not! With the correct tool selection and a few simple techniques, you can achieve professional-looking results every time. This guide will walk you through why the Tialn ball nose end mill, specifically with a 35-degree helix, is your secret weapon for plunge milling MDF, and how to use it effectively. We’ll cover everything you need to know, from understanding its benefits to practical tips for getting the best out of your cuts.
Why Plunge Milling MDF Can Be Tricky
Before we dive into the solution, let’s understand what makes MDF a bit challenging for plunge milling with the wrong tools. MDF is made from wood fibers, resin, and wax, pressed together under high temperature and pressure. This results in a very dense and uniform material, which is great for stability and a smooth surface. However, the very nature of this composition can cause problems during machining:
Friction and Heat: MDF can generate a significant amount of heat when cut. This heat can cause the resin in the board to melt and gum up cutting tools, reducing their effectiveness and lifespan.
Fiber Tear-Out: When a cutter plunges straight down into the material, it’s essentially pushing fibers apart. If the tool isn’t designed for this, it can rip and tear these fibers, leaving a rough, splintered edge. This is particularly noticeable on the entry points of pockets and slots.
Dust Production: MDF produces very fine dust. While this is a universal machining issue, the way a tool cuts can influence the dust particle size and how easily it’s evacuated. Gummed-up tools can exacerbate dust production and make cleanup more difficult.
The Tialn Ball Nose End Mill: A Specialized Solution
So, what makes a Tialn ball nose end mill with a 35-degree helix angle the go-to choice for MDF plunge milling? It all comes down to its unique geometry and specialized coating.
Understanding Ball Nose End Mills
A ball nose end mill, also known as a radius end mill, has a cutting edge that forms a hemisphere or a ball shape at its tip. This shape is incredibly versatile for creating curved surfaces, fillets, and detailed contours. For plunge milling, the rounded tip allows it to enter the material smoothly without the abrupt, potentially chipping action of a square-cornered end mill.
The Significance of the 35-Degree Helix Angle
The helix angle is the angle of the cutting flutes around the tool’s body. It affects chip formation, chip evacuation, and cutting forces.
Standard End Mills: Often have helix angles ranging from 15 to 45 degrees. A steeper helix (higher degree) can lead to smoother engagement and better chip evacuation but can also increase the tendency for chatter and radial forces.
35-Degree Helix: A 35-degree helix angle strikes a good balance. It’s steep enough to provide a smooth shearing action, which is crucial for reducing tear-out in fibrous materials like MDF. This angle helps the cutting edge engage the material gradually, minimizing the shock and stress on both the tool and the workpiece. It also aids in efficient chip removal, preventing the buildup of heat and material in the flutes.
The Tialn Coating: Enhancing Performance
Tialn, which stands for Titanium Aluminum Nitride, is a hard, wear-resistant coating applied to cutting tools. For milling MDF, a Tialn coating offers several significant advantages:
Increased Hardness and Wear Resistance: Tialn is exceptionally hard, meaning the end mill will stay sharp for longer, even when cutting abrasive materials or those that tend to gum up.
Reduced Friction: The coating creates a smoother surface on the cutting edge, which helps reduce friction between the tool and the workpiece. This means less heat generated, significantly decreasing the likelihood of MDF resin melting and sticking to the tool.
Improved Chip Flow: The low friction also helps chips flow more freely away from the cutting zone, further assisting in heat management and preventing clogging.
Higher Cutting Speeds (Potentially): With a durable coating and optimized geometry, you might be able to push cutting speeds a bit higher, leading to more efficient machining.
Key Benefits of Using a Tialn Ball Nose End Mill for MDF Plunge Milling
When you combine the ball nose shape, the 35-degree helix angle, and the Tialn coating, you get a tool that’s perfectly suited for the demands of MDF plunge milling.
Here are the primary advantages:
Minimized Tear-Out: The rounded tip and helical cut allow for a gradual chip formation, preventing fibers from ripping out at the entry point. This results in cleaner, sharper edges.
Superior Surface Finish: The smooth shearing action leads to a much finer finish on the bottom and sides of pockets, reducing the need for secondary finishing operations.
Extended Tool Life: The Tialn coating and the geometry protect the tool from wear and heat buildup, meaning it will last longer, especially when dealing with the abrasive and resinous nature of MDF.
Reduced Heat Buildup: Better chip evacuation and lower friction mean less heat is generated, which is critical for preventing resin melting and gumming.
Efficient Material Removal: The balanced helix angle allows for effective clearing of chips, ensuring the tool can continue cutting efficiently without getting bogged down.
Versatility: While excellent for plunge milling, ball nose end mills can also be used for 3D contouring and creating rounded profiles, making them a valuable addition to any workshop.
Essential Considerations for Using Your Tialn Ball Nose End Mill
To get the most out of your Tialn ball nose end mill, it’s important to consider a few key factors related to its use with MDF.
Choosing the Right Diameter
The diameter of the ball nose end mill you choose will depend on the detail required for your project.
Smaller Diameters (e.g., 1/8″, 1/4″): Ideal for intricate details, fine text, and sharp internal corners (though you’ll always have a radius equal to the tool’s radius in internal corners).
Larger Diameters (e.g., 1/2″, 3/4″): Suitable for clearing out larger areas, creating broader curves, and faster material removal.
For plunge milling, the diameter directly impacts the size of the pocket or slot you can create. Remember that the smallest internal radius you can achieve in a corner will be equal to the radius of your ball nose end mill.
Feed Rates and Spindle Speed
Optimizing spindle speed (RPM) and feed rate (how fast the tool moves through the material) is crucial for efficient and clean cutting. Generic recommendations can vary based on your specific machine, the exact composition of the MDF, and the end mill manufacturer’s guidelines. However, some general principles apply:
Start Conservatively: It’s always best to start with lower speeds and feed rates than you think you might need, and gradually increase them while observing the cut.
Listen to the Machine: Unusual noises like chattering or screaming can indicate that your speeds or feeds are not optimized.
Chip Load: A good indicator of optimal cutting is achieving the correct “chip load” – the thickness of the material each cutting edge removes per revolution. For MDF, aiming for a slightly lighter chip load can help reduce heat and strain.
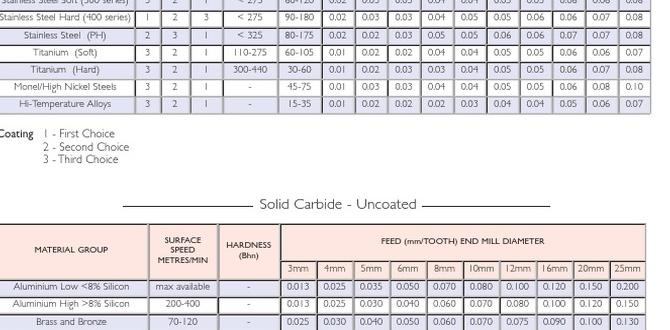
A good starting point for a 1/4″ Tialn ball nose end mill in MDF might be around 18,000-20,000 RPM with a feed rate of 30-50 inches per minute. However, always consult manufacturer data if available.
You can often find recommended cutting parameters for different materials and tool types from tooling manufacturers or reputable machining resources. For example, the Fabricators & Manufacturers Association (FMA) provides extensive resources on machining technologies, which can offer valuable insights even for non-metal applications.
Tool Engagement for Plunging
When plunging straight down, the ball nose’s ability to shear material gradually is paramount.
Plunge Depth: Avoid excessively deep plunge cuts in a single pass. It’s generally better to plunge in multiple shallower passes. This reduces the cutting load on the tool and improves chip evacuation.
Plunge Rate: The plunge rate (how fast the tool moves vertically) should typically be slower than your cutting feed rate. A common starting point might be half your cutting feed rate, but this can be adjusted based on results.
Dust Extraction
MDF dust is a significant health hazard and can cause significant wear on machines if not managed.
Powerful Dust Collection: Ensure your CNC machine is equipped with a robust dust extraction system directly at the cutting point. This will remove dust created by the cut and also help cool the cutting zone.
Dust Shoes: Many CNC routers use dust shoes that surround the spindle and tool, channeling dust directly into the vacuum system.
Step-by-Step: Plunge Milling MDF with Your Tialn Ball Nose End Mill
Let’s walk through the process of using your specialized end mill.
Tools and Materials Needed:
- Your CNC Router or Milling Machine
- Tialn Ball Nose End Mill (35-degree helix angle)
- MDF Sheet
- Collet and Spanner Wrench
- Dust Extraction System
- Safety Glasses
- Ear Protection
- Optional: Compressed Air for chip clearing (with caution)
-
Prepare Your Workspace:
Ensure your MDF sheet is securely clamped or fixtured to your CNC machine bed. Your dust collection system should be connected and turned on.
-
Install the End Mill:
Carefully insert the Tialn ball nose end mill into the collet of your spindle. Ensure it is seated fully and securely tightened with the correct spanner wrench. Make sure the collet nut and spindle housing are clean to prevent runout.
-
Set Zero and Tool Length:
Using your CNC software, set the XYZ zero point for your project. Accurately probe or set the tool length. This is critical for ensuring your cuts are at the correct depth.
-
Program Your Plunge Cuts:
In your CAM (Computer-Aided Manufacturing) software, define your pocket or slot toolpaths. For plunge milling, ensure the toolpath is set to enter the material from the Z-axis.
- Plunge Strategy: Most CAM software will allow you to control how the tool enters the material. Ensure it’s set to plunge directly down.
- Plunge Depth: Define your total desired depth, but be aware that you’ll likely be doing this in multiple passes.
- Plunge Rate: Set a conservative plunge rate, typically slower than your cutting feed rate.
- Step Down (for multiple passes): If your total depth is significant, set a step-down value for multiple passes. For example, if you need to cut 0.75 inches deep, you might set a step-down of 0.25 inches and multiple plunge passes.
-
Review Your Toolpath:
Before running the job, always simulate your toolpath using the preview features in your CAM software. This helps catch any potential issues, like collisions or incorrect depths.
-
Test Cut (Recommended):
If possible, perform a small test cut on a scrap piece of MDF. This allows you to verify your speeds, feeds, and plunge settings without risking your main project. Listen to the sound of the cut and inspect the resulting geometry.
-
Run the Machining Operation:
Start the CNC program. Closely monitor the process, especially during the initial plunge. Ensure dust extraction is performing well, and that there are no signs of excessive heat, smoke, or chatter.
-
Inspect the Results:
Once the machining is complete, carefully remove the finished piece and inspect the plunge areas. You should notice clean entry points with minimal fiber tear-out and a smooth internal finish.
Comparing Tialn Ball Nose End Mills with Other Options
It’s helpful to see how the Tialn ball nose end mill with a 35-degree helix stacks up against other common tool choices for MDF.
| End Mill Type | Pros for MDF Plunge Milling | Cons for MDF Plunge Milling | Best Use Cases |
|---|---|---|---|
| Tialn Ball Nose (35° Helix) | Excellent plunge capability, minimal tear-out, superior finish, long tool life. Tialn coating reduces heat and gumming. | Typically higher cost than basic end mills. Limited to creating radiused internal corners. | Detailed pockets, curved surfaces, slots, 3D carving, intricate designs in MDF. |
| Standard Flat Bottom End Mill | Can clear larger areas quickly. Can create square internal corners. | Poor for plunging (high tear-out, heat, vibration), rapid tool wear from heat and abrasion, messy finish. | Profile cutting, roughing large cavities where plunge is not a primary operation. |
| Single Flute Compression Bit | Very good chip evacuation, clean cuts on top surface. Designed for MDF. | Not ideal for deep plunging operations without auxiliary strategies. Can still produce some tear-out on plunge entry based on design. | Surface finishing, profile cutting, breaking edges on MDF. |
| Straight Flute Ball Nose End Mill | Good for general contouring and clearing. Rounded tip for smooth entry (compared to flat bottom). | Less aggressive chip removal than helical designs, more prone to heat and gumming in MDF compared to Tialn coated. Prone to tear-out on plunge if not carefully controlled. | General 3D carving, basic contouring where plunge is minimal or controlled. |
Maintenance and Care for Your End Mill
Proper care ensures your Tialn ball nose end mill performs at its best for as long as possible.
Cleaning: After each use, thoroughly clean the end mill. Use a soft brush, compressed air, or a specialized tool cleaner to remove any MDF dust, resin residues, or chips. For stubborn residue, a mild solvent might be appropriate, but always check the manufacturer’s recommendations.
Inspection: Periodically inspect the cutting edges for any signs of wear, chipping, or dullness. A dull end mill will produce poor results and can put unnecessary strain on your machine.
* Storage:** Store your end mills in a clean, dry place. A dedicated end mill holder or case will protect the cutting edges from damage and prevent contamination.
Frequently Asked Questions (FAQ)
Q1: What is the primary benefit of using a Tialn ball nose end mill for MDF?
A1: The primary benefit is its ability to plunge vertically into MDF with minimal fiber tear-out, resulting in cleaner entry points and smoother finishes, especially compared to standard flat-bottom end mills. The Tialn coating also enhances durability and reduces heat buildup.
Q2: Can I use any ball nose end mill for plunge milling MDF?
A2: While a ball nose end mill is better than a flat-bottomed one for plunging, the 35-degree helix angle and Tialn coating of this specific type offer significant advantages for MDF by optimizing chip evacuation and heat resistance, leading to superior results and tool life.
Q3: How do I prevent tear-out when plunge milling MDF?
A3: Using a Tialn ball nose end mill with a 35-degree helix is key. Additionally, ensure your plunge rate is set appropriately (slower than your cutting feed rate), consider plunging in multiple shallow passes rather than one deep pass, and ensure your dust collection is effective.
Q4: What RPM and feed rate should I use for a Tialn ball nose end mill in MDF?
A4: Recommended settings vary, but a good starting point for a 1/4″ Tialn ball nose end mill might be 18,000-20,000 RPM with a feed rate of 30-50 inches per minute. Always consult the tool manufacturer’s recommendations and perform test cuts to dial in the optimal settings for your specific machine and material.