Quick Summary: For smooth 3D surfacing on Delrin, a Tialn ball nose end mill with a 40-degree flute angle is your go-to tool. It cuts cleanly, reduces heat, and leaves a beautiful finish, making your projects shine. This guide shows you how to use it effectively and safely.
Tialn Ball Nose End Mill: Your Key to Perfect Delrin 3D Surfacing
Ever tried to get a super smooth finish on Delrin, only to end up with fuzzy edges or a rough surface? It’s a common challenge for those diving into 3D surfacing. Delrin, or acetal, is fantastic to work with – it’s strong, slippery, and machines beautifully. But getting that mirror-like finish, especially on complex curves, needs the right tools and techniques. Don’t worry, it’s not as tricky as it sounds! We’re going to walk through exactly how to use a special kind of end mill – a Tialn coated ball nose end mill with a 40-degree flute angle – to achieve stunning results on your Delrin projects. Get ready to transform your work from good to truly impressive!
What is a Tialn Ball Nose End Mill and Why for Delrin?
Let’s break down what makes this specific tool so special for Delrin 3D surfacing. Think of it as the perfect paintbrush for your milling machine when you want to create smooth, flowing shapes.
The “Ball Nose”: For Smooth Curves
The “ball nose” part of the name tells you about the tip of the end mill. Instead of being flat or pointed, its cutting end is shaped like a half-sphere, or a ball. This is crucial for 3D surfacing because it means the tool can create smooth, continuous curves and contours without leaving sharp corners or straight lines where you don’t want them. As the ball nose moves across the surface, it glides over the material, leaving a consistent, flowing finish.
The “Tialn Coating”: Adds Toughness and Heat Resistance
The “Tialn” coating (often Titanium Aluminum Nitride) is a thin, hard layer applied to the surface of the end mill. This coating is a game-changer for several reasons:
- Increased Hardness: It makes the cutting edges much harder, allowing the tool to cut through materials like Delrin more easily and for longer periods without getting dull.
- Reduced Friction: The coating creates a smoother surface on the tool itself, which reduces friction as it cuts. Less friction means less heat buildup.
- Better Heat Dissipation: It helps to carry heat away from the cutting edge more effectively. This is vital for plastics like Delrin, which can melt or deform if they get too hot.
- Longer Tool Life: By protecting the cutting edge and managing heat, Tialn coating significantly extends the lifespan of your end mill.
The “40 Degree Angle”: The Sweet Spot for Delrin
The flute angle, often referred to as the helix angle, is the twist of the cutting edges along the body of the end mill. For general metalcutting, you might see angles from 30 to 45 degrees. However, for plastics like Delrin, a 40-degree angle offers a fantastic balance:
- Efficient Chip Evacuation: The steeper angle helps to pull chips away from the cutting zone quickly. This is critical for plastics because it prevents them from melting back onto the tool or gumming up the workpiece.
- Smooth Cutting Action: A 40-degree angle provides a good shear angle, allowing the cutter to slice through the Delrin cleanly rather than rubbing. This leads to a smoother finish and less stress on the machine.
- Balance of Strength and Sharpness: It offers a good compromise between having a strong cutting edge that won’t chip easily and a sharp edge that cuts efficiently.
When you combine these elements – the smooth profiling of a ball nose, the protective and friction-reducing Tialn coating, and the efficient cutting action of a 40-degree helix angle – you get an end mill perfectly suited for achieving that exceptional 3D surface finish on Delrin.
Why is 3D Surfacing Tricky, and How This Tool Helps
3D surfacing involves creating complex, contoured shapes rather than simple straight lines or pockets. Think of sculpting a curved mold, a detailed relief, or a flowing ergonomic handle. Here’s why it’s tough and how our Tialn 40-degree ball nose end mill comes to the rescue:
The Challenges of 3D Surfacing Delrin:
- Melting and Gumming: Delrin can quickly build up heat when machined, leading to melted chips that stick to the tool and the workpiece. This ruins the surface finish and can even cause tool breakage.
- Chipping and Fuzzy Edges: If the cutting edge isn’t sharp or the cut is too aggressive, Delrin can chip or “fuzz” along the edges, leaving a rough, undesirable surface.
- Surface Finish Imperfections: Achieving a consistently smooth, almost polished look requires tools that can cut cleanly and leave minimal witness marks from the machining process.
- Complex Toolpaths: Creating the G-code for 3D surfacing can be intricate, and the tool’s geometry plays a huge role in how well the machined surface matches the digital model.
How the Tialn 40-Degree Ball Nose End Mill Solves These Issues:
- Superior Chip Evacuation: The 40-degree helix angle, combined with the smooth Tialn coating, helps to efficiently clear chips. This means less re-cutting of chips and significantly reduced heat buildup, preventing melting.
- Clean Cutting Action: The sharp cutting edges and the coating promote a clean shearing action, minimizing chipping and fuzzing for a smoother edge and surface.
- Reduced Friction and Heat: The Tialn coating dramatically lowers friction. Lower friction means less heat is generated at the cutting zone, which is a huge win for heat-sensitive Delrin.
- Consistent, Smooth Finishes: The ball nose shape is designed for smooth transitions across curved surfaces. When paired with the right cutting parameters, it leaves a surface that’s much closer to the desired finish, often requiring less post-machining work.
- Durability: The Tialn coating ensures the tool stays sharp longer, maintaining its cutting performance throughout the job and across multiple projects.
Using this specialized tool isn’t just about having the right equipment; it’s about using a tool engineered to overcome the specific challenges of machining plastics like Delrin for intricate 3D work. It’s about making your life easier and your projects look professional.
Essential Tools and Setup for Surfacing Delrin
Before you start cutting, let’s make sure you have everything you need and that your machine is set up correctly. This preparation is key to a successful and safe machining operation.
What You’ll Need:
- Your CNC Machine: This guide assumes you’re using a CNC mill.
- Tialn Coated 40-Degree Ball Nose End Mill: Ensure it’s the correct diameter for your job. For surfacing, smaller diameters are often used to get into tighter areas and create a finer finish.
- Material: Delrin (Acetal) Sheet or Block.
- Workholding: Clamps, vise, or a fixture to securely hold your Delrin. It must not move during machining.
- CAM Software: To generate your 3D surfacing toolpaths.
- Coolant/Lubricant (Optional but Recommended): Sprays or mist coolers can help manage heat, though Delrin often machines best dry or with minimal coolant.
- Dust Collection: Delrin dust can be fine. Good dust collection is important for shop safety and cleanliness.
- Safety Gear: Safety glasses are a must. Consider hearing protection and a dust mask.
Machine Setup Recommendations:
- Rigidity is Key: Ensure your CNC machine is sturdy and well-maintained. Any excessive vibration will negatively impact surface finish.
- Clean Spindle Taper: A clean taper where the end mill holder sits ensures balanced rotation and prevents runout, which is crucial for a good finish.
- Proper End Mill Holder: Use a high-quality collet or end mill holder to minimize runout. Runout causes the ball nose to cut unevenly, creating a poor surface finish.
- Workpiece Securely Mounted: This cannot be stressed enough. Your Delrin piece must be held down so it cannot shift or vibrate.
- Dust Extraction Ready: Ensure your dust collection system is turned on and positioned to capture dust effectively.
Taking these preparatory steps will set you up for success. Thinking about your setup before you hit the start button saves time and headaches!
Step-by-Step: Machining Delrin with Your Tialn Ball Nose End Mill
Now for the exciting part! Here’s how to approach 3D surfacing Delrin smoothly and efficiently.
Step 1: Design and CAM Programming
This is where you create the digital blueprint for your part and tell your machine how to cut it. You’ll need CAD (Computer-Aided Design) software to model your part and CAM (Computer-Aided Manufacturing) software to generate toolpaths.
- Model Your Part: Ensure your 3D model is accurate and represents the desired final shape.
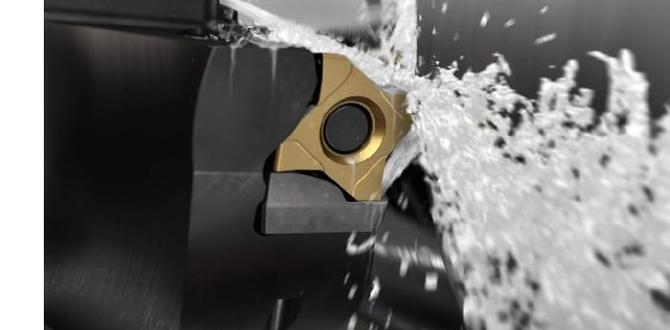
- Select Tool in CAM: In your CAM software, define your Tialn 40-degree ball nose end mill. You’ll input its diameter, number of flutes (typically 2 or 4), and crucially, its cutting parameters.
- Choose a Surfacing Strategy: Common strategies include:
- Spiral: The tool moves in an outward or inward spiral from the center.
- Offset: The tool cuts concentric paths, moving away from the center.
- 3D Adaptive Clearing (for roughing): While not for finishing, you might use this for initial material removal before switching to a finer finishing pass.
- Scallop/Stepover: This defines the distance between adjacent passes of the tool. For a smooth finish, you’ll want a small stepover.
- Define Cutting Parameters (Feeds and Speeds): This is critical! We’ll cover recommended ranges next.
- Set Z-Depth: Ensure your CAM program is set to cut to the correct final depth.
- Simulate: Always simulate your toolpath in the CAM software. This shows you potential collisions and allows you to verify the cutting strategy before running it on the machine.
Step 2: Setting Up Your Machine and Tool
- Install the End Mill: Load your Tialn 40-degree ball nose end mill into a clean collet and tighten it securely in your spindle. Ensure it’s seated correctly.
- Secure Your Material: Mount your Delrin workpiece firmly using your chosen workholding method. Double-check that it’s stable.
- Set Work Zero (Origin): Using your machine’s probing system or manual methods, set the X, Y, and Z zero points for your workpiece. For surfacing, setting Z zero at the top of the material is common.
- Tool Height Offset: Input the correct tool height offset (for manual tool changes) or ensure your tool length probe is calibrated if you have automatic tool changes.
Step 3: Generating and Loading G-Code
Once your toolpaths are programmed and simulated in CAM, export them as G-code. This is the specific set of instructions your CNC machine understands. Load this G-code file into your machine’s controller.
Step 4: The First Cut (Test Cut and Zeroing)
It’s always wise to do a small test cut, especially when trying new materials or toolpaths.
- “Air Cut”: If possible, run the program with the Z-axis slightly above the material to watch the tool move and ensure the toolpath looks correct without actually cutting.
- Inch/Material Dry Run: Jog the Z-axis down until the tip of the ball nose just touches the top surface of the Delrin. This is where your Z zero should be. Then, raise the Z-axis by your desired “initial layer height” (e.g., 0.050 inches or 1mm) so the tool starts the actual cut from slightly above the surface. This prevents gouging and helps ensure a consistent first pass.
Step 5: Running the Surfacing Program
- Start the Machine: Ensure your safety glasses are on and you’re clear of moving parts. Press the start button.
- Monitor Closely: Watch the first few minutes of the operation. Listen for any unusual noises and check if chips are clearing properly. Is the surface finish looking smooth?
- Adjust if Necessary: If you notice excessive heat, poor chip evacuation, or a rough finish, be ready to pause the machine and make adjustments to speeds, feeds, or toolpath stepover.
- Full Cycle: Let the machine complete the entire surfacing program.
Step 6: Inspection and Finishing
- Clean the Part: Once the program is complete and the spindle has stopped, carefully remove the Delrin part. Brush or blow away any chips.
- Inspect the Surface: Examine the surface finish. You should see a smooth, continuous contour with minimal lines or fuzz. The Tialn 40-degree ball nose should have left a beautiful finish.
- Secondary Operations: Depending on your project, you might have further machining steps or simply need to deburr the edges.
By following these steps, you’re well on your way to mastering 3D surfacing on Delrin with your specialized end mill.
Feeds and Speeds for Delrin Surfacing
Getting the right feeds and speeds is crucial for cutting Delrin cleanly and preventing melting. These are starting points, and you may need to fine-tune them based on your specific machine, the rigidity of your setup, and the exact grade of Delrin.
Remember, Delrin is a plastic. It doesn’t tolerate heat well if it builds up. We want to cut it, not melt it into a gummy mess! The Tialn coating and 40-degree helix angle help, but proper speeds and feeds are your best friends here.
Understanding the Terms:
- Spindle Speed (RPM): How fast the end mill spins.
- Feed Rate (IPM or mm/min): How fast the tool moves through the material.
- Depth of Cut (DOC): How deep the tool cuts into the material with each pass. For finishing passes, this is usually very small.
- Stepover: The distance between adjacent passes of the tool. For a smooth surface finish, this is typically a percentage of the tool’s diameter.
Recommended Starting Ranges (for a Tialn 40-degree Ball Nose End Mill):
These are general guidelines. Always consult the end mill manufacturer for their specific recommendations if available.
| Parameter | Metric (Delrin) | Imperial (Delrin) | Notes |
|---|---|---|---|
| End Mill Diameter | 6 mm | 1/4 inch | Smaller is often better for finishing finer details |
| Spindle Speed (RPM) | 8,000 – 15,000 RPM | 8,000 – 15,000 RPM | Higher speeds help chip formation and reduce melting. |
Feed Rate (
Related Posts |