Quick Summary:
A Tialn ball nose end mill with a 45-degree helix angle is ideal for facing aluminum, especially alloys like 7075. Its geometry promotes smooth chip evacuation and a superior surface finish on soft materials, minimizing issues like aluminum sticking to the cutter.
Hey there, fellow makers! Daniel Bates here from Lathe Hub. If you’ve ever wrestled with getting a perfectly flat, smooth surface on aluminum parts using a milling machine, you know it can be a bit frustrating. Aluminum, bless its lightweight heart, can sometimes grab cutters or leave a rough finish. But what if I told you there’s a specific tool designed to make this job easier and yield stunning results? That’s where our star for today comes in: the Tialn ball nose end mill with a 45-degree helix angle.
This isn’t just any milling tool. It’s a specialized bit that, when used correctly, can transform your aluminum facing operations from a chore into a satisfying success. We’re going to break down exactly why this tool is so good for aluminum and how you can use it to achieve that professional, mirror-like finish you’ve been chasing. Get ready to boost your machining game!
Why Your Aluminum Facing Needs a Tialn Ball Nose End Mill (Specifically 45 Degree!)
When we talk about milling aluminum, especially tougher alloys like 7075, the right tool makes all the difference. Aluminum can be sticky, prone to built-up edge (where aluminum welds itself to the cutting edge), and requires specific strategies to get a clean finish. This is where the Tialn ball nose end mill, particularly with a 45-degree helix angle, shines brightly.
Understanding the “Ball Nose” and “45 Degree Helix”
Let’s break down what makes these features so important for aluminum:
- Ball Nose Geometry: Unlike flat-bottomed end mills, a ball nose end mill has a perfectly rounded tip. For facing operations, this means it doesn’t leave a sharp corner that can dig in or create a noticeable step. The radiused tip gently blends into the cut, contributing to a smoother, more even surface finish. It also distributes cutting forces more broadly.
- 45-Degree Helix Angle: This refers to the angle of the flutes (the spiral edges that cut). A 45-degree helix angle is a sweet spot for many aluminum alloys. It provides:
- Good Chip Evacuation: Aluminum produces relatively long, stringy chips. A moderate helix angle like 45 degrees helps to lift these chips away from the cutting zone more effectively than a steeper or flatter angle. This prevents chip recutting, which is a major cause of poor finishes and tool damage.
- Softer Cutting Action: The 45-degree angle offers a smoother engagement with the material. This reduces chatter and vibration, leading to a quieter cut and a better surface finish. It’s less aggressive than a high-helix (e.g., 60 degrees), which can sometimes be too harsh for aluminum, but more effective than a low-helix (e.g., 30 degrees) for chip control.
- Reduced Built-Up Edge (BUE): While coatings play a big role, the cutting geometry also contributes. The chip flow characteristics of a 45-degree helix can help minimize the tendency for aluminum to stick to the cutting edges compared to some other geometries.
- Tialn Coating: “Tialn” stands for Titanium Aluminum Nitride. This durable, high-performance coating adds a significant advantage for machining aluminum. Tialn coatings offer:
- Increased Hardness: This improves wear resistance, meaning your tool lasts longer.
- Reduced Friction: Crucial for sticky materials like aluminum, as it helps prevent BUE.
- Higher Temperature Resistance: Allows for faster cutting speeds while maintaining tool integrity.
Specifically for Aluminum 7075
Aluminum 7075 is a popular, high-strength alloy, often compared to steel in its machining challenges. It’s prone to work hardening and can be particularly sticky. Using a Tialn ball nose end mill with a 45-degree helix is a fantastic choice because:
- It combats the stickiness better than many general-purpose end mills.
- The balanced cutting action and chip evacuation protect the tool from the rapid wear that 7075 can inflict.
- It consistently delivers the desired smooth finish on precision parts.
Choosing Your Tialn Ball Nose End Mill: Key Specifications
When you’re out shopping for this specialized tool, knowing what to look for will save you time and ensure you get the right one for the job. Here are the critical specifications:
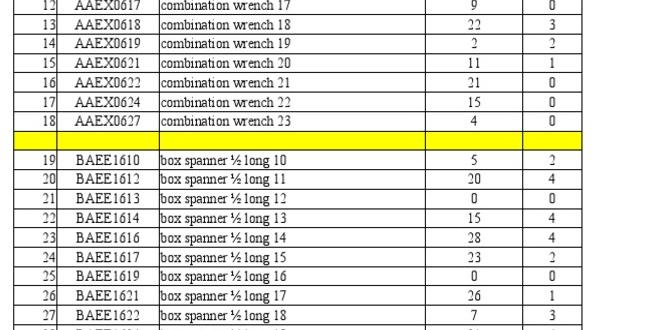
Diameter
The diameter of the end mill you choose will depend on the size of the surface you need to face and the capabilities of your milling machine. For general-purpose facing on smaller to medium parts, a 1/2 inch (12mm) or 3/4 inch (20mm) diameter is common. Larger diameters can face wider areas faster but require a more robust machine and setup.
Number of Flutes
For aluminum, especially with a Tialn coating and moderate helix, 2 or 3 flutes are often preferred.
- 2 Flutes: Typically offers the best chip clearance, which is paramount when milling aluminum. The larger spaces between flutes allow chips to escape easily, reducing the risk of clogging and chip recutting. This is often the go-to for aluminum.
- 3 Flutes: Can provide a smoother finish and slightly faster feed rates than a 2-flute in some applications, but chip evacuation might be a bit more restricted. For many, 2 flutes remain the top choice for maximizing a clean cut in aluminum.
Avoid 4-flute tools for rough aluminum milling; they tend to pack chips more easily.
Shank Diameter
Ensure the shank diameter matches your collets or tool holders. Standard sizes include 1/4 inch (6mm), 1/2 inch (12.7mm), 8mm, 10mm, 12mm, etc. Always use a properly fitting collet for maximum rigidity and accuracy.
Overall Length and Reach
Consider the depth of your workpiece and the desired reach. Most standard end mills will suffice for typical facing operations, but if you need to reach deep into a pocket, you’ll need a longer tool.
Coating
As discussed, Tialn (Titanium Aluminum Nitride) is excellent for aluminum. Other coatings like ZrN (Zirconium Nitride) or even uncoated carbide can work, but Tialn offers a superior balance of hardness, lubricity, and thermal resistance for this specific application.
Helix Angle
Reiterate this crucial point: 45 degrees is the target. You might see tools labeled as “high helix” (60 degrees) or “low helix” (30 degrees). For facing aluminum, 45 degrees offers the best compromise.
| Specification | Recommended for Aluminum Facing (Tialn Ball Nose 45 deg) | Why it Matters |
|---|---|---|
| Geometry | Ball Nose | Smooth finish, no sharp corner to dig. |
| Helix Angle | 45 Degrees | Optimal chip evacuation and balanced cutting action for aluminum. |
| Coating | Tialn (TiAlN) | Reduces friction, prevents BUE, increases tool life. |
| Number of Flutes | 2 or 3 Flutes | Maximizes chip clearance for sticky aluminum. |
| Material | Carbide | Provides rigidity and hardness for efficient cutting. |
Preparation is Key: Setting Up for Success
Before your ball nose end mill even touches the aluminum, proper setup is crucial. This ensures safety, accuracy, and extends the life of your tool.
Machine and Workholding
- Rigidity: Ensure your milling machine is rigid and free from excessive play in the axes. A wobbly machine will lead to chatter and a poor finish.
- Cleanliness: Make sure your spindle taper and collet are perfectly clean. Any debris can cause runout, which is detrimental to tool life and finish.
- Secure Workholding: Your aluminum workpiece must be clamped securely. Use appropriate clamps, vises, or fixturing. Any movement during the cut is unacceptable. Consider using soft jaws if you are clamping on a surface that will be machined.
- Tool Holder/Collet: Use a high-quality collet system to minimize runout. For carbide end mills, a good quality collet chuck is often better than a standard collet.
Spindle Speed and Feed Rate (SFM and IPT)
This is where things get a bit more technical, but we’ll keep it simple. Aluminum is machined at relatively high surface speeds (SFM – Surface Feet per Minute) and moderate chip loads (IPT – Inches per Tooth). The Tialn coating and 45-degree helix allow for more aggressive parameters than uncoated tools.
General Starting Points for 7075 Aluminum with Tialn Ball Nose End Mill (Carbide):
- Surface Speed (SFM): Around 300-600 SFM.
- For a 1/2 inch (12.7mm) end mill, using 400 SFM:
RPM = (SFM 12) / Diameter (inches)
RPM = (400
12) / 0.5 = 9600 RPM - For a 12mm end mill, using 120 m/min:
RPM = (Surface Speed m/min 1000) / (π Diameter mm)
RPM = (120 1000) / (3.14159 12) ≈ 3183 RPM
- For a 1/2 inch (12.7mm) end mill, using 400 SFM:
- Chip Load (IPT): Around 0.001 – 0.003 inches per tooth for a 1/2 inch diameter tool. The exact IPT will depend on the tool’s diameter and your machine’s rigidity.
- If using a 2-flute end mill at 9600 RPM and a chip load of 0.002 IPT:
Feed Rate (IPM) = RPM Flutes IPT
Feed Rate (IPM) = 9600 2 0.002 = 38.4 IPM
- If using a 2-flute end mill at 9600 RPM and a chip load of 0.002 IPT:
Important Note: These are starting points! Always consult the tool manufacturer’s recommendations. Listen to your machine; if it sounds like it’s chattering or straining, back off the feed rate or spindle speed. A good resource for machining data is the Machining Doctor.
Coolant/Lubrication
Milling aluminum, even with Tialn coating, benefits greatly from lubrication. This helps with chip evacuation, reduces friction, and prevents BUE.
- Flood Coolant: Ideal if your machine is equipped. A good coolant/lubricant designed for aluminum is best. Look for synthetic or semi-synthetic coolants.
- Mist Coolant: A good alternative for hobbyist machines. It provides a fine spray of lubricant directly to the cutting zone.
- Cutting Fluid/Oil: For manual machining, manually applying a specialized aluminum cutting fluid with a brush or oil can while cutting is essential.
Never use a general-purpose cutting fluid that might be meant for steel, as it could react poorly with aluminum.
Step-by-Step: Facing Aluminum with Your Tialn Ball Nose End Mill
Now, let’s get to the actual machining. This process assumes you’re using a CNC milling machine, but the principles apply to manual machines as well, with more operator input required.
Step 1: Secure and Zero
Ensure your workpiece is securely fixtured. Accurately set your Z-axis zero point on the top surface of the aluminum. If you’re surfacing a casting or a rough piece, you might do a light initial pass to establish a clean datum plane first.
Step 2: Program or Set Toolpath
For facing, you’ll typically use a zig-zag or spiral toolpath.
- Zig-Zag: The tool moves back and forth across the surface, stepping over by a percentage of its diameter. This is very common for facing.
- Spiral: The tool starts from the center and spirals outwards (or vice-versa). This can sometimes yield a very nice, continuous finish.
Crucially, you need to ensure your step-over is set appropriately. For a good finish on aluminum, a step-over of 40-60% of the tool diameter is a good starting point. The ball nose shape means the tool’s edges will overlap slightly.
Step 3: Set Tool Parameters
Input the calculated spindle speed (RPM) and feed rate (IPM) into your machine’s program or control panel. Double-check your tool length offsets and any geometric compensation. Ensure your coolant is activated.
Step 4: The First Cut (Roughing/Finishing Pass)
Start the program. It’s always wise to do a dry run first (without the tool touching the material) to check clearances and program flow. Then, initiate the cut. Listen carefully to the sound of the cut.
- Listen for Chatter: A high-pitched squeal or banging indicates vibration. This could be due to feed rate, spindle speed, tool engagement, or lack of rigidity. Adjust parameters.
- Observe Chip Load: Are the chips forming nicely, or are they wispy and stringy? Nice, curled chips are a good sign.
- Monitor Surface Finish: As the tool passes over the aluminum, observe the surface. It should be smooth, with minimal tool marks.
Since this is a ball nose end mill for facing, you are essentially generating a perfectly smooth, slightly curved surface across your entire part. The rounded tip ensures there are no sharp corners left behind, and the 45-degree helix helps push chips away cleanly.
Step 5: Verify Dimensions and Finish
Once the facing operation is complete, carefully inspect the surface. It should be uniformly flat (or as flat as your machine and setup allow) and exhibit a desired sheen. Use a micrometer or caliper on critical areas if necessary to verify depth of cut or overall dimensions.
Tips for the Best Finish
Achieving that sought-after mirror finish on aluminum is the goal. Here are some extra tips:
- Light Finishing Pass: Once you’ve done your main facing cut, consider a dedicated finishing pass with a slightly lighter depth of cut (e.g., 0.001-0.002 inches or 0.025-0.05mm) and potentially a slightly slower feed rate. This can dramatically improve the surface finish.
- Tool Wear: Keep an eye on your tool. If the finish starts to degrade, it’s time to check for wear or replace the tool before it causes damage. Tialn coatings help, but no tool lasts forever.
- Cleanliness is Paramount: After each pass, and especially after the final pass, ensure any residual aluminum chips or coolant residue is thoroughly cleaned from the part and the machine.
- Up Your CNC Program: For the ultimate finish, consider using advanced CAM software that can generate high-definition contouring toolpaths which optimize the tool’s movement to leave the most consistent surface possible.
When to Use vs. When to Avoid
While fantastic for aluminum, this specific tool has its strengths and weaknesses.
Best Used For:
- Facing Soft Materials: Especially aluminum alloys like 6061, 7075, and even milder steels if appropriate speeds/feeds are used.
- Achieving Smooth Surface Finishes: Where a cosmetic or functional smooth surface is required.
- General Machining Tasks: Creating flat surfaces on parts.
- Applications Requiring Smooth Transitions: Where sharp, square corners are not needed at the profile edge.
When to Consider Other Tools:
- Machining Hardened Steels or Exotic Alloys: Materials requiring extreme hardness and heat resistance might need specialized carbide grades or coatings (like AlTiN for steels).
- Creating Sharp, Square Corners