
Quick Summary: For titanium milling, a TiAlN ball nose end mill with a 50-degree helix angle is a specialized tool designed for efficient material removal and superior finish. We’ll guide you through its essential uses and best practices for tackling tough titanium grades like Grade 5.
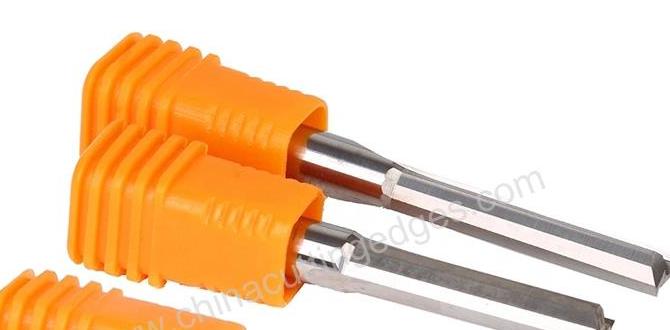
TiAlN Ball Nose End Mill 50 Deg: Your Secret Weapon for Titanium Machining
Machining titanium can feel like trying to cut through a rock. It’s strong, tough, and loves to grab onto standard cutting tools, making for frustrating and often ruined projects. If you’ve struggled with getting a clean cut, smooth finish, or just keeping your tool from overheating, you’re not alone. The key to conquering titanium lies in using the right tool for the job. That’s where a TiAlN ball nose end mill with a 50-degree helix angle shines. This specialized tool is engineered to handle titanium’s unique challenges, helping you achieve precise shapes and a beautiful finish without the headaches.
In this guide, we’ll break down exactly what makes this tool so effective for titanium and how you can use it with confidence. We’ll cover everything from understanding its features to setting up your machine for success. Get ready to transform your titanium milling experience!
Understanding the TiAlN Ball Nose End Mill: What’s Special About It?
Let’s break down what each part of the name “TiAlN Ball Nose End Mill 50 Deg” tells us and why it’s critical for working with titanium.
TiAlN Coating: The Heat Shield
The “TiAlN” stands for Titanium Aluminum Nitride. This isn’t just a fancy color; it’s a thin, hard coating applied to the cutting tool. Think of it as a protective shield.
- Withstands High Heat: Titanium is known to generate a lot of heat when machined. TiAlN is incredibly hard and has a high thermal barrier, helping the tool resist this heat. This means the cutting edge stays sharper for longer, reducing wear and preventing it from softening.
- Reduces Friction: The smooth surface of the TiAlN coating helps chips slide away more easily. This is crucial for titanium, which can have a tendency to “stick” to the tool. Less sticking means less chatter and a better surface finish.
- Increased Tool Life: Because it resists heat and reduces friction, TiAlN coatings significantly extend the lifespan of your end mill, especially when working with tough materials like titanium.
Ball Nose: For Those Curves and Contours
The “Ball Nose” describes the shape of the cutting tip. Instead of a flat or pointed tip, a ball nose end mill has a hemispherical end.
- 3D Machining: This shape is perfect for creating curved surfaces, contours, fillets, and pockets with rounded bottoms. It allows for smooth, continuous movements in multiple axes, ideal for complex aerospace parts or custom designs.
- Parting and Slotting: While not its primary use, a ball nose can be used for some slotting operations, leaving a rounded bottom.
- Surface Finishing: The radiused tip is excellent for achieving a high-quality surface finish on contoured parts, as it doesn’t leave sharp corners that can create stress risers or look unsightly.
50-Degree Helix Angle: The Sweet Spot for Titanium
The “50 Deg” refers to the helix angle of the flutes. This is the angle at which the cutting edges spiral around the tool’s body. For machining titanium, a higher helix angle is generally preferred.
- Improved Chip Evacuation: A steeper helix angle (like 50 degrees) helps to pull chips away from the cutting zone more efficiently. This prevents chips from clogging the flutes, which can lead to tool breakage and poor surface finish.
- Reduced Cutting Forces: Higher helix angles often mean a more gradual engagement of the cutting edge. This can lead to reduced cutting forces, making the machining process smoother and requiring less machine rigidity.
- Better for Stringy Materials: Titanium is known to produce long, stringy chips. The 50-degree helix is particularly good at managing these types of chips effectively.
- Ideal for Climb Milling: This angle works very well with climb milling strategies, which can further reduce cutting forces and improve surface finish and tool life in titanium.
Why This Combination is Essential for Titanium (Especially Grade 5)
Titanium, particularly aerospace-grade alloys like Titanium Grade 5 (Ti-6Al-4V), presents unique machining challenges. It’s strong, has low thermal conductivity (meaning heat builds up quickly at the cutting edge), and tends to work-harden, becoming even harder as you machine it.
A tool specifically designed for these conditions is not a luxury; it’s a necessity. The synergy of the TiAlN coating, ball nose geometry, and 50-degree helix angle works together to overcome these obstacles:
- Heat Management: The TiAlN coating protects the cutting edge from the intense heat generated by titanium’s low thermal conductivity, preventing premature wear.
- Chip Control: The 50-degree helix angle, combined with appropriate feed rates, ensures that the problematic stringy chips are evacuated cleanly, preventing recutting and tool damage.
- Durability and Finish: The ball nose geometry allows for efficient material removal on complex surfaces while the coating and helix angle ensure a good surface finish and longevity of the tool.
- Plunge Milling Capability: When used for plunge milling (driving the tool straight down into the material to create a cavity), the ball nose geometry and precise flute geometry of a good quality end mill are critical to avoid catastrophic tool failure. The 50-degree helix often aids in the smooth entry and chip evacuation during these operations.
Key Features to Look For in a 50 Deg TiAlN Ball Nose End Mill for Titanium
When you’re out shopping for this specialized tool, keep these important features in mind to ensure you’re getting one that will perform optimally for titanium:
| Feature | Why It Matters for Titanium |
|---|---|
| High Performance Carbide Substrate | A fine-grain carbide base provides the strength and toughness needed to withstand the forces involved in cutting titanium. It prevents chipping and breaking. |
| TiAlN or Advanced AlTiN Coating | As discussed, this is non-negotiable for heat resistance and reduced friction. Advanced versions like AlTiN offer even better performance at higher temperatures. |
| Corner Radius & Chamfer (Optional but Recommended) | Some ball nose mills have a small chamfer or reinforced corner radius. This adds extra durability to the most vulnerable part of the cutting edge, preventing it from chipping out. |
| Number of Flutes (e.g., 3 or 4 Flutes) | For titanium, generally 3 or 4 flutes are good. Fewer flutes (3) can offer better chip evacuation for slotting, while more flutes (4) can provide a smoother finish on contoured surfaces. For high-performance roughing and finishing, some specialized 4-flute designs are excellent. Always check manufacturer recommendations. |
| Core Strength and Relief | A robust core diameter and proper flute geometry with sufficient relief angles help maintain tool strength and allow for efficient chip clearance. |
| Specific Grades or Series for Titanium | Many tool manufacturers offer specific end mill series optimized for titanium. These often have engineered flute shapes, core designs, and coatings specifically for this challenging material. |
Setting Up Your Machine for Titanium Milling with a Ball Nose End Mill
Having the right tool is only half the battle. Proper machine setup and cutting parameters are crucial for success and safety when machining titanium. This section focuses on getting your machine ready.
1. Machine Rigidity and Power
Titanium is a demanding material. Your milling machine needs to be up to the task.
- Rigidity is Key: A sturdy, rigid machine will absorb cutting forces better, reducing vibration and chatter. This is essential for achieving a good surface finish and preventing tool breakage. Hobby machines might struggle with larger cuts, so be conservative.
- Sufficient Spindle Power: Titanium requires significant cutting force. Ensure your spindle has enough horsepower to maintain speed and torque under load.
- Secure Workholding: Your workpiece must be held down extremely firmly. Any movement can lead to inaccurate cuts, tool damage, or a dangerous situation. Use robust vises, clamps, or fixturing.
2. Selecting the Right Coolant/Lubrication
Proper cooling and lubrication are vital for managing heat and extending tool life.
- Flood Coolant: For serious titanium machining, a flood coolant system is highly recommended. This continuously flushes away chips and cools the cutting zone.
- MQL (Minimum Quantity Lubrication): MQL systems deliver a fine mist of oil directly to the cutting zone. This is a more efficient way to lubricate and cool than traditional methods and is often preferred for titanium.
- Specific Machining Fluids: Use coolants or lubricants specifically designed for machining titanium or high-temperature alloys. These fluids are formulated to handle the extreme conditions. Avoid water-based coolants that can sometimes react with titanium at high temperatures.
- Air Blast: While not as effective as liquid coolant, a strong blast of compressed air can help evacuate chips and provide some cooling. It’s better than nothing but not ideal for heavy titanium cuts.
3. Tool Holder Considerations
The way your end mill is held in the spindle affects accuracy and rigidity.
- High-Quality Tool Holders: Use a robust tool holder like a
- ER Collet Chucks: These provide excellent runout and strong gripping force.
- Shrink Fit Holders: For demanding applications, shrink fit holders offer superior rigidity and concentricity.
- Avoid Set Screw Holders: These are generally not recommended for titanium as they can lead to runout and damage the end mill shank.
Always ensure your tool holder is clean and that the end mill is inserted to the recommended depth—never stick it out further than necessary to maintain rigidity.
50 Deg TiAlN Ball Nose End Mill: Step-by-Step Usage Guide for Titanium
Now that your machine is set up, let’s get to actually cutting. These steps will guide you through using your TiAlN ball nose end mill effectively and safely on titanium.
Step 1: Secure the Workpiece
As mentioned, this is critical. Ensure your titanium workpiece (especially Grade 5) is clamped down with absolute certainty. Any looseness will cause problems.
Step 2: Install the End Mill Correctly
Secure your 50-degree TiAlN ball nose end mill in a high-quality tool holder. Make sure it’s clean and properly seated. Insert it into the spindle, ensuring it’s tightened securely according to your tool holder’s specifications.
Step 3: Set Up Tool Length Measurement
Accurate tool length measurement is vital for ensuring the correct depth of cut and for preventing crashes. Use your machine’s tool setter or a known method to accurately measure the tool length from the spindle face.
Step 4: Calculate Cutting Parameters (Speeds and Feeds)
This is where things get technical, but it’s crucial for success. Titanium is forgiving of under-machining but punishes overfeeding or overspeeding.
- Consult Manufacturer Data: Always start with the cutting data recommended by the end mill manufacturer. They often provide charts specific to materials like titanium.
- Surface Speed (SFM): Titanium generally requires lower surface speeds than softer metals like aluminum or steel. For a TiAlN coated carbide end mill, you might see recommendations in the range of 40-100 SFM, but always check the specific tool’s datasheet.
- Chip Load (CL): This is the amount of material each cutting edge removes per revolution. Start conservatively. For titanium, a chip load might be very small, perhaps 0.001″ to 0.003″ per tooth, depending on the diameter and depth of cut.
- Calculate RPM:
RPM = (Surface Speed 4) / Diameter
(Using inches and SFM).
A slower RPM is generally better when starting out. - Calculate Feed Rate (IPM):
Feed Rate = RPM Number of Flutes Chip Load
(Using inches and IPM). - Depth of Cut (DOC) and Width of Cut (WOC): These will depend on your machine’s rigidity, the size of the end mill, and the desired outcome (roughing vs. finishing). For titanium, shallower radial and axial depths of cut are often necessary.
Example Calculation (Hypothetical):
| Parameter | Value | Notes |
|---|---|---|
| End Mill Diameter | 0.5 inches | |
| Recommended Surface Speed (SFM) | 60 SFM | For TiAlN coated carbide on Titanium Grade 5. Check tool-specific data! |
| Recommended Chip Load per Tooth (CL) | 0.002 inches | Conservative starting point. |
| Number of Flutes | 4 | |
| Calculated RPM | 764 RPM | (60 4) / 0.5 |
| Calculated Feed Rate (IPM) | 12,224 IPM | 764 RPM 4 flutes 0.002″ CL |
Important Note: These are example calculations. Always refer to the end mill manufacturer’s recommendations, and be prepared to adjust based on the machine’s
performance and the sound/feel of the cut. Start with lighter cuts and increase if the machine and tool handle it well.
Step 5: Set Up Coolant/Lubrication
Turn on your flood coolant, MQL system, or air blast. Ensure it’s directed precisely at the cutting zone.
Step 6: Initiate First Cut (with Caution!)
Start the spindle and approach the workpiece. Begin your first axial (plunge) or radial (sideways) cut with conservative parameters. Listen to the machine and watch the chip formation.
- Listen for Smoothness: The cut should sound like a consistent, controlled cut, not a screaming or chattering mess.
- Observe Chips: Chips should be relatively small and well-formed, not long, stringy, or dusty. Golden-brown chips are often a good sign; dark blue or black chips indicate overheating.
- Watch for Overheating: If the workpiece or tool starts to glow or smoke, stop the machine immediately and re-evaluate your parameters or coolant flow.
Step 7: Step Through Your Machining Strategy
- Plunge Milling: For creating cavities, use a controlled plunge motion. Start with a shallow plunge depth and step up gradually. The ball nose geometry is key here for a smooth entry and controlled chip removal.
- Contour Milling: For 3D shapes, program smooth, continuous tool paths. The 50-degree helix supports efficient cutting in multiple directions.
- Adaptive/High-Efficiency Machining (HEM): For roughing, consider HEM strategies. These use smaller radial stepovers and larger axial depths of cut to keep the tool engaged in a consistent, efficient manner, greatly improving tool life and reducing heat.
For finishing passes, use a much smaller stepover and a higher feed rate (while maintaining appropriate RPM) to achieve a fine surface finish. The ball nose geometry and TiAlN coating are critical for this smooth finish.
Step 8: Monitor and Adjust
Machining titanium is an iterative process. You’ll likely need to fine-tune speeds, feeds, and depths of cut as you go. Don’t be afraid to slow down if needed. The goal is a controlled, efficient cut, not a race.
Common Issues and Troubleshooting
Even with the right tool and setup, challenges can arise. Here’s how to tackle some common problems:
Related Posts


| Problem | Possible Cause(s) | Solution(s) |
|---|