Quick Summary
For precise FR4 machining and minimal deflection, select a 1/4 inch carbide end mill with a 1/4 inch shank and stub length. This specific tool geometry is crucial for achieving clean cuts and accuracy on this challenging composite material.
Mastering FR4 Machining: Your Guide to the Perfect Carbide End Mill
Working with FR4, a common fiberglass-reinforced epoxy laminate, can be a real challenge for any machinist, especially when you’re just starting out. It’s tough, it’s abrasive, and it can quickly dull your tools if you’re not careful. The biggest frustration many beginners face is chatter and deflection, leading to rough cuts and inaccurate parts. But don’t worry, it’s not as complicated as it sounds! The key lies in choosing the right tool for the job. Get this part right, and you’ll be amazed at how much smoother and more accurate your FR4 projects become.
This guide is all about helping you understand exactly which end mill will make your FR4 machining experience a breeze. We’ll break down why a specific type of end mill – a stub-length, 1/4-inch carbide end mill with a 1/4-inch shank – is your best friend for this material. By the end, you’ll have the confidence to pick the right tool and achieve fantastic results on your metal lathe, milling machine, or even your CNC setup.
Why FR4 Needs Special Attention
FR4 isn’t like plain metal or soft wood. It’s made of woven glass fibers and epoxy resin. This combination makes it strong and an excellent electrical insulator, which is why it’s so popular for printed circuit boards (PCBs). However, these same properties make it demanding to machine:
Abrasive Nature: The glass fibers act like tiny sandpaper, wearing down cutting edges quickly. This means you need a tool made of a hard material that can withstand this.
Heat Generation: Machining FR4 produces significant heat. If not managed, this heat can melt the resin, clog the flutes of your end mill, and lead to poor surface finish and tool damage.
Delamination Risk: Pushing too hard or using the wrong tool can cause the layers of the FR4 to peel apart, a problem known as delamination. This ruins the part and can lead to inaccurate dimensions.
Chipping: The edges of FR4 can be prone to chipping if the tool isn’t sharp or if cutting forces are too high.
The Superstar Tool: The 1/4 Inch Carbide End Mill, Stub Length, 1/4 Inch Shank

To tackle these challenges, we turn to a very specific type of cutting tool: a carbide end mill. But not just any carbide end mill – we need one with a precise configuration. Let’s break down why this particular tool is so effective for FR4:
1. Carbide: The Hard Material Champion
The “carbide” in carbide end mill refers to tungsten carbide, a material twice as stiff as steel and much harder.
High Hardness: Carbide stays sharp and maintains its cutting edge much longer than high-speed steel (HSS) when machining abrasive materials like FR4. This means fewer tool changes and more consistent results.
Heat Resistance: Carbide can handle higher temperatures generated during machining, which is crucial for FR4.
2. The 1/4 Inch Diameter: Sweet Spot for Detail and Strength
A 1/4 inch diameter end mill strikes a great balance for many FR4 applications.
Fine Detail: It’s small enough to machine intricate shapes and fine features often required in PCB prototyping or small component fabrication.
Manageable Chip Load: The smaller diameter allows for controlled chip loads, reducing the risk of overheating and delamination.
Common Size: It’s a very common size, making it readily available and often more affordable than very large or very small diameters.
3. The 1/4 Inch Shank: Stability and Rigidity
The shank is the part of the end mill that fits into your tool holder (like a collet or end mill holder). Having a 1/4 inch shank that matches the diameter is important for rigidity.
Reduced Runout: A shank that closely matches the tool diameter with a properly sized collet minimizes “runout” – the wobble of the cutting tool. Less runout means more accurate cuts and a better surface finish.
Secure Grip: A 1/4 inch shank fits securely in standard 1/4 inch collets and tool holders, providing a solid connection.
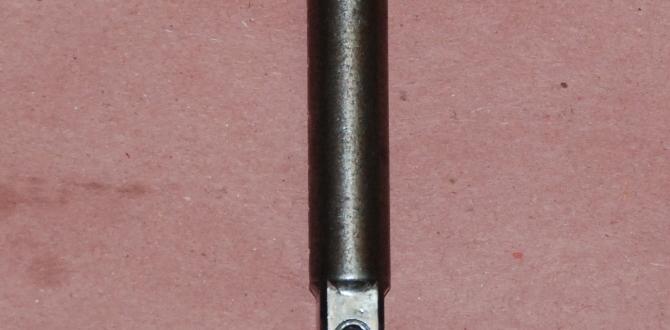
4. Stub Length: Minimizing Deflection is Key!
This is where the prompt’s core technical detail comes into play, and it’s the most critical aspect for FR4. A “stub length” end mill is shorter than a standard end mill of the same diameter.
Why Stub Length Matters: Imagine a long, thin stick versus a short, thick stick. Which one is easier to bend? The long, thin one. The same principle applies to end mills. A stub-length end mill is inherently more rigid because it has less “stick-out” – the amount of the tool extending beyond the collet.
Minimizing Deflection: When an end mill is under cutting load, it bends slightly (deflects). With FR4, even a small amount of deflection can lead to inaccuracy and poor finish. A stub-length end mill deflects significantly less because its shorter length provides much greater resistance to bending. This is crucial for maintaining tight tolerances and avoiding issues like chip recutting and surface roughness.
For FR4: The fiberglass composite nature of FR4 creates lateral forces during cutting. A stub length end mill’s increased rigidity directly combats these forces, ensuring the tool stays on its intended path with minimal deviation.
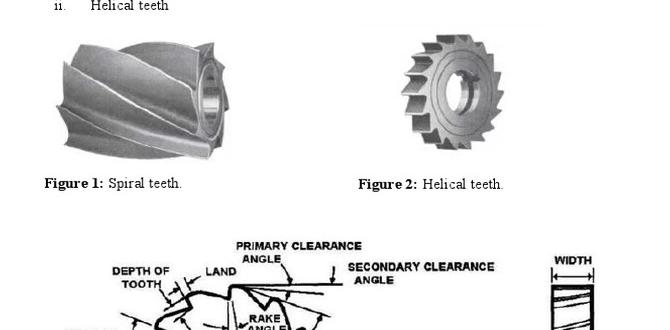
5. Two Flutes: Efficient Chip Evacuation
For FR4, end mills with two flutes are often preferred.
Better Chip Clearance: FR4 generates a lot of fine, abrasive dust and chip material. Tools with fewer flutes (like two-flute) have larger spaces between the cutting edges (flutes). This allows the chips to exit the cut zone more easily, preventing clogging and chip recutting.
Heat Reduction: Efficient chip evacuation also helps carry heat away from the cutting zone, further combating the heat issues inherent with FR4.
Recommended Tool Specifications Summary
Here’s a quick rundown of the ideal tool you should be looking for:
| Feature | Recommendation for FR4 | Why? |
|---|---|---|
| Material | Carbide (Solid) | Hardness, wear resistance, heat resistance for abrasive FR4. |
| Diameter | 1/4 inch | Good balance for detail work and manageable chip loads on FR4. |
| Shank Diameter | 1/4 inch | Ensures a secure fit in standard collets, reduces runout, common size. |
| Length | Stub Length (e.g., 1.5″ or 2″ overall length) | Crucial for minimizing deflection due to increased rigidity. |
| Number of Flutes | 2 | Better chip evacuation from FR4 dust, reduces clogging and heat. |
| Coating | Uncoated or specific FR4 coatings (optional) | Uncoated is fine; specialized coatings can sometimes extend life, but focus on geometry first. |
Setting Up Your Machine for Success
Choosing the right tool is only half the battle. How you use it on your machine matters just as much!
1. Spindle Speed (RPM) and Feed Rate
These two settings are closely related. Getting them right balances material removal with tool life and surface finish.
Spindle Speed (RPM): This is how fast the end mill spins. For FR4 with a 1/4-inch carbide end mill, a good starting point might be between 10,000 and 20,000 RPM. The exact speed depends on your machine’s capabilities and coolant/lubrication.
Feed Rate (IPM or mm/min): This is how fast the tool moves through the material. For FR4, you generally want a faster feed rate relative to spindle speed. This helps create larger chips that are easier to clear, rather than fine dust that can pack into the flutes and cause overheating. A common rule of thumb is to aim for a chip load of around 0.001 to 0.003 inches per tooth.
Calculation Example: If you’re running at 15,000 RPM with a 2-flute end mill, and you aim for a 0.002 inch chip load per tooth:
Feed Rate = RPM × Number of Flutes × Chip Load per Tooth
Feed Rate = 15,000 × 2 × 0.002 = 60 inches per minute (IPM)
Start Conservatively: Always start with conservative settings and gradually increase them while listening to the cut and observing the chips. If you hear excessive squealing or see very fine dust, you might be feeding too slowly or spinning too fast. If you see large, ragged chips or hear a heavy clunking, you might be feeding too quickly or not spinning fast enough.
2. Your Milling Machine Setup
Rigidity is King: Ensure your milling machine itself is rigid. A wobbly machine will amplify any issue, even with the best end mill. Ensure your machine’s ways (guides) are properly adjusted and lubricated for smooth movement.
Collet Chuck: Use a high-quality collet chuck for your end mill. This provides the most concentric grip and minimizes runout. A simple end mill holder can work, but a collet chuck is generally better for precision.
Workholding: Secure your FR4 firmly. Use clamps that don’t put excessive stress on the material, which could cause it to crack or warp. Double-sided tape can work for thin FR4, but for thicker pieces, mechanical clamping is usually required. Make sure your clamps are positioned so they don’t interfere with the cutting path.
3. Using a Vacuum
For FR4, a vacuum system attached to your mill can be a game-changer.
Dust Control: It helps capture the fine fiberglass dust at the source, improving air quality and making cleanup much easier.
Cooling Effect: The airflow from the vacuum can also provide a small amount of cooling to the cutting area.
4. Coolant or Lubrication (Optional but Recommended)
While not always mandatory, using a coolant or lubricant can significantly improve your results with FR4.
Flood Coolant: A deluge of coolant can keep the tool and workpiece cool, reducing heat buildup and helping to flush chips away.
Mist Coolant: A fine mist of coolant atomized with air can provide both cooling and lubrication without the mess of flood coolant.
Aerosol Sprays: For smaller jobs, a specialized milling lubricant spray can be applied directly to the cutting area.
Importance: Coolant/lubrication helps prevent the resin from melting, extends tool life, and improves surface finish.
Source Example: For guidance on machining plastics and composites, resources like the Michigan Tech University offer valuable insights into material-specific machining parameters.
Step-by-Step Machining Process for FR4

Let’s walk through how to machine FR4 using your new favorite end mill.
Step 1: Prepare Your Workpiece and Machine
1. Secure the FR4: Mount your FR4 workpiece firmly and accurately to the milling machine table. Ensure it’s square to your machine’s axes.
2. Install the End Mill: Insert the 1/4 inch stub-length carbide end mill into a clean collet in your collet chuck. Tighten it securely. Ensure it’s inserted to the proper depth in the collet – not too little, not too much.
3. Mount the Tool Holder: Install the collet chuck with the end mill into your milling machine’s spindle.
4. Set Your Z-Axis Height: Carefully set your Z-axis zero point. This is the exact height where the tip of the end mill touches the top surface of your workpiece. Use an edge finder, a dial indicator, or a touch probe for accuracy.
5. Prepare Coolant/Vacuum: If using, turn on your coolant mist system or vacuum dust collection.
Step 2: Program or Manually Control Your Cuts
For CNC Users:
1. Load Your G-code: Load your machining program into the CNC controller.
2. Verify Tool Path: Before running, often you can simulate the tool path on screen or perform a “dry run” (machining air above the workpiece) to check for any obvious errors.
3. Safe Start: Ensure the tool starts at a safe clearance height above the workpiece.
For Manual Machinists:
1. Plunge Safely: Position the end mill just above the surface where you want to start cutting.
2. Into the Material: Engage the spindle and slowly feed the end mill down into the FR4. Use a controlled plunge rate. You want to make a small chip, not bury the tool.
Step 3: Execute the Machining Pass
1. Start the Cut: Begin feeding the end mill through the FR4 using your programmed G-code or manual handwheel.
2. Listen and Watch: Pay close attention to the sound of the cutting. A smooth, consistent sound is good. Squealing, chattering, or loud clunking indicates a problem. Watch the chips being produced. They should be relatively uniform and clear away from the tool.
3. Depth of Cut: For FR4, it’s usually best to take shallower depths of cut. Instead of trying to cut 1/4 inch deep in one pass with a 1/4 inch end mill, consider taking passes of 0.050 to 0.100 inches. This reduces the cutting load on the tool and minimizes deflection.
4. Stepover: When making a contour cut, the “stepover” is the distance the tool moves sideways between passes. For FR4, a stepover of 30-50% of the tool diameter (e.g., 0.075 to 0.125 inches for a 1/4 inch end mill) is often a good starting point for pocketing or contouring.
Step 4: Finishing Passes
Climb Milling vs. Conventional Milling:
Climb Milling: The tool rotates in the same direction as its feed movement. This generally results in a better surface finish and reduced tool wear, especially on composites. Most CNC machines default to or can be programmed for climb milling.
Conventional Milling: The tool rotates against its feed movement. This can put more stress on the tool and workpiece and is generally less preferred for FR4.
Finishing Pass: After the bulk of the material is removed, a final “finishing pass” with a very light depth of cut (e.g., 0.005 to 0.010 inches) can achieve a very smooth surface. Use a slower feed rate for this pass if possible.
Step 5: After Machining
1. Retract Tool: Safely retract the end mill above the workpiece and out of the cut.
2. Turn off Spindle/Coolant: Stop the spindle and any coolant/vacuum systems.
3. Inspect Workpiece: Carefully remove the part from the machine. Inspect it for surface finish, dimensional accuracy, and any signs of delamination or chipping.
4. Clean the Tool and Machine: Remove any FR4 dust or residue from the end mill and your machine. Proper cleaning extends tool life and keeps your machine in good working order.
When to Consider Other Tooling (and When Not To)
While the 1/4 inch stub-length carbide end mill is our star player for FR4, understand its limitations and alternatives.
Smaller Diameter Tools: If you need to machine very fine details (smaller than what a 1/4 inch tool can achieve), you’ll need smaller end mills (e.g., 1/8 inch or 1/16 inch). For these smaller diameters, the stub length becomes even more critical to maintain rigidity, as even standard lengths of these small tools can deflect significantly.
Longer Tools: Avoid standard or “gantry” length end mills for FR4 unless absolutely necessary. Their increased length is a major source of deflection, which FR4 will punish you for.
Ball End Mills: Useful for creating curved surfaces or 3D contours, but the same stub-length principle applies.
Compression Bits: Commonly used in woodworking for plywood and laminates to get a clean finish on both the top and bottom. While sometimes used in FR4, they are less common in typical metal/plastic CNC milling. Their design can be trickier to optimize for FR4’s specific properties.
Router Bits vs. End Mills: Router bits are designed for different speeds and materials (often wood). While some aggressive carbide router bits might cut FR4, they are not designed for the precision and rigidity demands of milling machines and can lead to poor results. Stick to end mills designed for milling machines.
Common Mistakes to Avoid

Using the Wrong Tool: Trying to