A 1/8 inch carbide end mill is your go-to tool for precise, clean cuts in plywood. Its small diameter allows for intricate details and tight corners, while carbide’s hardness ensures durability and heat resistance for smooth, efficient operation. Perfect for hobbyists and makers, it makes plywood machining a breeze.
Working with plywood can be a bit tricky. You want clean cuts, smooth edges, and the ability to create detailed designs, but sometimes your tools just don’t seem up to the task. It’s a common frustration for many DIYers and hobbyists who love using plywood for its versatility and affordability. But what if there was a small, unassuming tool that could make all the difference? What if that tool was an 1/8 inch carbide end mill?
You might be wondering if such a small tool can really handle the demands of routing and milling plywood. The answer is a resounding yes! In this guide, we’ll explore why the 1/8 inch carbide end mill is truly plywood’s best friend. We’ll cover everything you need to know, from understanding what makes it special to how to use it for amazing results. Get ready to unlock new levels of precision and creativity in your projects!
Let’s dive in and discover how this little powerhouse can transform your woodworking experience.
Why Choose a 1/8 Inch Carbide End Mill for Plywood?
Plywood might seem like a simple material, but its layered construction and varying densities can present challenges for cutting tools. This is precisely where the 1/8 inch carbide end mill shines. Its unique characteristics make it exceptionally well-suited for achieving excellent results with plywood.
The Magic of Carbide
The “carbide” in carbide end mill is key. Carbide, specifically tungsten carbide, is an extremely hard and dense material. This hardness gives it several advantages over traditional high-speed steel (HSS) tools:
- Superior Hardness: Carbide is significantly harder than HSS, which means it can maintain its sharp cutting edge for much longer, even when working with abrasive materials like plywood.
- Heat Resistance: Machining generates heat. Carbide’s ability to withstand higher temperatures without softening ensures consistent performance and prevents premature tool wear, especially crucial when you’re making repeated passes or working at higher speeds.
- Durability: Its toughness translates to a longer tool life, meaning fewer tool changes and a more cost-effective solution in the long run.
The Advantage of a 1/8 Inch Diameter
The 1/8 inch (or 3.175mm) diameter might seem small, but it’s incredibly versatile, especially for plywood projects:
- Intricate Details: This small diameter is perfect for creating fine lines, intricate patterns, small text, and delicate cutouts that larger end mills simply can’t achieve.
- Tight Radii and Corners: Achieving sharp, internal corners or small-radius arcs is much easier with a smaller tool. It allows you to get closer to design elements without overcutting.
- Reduced Tear-Out: A smaller diameter end mill generally removes less material per pass, which can help to minimize tear-out and chipping, especially on the delicate edges of plywood veneers.
- Maneuverability: In CNC routing applications, a smaller tool can navigate complex paths more easily and with less stress on the machine.
What About the “Plywood’s Best Friend” Claim?
Combining the durability and heat resistance of carbide with the precision of a 1/8 inch diameter creates a tool that is ideal for the nuances of plywood. Many woodworking projects, from custom signage and decorative inlays to intricate joinery and small components, benefit immensely from the capabilities of this specific end mill. It offers a balance of performance, precision, and longevity that makes it a top choice for anyone working with plywood.
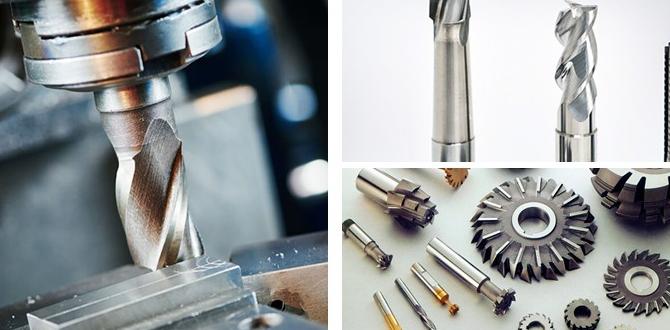
Understanding the Anatomy of a 1/8 Inch Carbide End Mill
Before you start cutting, it’s helpful to understand the parts of your end mill and what makes them effective. While the 1/8 inch diameter is the star for plywood, other features contribute to its performance.
Key Features to Look For:
- Shank Size: While the cutting diameter is 1/8 inch, the shank (the part that inserts into your tool holder or collet) is often 1/4 inch. This provides a more robust connection than a 1/8 inch shank, offering better rigidity and reducing the chance of chatter or breakage. A 1/4 inch shank is standard for many small end mills for this reason.
- Number of Flutes: Flutes are the spiral grooves on the cutting edges. For plywood, you’ll typically find 2-flute or 4-flute end mills.
- 2-Flute: These generally offer better chip clearance, which is important when cutting softer materials like plywood. They can also handle slightly higher feed rates.
- 4-Flute: With more cutting edges, 4-flute end mills tend to provide a smoother surface finish and can handle harder materials. For plywood, a 2-flute often offers a good balance of speed and chip evacuation.
- Coating: Some carbide end mills come with coatings. While not always necessary for basic plywood work, coatings like Titanium Nitride (TiN) or similar can further enhance hardness, reduce friction, and improve heat resistance, extending tool life. For standard plywood, an uncoated or a basic coating is usually sufficient.
- End Type:
- Square End: These are the most common. They create flat-bottomed slots and can mill to a square corner.
- Ball Nose: With a rounded tip, these are excellent for 3D carving and creating curved surfaces.
- Corner Radius: A square end mill with a small radius on the corner can help strengthen the corner and reduce the chance of chipping.
For most general plywood cutting and engraving, a square end mill is the workhorse.
When selecting your 1/8 inch carbide end mill, look for one with a standard 1/4 inch shank for stability. A 2-flute design is often ideal for plywood, offering good performance and chip management.
Setting Up for Success: Tools and Considerations
Having the right tool is only half the battle. Proper setup is crucial for safety, precision, and getting the best results from your 1/8 inch carbide end mill when working with plywood.
Essential Equipment:
- CNC Router or Milling Spindle: This is where your end mill will be mounted. For hobbyists, a small CNC router or a powerful rotary tool with a collet system (like a Dremel or dedicated spindle) works well. Ensuring it can hold a 1/8 inch bit is key.
- Collet or Tool Holder: This securely grips the end mill’s shank and fits into your spindle. A tight-fitting collet is vital to prevent the end mill from slipping, which can cause damage or injury. For a 1/4 inch shank end mill, you’ll need a 1/4 inch collet.
- Workholding: This is how you’ll secure your plywood to your work surface. Options include clamps, double-sided tape (for lighter jobs), or a vacuum table. Ensure the plywood cannot move during cutting.
- Dust Collection: Plywood dust can be fine and unpleasant. A good dust collection system connected to your spindle or router will keep your workspace cleaner and improve visibility.
- Safety Gear: Always wear safety glasses to protect your eyes from flying debris. Hearing protection is also recommended, especially with CNC routers.
Pre-Cut Checks:
- Spindle Speed (RPM): Different materials and tools require different speeds. For plywood with a 1/8 inch carbide end mill, a common range is around 18,000-24,000 RPM, but this can vary based on your specific machine and the plywood type. Check your machine’s manual or online resources for recommended settings.
- Feed Rate: This is how fast the tool moves through the material. Too fast, and you risk breaking the bit or bogging down the spindle. Too slow, and you can burn the wood. For a 1/8 inch end mill in plywood, starting around 20-40 inches per minute (IPM) is often a good ballpark, but always test on a scrap piece.
- Depth of Cut: It’s generally better to take multiple shallow passes rather than one deep one. For a 1/8 inch end mill in plywood, a depth of cut of 0.1 to 0.2 inches per pass is a reasonable starting point, depending on the material’s thickness and density.
- Material Hold-Down: Double-check that your plywood is firmly secured. Any movement can lead to inaccurate cuts or broken bits.
- Bit Condition: Ensure your end mill is clean, sharp, and free from any damage. A dull or damaged bit will produce poor results and can be dangerous.
A table can help summarize these initial considerations:
| Parameter | Recommended Starting Point (1/8″ Carbide End Mill in Plywood) | Notes |
|---|---|---|
| Spindle Speed (RPM) | 18,000 – 24,000 | Adjust based on material and machine |
| Feed Rate (IPM) | 20 – 40 | Test on scrap; adjust for clean cuts, avoid burning |
| Depth of Cut (per pass) | 0.1″ – 0.2″ | Take multiple passes for thicker material; reduces stress |
| Tool Type | 2-Flute Carbide End Mill | For good chip clearance and finish |
| Workholding | Secure Clamps or Tape | Ensure material does not shift |
| Safety | Eye Protection, Hearing Protection | Always be prepared |
Remember, these are starting points. Always perform test cuts on scrap material to dial in the perfect settings for your specific plywood and machine.
Step-by-Step: Achieving Clean Plywood Cuts
Now you’re equipped with the knowledge and setup considerations. Let’s walk through the process of using your 1/8 inch carbide end mill to cut plywood.
Step 1: Design Preparation
Whether you’re using CNC software (like VCarve, Easel, Fusion 360) or preparing for manual milling, your design should be finalized. Ensure that all lines and shapes are clean and properly scaled. For CNC, set your tool parameters accurately in the software, specifying the 1/8 inch end mill, its flutes, and any desired cutting strategies.
Step 2: Securing the Plywood
Place your plywood sheet on your CNC router bed or milling machine table. Use your chosen workholding method ( clamps, tape, etc.) to ensure the plywood is absolutely stable and won’t move during the cutting process. Overlapping clamps are good to avoid clamping directly on the cut path.
Step 3: Setting Up the End Mill
Insert the 1/8 inch carbide end mill into the collet of your spindle or router. Tighten the collet securely. Make sure the shank is seated properly and the end mill is not sticking out excessively. A good rule of thumb is to have the cutting portion of the end mill visible, but not so much that it compromises rigidity.
Step 4: Zeroing Your Machine
This is a critical step for accuracy, especially in CNC. You need to tell your machine where the “zero” point is on your workpiece. This is typically done by:
- X and Y Zero: Set the origin point for your horizontal movement (usually a corner of the plywood or a specific reference point on your design).
- Z Zero: This sets the height of your cutting tool relative to the surface of the plywood. You can do this by carefully lowering the spinning (or un-spun) end mill until it just touches the surface of the plywood. Many CNC users use an “edge finder” or a touch plate for precise Z-zeroing.
Step 5: Performing Test Cuts
Before committing to your final project, always run a test cut on a scrap piece of the same plywood. This is where you’ll fine-tune your settings:
- Feed Rate Test: Cut a simple line or shape at a conservative feed rate. Listen to the sound of the cut – a smooth hum is good, while a high-pitched whine or screaming indicates it’s too fast, and a chugging or bogging sound means it’s too slow. Gradually increase the feed rate until you achieve a clean cut without burning or excessive load.
- Depth of Cut Test: If your material is thick, test different depths of cut. See how each pass affects the cut quality and the load on your spindle.
- Surface Finish Check: Examine the edges and surfaces of your test cut. Are they clean and smooth, or are they showing signs of chipping or burning? Adjust your feed rate and speed accordingly.
Here’s a quick guide for test cuts:
- Load a scrap piece of plywood.
- Load your 1/8 inch end mill and set X, Y, and Z zeros.
- Define a simple test path (e.g., a square, a circle, a straight line).
- Run the test path at a conservative feed rate and speed.
- Incrementally adjust feed rate and speed to find the sweet spot for chip formation and surface finish.
- If necessary, adjust depth of cut for multi-pass cuts.
Step 6: Executing the Main Cut
Once you’re confident with your test cuts, load your actual project file. Double-check your settings one last time. Start the machine and monitor the process, especially during the initial passes. For complex shapes, watch for any signs of stress or unusual sounds.
Step 7: Finishing Touches
After the cutting is complete, carefully remove the cut piece from the spoil board. You may find that the edges are remarkably clean thanks to the carbide end mill. Light sanding might still be beneficial for a perfectly smooth finish, but you’ll likely find less need for extensive cleanup compared to other bits.
For projects requiring precise internal corners or sharp detail, the 1/8 inch carbide end mill’s capability in Step 1 and its execution in Step 6 are paramount.
Plywood Types and How They Affect Cutting
Not all plywood is created equal, and the type you’re using can influence the settings and results when machining with your 1/8 inch carbide end mill.
Common Plywood Types:
- Baltic Birch Plywood: Known for its uniform core layers made entirely of birch veneers, Baltic Birch is very stable, strong, and has fewer voids. This makes it an excellent material to machine, offering clean cuts and good chip formation. It’s a favorite for cabinets, jigs, and precise joinery.
- Hardwood Plywood: These often have a core of softwood or a composite material, topped with a thin veneer of decorative hardwood (like oak, maple, or cherry). While the surfaces look great, the core can be less consistent, potentially leading to chip-out or voids.
- Softwood Plywood (e.g., Fir, Pine): Softer and less dense than birch or hardwood plywood. It’s typically more economical and easier to machine, but can be more prone to tear-out, especially on the outer veneers.
- MDF (Medium-Density Fiberboard): While not technically plywood, MDF is often used similarly. It’s incredibly consistent and machines very smoothly, but produces a very fine, abrasive dust. Carbide tools handle MDF well, but dust collection is essential.
Cutting Considerations for Different Plywoods:
Understanding these differences helps you adjust your cutting strategy:
- For Baltic Birch: You can often push slightly higher feed rates and take slightly deeper cuts due to its uniformity and strength.
- For Hardwood Plywood: Be mindful of the core material. If it’s inconsistent, you might need to slow down your feed rate slightly and ensure good chip clearance to avoid clogging.
- For Softwood Plywood: Consider taking shallower depths of cut and slightly slower feed rates to minimize tear-out on the outer veneers. A climb cut (if your machine supports it and you’re experienced) can sometimes help achieve a cleaner surface on the top layer for certain designs.
- For MDF: It machines very smoothly, but its dust is highly abrasive. Ensure your dust collection is top-notch, and be aware that it can wear down tools faster over time than natural wood, though carbide is far more resistant than HSS.
A comparative table can be useful:
| Plywood Type | Machineability | Key Considerations for 1/8″ Carbide End Mill |
|---|