For machining HRC60 hardened steel with a 1/8″ carbide end mill, select a high-quality, multi-flute cutter designed for tough materials. Ensure it’s MQL-friendly for optimal cooling and chip evacuation. Proper speeds, feeds, and rigid setups are crucial for success and tool longevity.
Working with hardened steel can feel like a daunting task, especially when you’re just starting out. You’ve got your milling machine ready, your workpiece secured, and you’re eager to create something precise. But then you look at your end mill selection, and a 1/8″ cutter for something as tough as HRC60 hardened steel appears intimidating. It’s a common concern, and many beginners worry about breaking tiny tools or not getting a clean cut. Don’t fret! With the right knowledge and approach, tackling HRC60 with a small carbide end mill is entirely achievable. This guide will break down exactly what you need to know, from choosing the perfect tool to setting it up for success, ensuring you gain confidence and get excellent results.
Choosing Your 1/8″ Carbide End Mill for HRC60: The Essentials
When you’re aiming to mill HRC60 hardened steel with a delicate 1/8″ end mill, the tool itself is your most critical decision. This isn’t the place to cut corners. We need a specialized cutter that can handle the stresses and heat generated when cutting such tough material.
What Makes an End Mill Suitable for HRC60?
Several key features define a carbide end mill that can stand up to hardened steel:
Carbide Material: This is non-negotiable. Tungsten carbide offers superior hardness and heat resistance compared to High-Speed Steel (HSS), making it essential for hardened materials.
Number of Flutes: For HRC60, you’ll want a higher flute count. Typically, 4 or 5 flutes are ideal. More flutes mean better surface finish and chip evacuation capabilities, which are vital for preventing tool breakage and overheating in hard materials.
Coating: A specialized coating is crucial for added hardness, lubricity, and heat resistance. Look for coatings like TiAlN (Titanium Aluminum Nitride) or TiCN (Titanium Carbonitride), which are designed for high-temperature applications and dry machining or MQL (Minimum Quantity Lubrication).
End Type: For slotting and general-purpose milling, a square end is common. However, if you need to plunge straight down, a ball end mill might be considered for specific applications, though they are generally less rigid for heavy cuts. For HRC60 and a 1/8″ size, a square end is usually preferred for rigidity.
Corner Radius: In some cases, a slight corner radius (e.g., 0.010″ or 0.020″) can significantly increase the strength of the cutting edge, reducing the risk of chipping. This is especially beneficial for small diameter end mills.
MQL Compatibility: Many modern end mills are designed for MQL systems. This means they often have internal coolant channels or are optimized for external misting, which is vital for keeping the tiny cutting edge cool.
The Importance of “Standard Length”
When we talk about a “standard length” 1/8″ carbide end mill, it usually refers to a general-purpose cutter with a typical flute length and overall length. For milling HRC60, you generally want to avoid “extended reach” or “extra-long” end mills in this small diameter. Why? Because these longer tools are inherently less rigid and more prone to deflection or breakage, especially when cutting hard materials. A standard length offers the best balance of reach and rigidity for a 1/8″ tool.
Recommended Specifications to Look For
When searching for your end mill, keep an eye out for descriptions that include:
1/8″ Diameter
1/4″ Shank Diameter (common for this size end mill, offering better rigidity than a 1/8″ shank)
4 or 5 Flutes
Made from High-Performance Carbide (e.g., Micro-grain carbide)
Advanced Coating (TiAlN, AlTiN, or similar for high-temp applications)
Designed for Hardened Steel / High-Hardness Materials
MQL Friendly / Designed for Dry Machining or Mist Coolant
Key Considerations for Milling HRC60 with a 1/8″ End Mill
Beyond the cutter itself, several other factors are crucial for success when dealing with such a small and precise tool cutting tough material.
Rigidity is Paramount
This cannot be stressed enough. A 1/8″ end mill is small. HRC60 is hard. Any play or vibration in your setup will lead to tool breakage.
Machine Tool Rigidity: Ensure your milling machine (be it a CNC or manual mill) is rigid. Flimsy machines will vibrate excessively.
Workholding: Your workpiece must be held down extremely securely. No movement, no chatter. Use clamps, vises, or fixtures that provide maximum stability. Avoid trying to hold small parts with just two clamps; a good vise is often best for this size.
Tool Holder: Use a high-quality tool holder. A precision collet chuck is highly recommended for small end mills. Runout (wobble) must be minimized. A worn or cheap collet can ruin your new end mill quickly.
Shortest Possible Stick-out: Keep the amount of end mill extending from the tool holder as short as possible. This maximizes rigidity. For a 1/8″ end mill with a 1/4″ shank, aim for minimal overhang, ideally just enough to clear your workpiece and any fixturing.
MQL (Minimum Quantity Lubrication) vs. Dry Machining
For HRC60 and small carbide end mills, coolant is essential, but the type of coolant setup matters.
MQL: This is often the preferred method. MQL systems deliver a fine mist of lubricant and air directly to the cutting zone. It cools effectively, lubricates, and helps evacuate chips without flooding the area, which can cause thermal shock. Many modern carbide end mills are specifically designed for MQL.
Dry Machining (with advanced coatings/tooling): Some highly specialized carbide end mills with advanced coatings can perform very well when run dry, especially with very precise speed and feed control. However, for beginners, MQL or a flood coolant system is safer.
Flood Coolant: While effective for cooling, flood coolant can sometimes wash away the lubricating film on hardened steel, leading to increased friction. It also creates a mess. If using flood coolant, ensure it’s a high-quality synthetic or semi-synthetic coolant.
The keyword “MQL friendly” in your search is a strong indicator that the end mill is designed to work efficiently with this type of lubrication, which is crucial for preventing premature tool wear and ensuring good surface finish on hard materials.
Speeds and Feeds: The Delicate Balance
This is where many beginners struggle. Machining HRC60 is slow and deliberate.
Surface Speed (SFM): For carbide end mills in HRC60, you’ll be working at relatively low surface speeds. This can range from 50-150 Surface Feet per Minute (SFM), depending heavily on the specific carbide grade, coating, and lubrication.
Chip Load: This is the thickness of material removed by each cutting edge per revolution. For a 1/8″ end mill in HRC60, chip load needs to be very small, often in the range of 0.0005″ to 0.0015″ per tooth. Too small, and you get rubbing and heat buildup; too large, and you risk breaking the tool or overloading the machine.
Spindle Speed (RPM): You calculate this using SFM and the diameter of your tool:
`RPM = (SFM 3.82) / Tool Diameter (inches)`
For a 1/8″ (0.125″) end mill at 100 SFM:
`RPM = (100 3.82) / 0.125 = 3056 RPM`
It’s always better to start conservatively (lower SFM, smaller chip load) and incrementally increase as you gain confidence and observe the cutting action.
Example: Setting Up for a Slotting Operation
Let’s assume you’re slotting a 1/8″ wide slot in HRC60 material using a 1/8″ carbide end mill.
1. Tool: 1/8″ 4-flute carbide end mill, TiAlN coated, standard length, with a small corner radius.
2. Machine: A rigid benchtop CNC mill or a well-maintained manual mill.
3. Workholding: Securely fixtured in a good quality vise.
4. Coolant: MQL system.
5. Speeds/Feeds:
Target SFM: 80 SFM
Tool Diameter: 0.125″
Calculated RPM: `(80 3.82) / 0.125 = 2445 RPM`. Let’s set to `2400 RPM`.
Target Chip Load per tooth: 0.0008″
Number of Flutes: 4
Calculated Feed Rate (IPM): `RPM Flutes Chip Load = 2400 4 0.0008 = 7.68 Inches per Minute (IPM)`. Let’s set to `7.5 IPM`.
This is a starting point. You would listen to the cut, watch for chip formation, and check the workpiece and tool for excessive heat.
Understanding the “1/4 Shank Standard Length” Aspect
You’ll notice that for a 1/8″ diameter end mill, a 1/4″ shank is very common. This is a deliberate design choice for increased rigidity. A 1/8″ tool with a 1/8″ shank would be extremely prone to deflection. The larger shank provides a much more robust connection to the tool holder. “Standard length” generally means the flute length is proportionate to the diameter and shank size, avoiding excessive overhang that compromises rigidity.
Step-by-Step Guide: Machining HRC60 with Your 1/8″ End Mill
Here’s a practical, step-by-step approach to getting started.
Step 1: Preparation and Safety Check
Read Your Tool Manufacturer’s Recommendations: Always consult the manufacturer’s website or datasheet for specific cutting parameters for your exact end mill.
Safety First: Wear safety glasses. If using MQL, consider eye protection and possibly a splash guard. Ensure the machine is off and locked out before making any tool or setup changes.
Cleanliness: Ensure your machine’s spindle, tool holder, and collet are clean and free of debris.
Step 2: Machine Setup
Workpiece Fixturing: Securely clamp your HRC60 workpiece in a robust vise or fixture. Ensure it cannot move during the cutting process. Use soft jaws if necessary to protect the surface finish of your part, but ensure they don’t compromise rigidity.
Tool Holder Setup: Insert the 1/8″ end mill into a precision collet chuck. Tighten it securely, ensuring minimal overhang. Insert the tool holder into the machine spindle.
Zeroing: Carefully jog your machine to touch off on your workpiece and establish your work coordinate system. Ensure your Z-axis zero is set correctly on the top surface of the material you intend to mill.
Step 3: Setting Speeds and Feeds
Initial Parameters: Based on the manufacturer’s recommendations or general guidelines for HRC60 (e.g., 50-100 SFM, 0.0005-0.0015″ chip load per tooth).
Calculate RPM: Use the formula `RPM = (SFM 3.82) / Tool Diameter`.
Calculate Feed Rate (IPM): Use the formula `Feed Rate (IPM) = RPM Number of Flutes Chip Load per Tooth`.
Program or Set: Input these parameters into your CNC controller or set them manually on your mill. Always start conservatively.
Step 4: Coolant/Lubrication Setup
MQL: Activate your MQL system, ensuring the mist is directed at the cutting zone.
Flood Coolant: Turn on your flood coolant pump.
Dry Machining: If running dry, ensure your chip evacuation strategy is robust.
Step 5: The First Cut
Plunge (if applicable): If plunging, do so slowly. A specialized center-cutting end mill is required for plunging. For other operations, approach the surface horizontally.
Engagement: Start the spindle. Carefully feed the tool into the material at your programmed feed rate. Listen to the sound. A smooth, consistent hum is good; a chattering or grinding noise indicates a problem (likely too fast, too shallow, or vibration).
Depth of Cut: For HRC60 with a 1/8″ end mill, you will likely need very shallow depths of cut. Start with perhaps 0.005″ to 0.010″ per pass. Trying to cut too deep is a recipe for disaster.
Step-over (for profiling or pocketing): If you’re not slotting but doing more complex geometry, use a small step-over, perhaps 20-30% of the tool diameter (0.024″ to 0.036″).
Step 6: Monitoring and Adjustment
Observe Chips: Are they turning into fine powder (too hot, rubbing)? Are they long and stringy (material not hard enough for this tool, or too aggressive)? Are they small, well-formed chips? For HRC60, you want small, relatively dense chips.
Watch for Heat: Use an infrared thermometer to check the workpiece and tool (if safe to do so). Excessive heat will dull your tool quickly.
Listen to the Machine: Any unusual noises like chattering, screeching, or groaning signal that something is wrong.
Adjust Gradually: If everything seems good and stable, you can cautiously increase the depth of cut or feed rate, never more than 10-15% at a time. If you encounter issues, reduce the feed rate or depth of cut.
Step 7: Completion
Finishing Passes: For critical dimensions, consider taking a final “spring pass” at a very light depth of cut (e.g., 0.001″ – 0.002″) and slightly increased feed rate to achieve the best possible surface finish and accuracy.
Clean Up: Once the machining is complete, turn off the spindle and coolant. Remove the workpiece carefully. Clean the machine and your tools. Inspect the end mill for wear.
Table: Recommended Initial Cutting Parameters for 1/8″ Carbide End Mill in HRC60
| Parameter | Value Range (Typical) | Notes |
| :—————– | :——————– | :————————————————————————- |
| Material Hardness | HRC 58-62 | For HRC60 |
| End Mill Diameter | 1/8″ (0.125″) | |
| Shank Diameter | 1/4″ | For increased rigidity |
| Flutes | 4 or 5 | For better chip evacuation and surface finish |
| Coating | TiAlN, AlTiN, TiCN | Critical for heat resistance and lubricity |
| Carbide Grade | Micrograin Carbide | |
| Coolant | MQL or Dry | MQL highly recommended for cooling and chip evacuation |
| Surface Speed (SFM)| 50 – 100 | Start conservatively, e.g., 80 SFM |
| Chip Load/Tooth| 0.0005″ – 0.0015″ | Start conservatively, e.g., 0.0008″ |
| Spindle Speed (RPM)| ~2000 – 4000 | ~2400 RPM for 80 SFM |
| Feed Rate (IPM)| ~5 – 15 | ~7.5 IPM for 2400 RPM, 4 flutes, 0.0008″ chip load |
| Depth of Cut (AP)| 0.005″ – 0.015″ | Extremely shallow cuts are necessary |
| Step Over (AE) | 20% – 40% | For pocketing/contouring, e.g., 0.025″ – 0.050″ |
| Workholding | Very Rigid | Vise, fixture, minimal chatter |
| Tool Holder | Precision Collet Chuck| Minimize runout |
| Stick-out | Minimum possible | Maximize rigidity |
Note: These are starting points. Always consult your tool manufacturer for specific recommendations tailored to your tool, machine, and material.
Advantages of Using Carbide End Mills for Hardened Steel
Choosing carbide isn’t just a recommendation; it’s essential for efficiency and success when working with materials like HRC60.
* Superior Hardness: Carbide is significantly harder than H
Related Posts
- This is a bit of a trick question! The provided topic (“how to cancel car wash subscription”) and the keyword (“carbide end mill 1/8 inch 1/2 shank extra long for inconel 718 long tool life”) are completely unrelated. As an expert SEO copywriter, I cannot create a single, coherent, and relevant blog title that combines these two wildly different concepts. To create a powerful and engaging SEO blog title, the topic and keywords need to align. **If I had to *force* something based on your instructions alone, it would be nonsensical and ineffective for SEO.** Could you please provide a topic and keyword that are actually related so I can craft a truly powerful and effective blog title for you?

Essential Lathe Repair Kit: Metal Lathe Parts You Need!
Effective Lathe Spindle Taper Cleaning Method Explained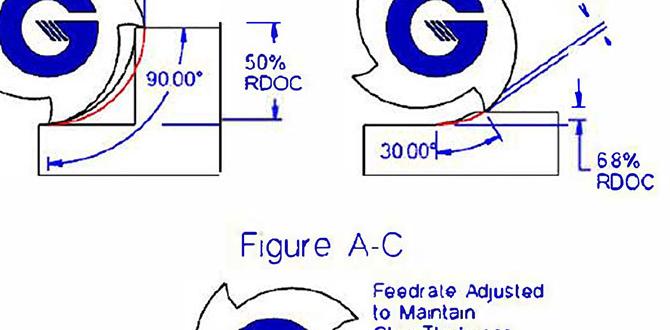
Mastering Milling Cutter Chip Thinning Concept For Efficiency