Unlock Precision with a 1/8-Inch Carbide End Mill: Your Key to Confident Machining and Proven Performance. This guide simplifies its use, ensuring smooth cuts and excellent results for beginners.
Hey there, fellow makers! Daniel Bates here from Lathe Hub. Ever stared at a tiny piece of metal and wondered how to carve it just right? Especially when you’re starting out, those small, intricate cuts can seem a bit daunting. You might be thinking about that perfect 1/8-inch carbide end mill and how it can help you achieve those clean lines and detailed shapes without a fuss. It’s a common tool, but knowing how to use it effectively makes all the difference between a good project and a great one. Don’t worry, we’ll walk through it step-by-step, making it super clear and easy. Get ready to boost your confidence and bring your creative ideas to life with precision!
The Mighty 1/8-Inch Carbide End Mill: Your New Best Friend
You’ve seen them, maybe even held one – those small but mighty cutting tools. The 1/8-inch carbide end mill is a gem in any workshop, whether you’re working with a metal lathe, a milling machine, or even some advanced woodworking projects. Why is it so special? It’s all about control and precision. For beginners, having a tool that’s forgiving yet highly capable is essential. This little guy is perfect for those delicate operations where you need accuracy and a super smooth finish.
What Makes Carbide So Great?
Carbide, short for tungsten carbide, is an incredibly hard and durable material. This hardness is what gives carbide end mills their edge (pun intended!). They can cut through tougher materials like steel, aluminum, and even some plastics much more effectively than high-speed steel (HSS) tools. Plus, they can handle higher cutting speeds, meaning you can often work faster. For a 1/8-inch end mill, this translates to:
Superior Hardness: Resists wear and stays sharp longer.
High-Temperature Resistance: Can cut effectively at higher speeds without losing its edge.
Increased Durability: Less likely to chip or break under the right conditions.
Why a 1/8-Inch Size?
The 1/8-inch diameter is a sweet spot for many tasks. It’s small enough for fine detail work, creating channels, slots, and intricate patterns. Think about engraving, making tiny gears for models, or cleaning up small fillets. It’s just the right size for jobs where larger tools would be way too aggressive or simply wouldn’t fit.
Understanding Your 1/8-Inch Carbide End Mill: Key Features
Not all end mills are created equal, even within the 1/8-inch category. Let’s break down what you need to know to pick the right one and use it confidently.
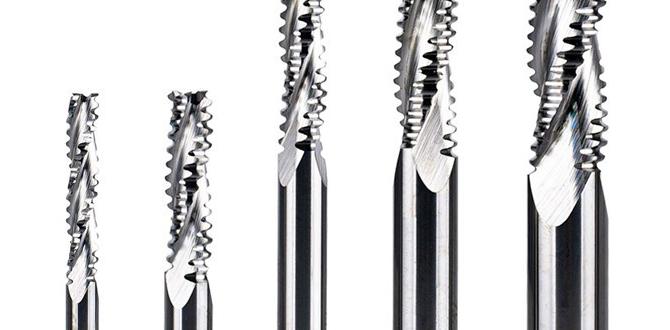
Types of 1/8-Inch Carbide End Mills
Number of Flutes: This refers to the number of cutting edges on the end mill.
2 Flutes: Typically best for softer materials like plastics and aluminum. They offer good chip clearance, which is crucial to prevent the material from clogging up the flutes.
4 Flutes: More versatile and better suited for harder materials like steel and cast iron. They provide a smoother finish and can handle heavier cuts than 2-flute mills in many applications.
End Type:
Square End: The most common type, with flat cutting edges at the tip. Great for general milling, slotting, and profiling.
Ball Nose End: These have a rounded tip, perfect for creating curved surfaces, contouring, and 3D machining.
Corner Radius End: A square end mill with slightly rounded corners. This helps to strengthen the corners and reduce stress, making them less prone to chipping, especially when doing slotting or corner profiling.
Shank Diameter: While the cutting diameter is 1/8 inch, the shank (the part that goes into your tool holder) can vary. A common pairing is a 1/8-inch end mill on a 1/8-inch shank, but you’ll also find 1/8-inch end mills with larger shanks (like 3/8 inch or 1/2 inch). This is often done for rigidity or to allow for easier holding in collets or chucks. A shank diameter larger than the cutting diameter is sometimes referred to as a “reduced neck” or “over-the-shank” design.
Coating: Some carbide end mills come with special coatings (like TiN, TiAlN, or AlTiN) that can further enhance their performance, improve tool life, and allow for higher cutting speeds, especially in tougher materials.
The “Reduced Neck” Feature
You might have seen terms like “reduced neck” or “over-the-shank” when looking at end mills. For a 1/8-inch end mill, this often means the end mill has a 1/8-inch cutting diameter, but the shank beyond the cutting portion is larger, say 3/8 inch. This larger shank provides a few benefits:
Increased Rigidity: A thicker shank means less deflection (bending) of the tool, even with aggressive cuts.
Better Holding: It can be held more securely in larger collets or chucks, reducing runout (wobble).
Minimized Chip Recirculation: In deep slots, the larger shank can help prevent chips from getting caught and re-cut, which is a common issue with small-diameter tools.
When You See “Carbide End Mill 1/8 Inch 3/8 Shank Reduced Neck for Cast Iron Minimize Deflection”
This specific description tells us a lot!
Carbide End Mill 1/8 Inch: The core tool.
3/8 Shank: The shank is 3/8 inch in diameter.
Reduced Neck: The area where the 1/8-inch cutting diameter transitions to the 3/8-inch shank is designed to be robust.
For Cast Iron: This indicates it’s optimized to cut smoothly and efficiently in cast iron, a material known for being brittle but also abrasive.
Minimize Deflection: The overall design aims to reduce bending and vibration during cutting, crucial for accuracy and tool life.
Getting Started: Essential Steps for Using Your 1/8-Inch Carbide End Mill
Using a small end mill requires a bit of finesse. Here’s a straightforward approach to get you started.
1. Machine Setup: The Foundation of Success
Before you even think about cutting, ensure your setup is rock solid.
Secure the Workpiece: Use clamps, vices, or other appropriate methods to firmly hold your material. Any movement will lead to inaccurate cuts or tool breakage.
Use the Right Spindle Speed (RPM): This is crucial! Carbide can’t just be spun wildly. Too fast, and you’ll overheat the tool and workpiece. Too slow, and you won’t cut effectively, leading to chatter. For a 1/8-inch carbide end mill, speeds can vary greatly by material, but general starting points might be:
Soft Aluminum: 5,000 – 10,000 RPM
Steel: 3,000 – 6,000 RPM
Cast Iron: 3,000 – 7,000 RPM
Plastics: 8,000 – 15,000+ RPM
Always check manufacturer recommendations or use online calculators. A good resource for this is Machinis.com’s G-Wizard Calculator, which helps estimate speeds and feeds for various tools and materials.
Use the Right Feed Rate: This is how fast the tool moves through the material. Too fast, and you’ll break the tool. Too slow, and you might rub and overheat. A good starting point for 1/8-inch carbide is often a chip load (the thickness of the material removed by each flute) of around 0.001″ to 0.003″ (0.025mm to 0.075mm), depending on the number of flutes and material. This translates to feed rates usually in the range of 3-20 inches per minute (IPM). Start conservatively!
Choose the Right Tool Holder: A high-quality collet chuck or ER collet is essential for holding the end mill securely and minimizing runout. Ensure the collet fits your shank diameter precisely.
2. Mounting the End Mill: Precision is Key
Clean Everything: Make sure the end mill shank and the collet are perfectly clean. Any dirt or oil can cause poor grip and runout.
Insert Correctly: Insert the end mill into the collet. Ensure it’s seated properly and that you’re not sticking out too much. Generally, you want to engage at least 2-3 times the diameter of the cutting tool in the collet. So, for a 1/8-inch end mill, you’d want about 1/4″ to 3/8″ of the shank securely gripped.
Tighten Firmly: Use the appropriate wrench to tighten the collet nut. Don’t overtighten, but ensure it’s secure.
3. Making the Cut: Step-by-Step Guide
Let’s say you want to mill a simple slot.
Step 1: Position Your Tool: Carefully bring the tip of the end mill down to the surface of your workpiece. Use a piece of paper or a touch probe for precise Z-axis zeroing.
Step 2: Set X and Y Zero: Jog the end mill so it’s at the desired starting point for your slot in the X and Y dimensions.
Step 3: Engage the Spindle: Turn on your spindle and bring it up to the calculated RPM. Ensure it’s running smoothly.
Step 4: Plunge Into the Material (if necessary): If you need to cut a slot from the inside, you’ll need to plunge the end mill down. Do this slowly and at a reduced feed rate. Some end mills are designed for plunging, while others are not. For general-purpose end mills, plunging can cause excessive wear or breakage. A more common approach for slotting is to ramp into the material or start the cut at the edge.
Step 5: Start Milling:
Conventional Milling: The tool rotates against the direction of feed. This tends to push the workpiece upwards. Good for harder materials.
Climb Milling: The tool rotates in the same direction as the feed. This pulls the workpiece, resulting in a smoother finish and less force on the tool. This is generally preferred when possible, especially with modern CNC machines and when the workpiece is held rigidly. Start with climb milling if your setup allows it.
Step 6: Control Your Depth of Cut (DOC): For a 1/8-inch end mill cutting into harder materials, take shallow passes. A common rule of thumb for DOC is around 25-50% of the tool diameter for steel, and up to 50-100% for softer materials like aluminum or plastics, but always start conservatively. For a 1/8″ end mill, this means a DOC of 0.0625″ (1/16″) or less, especially for steel. For example, if you need to cut a 1/4″ deep slot, you’d do it in two passes.
Step 7: Coolant/Lubrication: For metal cutting, especially steel and cast iron, using a coolant or lubricant is highly recommended. It helps to:
Cool the cutting edge, prolonging tool life.
Lubricate the cut, improving chip evacuation and finish.
Prevent rust on your workpiece and machine.
For small operations, a simple spray bottle with cutting fluid or even a drop of oil can work wonders. For cast iron machining, dry machining is sometimes viable due to its graphite content, but chip evacuation becomes extremely important. Always research the best practice for your specific material.
Common Applications for Your 1/8-Inch Carbide End Mill
This versatile tool shines in a variety of tasks that are perfect for hobbyists and beginners.
1. Slotting and Grooving
Creating precise slots and grooves in metal or plastic is a breeze. Whether you’re making a keyway, a channel for a wire, or a decorative groove, the 1/8-inch end mill’s size is ideal.
Beginner Tip: Use climb milling for a cleaner surface and to reduce chatter. Make multiple shallow passes rather than one deep cut.
2. Profiling and Contouring
Need to cut out a shape from a piece of material? An end mill can do that. You can program (or manually guide) it to follow a path, cutting around the perimeter of your desired shape.
Beginner Tip: If using a manual mill, take light finishing passes to achieve the desired size and surface finish.
3. Engraving and Detail Work
The small diameter is perfect for adding text, logos, or intricate designs onto your projects.
Beginner Tip: This often requires very slow speeds and fine feed rates. Consider specialized engraving bits if you do a lot of this, but a standard 1/8-inch carbide end mill can certainly do the job for occasional use.
4. Deburring and Chamfering Edges
While not its primary function, a 1/8-inch end mill can be used to lightly deburr small internal corners or create tiny chamfers to break sharp edges.
Beginner Tip: This is best done with a very light pass and can help improve safety and aesthetics on small parts.
5. Machining Small Parts and Fixtures
For creating small components, jigs, or fixtures for your workshop, this end mill is invaluable. Its precision allows for tight tolerances.
Beginner Tip: Always measure your results frequently, especially when working towards a specific dimension. Digital calipers are your best friend here.
Optimizing Performance: Tips for Cast Iron and Minimizing Deflection
Working with cast iron presents unique challenges. It’s hard, brittle, and abrasive. Minimizing deflection is key to accuracy and tool life.
Machining Cast Iron with Speed and Precision
Tool Selection: As mentioned, end mills specifically designed for cast iron, often with certain flute geometries and coatings, will perform best. A 1/8-inch carbide end mill with a 3/8 shank and reduced neck is a good candidate because the thicker shank reduces the chance of it bending.
Speeds and Feeds: Cast iron typically requires higher speeds and lower chip loads than steel. Aim for higher RPMs (e.g., 5,000-8,000 RPM for a 1/8″ tool) and a chip load that’s somewhat conservative to manage the brittle nature of the material and prevent chipping the end mill.
Chip Evacuation: This is critical! Cast iron chips can be fine and dusty. If they get re-cut, they can increase heat and wear on the tool. Good coolant flow or air blast can help. If machining dry, ensure your spindle speed and feed rate work together to expel chips effectively.
Depth of Cut & Stepover: Take shallow depths of cut. For slotting, a DOC of 0.030″ to 0.060″ might be appropriate for a 1/8″ end mill in cast iron. For profiling (taking material off the side), a stepover (the amount the tool moves sideways for each pass) of 30-50% of the tool diameter is common. A smaller stepover will provide a better surface finish but take longer.
Coolant: While sometimes machined dry, a coolant designed for ferrous materials, ideally with good lubricity and cooling properties, will usually extend tool life and improve surface finish.
Minimizing Deflection: Keeping True
Deflection is the bending of the cutting tool under the forces of cutting. For a small 1/8-inch end mill, this is a significant concern.
Rigid Setup: This is the most important factor.
Machine Spindle: Ensure your machine’s spindle is in good condition with minimal runout.
Tool Holder: Use a high-quality collet chuck or ER collet. Avoid running the end mill too far out of the holder. As noted before, utilizing the larger, reduced neck shank in a 3/8″ collet will inherently be more rigid than a 1/8″ shank.
Workpiece Holding: Make sure your workpiece is clamped extremely rigidly. Any flex in the workpiece or fixture will lead to deflection and inaccuracies.
Cutting Strategy:
Climb Milling: As discussed, climb milling bites into the material with the leading edge of the flute, using the cutting forces to help pull the tool into the cut and away from any spring-back from the workpiece. This is generally preferred for minimizing deflection compared to conventional milling, where the forces tend to lift the tool.
Shallow Cuts: The deeper you cut, the greater the forces and thus the greater the deflection. Take multiple shallow passes instead of one deep pass.
Reduced Stepover: When profiling, a smaller stepover means the tool is engaged with less material side-to-side at any given moment, reducing the cutting forces and thus deflection.
Tool Geometry: End mills with more flutes (like 4-flute) tend to be more rigid for a given diameter and are often better for harder materials. The reduced neck design is specifically intended to combat deflection by allowing the tool to be held deeper and more securely.
Safety First, Always!
Working with power tools and sharp metal requires respect and caution. Here are some non-negotiables:
Wear Safety Glasses: Always, no exceptions. Flying chips can cause serious eye injury.
Keep Hands Clear: Never hold small parts by