Carbide end mill 3/16″ 8mm with tight tolerance capabilities is the key to achieving precise, repeatable cuts for intricate jobs on your milling machine. This guide will show you how to select and use one effectively for demanding applications.
Getting those incredibly accurate cuts on your milling machine can sometimes feel like a puzzle, right? Especially when the project demands that extra bit of precision, like fitting two parts together perfectly or creating a detailed engraving. Many DIYers and budding machinists find that small details matter a lot, and a common stumbling block is achieving ‘tight tolerances’ – where the measurements are super exact. This often leads to frustration when parts don’t fit or your finished piece isn’t quite right. But don’t worry! We’re going to break down exactly how a 3/16″ or 8mm shank carbide end mill can be your secret weapon for these challenging, precision-focused tasks. We’ll cover what makes them special and how to use them to get those perfectly tight tolerances you’re aiming for.
Understanding Carbide End Mills for Precision Work
When we talk about “tight tolerances,” we’re referring to a very small margin of error allowed in manufacturing. For example, if a drawing calls for a hole to be exactly 10mm in diameter, a tight tolerance might mean it only needs to be between 9.990mm and 10.010mm. Achieving this level of accuracy requires tools that are themselves made with incredible precision and stiffness. That’s where carbide end mills shine.
Why Carbide?
Carbide, scientifically known as tungsten carbide, is a super hard and wear-resistant material. Unlike High-Speed Steel (HSS) tools, carbide cutting tools can:
- Perform at much higher cutting speeds.
- Hold their sharp edge for longer, even under heavy loads.
- Resist deformation at elevated temperatures generated during cutting.
- Provide greater rigidity, which is crucial for minimizing vibrations and deflections – the enemies of tight tolerances.
For a material like copper, which is soft and can easily load up (gummy) a cutting tool, carbide’s wear resistance and ability to handle higher speeds are huge advantages. It allows for cleaner cuts and more predictable material removal.
The 3/16″ vs. 8mm Shank Debate
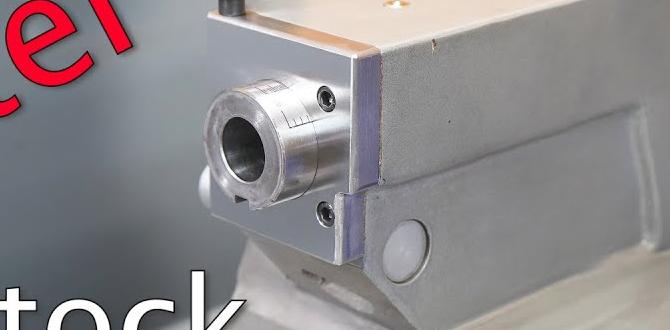
You’ll often see these end mills specified with both imperial (3/16 inch) and metric (8mm) shank sizes. In North America, 3/16″ is common for smaller hobbyist or benchtop machines. In many other parts of the world, and for slightly more robust machines, 8mm shanks are standard. For the purpose of achieving tight tolerances, the key is that the shank diameter matches your machine’s collet or tool holder precisely. A snug fit prevents any wobble or runout, ensuring the cutting edge follows a perfectly circular path. An 8mm shank is marginally larger than 3/16″ (which is ~4.76mm), offering a bit more clamping surface and potentially more rigidity, though a well-made 3/16″ tool in a quality collet can perform excellently.
Choosing the Right 3/16″ or 8mm Carbide End Mill for Tight Tolerances
Not all carbide end mills are created equal, especially when precision is paramount. Here’s what to look for:
Key Features to Consider:
- Number of Flutes: For tight tolerance work, especially in softer metals like copper or aluminum, a 2-flute or 3-flute end mill is often preferred. Fewer flutes allow chips to evacuate more easily, reducing the risk of the workpiece or tool becoming clogged. More flutes (like 4 or 6) can provide a smoother finish and are better for harder materials or finishing operations where chip evacuation is less of a concern and rigidity is key. For general tight tolerance work in copper, 2 or 3 flutes are excellent.
- Coating: While many end mills are uncoated (bright), coatings like TiN (Titanium Nitride), TiCN (Titanium Carbonitride), or AlTiN (Aluminum Titanium Nitride) can improve performance and tool life. For copper, uncoated or TiN coated are usually good choices, as they generally have lower friction.
- End Geometry:
- Square End Mills: These are the most common and versatile. They create sharp internal corners.
- Ball End Mills: Feature a rounded tip, ideal for creating complex 3D shapes, fillets, and precise profiles where sharp internal corners aren’t needed.
- Corner Radius End Mills: A compromise between square and ball, these have a small radius at the cutting corners. This strengthens the cutting edge and produces a fillet, which is often better for structural integrity and finish. For tight tolerances, a very small corner radius (e.g., 0.010″ or 0.25mm) can be beneficial.
- Helix Angle: A higher helix angle (e.g., 45 degrees) can provide a smoother cut and better chip evacuation but might be less rigid. A lower helix angle (e.g., 30 degrees) offers more rigidity but may be noisier. For demanding precision in softer metals, a moderate helix (around 30-35 degrees) often strikes a good balance.
- Milling Length: Ensure the “reach” or flute length is appropriate for your workpiece. If you need to cut deep into material, you’ll need a long-reach end mill. However, longer end mills are inherently less rigid than shorter ones, which can impact tight tolerance work. For most precise tasks, shorter flute lengths are preferable if the workpiece allows.
“Long Reach” Variants – A Note on Rigidity
The keyword “long reach” in our topic refers to end mills with a longer flute length extending significantly beyond the shank. While useful for accessing deep pockets, these can be more prone to vibration and deflection. For proven tight tolerance work, you ideally want the shortest flute length that allows you to complete the operation. If precise depth is required, a standard length end mill with a strong shank (like 8mm) is often superior to a long-reach one. Therefore, for the tightest tolerances, look for a standard or short flute length if possible.
Practical Considerations for Using Carbide End Mills in Soft Metals (like Copper)
Working with copper presents unique challenges for milling. It’s soft, ductile, and can easily “gum up” cutting tools. Precision demands careful strategy:
Chip Evacuation is Crucial
Soft materials like copper tend to produce long, stringy chips. If these chips aren’t removed from the cutting zone quickly, they can:
- Weld onto the cutting edge (galling), dulling the tool and causing poor surface finish.
- Re-cut existing material, leading to inaccurate dimensions.
- Overload the end mill, potentially causing breakage.
This is why 2-flute or 3-flute end mills are often recommended for copper and aluminum. They provide larger chip gullets (the space between flutes) for better chip flow.
Lubrication and Coolant
Using a cutting fluid or lubricant is highly recommended when milling copper, even with carbide. It:
- Reduces friction and heat.
- Helps to create a thin, consistent chip.
- Assists in flushing chips away from the cutting zone.
For hobbyists, aerosol spray lubricants or even a light oil applied with a brush can make a significant difference. An effective coolant system is often found on more advanced machines. For example, the National Institute of Standards and Technology (NIST) highlights the importance of proper lubrication in precision machining processes to ensure quality and reliability.
Workholding is King
No matter how high-quality your end mill is, if your workpiece isn’t held firmly, you won’t achieve tight tolerances. Ensure your material is:
- Securely clamped in a vise or fixture.
- Supported properly to prevent flex or vibration.
- Aligned correctly with the machine axes.
A loose workpiece will move during cutting, resulting in lost accuracy and poor surface finish. Imagine trying to draw a perfectly straight line while holding the paper loosely – it’s a similar principle!
Achieving Tight Tolerances: Step-by-Step Guide
Here’s how to use your 3/16″ or 8mm carbide end mill to get those precise cuts:
- Machine Setup:
- Ensure your milling machine is clean and well-lubricated.
- Install the correct collet (3/16″ or 8mm) into your spindle.
- Insert the end mill firmly into the collet, ensuring it’s seated properly. Tighten the collet securely.
- If using a CNC, ensure the tool length is set accurately.
- Workpiece Fixturing:
- Securely clamp your copper (or other material) workpiece in a rigid vise or fixture. Use soft jaws if necessary to avoid marring the material, but ensure maximum contact for stability.
- Align the workpiece to ensure a parallel and square relationship with the machine axes.
- Initial Setup & Zeroing:
- Using your machine’s travel controls (handwheels or DRO), position the tip of the end mill precisely over the starting point of your cut.
- Establish your X, Y, and Z zero points (datum). For Z zero, it’s often best to touch off on the top surface of the workpiece.
- Cutting Parameters:
- Spindle Speed (RPM): Carbide works best at higher speeds than HSS. For 3/16″ or 8mm end mills in copper, typical speeds might range from 6,000 to 20,000 RPM, depending on the specific tool and machine capability. Always consult the tool manufacturer’s recommendations if available.
- Feed Rate: This is how fast the tool moves into the material lengthwise. Too fast, and you risk overloading the tool or causing chatter. Too slow, and you risk rubbing and overheating. A good starting point for soft metals might be between 0.001″ and 0.003″ per tooth per revolution (ipr). This means if you have a 2-flute end mill, you’d multiply the “per tooth” value by 2 for the overall feed rate.
- Depth of Cut (DOC): For tight tolerance work, taking lighter passes is crucial. Don’t try to remove all the material in one go. For roughing, a depth of cut of 0.1 to 0.2 times the tool diameter is common (e.g., 0.02″ to 0.04″ for a 3/16″ end mill). For finishing passes, reduce this significantly to 0.002″ to 0.005″ or even less.
- Stepover (ES): This is the distance the end mill moves sideways for each pass when profiling. For finishing passes where tight tolerances are essential, a small stepover (e.g., 5-10% of the tool diameter, or 0.001″ – 0.002″) will result in a much smoother surface finish and better dimensional accuracy.
- Applying Lubrication:
- As you begin cutting, apply your chosen lubricant or coolant to the cutting zone. Keep it applied continuously during cuts.
- Making the Cut:
- Engage the spindle and feed the end mill into the material using your chosen feed rate.
- For precise depth control, use your Z-axis DRO. Make a light finishing pass if necessary.
- If profiling (cutting around a shape), ensure your machine’s programmed path or your manual movements are smooth and consistent.
- Verification:
- After the cut, carefully remove chips and use precision measuring tools (calipers, micrometers) to verify your dimensions.
- If the tolerance isn’t met, analyze why (feed rate, DOC, rigidity, tool wear) and adjust for the next attempt.
Surface Finish and Tolerances: The Interplay
Achieving tight tolerances is often linked directly to achieving a good surface finish. A rough surface finish means that the microscopic peaks and valleys of the material surface are far apart. This immediately makes it impossible to mate two surfaces tightly. A smooth, polished-like surface finish can allow for mating with much less clearance. Here’s how your end mill choice impacts this:
Types of End Mills and Their Finish Characteristics
| End Mill Feature | Impact on Surface Finish | Relevance to Tight Tolerances |
|---|---|---|
| Number of Flutes | Fewer flutes (2-3) can leave a slightly coarser finish but excel in chip evacuation. More flutes (4+) can produce a smoother finish on the final pass if chip evacuation is managed. | Good chip evacuation prevents recutting and galling, which preserves dimensional accuracy. A smoother finish means less variation across the surface. |
| Coating | Lubricious coatings (like TiN, TiCN) reduce friction, leading to cleaner cuts and less material adhesion, thus a better finish. | Prevents tool wear and galling, maintaining the tool’s cutting geometry for consistent and accurate material removal. |
| Sharpening & Quality | A sharp, precisely ground edge is paramount. Dull or poorly ground tools will push material rather than cut it, resulting in tearing and poor finish. | Directly impacts dimensional accuracy. A sharp tool cuts precisely to size. A dull tool removes less, or more erratically. |
| Helix Angle | Higher helix angles often lead to a smoother shearing action and better finish but can reduce rigidity. | The rigidity trade-off is critical. For tight work, ensuring the tool doesn’t deflect is more important than extreme smoothness if it compromises accuracy. |
| End Geometry | Ball nose and corner radius end mills produce a contoured surface profile. The stepover distance in such operations directly dictates the “waviness” of the surface. | For precise pockets or features, the shape of the tool tip and how it interacts with the surface are critical for achieving uniform depth and profile. |
For your 3/16″ or 8mm carbide end mill, especially when aiming for tight tolerances, a balance is often found with a 2 or 3-flute, uncoated or TiN-coated tool with a sharp edge, moderate helix angle, and potentially a very small corner radius if required by the geometry. The key is that the tool is in excellent condition.
Troubleshooting Common Issues
Sometimes, even with the right tools and setup, things don’t go perfectly. Here are common issues and how to address them:
- Chatter/Vibration:
- Cause: Too high depth of cut, too high feed rate, worn tool, poor workholding, machine spindle issues, incorrect tool length.
- Solution: Reduce DOC, optimize feed rate, use a new sharp tool, ensure workpiece is absolutely rigid, use a tool holder with minimal overhang, investigate machine spindle for runout.
- Poor Surface Finish (Galling/Built-up Edge):
- Cause: Insufficient lubrication, too low spindle speed, too high feed rate, dull tool, poor chip evacuation.
- Solution: Increase coolant/lubricant flow, increase spindle speed, reduce feed rate, ensure correct cutting parameters for copper are used, use a 2-3 flute end mill with good chip clearance or air blast.
- Inaccurate Dimensions:
- Cause: Workpiece shifting during cut, tool deflection, excessive runout in spindle/tool holder, inaccurate machine calibration, tool wear.
- Solution: Improve workholding, reduce DOC/feed rate, check spindle and collet for runout (a dial indicator is your friend here!), recalibrate machine axes, use a fresh end mill or consider a more rigid tool.
- Tip: For extremely precise work, consider taking a light “finishing pass” at a greatly reduced depth of cut (e.g., 0.002″-0.005″) after the main cutting has been done. This pass cleans up any minor inaccuracies.
- Tool Breaking:
- Cause: Excessive force (too high DOC/feed), material inconsistency, chip recutting, poor rigidity, sudden impacts.
- Solution: Reduce cutting forces, ensure smooth operation, use coolant to keep chips flowing, verify rigidity. If the tool snaps,