Have you ever wondered how a simple screw can control powerful machinery? If you dive into the world of DIY metal lathes, that’s exactly what you will discover. A lead screw is a key part of these machines. It helps move the tool with precision. Imagine creating your own metal parts right at home!
Many people think specialized tools are too hard to build. But did you know that making a metal lathe is easier than you think? You don’t need to be an expert to start. With the right materials and a bit of guidance, anyone can create their own DIY metal lathe lead screw.
As you learn about this fascinating project, you will not only save money but also gain new skills. Isn’t it exciting to think that you can craft unique items from metal? You could even make gifts or solve problems around the house!
In this article, we will explore the steps to make your own lead screw. Get ready to unlock the potential of your DIY metal lathe and impress your friends with your craftsmanship!
Diy Metal Lathe Lead Screw: Build Your Own Precision Tool
Creating a DIY metal lathe lead screw opens up new possibilities for metalworking enthusiasts. This simple yet crucial component helps control the movement of the lathe, enabling precise cuts. Did you know that a well-functioning lead screw can significantly improve your project’s accuracy? By understanding materials and design choices, you can build a reliable lead screw tailored to your lathe. Experiment with different techniques and materials to enhance your DIY skills. What will you create next?
Understanding Lead Screws in Metal Lathes
Definition and purpose of lead screws. Importance of lead screws in precision machining.
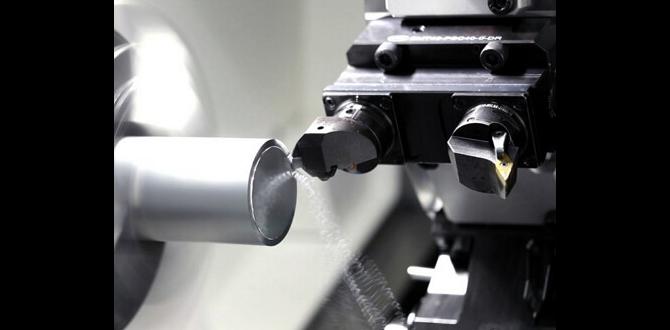
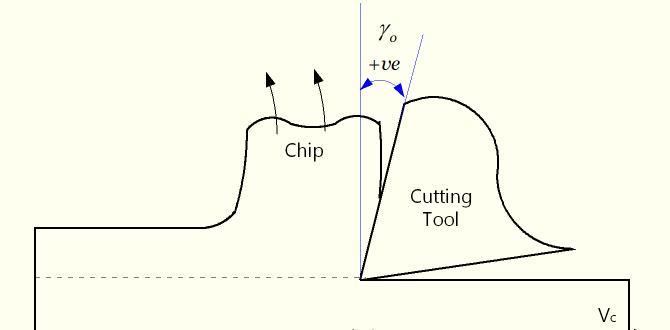
Lead screws are vital parts of metal lathes. They help move tools or workpieces in a precise way. Think of them as the trusty sidekick for any machinist! Without a lead screw, your machine would wobble like a toddler on roller skates! They ensure that everything stays on track during precision machining, which is super important for making perfect parts. In fact, without these nifty screws, your fancy projects might look more like abstract art than useful tools!
| Definition | Purpose |
|---|---|
| Lead screws are threaded rods. | They guide the movement of the machine. |
| They allow for smooth operation. | They support precision in designs. |
Materials Required for DIY Lead Screw
Types of materials for lead screw construction. Pros and cons of each material choice.
To build a strong lead screw, you need to pick the right materials. Here are some common choices:
- Steel: It is very strong and durable, but can be heavy and hard to cut.
- Aluminum: This material is lightweight and easy to work with. However, it can wear out faster than steel.
- Brass: Brass looks nice and resists rust. But, it is softer, which means it may not last as long.
Each material has its pros and cons. Think about what you need before making your choice!
What should I consider when choosing materials for a lead screw?
Consider strength, weight, and wear resistance. Each material offers different benefits that fit various needs.
Tools and Equipment Needed
Essential tools for lead screw fabrication. Optional tools for enhanced precision and efficiency.
To make a lead screw for your DIY metal lathe, you need some important tools. First, gather these essential items:
- Measuring tape or ruler
- Caliper
- Drill press
- Lathe
- Taps and dies
Optional tools can help you work even better:
- Digital readout
- Micrometer
- Vise
- Torque wrench
Using these tools, you can create precise and efficient lead screws. With practice, your skills will improve!
What tools are needed for fabricating a lead screw?
You’ll need measuring tools, a drill press, and a lathe as essential tools. Optional tools like digital readouts and micrometers can help increase precision.
Step-by-Step Guide to Building Your Lead Screw
Detailed instructions from design to assembly. Common pitfalls and how to avoid them.
Building your lead screw can feel like a puzzle, but don’t worry, it’s a fun one! Start by sketching your design on paper. Use measurements that match your metal lathe. Cut your materials carefully to avoid boo-boos. When assembling, make sure everything fits snugly—like a cozy hug! Common mistakes include miscalculating lengths or forgetting crucial bolts. To dodge these troubles, double-check your work and have a buddy help you. It’s way more fun to DIY with a friend!
| Common Pitfalls | How to Avoid |
|---|---|
| Wrong measurements | Always measure twice! |
| Loose connections | Tighten those bolts! |
Testing and Calibration of the Lead Screw
Techniques for testing accuracy and performance. Adjustments and fixes for common issues.
To ensure your DIY metal lathe lead screw is working properly, start by testing its accuracy. Use a dial indicator to measure any discrepancies. If the screw isn’t moving smoothly, it might need a little TLC. Check for dirt or damage, then clean or replace parts as needed. Small adjustments can make a big difference, and sometimes a laugh helps. After all, you don’t want your lathe moving like a sleepy tortoise!
| Common Issues | Adjustments/Fixes |
|---|---|
| Too much backlash | Adjust the nut tension |
| Rough movement | Lubricate the screw |
| Inaccurate measurements | Recalibrate with a dial indicator |
Remember, a well-calibrated lead screw can be the difference between a masterpiece and a quirky creation! Think of it as giving your lathe a little pep talk. Now, go forth and lathe with confidence!
Maintenance Tips for Longevity
Routine maintenance practices for lead screws. Signs of wear and when to replace components.
To keep your lead screw spinning like it’s on a dance floor, regular maintenance is key. First, check the screws for dirt and oil buildup; a little cleaning goes a long way. Listen for odd noises; squeaks are bad music your machine shouldn’t play! If you see any rust or wear, it’s time for replacements. Don’t ignore the signs! Here’s a quick table of maintenance reminders:
| Maintenance Task | Frequency | Signs of Wear |
|---|---|---|
| Clean lead screw | Every month | Dirt or grease build-up |
| Lubricate | Every 3 months | Squeaking sounds |
| Inspect wear | Every 6 months | Visible rust or damage |
With these tips, you’ll keep your DIY metal lathe humming smoothly and maybe even jiving a little! Remember, a happy machine is a productive machine!
Upgrades and Modifications
Potential enhancements to improve your lead screw. Customization options based on user needs and projects.
Upgrading your lead screw can kick your DIY projects up a notch! Consider using a smoother, high-tolerance screw for better precision. You can also add a programmable controller for automated fun. It’s like giving your lathe a superhero cape! Of course, think about your specific needs. Do you want to carve tiny things or giant sculptures? Choose the upgrades to fit your plans.
| Upgrade | Benefit |
|---|---|
| Smoother Lead Screw | Increases precision |
| Programmable Controller | Automates tasks |
| Custom Material | Enhances durability |
Funny enough, your lathe could be the coolest tool in the shed with these tweaks! So, let’s get to modifying!
Frequently Asked Questions
Common queries regarding DIY metal lathe lead screws. Expert answers to assist DIYers in troubleshooting.
Got questions about DIY metal lathe lead screws? You’re not alone! Many DIYers wonder how to fix issues like wobbling or tightness. One common query is, “Why is my lead screw so hard to turn?” The answer is simple: Inspect for dirt or misalignment. Another popular question is, “How do I ensure smooth operation?” To keep things running smoothly, regular lubrication is key. Let’s dive into these FAQs to help you master your lathe. Remember, it’s all about smooth moves—kind of like dancing, but with metal!
| Question | Expert Answer |
|---|---|
| Why is my lead screw hard to turn? | Inspect for dirt or misalignment. |
| How can I ensure smooth operation? | Regular lubrication is key. |
Resources and Further Reading
Recommended books, forums, and websites for deeper knowledge. Video tutorials and guides for visual learners.
Want to dive deeper into the world of DIY metal lathes? Check out your local library for books that make learning fun. Websites like Instructables and forums like Reddit have helpful tips. Watching videos can make things clearer; YouTube has tons of tutorials. Need a laugh while learning? Search for lathes gone wrong! Here’s a quick table to guide you on where to look:
| Resource Type | Name |
|---|---|
| Books | “Metalworking 101” |
| Forums | Reddit Metalworking |
| Websites | Instructables |
| Video Tutorials | YouTube DIY Channels |
With these resources, you’ll become a metal lathe pro in no time!
Conclusion
In summary, a DIY metal lathe lead screw is a great project for beginners. It helps you improve your skills and create precise parts. You’ll need basic materials and tools, but the process is rewarding. We encourage you to explore designs and tutorials online. Start building your own lathe lead screw and enjoy the learning experience!
FAQs
What Materials Are Best Suited For Constructing A Lead Screw For A Diy Metal Lathe?
For a lead screw in a DIY metal lathe, you can use steel or aluminum. Steel is strong and helps the screw last a long time. Aluminum is lighter and easier to work with. Both materials can help you make smooth and accurate cuts. Choose the one that fits your project best!
How Can I Accurately Measure And Cut A Lead Screw To Ensure It Fits Properly In My Lathe Design?
To measure your lead screw, first find the length you need. Use a ruler or tape measure to get an exact number. Mark the screw with a pencil where to cut. Then, use a saw to cut it carefully along the mark. Check the fit in your lathe design to make sure it’s just right.
What Types Of Threads Are Commonly Used For Lead Screws, And Which Would Be Most Effective For My Diy Metal Lathe Project?
Common threads for lead screws are square, trapezoidal, and Acme threads. Square threads hold a lot of weight and give a smooth movement. Trapezoidal threads are strong and easy to find. Acme threads are also popular and work well for DIY projects. For your metal lathe, trapezoidal threads might be the best choice because they balance strength and ease of use.
How Do I Incorporate A Nut Mechanism For The Lead Screw To Minimize Backlash In My Lathe Design?
To reduce backlash in your lathe, you can use a nut mechanism with the lead screw. First, find a snug-fitting nut for the screw. Then, attach it securely to the lathe frame. Adjust the nut slightly to remove any space between it and the screw. This will help the parts move together smoothly and keep your cuts accurate.
What Are The Common Challenges Faced When Building A Lead Screw For A Diy Metal Lathe, And How Can They Be Overcome?
When building a lead screw for a DIY metal lathe, you might face a few problems. One challenge is getting the parts to fit together well. To fix this, measure your pieces carefully and adjust if needed. Another issue can be making it turn smoothly. You can solve this by using good bearings or lubrication. Lastly, make sure everything is strong enough to handle pressure; using sturdy materials helps with that.