Quick Summary:
A jaw chuck for your lathe is a crucial clamping device used to securely hold your workpiece. It offers excellent gripping power and centering accuracy, making it essential for turning operations. This guide will help you understand, choose, and use a jaw chuck safely and effectively, even if you’re new to machining.
Jaw Chuck for Lathe: Your Essential Beginner’s Guide
Welcome to Lathe Hub! If you’ve just started exploring the world of lathes, you might be wondering about that rotating thingy that holds your material. That’s likely a chuck, and for many tasks, a jaw chuck is your best friend. Sometimes, getting the workpiece perfectly centered or gripping it tightly can feel a bit daunting. Don’t worry, it’s a common puzzle for beginners! This guide is here to break down everything you need to know about jaw chucks for lathes, making them less mysterious and more manageable. We’ll walk through what they are, why you need one, and how to use it with confidence. Let’s get your projects spinning smoothly!
What Exactly is a Jaw Chuck for a Lathe?
Think of a jaw chuck as the hands of your lathe, designed to grab and hold onto the material you’re working with – often called the workpiece – while the lathe spins it. It’s typically mounted onto the lathe’s spindle, the part that rotates. The “jaws” are adjustable metal blocks that move in and out, usually simultaneously, to grip the workpiece from the outside (external grip) or from the inside (internal grip).
This secure holding action is absolutely vital. Without a reliable chuck, your workpiece could fly off the lathe at high speed, which is incredibly dangerous. A good jaw chuck ensures your material stays put, allowing you to shape, drill, or finish it accurately and safely. For beginners, this means less worry about catastrophic failures and more focus on learning the fun parts of machining!
Why You Need a Jaw Chuck on Your Lathe
When you’re starting out, you might encounter different ways to hold workpieces on a lathe. While some simple methods exist for very basic tasks, a jaw chuck offers a significant upgrade in capability, precision, and safety. Here’s why it’s practically a must-have:
- Secure Clamping: Jaw chucks provide a very strong and reliable grip. This is essential for preventing the workpiece from vibrating, shifting, or becoming dislodged during operation.
- Centering Accuracy: Most jaw chucks are designed to ensure the workpiece is held precisely in the center of the spindle’s rotation (concentricity). This is critical for turning operations where you need perfectly round parts or features aligned with the axis of rotation.
- Versatility: A single jaw chuck, especially a universal one, can grip a wide range of workpiece shapes and sizes. The jaws can be adjusted, and sometimes reversed, offering flexibility for different projects.
- Efficiency: Compared to other methods for securing workpieces, a jaw chuck is generally much faster to set up and change over. This means more time spent turning and less time fiddling with clamps.
- Safety First: As mentioned, a secure grip is paramount for safety. A well-functioning jaw chuck dramatically reduces the risk of accidents.
Types of Jaw Chucks: Finding the Right Fit for You
When you start looking at jaw chucks, you’ll notice a few main types. Each has its own strengths, and understanding them will help you make the best choice for your lathe and your projects.
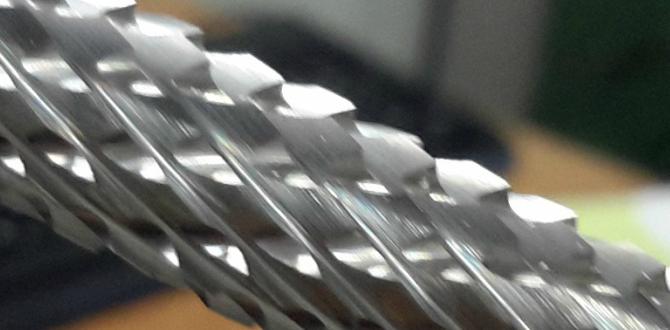
1. Scroll Chucks (Universal Chucks)
These are the most common type you’ll find on most metalworking and some woodworking lathes. They are also known as universal chucks because all the jaws move simultaneously to grip the workpiece. This synchronized movement is achieved by a scroll plate (a spiral gear) that engages with the outer teeth of the jaws.
- How they work: When you turn a scroll chuck with its dedicated wrench, the scroll plate rotates, moving all the jaws in or out at the same rate. This makes them quick to operate and excellent for gripping round or hexagonal stock accurately.
- Advantages:
- Fast to operate.
- Good concentricity for round stock.
- Relatively easy to use.
- Most come with both internal and external gripping capabilities if jaws are reversed.
- Disadvantages:
- Can be less precise with irregularly shaped or square stock compared to independent chucks.
- Can sometimes slip under very heavy cuts if not tightened properly.
2. Independent Chucks
An independent chuck has jaws that can be moved and adjusted one at a time, independently of the other jaws. Each jaw has its own screw. This provides much greater flexibility.
- How they work: Each jaw is operated by its own screw, usually accessible from the front of the chuck. This allows you to precisely position each jaw to grip irregularly shaped workpieces, square stock, or to set offsets.
- Advantages:
- Excellent for gripping square, rectangular, or irregularly shaped workpieces precisely.
- Allows for precise offsetting for features like eccentric Cams.
- Can provide a very secure grip on non-round stock.
- Disadvantages:
- Much slower to operate than scroll chucks.
- Achieving perfect concentricity for round stock requires more skill and time.
- Less common on smaller hobbyist lathes.
3. Combination Chucks
As the name suggests, these chucks combine features of both scroll and independent chucks. They typically have a scroll mechanism for quick, universal gripping, but also have adjusting screws to fine-tune jaw positions or for independent adjustments.
- Advantages: Offers the best of both worlds – speed and versatility.
- Disadvantages: Can be more complex and expensive.
4. Drill Chucks (Jacobs Chucks)
While not strictly a “jaw chuck” in the same sense as a scroll or independent chuck used for turning larger parts, a drill chuck is essential for holding drill bits, reamers, and small end mills when you want to perform operations precisely on the center line of your workpiece. They are mounted in the tailstock or sometimes a turret tool post.
- How they work: Typically operated by a key (key-operated) or by hand (keyless), the jaws in a drill chuck tighten down onto a cylindrical shank.
- Advantages: Excellent for holding small diameter tools accurately.
- Disadvantages: Not suitable for holding larger workpieces for turning operations.
For most beginners learning on standard metal or wood lathes, a 3-jaw scroll chuck is the most common and practical starting point. It offers a good balance of ease of use, speed, and accuracy for a wide variety of common tasks.
Key Components of a Jaw Chuck
Understanding the parts of your jaw chuck will make it easier to use and maintain. Here are the main components you’ll encounter, especially on a scroll chuck:
- Body: This is the main housing of the chuck that attaches to the lathe spindle.
- Jaws: These are the moving parts that grip the workpiece. They are usually hardened steel and can often be reversed or replaced. Most common chucks have 2, 3, or 4 jaws.
- Hard Jaws: These are often serrated and are used to grip externally. They can also be used internally.
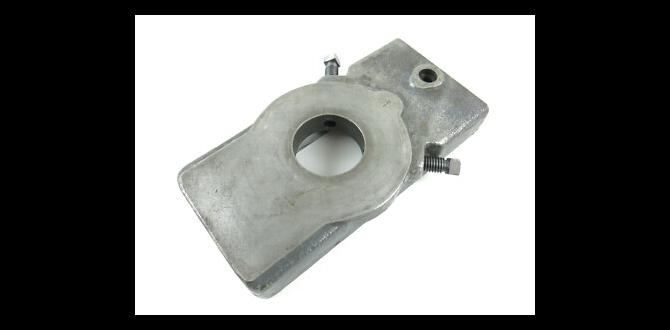
- Soft Jaws: These are blank jaws that can be machined to precisely fit a specific workpiece shape or to provide a custom grip.
- Scroll Plate: A round, flat disc with a spiral groove on its surface. When the scroll wrench turns, this plate rotates, forcing the jaws to move in or out along their guides.
- Scroll Ring (or Nut): This is the part that engages with the scroll plate.
- Jaw Guides: Grooves or slots in the chuck body that the jaws slide in.
- Chuck Wrench (Key): A tool used to turn the scroll nut or operate the jaw screws, causing the jaws to move.
How to Mount a Jaw Chuck to Your Lathe
Mounting the chuck securely and correctly is your first critical step. Always consult your lathe’s manual for specific instructions, as mounting methods can vary. Here’s a general overview and some safety considerations:
Mounting Methods
There are a few common ways chucks are attached to the lathe spindle:
- Direct Spindle Threading: The chuck has internal threads that screw directly onto external threads on the lathe spindle nose. This is common on older or simpler lathes.
- Camlock Spindle (D1-Style): This is a very common and secure method on many modern metal lathes. The chuck has a flat backplate with locating “dogs” or pins that fit into corresponding features on the spindle nose. Large bolts (cam bolts) then pass through the chuck backplate and thread into the spindle, locking it in place with cams.
- Threaded Adapter: Sometimes, a chuck with a specific thread (like D1-camlock backplate) is fitted with an adapter to suit a lathe spindle with a different thread.
General Mounting Steps (for Threaded Spindles)
Safety First! Ensure the lathe power is OFF and the spindle will not move.
- Clean Everything: Thoroughly clean the lathe spindle threads and the chuck’s mating threads. Any dirt, grit, or old grease can cause issues or damage.
- Inspect Threads: Check both sets of threads for any damage (nicks, bent threads). If damaged, do not proceed and seek professional advice or replacement parts.
- Start Threading: Carefully thread the chuck onto the spindle by hand. It should thread on smoothly and easily. If it binds or cross-threads, back it off immediately and start again. Forcing it can damage both parts.
- Tighten Properly: Once hand-tight, use a soft mallet or a block of wood and a hammer to “tap” the chuck around in the direction of tightening. This helps seat it firmly. For some chucks, a spanner or lever provided with the lathe might be used to snug it up further. The exact method will be in your lathe’s manual.
- Tight Rope (Optional but Recommended): Some machinists use a “tight rope” or lever method to ensure the chuck is pulled up very securely against the spindle shoulder. This usually involves a sturdy bar or piece of wood placed against a jaw (with the chuck jaws slightly open for clearance if needed) and leveraging against a fixed part of the lathe to give it a final, firm pull. Be extremely careful not to damage the chuck or lathe doing this.
General Mounting Steps (for Camlock Spindles D1-Style)
Safety First! Ensure the lathe power is OFF and the spindle will not move.
- Clean: Clean the spindle nose and the back of the chuck thoroughly. Ensure the locating pins on the spindle are clean and free of debris.
- Position Chuck: Lift the chuck and align its backplate over the spindle nose. Make sure the locating pins on the spindle fit into their corresponding holes on the chuck’s backplate.
- Insert Bolts: Insert the cam bolts through the designated holes in the chuck backplate.
- Thread Bolts: Thread the cam bolts into the spindle nose by hand as far as they will go.
- Tighten Cams: Insert the cam wrench and turn each cam bolt to lock the chuck onto the spindle. You’ll feel resistance as the cam engages. Turn until snug.
- Check Security: Gently try to wiggle the chuck. It should feel solid and rigidly attached to the spindle.
How to Use a Jaw Chuck Safely and Effectively
Once your chuck is mounted, it’s time to learn how to use it. For a beginner, focusing on the 3-jaw scroll chuck is a great starting point.
1. Selecting and Inserting Jaws (if applicable)
Most common chucks come with a set of hard jaws. Sometimes, you might have soft jaws that need to be machined. Ensure the jaws are clean and that the jaw numbers correspond to the jaw numbers on the chuck body. Jaws typically slide into specially designed slots on the chuck and are pulled or pushed by the scroll plate.
2. Mounting Your Workpiece
This is where the magic happens. We’ll focus on gripping round stock externally, as it’s the most common scenario for beginners.
- Open the Chuck: Insert the chuck wrench into the designated slot on the chuck body. Turn the wrench counter-clockwise (usually) to open the jaws. Continue until the jaws are open wide enough to easily fit your workpiece, with a little clearance.
- Insert the Workpiece: Place your workpiece into the opened jaws. Make sure it’s seated against the internal stops within the chuck if your chuck has them, or that it’s positioned at the desired depth.
- Close the Chuck for Initial Grip: Turn the chuck wrench clockwise to close the jaws. As the jaws move inward, they will grip the workpiece. Turn until the jaws are snug, but don’t overtighten yet.
- Center the Workpiece (Roughly): Give the workpiece a light tap with a soft mallet or a block of wood to help it settle and center itself within the jaws.
- Center the Workpiece (Precisely): This is crucial for accuracy.
- Dial Indicator: The most accurate way is to use a dial indicator. Mount it on the lathe’s tool post or in another suitable holder. Bring the indicator’s tip into contact with the workpiece near the chuck jaws. Rotate the spindle slowly by hand. The reading on the dial indicator shows how much that point is “out of true.”
- Adjustments: Loosen the chuck slightly (just enough to allow movement but keep it gripped), and tap the workpiece gently with your soft mallet in the direction that will reduce the indicator reading. Retighten the chuck. Repeat this process until the indicator shows minimal runout (typically less than 0.001″ or 0.03mm for most operations).
- Visual Check (for rough work): For less critical work, you can sometimes eyeball it by watching for wobbles as you turn the spindle very slowly. However, using a dial indicator is highly recommended for accuracy.
- Final Tightening: Once centered, it’s time to tighten the chuck firmly. Use the chuck wrench and apply sufficient force.
- Leverage and Force: For a 3-jaw chuck, the jaws move together. Tighten each jaw sequentially, rather than tightening one jaw completely before moving to the next. Turn the wrench, move to the next jaw slot, turn, and repeat. This ensures even pressure.
- “Tight Rope” Technique (Optional): Similar to mounting, some machinists will use a lever against a jaw (be careful not to damage it!) to get a final, powerful pull to seat the jaws firmly. Always use caution and protect surfaces. The goal is to ensure the jaws are firmly seated and the workpiece won’t slip.
- Check Runout Again: After final tightening, check your dial indicator again. The runout should still be minimal. If it has increased significantly, you might need to repeat the centering and tightening process.
3. Gripping Internally
Many chucks allow you to reverse the jaws. This means removing the jaws, flipping them, and reinstalling them. When the jaws are reversed, they can grip the inside diameter (ID) of a hollow workpiece, such as a pipe or a casting.
The process is similar to external gripping, but you’ll be expanding the jaws against the inner surface. Accurate centering is still essential.
4. Using Soft Jaws
Soft jaws are made of a softer metal (like aluminum or mild steel) that can be machined to perfectly fit a specific workpiece or to create custom gripping features. This is invaluable when you need to hold irregularly shaped parts accurately or when you need to machine features that require the part to be held in a very specific way.
The process involves mounting the soft jaws while they are mounted on the chuck. You then use a dial indicator to align your workpiece (or a precision mandrel) in the chuck. Then, you cut/machine the soft jaws to match the profile of your workpiece. This is a more advanced technique, but it’s a powerful one for achieving high accuracy on complex jobs.
5. Removing Your Workpiece
To remove the workpiece, simply open the chuck jaws using the wrench. Ensure the spindle is stopped before attempting to open the chuck!
Jaw Chuck Maintenance: Keeping it Running Smoothly
A little bit of care goes a long way in ensuring your jaw chuck remains accurate and reliable for years to come. Here’s what you should do:
- Keep it Clean: After each use, especially if you were working with cutting fluids or metal chips, brush out any debris from the jaw slots, the scroll plate, and the jaw threads.