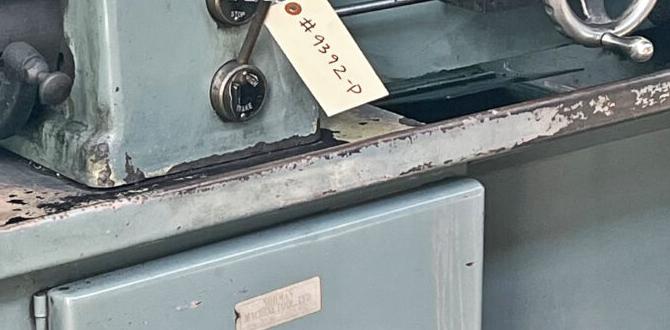
Have you ever wondered how machines work? A metal lathe is a fantastic tool that helps create many things, from small parts to large equipment. One important part of this tool is the apron, which controls the movement of the tool and the workpiece. But what happens when something goes wrong?
It might be time to dive into the art of disassembly! Disassembling the metal lathe apron can seem daunting, but it can actually be quite rewarding. What if you could fix your lathe yourself? Imagine the pride in learning how to take apart and put back together a crucial part of your machine.
In this article, we will explore the important steps for disassembling the metal lathe apron. By the end, you will have the knowledge and skills to tackle this task confidently. Ready to get started? Let’s unlock the mysteries of the metal lathe apron together!
Metal Lathe Apron Disassembly Steps: A Comprehensive Guide

Metal Lathe Apron Disassembly Steps
Disassembling a metal lathe apron can be fun and educational. First, it’s essential to gather the right tools. Safety always comes first, so wear gloves! Next, carefully remove screws and knobs. Did you know that taking pictures helps? It’s a smart way to recall your steps. Once apart, clean the parts for better functionality. Finally, understanding how each component connects can make reassembly easier. Enjoy learning about your machine!Understanding the Metal Lathe Apron
Definition and function of the apron in a metal lathe. Common components of a lathe apron and their purpose.The apron is a key part of a metal lathe. It helps control the movement of the cutting tool and workpiece. The apron has several important parts. Each part plays a special role in how the lathe works. Here are some main components:
- Handwheel: Controls the movement of the carriage.
- Clapper Box: Holds the cutting tool securely.
- Feed Rod: Sends power to move the tool and workpiece.
- Nuts and Gears: Ensure smooth operation and accurate movement.
The apron makes the lathe run smoothly, allowing for fine adjustments and precise cuts. It’s like the captain steering a ship, guiding the tool to create perfect shapes.
What is the purpose of the apron in a metal lathe?
The apron makes sure everything works well together. It controls how the cutting tool moves. This helps make clean and accurate cuts.
Tools Required for Disassembly
List of essential tools needed for apron disassembly. Safety equipment recommendations.To take apart the metal lathe apron, you will need some important tools. Here are the essential items:
- Wrench set
- Screwdrivers (flat and Phillips)
- Socket set
- Pliers
- Hammer
Don’t forget your safety gear! Always wear:
- Safety glasses
- Gloves
- Dust mask
These tools and protective equipment will help you work safely and effectively.
What tools do you need for metal lathe apron disassembly?
You will need a wrench set, screwdrivers, a socket set, pliers, and a hammer.Preparing for Disassembly
Steps to ensure the lathe is safe to work on. Importance of cleaning and organizing workspace.Before diving into the metal lathe apron disassembly, it’s crucial to take safety steps. First, unplug the lathe. It’s important to avoid surprising your fingers with unexpected whirring! Next, wear safety glasses to shield your eyes from flying debris — you don’t want to practice your dodging skills! Make sure your workspace is clean. A clutter-free area is like a happy place for tools.
| Safety Steps | Organizing Tips |
|---|---|
| Unplug the lathe | Clear unnecessary items |
| Wear safety glasses | Group similar tools together |
| Gather necessary tools | Label containers for parts |
Cleaning and organizing your workspace can save you from a “Where did that screw go?” meltdown later on. Remember, a tidy bench is a happy bench!
Step-by-Step Disassembly Process
Detailed guide on removing the apron from the lathe. Breakdown of each component disassembly within the apron.Ready to tackle the apron on your lathe? Here’s how to do it step-by-step! Start by gathering your tools. A wrench and screwdriver will be your best friends. First, unplug the lathe—safety first! Remove the screws on the apron’s sides. Next, gently lift and detach the components like gears and levers. Remember, each piece is like a puzzle. Keep them organized so you can reassemble them later without losing your marbles!
| Component | Action |
|---|---|
| Screws | Remove with a screwdriver |
| Gears | Carefully lift off |
| Levers | Detach gently |
And voilà! You now have the apron disassembled. Like a magician, you’ve revealed the magic inside your lathe. Don’t forget to smile; you’re one step closer to becoming a lathe master!
Troubleshooting Common Issues
Identifying potential problems during disassembly. Solutions for dealing with stuck components or damaged parts.Disassembling a metal lathe apron can sometimes lead to problems. Common issues include stuck parts or damaged components. To fix these problems, start by checking all the screws and bolts. They might be too tight. If a part won’t budge, try using penetrating oil. Next, tap it lightly with a hammer. This can help break any rust. If you find broken pieces, can you replace or repair them? Having the right tools makes the job easier.
What should I do if parts are stuck?
If you face stuck parts, use penetrating oil and gentle taps. This often frees up the components without damage.
Tips to Handle Stuck Components:
- Apply penetrating oil
- Lightly tap with a hammer
- Check for rust or dirt
- Use a heat source if necessary
Maintenance Tips for the Apron Components
Recommended maintenance practices postdisassembly. Signs to watch for that indicate a need for further inspection or repair.Taking care of the apron components is important for smooth operation. After you take it apart, clean and inspect each part carefully. Look for signs of wear, such as cracks or rust. Lubricate moving parts to keep them running well. Check for tightness and alignment to avoid problems later.
- Clean all parts with a soft cloth.
- Look for cracks or rust.
- Lubricate moving components.
- Check for proper alignment.
Regular checks can save you time and money. Remember, if something feels off, it may need repair. Trust your instincts.
What should I watch for after disassembly?
Look for cracks, rust, or unusual wear. These signs mean it’s time for further inspection or repair. Stay aware of any strange noises too!
Reassembly of the Metal Lathe Apron
Guidelines for reassembling the apron correctly. Key considerations to ensure proper alignment and function.To reassemble the metal lathe apron, follow these simple guidelines. First, check all parts carefully. Make sure everything is clean and free from damage. Align parts to fit closely without forcing them. Use the right tools for each step.
- Start with the gears and levers.
- Attach screws securely, but don’t overtighten.
- Test movement after reassembly to ensure smooth function.
Always pay attention to how pieces fit together. Proper alignment affects performance. A well-placed apron makes the lathe work better!
How to confirm proper alignment?
Check if all parts move freely without any blocks. This step confirms you assembled everything right.Conclusion
In conclusion, disassembling a metal lathe apron involves careful steps. Start by gathering your tools and working in a clean space. Remove screws, then lift off the apron gently. Always remember to take notes or pictures to help reassemble later. For more details, consider reading guides or watching videos. This will boost your confidence in working with lathes!FAQs
Sure! Here Are Five Related Questions On The Topic Of Metal Lathe Apron Disassembly Steps:Sure! Here are five questions about metal lathe apron disassembly steps: 1. What is a metal lathe apron? A metal lathe apron is a part of the lathe machine. It helps hold and move the tools. 2. Why do we need to take apart the apron? We take apart the apron to clean it, fix problems, or replace worn parts. 3. What tools do you need to disassemble the apron? You need a wrench, screwdriver, and maybe some pliers. 4. How do we start taking the apron apart? First, turn off the lathe and unplug it for safety. Then, carefully remove any screws or bolts. 5. What should you do with the parts you take off? Keep the parts organized, so you know where everything goes. This helps when you put it back together.
Sure! Please provide the question you’d like me to answer.
What Tools Are Necessary To Safely Disassemble The Apron Of A Metal Lathe?To safely take apart the apron of a metal lathe, you need a few tools. First, get a screwdriver that fits the screws. You’ll also need a wrench to turn some bolts. A pair of pliers can help with tough pieces. Lastly, a clean cloth can help you keep things tidy while you work.
What Are The Main Components Of A Metal Lathe Apron That Should Be Carefully Examined During Disassembly?When you take apart a metal lathe apron, check the saddle, which holds the cutting tool. Look at the gears, as they help move the apron. Examine the handwheel, which you use to control the movement. Don’t forget the feed rod and the carriage, which move the apron along the lathe. Make sure all these parts are not worn out or damaged.
Are There Any Specific Safety Precautions To Follow When Disassembling The Apron Of A Metal Lathe?Yes, there are some safety precautions to remember. First, always turn off the lathe and unplug it before you start. Wear safety goggles to protect your eyes from metal bits. Use gloves to keep your hands safe from sharp edges. Finally, be careful and take your time so you don’t get hurt.
How Can One Prevent Damage To The Gears And Levers While Removing The Apron From The Metal Lathe?To prevent damage while removing the apron from the metal lathe, first, unplug the machine. This keeps it safe. Next, carefully check the gears and levers. Make sure you don’t pull or twist them too hard. Finally, use the right tools gently to avoid breaking anything.
What Is The Typical Order Of Operations For Disassembling The Apron, And How Can One Ensure All Parts Are Organized For Reassembly?To take apart the apron, start by removing any clips or fasteners. Next, take off the top part of the apron. Then, carefully remove the bottom section. As you take parts off, put them in a labeled bag or box. This helps you remember where everything goes when you put the apron back together.