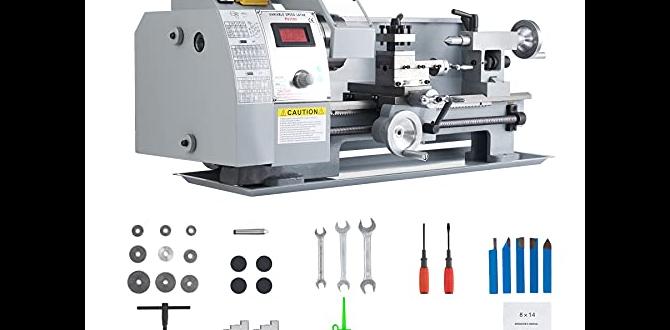
Mini wood lathe chuck sets are essential for safely and securely holding your workpiece, allowing for precise turning of various projects. Investing in a quality set provides versatility, accuracy, and peace of mind for both beginners and experienced woodturners.
Turning wood on a mini lathe can be an incredibly rewarding hobby. You can create beautiful bowls, intricate spindles, and unique decorative items right in your own workshop. But to make anything precise and safe, you need to hold your wood firmly. That’s where a mini wood lathe chuck set comes in. Think of it as the strong, reliable hand that keeps your material steady while the lathe spins. Without a good chuck, your projects might not turn out as planned, or worse, they could become a safety hazard. This guide will walk you through why a chuck set is so important, what to look for when buying one, and how to use it with confidence. Let’s get your turning projects off to a solid start!
Why a Mini Wood Lathe Chuck Set is a Game-Changer
When you first start out with a mini wood lathe, you might be tempted to use basic methods to secure your wood, like screws or dog drives. While these can work for very simple tasks, they have significant limitations. A proper chuck system opens up a whole new world of possibilities and, more importantly, enhances safety.
Here’s why a mini wood lathe chuck set is considered an essential piece of equipment:
Superior Workpiece Security: Unlike simpler methods, chucks grip the wood from the outside (jaws expanding) or inside (jaws contracting) with much more force and surface area. This means your workpiece is far less likely to come loose during operation, even at higher speeds.
Versatility in Holding: A good chuck set usually comes with interchangeable jaws, allowing you to grip various shapes and sizes of wood. You can hold round stock, square stock, tenons, and even the inside of pre-drilled holes. This adaptability is crucial for different turning projects.
Accuracy and Precision: By providing a solid and centered grip, a chuck helps you achieve greater accuracy in your turning. This is vital for creating perfectly round bowls, symmetrical spindles, and projects where precise dimensions matter.
Reduced Wood Waste: When wood is held securely, you can turn it down closer to the chuck jaws without worrying about it flying off. This means you can maximize the material you use and get more out of your wood blanks.
Enhanced Safety: This is paramount. A loose workpiece can be extremely dangerous. A chuck’s secure grip significantly reduces the risk of accidents, allowing you to focus on your turning without constant worry.
Efficiency: Setting up your workpiece in a chuck is generally faster and more reliable than using screws or other less sophisticated methods, especially for repetitive tasks or when switching between different pieces.
Understanding the Components of a Mini Wood Lathe Chuck Set
A mini wood lathe chuck set isn’t just a single tool; it’s a system designed for holding wood. The core of the system is the chuck itself, which attaches to your lathe’s spindle. Then, you have various accessories, most importantly, the jaws, that customize its holding capabilities.
Here are the key components you’ll typically find:
The Chuck Body: This is the main part that screws onto your lathe’s headstock spindle. It contains the mechanism (usually a scroll screw) that drives the jaws in and out simultaneously and symmetrically.
Jaws: These are the interchangeable parts that actually grip the wood. Different jaw sets are designed for specific gripping tasks. Common types include:
Grip Jaws (Standard Jaws): These are the most versatile and are used for gripping both externally (around a tenon or recess) and internally (inside a pre-drilled hole).
Scroll Jaws: Often larger and designed for significant expansion or contraction to hold a wide range of diameters.
Pin Jaws/Dovetail Jaws: Excellent for holding small, delicate pieces or irregularly shaped items.
Faceplate Jaws: Used for holding larger, flatter pieces of wood directly.
Jaw Slides/Carriage: These are the components that move along the chuck body, driven by the scroll screw, to which the jaws are attached.
Adjustment Screws/Keys: Used to tighten and loosen the jaws, often with a T-handle or an Allen key.
Insert or Threaded Adapter: This allows the chuck to screw onto different lathe spindle threads. Many chucks come with a specific thread, and an adapter can be used to fit other lathe sizes. It’s crucial to ensure your chuck is compatible with your lathe’s spindle thread.
Types of Mini Wood Lathe Chucks for Beginners
For beginners, the most common and recommended type of chuck is a scroll chuck. These are highly versatile and user-friendly.
Scroll Chucks: These are almost universally the go-to for woodturners starting out. They use a scroll mechanism to move all jaws simultaneously and equally. This ensures your workpiece remains centered as you tighten or loosen the chuck, which is critical for accurate turning and safety.
Pros: Extremely versatile, excellent centering, widely available, good selection of jaw types.
Cons: Can be more expensive than basic screw chucks or faceplates.
While other types of chucks exist (like independent jaw chucks common in metalworking, or specific screw chucks), for dedicated woodturning on a mini lathe, a scroll chuck set is the standard and most highly recommended starting point.
Choosing the Right Mini Wood Lathe Chuck Set
With so many options available, selecting the right mini wood lathe chuck set can feel daunting. Here’s a breakdown of factors to consider:
1. Lathe Spindle Thread Size
This is the most critical factor. Your chuck must screw onto your lathe’s spindle. Common thread sizes include 1″ x 8 TPI (Threads Per Inch) and 3/4″ x 10 TPI, but smaller mini lathes can have finer threads like 1″ x 10 TPI, 16mm x 2mm, or M33 x 3.5.
Check your lathe’s manual: This is the best place to find the exact spindle thread size.
Measure: If you don’t have the manual, you might need to measure the diameter and count the threads per inch.
Thread Adapters: If you can’t find a chuck with your specific thread, look for one with a common thread and a compatible adapter. For example, if your lathe has a 16mm thread and you find a chuck with a 1″ x 8 TPI thread, you’ll need a 16mm to 1″ x 8 TPI adapter.
2. Chuck Size and Jaw Capacity
Mini lathes are typically smaller, so you’ll want a chuck designed for them. A typical mini lathe chuck might be 2-3 inches in diameter.
Jaw Reach: Consider the minimum and maximum diameter of wood each set of jaws can hold. A versatile set will handle a good range, from small spindle work to modest bowl blanks.
Recommended Jaw Sets: Most starter sets include a versatile set of grip jaws suitable for a wide range of tasks. You can purchase additional jaw sets later as your needs evolve.
3. Manufacturer Reputation and Quality
When it comes to tools that hold potentially hazardous items spinning at high speeds, quality matters.
Trusted Brands: Look for manufacturers known for producing reliable woodworking machinery and accessories. Some reputable brands include Nova, Vicmarc, PSI, and Record Power, though availability may vary regionally and by mini lathe specific models.
Material Quality: Higher-quality chucks are usually made from hardened steel or other durable alloys for longevity and precision.
Precision Engineering: A well-engineered chuck will operate smoothly, hold its grip securely, and maintain concentricity (keeping the workpiece perfectly centered).
4. Price and Value
Woodturning chucks can range from under $100 for very basic models to several hundred dollars for high-end systems.
Beginner Sets: A good starter chuck set often includes the chuck body and a versatile set of jaws for around $150-$300.
Future Investment: While it’s tempting to buy the cheapest option, a quality chuck is an investment that will serve you better and safer for years. Consider what you plan to turn and if the starter set adequately supports those goals. Buying a well-regarded brand ensures parts and accessories are usually available for future expansion.
5. Included Accessories
Some sets include extras that can be beneficial:
Jaw Sets: As mentioned, starter sets usually come with at least one pair of versatile jaws.
Chuck Key/Handle: Essential for tightening and loosening the chuck jaws.
Thread Adapter: If the chuck doesn’t directly match your lathe’s spindle.
Storage Case: A nice-to-have for keeping everything organized and protected.
Essential Jaw Types for Your Mini Wood Lathe Chuck Set
The versatility of a scroll chuck comes from its interchangeable jaws. While a basic set will get you far, understanding other jaw types will help you choose future additions or identify what your starter set should ideally include.
Here’s a look at commonly found jaw types:
| Jaw Type | Primary Use | Grip Method | Best For |
| :————————— | :—————————————————————————————- | :———————————— | :—————————————————————————————————– |
| Grip Jaws (Standard) | Versatile external and internal gripping. | External expansion, Internal contraction | Tenons, recesses, pre-drilled holes for bowls, general spindle work. |
| Dovetail Jaws | Secure gripping of tenons and internal dovetail recesses. | External expansion (dovetail shape) | Creating and holding tenons for bowl rims, superior grip on tenons compared to standard grip jaws. |
| Pin Jaws (Small Scroll) | Holding very small workpieces, spindles, or off-center work. | Internal contraction or external expansion | Small spindles, finials, re-turning tenons, holding small hollow forms. Often used for re-chucking. |
| Faceplate Jaws | Holding large, flat pieces of wood or items that can be screwed to the jaw faces. | External grip on a flat surface | Large bowls, boxes, or sections of wood that don’t have a tenon or hole. Can be used for face-grain work. |
| Cole Jaws (Large Scroll) | Designed for holding larger diameter bowls both internally and externally. | Wider expansion/contraction range | Re-chucking larger bowls for hollowing the base or finishing the rim. Typically for larger chucks. |
| Vacuum Jaws | Used with a vacuum pump to hold workpieces. Requires a specialized chuck. | Vacuum suction | Hollowing thin-walled bowls, delicate work where surface damage is a concern. |
For a beginner set, the Grip Jaws (Standard) are usually included and are the most important to start with. They offer a good balance for gripping tenons (the cylindrical extensions on the end of a workpiece) inserted into a pre-drilled hole, or for gripping inside a pre-drilled recess.
Using Your Mini Wood Lathe Chuck Set Safely and Effectively
Getting a chuck set is only the first step. Learning to use it properly is key to successful and safe turning. Always prioritize safety – always wear safety glasses and consider other personal protective equipment (PPE) like hearing protection and a dust mask.
Step-by-Step: Mounting Your Chuck
1. Prepare Your Lathe: Ensure your lathe is turned off and unplugged.
2. Identify Spindle Thread: Double-check your lathe’s spindle thread size.
3. Attach Adapter (If Necessary): If your chuck doesn’t have the correct thread, screw the appropriate adapter onto the lathe spindle. Make sure it’s snug.
4. Screw on the Chuck: Carefully screw the chuck body onto the spindle (or the adapter) by hand. It should thread on smoothly.
5. Tighten the Chuck: Most chucks have a provision for tightening them against the spindle shoulder to prevent them from unscrewing during operation. This might involve a set screw or a locking mechanism. Refer to your chuck’s manual for the specific procedure. A chuck that is not properly tightened can unscrew itself off the spindle, which is extremely dangerous.
6. Test: Gently try to turn the chuck body by hand to ensure it’s secure.
Step-by-Step: Mounting a Wood Piece (Using Standard Grip Jaws)
This example assumes you’re gripping a tenon on a piece of wood that you’ve already prepared.
1. Prepare Your Wood Piece: You’ll need a tenon turned on one end of your workpiece. This tenon is a cylindrical projection that will fit into a pre-drilled hole. The diameter of the tenon should match the internal gripping capacity of your jaws when they are in a specific position, or the external gripping capacity you’re aiming for. You’ll also need a hole drilled into the end of your workpiece, typically around 1/2″ to 3/4″ deep, to accommodate the chuck jaws.
2. Loosen the Chuck Jaws: Using the chuck key or T-handle, turn the chuck mechanism to expand the jaws outward until they are far enough apart to fit around your tenon, or contract them inward if you are gripping inside a hole. Ensure the jaws move smoothly and symmetrically.
3. Position the Wood: With the lathe turned off, carefully place the tenon of your wood piece into the chuck jaws, or insert the jaws into the pre-drilled hole. Make sure the wood is seated as far onto the jaws as they will go, and that the jaws are gripping the strongest part of the tenon or the material closest to the end grain.
4. Tighten the Jaws: Slowly and evenly tighten the chuck jaws onto the wood using the chuck key. Turn the key in one hole, then move to the next hole on the chuck and tighten that jaw, and repeat. This ensures the jaws close symmetrically onto the wood, keeping it centered.
5. Check for Security:
Movement Test: Gently try to wiggle the wood by hand. It should not move at all. There should be no play between the wood and the jaws.
Centering: Ensure the workpiece is running true. You can do this by turning the lathe on at a very slow speed (just above the slowest setting) and using a pencil to mark the center as it spins. If the mark is not a perfect circle, the piece is off-center.
6. Prepare to Turn: Once you are confident the wood is securely mounted and centered, turn off the lathe. Ensure all chuck keys are removed from the chuck and the machine area. You can now proceed to turn at your desired speed.
Important Safety Considerations:
Never leave a chuck key in the chuck. It can fly out at high speed and cause serious injury.
Always start at the lowest speed: When you first mount a new piece, turn the lathe on at its slowest speed to check for balance and security. Increase speed gradually as you get comfortable and as the workpiece becomes more balanced.
Listen to your lathe: Unusual vibrations or noises can indicate an unbalanced workpiece, a loose chuck, or a problem with the setup. Stop the lathe immediately if you hear anything unusual.
Inspect your wood: Avoid chucking into cracked or rotten wood, as it can break apart.
Re-tighten as needed: Wood can sometimes compress slightly as you turn it. It’s good practice to stop the lathe periodically, turn the power off, and snug up the chuck jaws if necessary.
Maintaining Your Mini Wood Lathe Chuck Set
A little care goes a long way in keeping your chuck operating smoothly and accurately for years.
Keep it Clean: After each use, brush away any wood dust or chips from the chuck body and jaws. Avoid getting excessive dust into the scroll mechanism.
Lubrication: Periodically, lubricate the scroll threads and jaw slides. A good quality lithium grease or specialized chuck lubricant is recommended. Consult your chuck’s manual for specific lubrication points and recommended lubricants.
Avoid Dropping: Chucks are precision instruments. Dropping one can damage the threads or the internal mechanism, affecting its performance.
Handle Jaws Carefully: Store jaws safely when not in use, preferably in their original case. Avoid bending or damaging the jaw slides or gripping surfaces.
Check for Wear: Periodically inspect the jaw slides and the scroll for any signs of excessive wear. If you notice significant play or damage, it might be time to consider replacement parts or a new chuck.
Practical Projects Perfect for Your Mini Lathe Chuck
Once you’ve mastered the basics of using your chuck, a whole world of projects opens up. Here are a few ideas perfect for beginners and their mini wood lathe chuck sets:
1. Wooden Spindles: Think of chair legs, bedposts, or decorative finials. Spindle turning is a great way to practice holding between centers (using drive centers and tailstock spurs that hold the wood from the ends) but also offers many opportunities for chuck work, such as turning tenons for tenon-and-mortise connections or creating specific decorative elements.
2. Small Bowls and Lids: Using your chuck to grip a tenon or a recess is the standard method for turning bowls. You can turn the outside, then flip the piece around and grip it in a recess on the chuck to hollow out the inside. Lids for boxes or containers are also perfect for chuck work.
3. Pens and Pencils: These small, intricate projects are ideal for chuck work, often using specialized jaws or chuck adapters designed for small stock.
4. Cups and Goblets: Combining turning techniques for the body, stem, and base, these projects benefit greatly from the secure grip a chuck provides, especially when working with the base of the piece for stability.
5. Decorative Items: Including candle holders, small vases, decorative balls, or ornaments. The ability to

