Parting tools for lathe are crucial for cleanly separating your workpiece from the stock, preventing costly mistakes and making your lathe projects much more efficient. Mastering their use saves time, reduces material waste, and ensures professional results, even for beginners.
Ever faced the frustration of a nearly finished project on your lathe, only to have it wobble, break, or come off unevenly when you try to cut it free from the original stock? It’s a scene many beginners, and even some seasoned makers, know all too well. This common challenge isn’t about your lathe’s power or your skill level; it’s often about using the right tool for the job. Specifically, it’s about understanding and effectively using parting tools. These specialized blades are designed to make that final separation clean, precise, and stress-free, saving you time, material, and a lot of potential headaches. In this guide, we’ll break down what parting tools are, why they’re so important, and how to use them like a pro, ensuring your projects finish as beautifully as they start.
What Exactly Are Lathe Parting Tools?
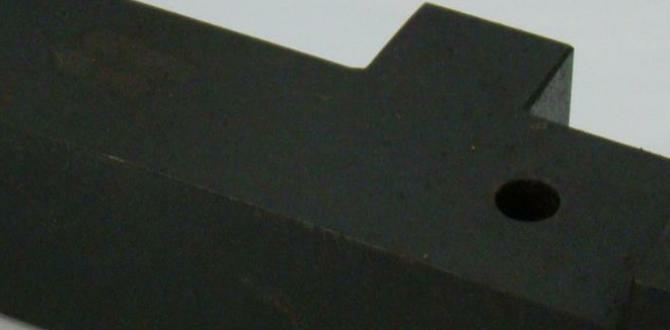
A parting tool, sometimes called a parting-off tool or cutoff tool, is not your everyday lathe chisel. Think of it as a very specialized knife. Its primary job is to cut completely through a piece of material mounted on a lathe, separating it from the original stock. Unlike other tools that shape or face material, its purpose is singular: to create a clean break.
The key feature of a parting tool is its thin, narrow blade that extends far out from its holder. This design allows it to plunge straight into the material without the blade hitting the rest of the workpiece. The blade is typically ground with a slight side clearance, meaning it’s a tiny bit wider at the back than at the cutting edge. This prevents the sides of the blade from rubbing against the cut as you go deeper, which is essential for a smooth, clean parting. This precise geometry is what makes them so effective and what sets them apart from general-purpose turning tools.
Why Are Parting Tools So Important for Savings?
The savings associated with using the correct parting tool are multi-faceted. For a beginner, mastering this one tool can prevent some of the most common and discouraging project failures.
- Material Waste: When you try to cut off a piece with a standard turning tool, especially a round-nose or scraper, the tool can grab, dig in, or push the workpiece. This often results in a bent, broken, or unevenly parted-off piece that’s unusable or requires significant rework. Using a proper parting tool, with its narrow kerf and stable design, dramatically reduces the chances of this happening. Less material lost means you get more usable parts from your stock.
- Time Saved: Failed parting attempts mean you might have to start over with a new piece of stock. Even if you can salvage the piece, you might spend time trying to fix a bad cut or reshape it. A clean parting takes seconds and leaves a smooth finish, ready for the next step or ready to be a finished part. This efficiency is vital when you’re working on multiple projects or have limited workshop time.
- Improved Finish Quality: A good parting tool leaves a clean, often burnished surface where it separates. This means less sanding or secondary operations are needed, adding to the overall quality of your finished piece. A rough, torn edge from a poorly executed parting can mar the appearance of an otherwise perfect project.
- Tool Longevity: While parting tools are specialized, using them correctly prevents them from being abused. Trying to force a standard tool to do a parting job can bend or break the tool, leading to costly replacements or repairs.
- Project Success and Confidence: For beginners, successfully completing a project without costly failures is a huge confidence booster. Knowing you have the right tool and can use it effectively makes tackling new and more complex projects much less intimidating. This psychological saving is often underrated but incredibly valuable.
Types of Parting Tools
Parting tools come in a few main flavors, each suited to different materials and lathe types. Understanding these will help you choose the best one for your needs.
1. Standard Blade Parting Tools
These are the most common type and are often what people picture when they think of a parting tool. They consist of a shank (the part that fits into the tool holder) and a thin, replaceable blade that sits in a slot on the shank. The blade is usually held in place by one or two screws.
Pros:
- Replaceable blades: When a blade gets dull or breaks, you can simply unscrew the old one and pop in a new one. This is cost-effective and extends the life of the toolholder.
- Versatile: Blades come in various widths, allowing you to cut off pieces of different thicknesses.
- Easy to sharpen: While blades are replaceable, they can also be removed and sharpened if the need arises (though many users opt for replacement due to the blade’s thinness).
Cons:
- Blade can deflect: For very deep cuts or on very powerful machines, the thin blade can sometimes deflect or chatter.
- Requires a dedicated tool holder: You’ll need a tool post that can accept specialized parting tool holders.
2. Solid Parting Tools
Unlike blade-style parting tools, solid parting tools are made from a single piece of high-speed steel (HSS) or carbide. The cutting edge is ground directly onto the end of the solid bar.
Pros:
- More rigid: Because they are solid, they generally deflect less than blade-style tools, making them better for deeper cuts or tougher materials.
- Simpler design: No moving parts, no blades to replace.
Cons:
- Sharpening can be more difficult: You are grinding the entire tool, which can be tricky to get the correct clearances.
- If the tip breaks, the whole tool is often lost or needs significant regrinding.
- Less common for very thin cuts.
3. Carbide Insert Parting Tools
These are a more modern approach, using a robust tool holder and a small, replaceable carbide insert as the cutting edge. The insert typically has a specific geometry for parting.
Pros:
- Extremely rigid and stable: Excellent for high-speed cutting and deep parting.
- Carbide inserts are very hard and retain their edge well, especially in metals.
- Quick insert changes: When an insert is worn or chipped, you simply swap it out.
Cons:
- Higher initial cost for the toolholder and inserts.
- Carbide inserts can be brittle, especially in interrupted cuts or if misused.
- Not as common for very fine woodworking applications where a very thin blade might be preferred.
4. HSS vs. Carbide
This is a crucial material choice. High-Speed Steel (HSS) is common for woodworking and softer metals. It’s tougher and can be sharpened easily with a file or grinding wheel. However, it heats up faster and dulls quicker than carbide, especially when cutting harder metals or at higher speeds.
Carbide, on the other hand, is much harder and stays sharp longer, making it ideal for production work and harder metals. It’s also more brittle, so it needs to be used carefully to avoid chipping or breaking. For beginners, HSS parting tools are often recommended due to their forgiving nature and ease of maintenance.
Choosing the Right Parting Tool for Your Lathe and Material
The “best” parting tool isn’t a one-size-fits-all answer. It depends on what you’re working with and the capabilities of your lathe.
For Wood Lathes:
Woodworking typically involves softer materials (wood) and often lower speeds compared to metalworking. For wood, a standard HSS blade-style parting tool is usually perfect. You’ll want a blade width that is appropriate for the diameter of the piece you’re parting off. A common size for general woodworking is around 1/8-inch for the blade width. For larger pieces, you might need a wider blade or a more robust tool.
Consider a tool that has a comfortable grip and can be easily maneuvered. The geometry of woodworking parting tools often has more of a rake angle to easily shear through wood fibers.
For Metal Lathes:
Metalworking demands more rigidity and the ability to handle higher speeds and tougher materials. For general metalworking, a standard blade-style HSS parting tool can work well for softer metals like aluminum or brass. However, for steel or for deeper cuts, a more rigid option is often better.
Carbide insert parting tools are very popular in metalworking shops because of their stability and ability to handle harder materials and faster cutting speeds. They offer a very clean cut with minimal chatter. Solid carbide parting tools also provide excellent rigidity.
Key factors to consider:
- Workpiece Diameter: The thicker the piece you need to part off, the wider and more rigid your parting tool needs to be.
- Material Hardness: Harder metals require tougher, more rigid tools, often leaning towards carbide.
- Lathe Power and Rigidity: A more powerful lathe can handle deeper cuts and higher speeds, which may favor more robust parting tools. A lighter-duty lathe might benefit from careful, slower parting with a thinner blade to avoid deflection.
- Blade Width (Kerf): The width of the cutting edge is called the kerf. A narrow kerf wastes less material, but a wider kerf can sometimes offer more stability. For most applications, a blade width of 1/16″ to 1/8″ is common.
| Lathe Type | Typical Material | Recommended Parting Tool Type | Blade Material | Considerations |
|---|---|---|---|---|
| Wood Lathe | Wood | Blade-style | HSS | Ease of sharpening, comfortable grip, moderate blade width (e.g., 1/8″). |
| Metal Lathe (Hobbyist) | Aluminum, Brass, Mild Steel | Blade-style or Carbide Insert | HSS or Carbide | Rigidity for steel, narrow kerf for material saving. |
| Metal Lathe (Production/Industrial) | Steel, Stainless Steel, Exotic Alloys | Carbide Insert or Solid Carbide | Carbide | Maximum rigidity, high-speed capability, quick insert changes. |
How to Use a Parting Tool Safely and Effectively
Using a parting tool correctly is far more than just plunging it into your workpiece. It involves careful setup and a steady hand. Here’s a step-by-step guide:
Step 1: Secure Your Workpiece
First and foremost, ensure your workpiece is held very securely in the chuck or between centers. Any movement can lead to tool breakage, workpiece damage, or injury. For metalworking, a strong chuck grip is essential. For woodworking, a secure fit between centers or in a jam chuck is vital.
Step 2: Set Up Your Parting Tool
This is critical for a clean cut. The parting tool blade must be set perfectly perpendicular to the lathe’s bed. If it’s angled, one side will cut deeper than the other, leading to binding, chatter, and a poor finish.
- Height: The cutting edge of the parting tool must be set exactly at the center of the workpiece. Use a center gauge or a ruler to check this. Setting it too high can cause chatter; too low can put undue stress on the tool and lead to breakage.
- Alignment: Use an alignment gauge or a piece of square stock to ensure the blade is perfectly parallel to the lathe bed. Many tool posts have fences or guides to help with this.
- Depth: Position the parting tool where you want to make the cut. For your first attempt, it’s often wise to leave a small shoulder (about 1/8-inch or 2-3mm) of material. This provides a stable point to part from, rather than trying to part completely in one plunge.
A good resource for understanding tool setup on lathes, including parting tools, can be found through resources like NIST’s manufacturing technology guidance, which often details foundational machining practices.
Step 3: Start the Cut – Slowly and Steadily
This is where patience pays off. Begin feeding the parting tool into the workpiece slowly and steadily. Don’t force it. Let the tool’s sharpness do the work.
- For Metal: Apply a cutting fluid or lubricant. This cools the tool and workpiece, reduces friction, and helps clear chips. Feed the tool in with a consistent, moderate pressure.
- For Wood: Feed the tool in with a smooth, sweeping motion. Avoid stopping and starting, which can create flat spots or stress marks on the wood.
Step 4: Monitor and Lubricate/Clear Chips
Keep an eye on the cut as it progresses:
- Listen: Pay attention to the sound. A smooth, consistent sound is good. A chattering or groaning sound indicates a problem – back off slightly or stop.
- Look: Watch the chip formation. For metal, you want nice curly chips. For wood, you want shavings. If you see dust or smoke, you’re generating too much heat, which means friction, dulling the tool and increasing the risk of fire or burning.
- Lubricate/Cool (Metal): If using metal, ensure you are reapplying cutting fluid as needed.
- Clear Chips (Wood): For wood, you may need to periodically withdraw the tool slightly to clear the shavings, especially if they are packing up.
You can find comprehensive safety guidelines for machine tools on sites like OSHA’s machine guarding standards, which emphasize the importance of safe tool operation and hazard control.
Step 5: Deepening the Cut and Parting Off
Continue feeding the tool in, maintaining a steady pressure. Most modern parting tools have a narrow kerf, meaning they remove very little material. However, the deeper you go, the less support the blade has.
Tip: Leaving a Shoulder
As mentioned, it’s often a good idea to leave a small shoulder of material connecting your part to the stock. This provides stability and prevents the cut piece from spinning or breaking off prematurely, which can be dangerous. Once the main cut is deep, you can then use a specialized parting-off tool or even a slightly wider tool (with care) to complete the separation. For wood, a small ream or a slight back-bevel on the parting tool can help push the piece off cleanly.
For Metal: As you get close to fully parting, you might want to slow down your feed rate. Some machinists apply a slight rocking motion to the tool (back and forth) as they push it deeper in the final stages to help clear chips and prevent binding. Others may even support the outboard end of the workpiece with a tailstock center if it’s long and thin, to prevent sagging as the cut nears completion.
For Wood: Continue feeding until the piece separates. If it feels like it’s going to break off unevenly, stop and reassess. Sometimes, a light tap with a wooden mallet on the stock can help it separate cleanly if there’s a tiny bit of material left.
Step 6: Finishing the Cut Surface
A well-used parting tool should leave a relatively smooth surface. For metal, you may want to file or lightly sand it. For wood, you might just need a light sanding or to leave it as is, depending on the project.
Common Problems and Solutions
Let’s look at some common issues beginners run into and how to solve them:
| Problem | Cause | Solution |
|---|---|---|
| Chatter/Vibration | Parting tool not set at center height, dull tool, blade deflection, workpiece not secure, too fast feed rate. | Verify tool height and alignment, sharpen or replace tool, use a more rigid tool or narrower blade, ensure workpiece is tight, slow down feed rate. |
| Part Breaks Unevenly/Cracks | Workpiece spinning as it separates, workpiece sagging, parting too quickly, dull tool. | Leave a small shoulder to remove last, support workpiece with tailstock center (if applicable), slow down feed, ensure tool is sharp. |