Quick Summary: A steady rest for a lathe is a workshop tool that supports long, thin workpieces to prevent sagging and vibration. It’s essential for accurate turning, reducing chatter, and achieving smooth finishes on challenging projects. Learn how to use one safely and effectively in this guide.
Welcome, fellow makers, to Lathe Hub! Ever tried to turn a long, slender piece of metal or wood on your lathe and ended up with a wobbly mess? That frustrating experience is incredibly common, especially when you’re just starting out. The good news is there’s a brilliant solution: the steady rest. This simple yet ingenious accessory is your new best friend when it comes to tackling those tricky, elongated projects. It’s designed specifically to give your workpiece the support it needs to stay stable and true.
In this guide, we’ll break down exactly what a steady rest is, why you absolutely need one, and how to use it with confidence. We’ll demystify its parts, go through the setup process step-by-step, and offer tips for getting the best results. Get ready to transform those wobbly failures into smooth, successful turns!
What Exactly is a Steady Rest for a Lathe?
Think of a steady rest as a helping hand for your workpiece. When you’re turning long, thin pieces on a lathe, gravity can cause them to bend downwards, especially at the far end from the headstock. This bending leads to several problems:
- Vibration and Chatter: The workpiece shakes as it spins, creating rough surfaces and annoying noises.
- Inaccurate Cuts: The tool can’t follow a consistent path, resulting in uneven diameters and poor concentricity.
- Breakage: A severely unsupported piece can even snap under the stress.
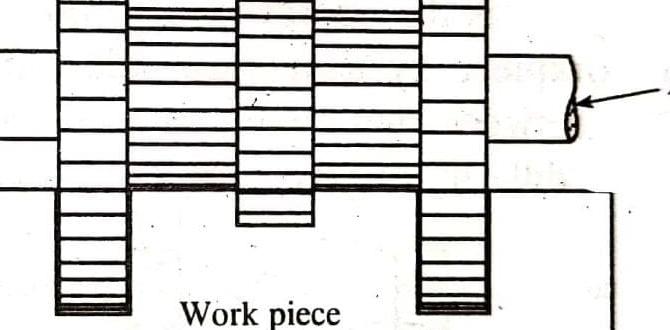
A steady rest clamps onto the lathe bed and positions support arms (usually with rollers or smooth blocks) around your spinning workpiece. It essentially stabilizes the middle or a section of the workpiece, drastically reducing sag and vibration. It’s an essential piece of equipment for any serious woodturner or machinist working with long stock.
Why You Need a Steady Rest: The Benefits
Investing time in understanding and using a steady rest will pay dividends in your projects. The core benefits are all about achieving better results and making your life easier at the lathe.
Improved Accuracy and Finish
By supporting the workpiece, a steady rest minimizes deflection. This means your cutting tool can engage the material more consistently, leading to straighter, rounder, and more precisely dimensioned parts. The reduction in vibration also translates directly to a smoother surface finish, often reducing the need for extensive sanding or secondary finishing.
Reduced Chatter and Vibration
Chatter is that unpleasant, high-frequency vibration that ruins finish and can damage cutting tools. Long, unsupported workpieces are prime candidates for chatter. A steady rest acts as a damper, absorbing much of the vibration before it can become problematic.
Ability to Turn Longer and Thinner Workpieces
Without a steady rest, there are practical limits to how long and thin a piece you can reliably turn. Trying to turn a spindle that’s several feet long and only an inch or two in diameter would be nearly impossible without this support. A steady rest opens up a whole new range of project possibilities.
Enhanced Safety
While any lathe operation requires caution, a flexing or vibrating workpiece can be unpredictable. A stable workpiece is a safer workpiece. Less chance of the tool digging in unexpectedly, less chance of material failure under stress.
Reduced Tool Wear
When a workpiece is vibrating, your cutting tool is constantly working harder and experiencing uneven forces. This can lead to faster tool wear. By stabilizing the workpiece, the tool’s job becomes more consistent and less stressful, potentially extending the life of your valuable cutting edges.
Types of Steady Rests
Steady rests come in a few variations, though they all serve the same fundamental purpose. The most common types you’ll encounter are:
- Fixed Steady Rests: These are the most basic and often the most robust. They typically have three adjustable arms with bronze or nylon pads that press against the workpiece. They are adjusted manually.
- Roller Bearing Steady Rests: These use roller bearings instead of static pads. This significantly reduces friction, allowing for faster spindle speeds and a smoother turning experience with less risk of marring the workpiece. They are generally more expensive but offer superior performance.
- Follow Rests: While often discussed together, a follow rest is slightly different. It’s attached near the cutting tool and follows the diameter of the turned part, providing support very close to where the cut is being made. It’s excellent for pure turning operations where you’re reducing diameter significantly. A steady rest supports a section of the stock before it’s significantly altered.
For beginners, a fixed steady rest is an excellent starting point. They are generally more affordable and straightforward to understand and operate. As you progress, you might consider upgrading to a roller bearing type for certain applications.
Anatomy of a Steady Rest
Understanding the parts of a steady rest will make setup and adjustment much easier. Here are the key components:
- Base/Frame: This is the main body of the steady rest that mounts to the lathe bed. It provides a stable platform for the support arms.
- Arms: Most steady rests have three arms that pivot or slide to surround the workpiece.
- Pads or Rollers: These are the parts that actually make contact with the workpiece. They can be made of brass, bronze, nylon, or be actual roller bearings, depending on the type of rest. They are typically adjustable to apply the right amount of pressure.
- Adjustment Screws: Located typically at the end of each arm, these fine-tune the position of the pads/rollers against the workpiece. Some may have locking mechanisms to hold their position.
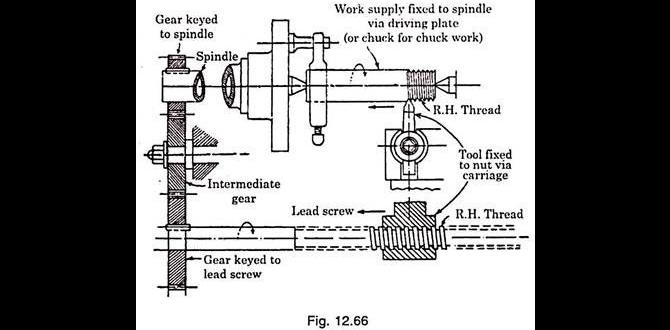
The base of the steady rest is designed to align perfectly with your lathe’s bed so it travels with the carriage, offering support at any point along the workpiece’s length. When positioning it, you’ll want it to be directly opposite your chuck or between centers, depending on how your workpiece is held.
How to Install and Use a Steady Rest: A Step-by-Step Guide
Setting up a steady rest might seem intimidating at first, but it’s a logical process. Follow these steps carefully for safe and effective use.
Step 1: Prepare Your Lathe and Workpiece
- Safety First: Ensure your lathe is off and you have good lighting in your workspace.
- Secure the Workpiece: Mount your workpiece securely. If you’re using a steady rest, you’ll likely be chucking one end and may be using a live center at the tailstock. Ensure both ends are well-supported initially.
- Clean Surfaces: Make sure the ways (the bed of your lathe) where the steady rest will mount are clean and free of debris. Also, clean the surface of your workpiece where the steady rest pads/rollers will make contact.
Step 2: Mount the Steady Rest to the Lathe Bed
Steady rests usually have mounting features that align with your lathe’s bed. Slide the base of the steady rest onto the lathe bed.
- Positioning: Place the steady rest on the bed, typically near the headstock to start, but ensure it doesn’t interfere with the carriage or compound rest. The goal is to have the steady rest positioned directly in line with the workpiece’s axis.
- Lock in Place: Secure the steady rest to the bed using its locking mechanism. This might involve clamps or bolts that tighten onto the bed ways. It must be held firmly so it doesn’t move during operation.
Step 3: Position the Steady Rest Arms
With the steady rest mounted, open its arms to allow clearance for the workpiece.
- Open the Arms: Loosen any locking screws on the arms and swing them outwards.
- Center the Workpiece Opening: Carefully move the steady rest (if on a movable base) so the opening between the arms is roughly centered around the workpiece.
Step 4: Adjust the Pads/Rollers to Support the Workpiece
This is the most critical step. You want enough support without binding the workpiece or causing drag.
- Initial Approach: Slowly tighten the adjustment screws on each arm, bringing the pads/rollers closer to the workpiece.
- Gentle Contact: You’re aiming for gentle contact. The workpiece should spin freely by hand. You don’t want it to be tight enough to cause resistance.
- Check for Evenness: Ensure all three pads/rollers are making contact with the workpiece with roughly equal pressure. You can often feel or hear when contact is made.
- The “Slight Drag” Test: A common method is to turn the workpiece by hand. It should spin relatively freely, but with just the slightest hint of drag. Too much pressure will bind the workpiece and create excessive friction and heat, while too little offers no support.
- Lock the Adjustments: Once you’re satisfied with the contact, carefully lock the adjustment screws to prevent them from moving.
Step 5: Perform a Test Spin
Before turning, always do a manual test run.
- Clearance Check: Turn the lathe on at its lowest speed. Ensure the steady rest, carriage, and any other lathe components do not collide with the workpiece or the steady rest itself as the spindle rotates.
- Listen and Watch: Observe the workpiece carefully as it spins. Listen for any unusual noises like knocking or excessive humming.
- Check for Vibration: The primary goal of the steady rest is to eliminate vibration. The workpiece should look and feel much more stable.
Step 6: Proceed with Machining
Now you can begin your turning operation.
- Start with Light Cuts: Begin with shallow cuts to confirm everything is running true.
- Monitor Continuously: Keep an eye and ear on the operation. If vibration returns, you may need to re-adjust the steady rest.
- Lubrication and Cooling: For metalworking, ensure you are using appropriate cutting fluids. For wood, ensure there’s no excessive friction that could generate heat.
- Carriage Mounting: If your steady rest is designed to travel with the carriage (it essentially attaches to the carriage itself and rests on the workpiece), ensure it moves smoothly.
Special Considerations for Machining Metal
When working with metal, friction can be a significant factor. Roller bearing steady rests are highly recommended for metal turning to minimize heat buildup and marring. If using a fixed rest with pads:
- Use Lubrication: Always use cutting fluid to lubricate the contact points between the pads and the workpiece.
- Be Mindful of Heat: Metal turning generates heat. Excessive friction from a steady rest can cause the workpiece to expand, potentially binding it or creating inaccuracies. Periodically check for binding and adjust pressure accordingly.
- Avoid Over-Tightening: This is crucial. Over-tightening can score the workpiece and create immense pressure that can damage your tools or the workpiece itself.
For a fantastic overview of machining safety, including the proper use of accessories, the Occupational Safety and Health Administration (OSHA) provides comprehensive guidelines on machine safeguarding:
OSHA Machine Guarding Standards
Table: Steady Rest vs. Follow Rest – Key Differences
It’s easy to confuse a steady rest with a follow rest. While both provide support, they function differently and are suited for different tasks. Here’s a quick comparison:
| Feature | Steady Rest | Follow Rest |
|---|---|---|
| Mounting | Mounts to the lathe bed or saddle. Travels with the carriage. | Typically mounts to the carriage and follows the cutting tool. |
| Positioning | Supports the workpiece at a distance from the cutting tool, generally in the middle of a long section. | Supports the workpiece very close to the cutting tool, usually only inches away. |
| Primary Purpose | Reduces sag and vibration in long, slender workpieces, allowing for turning of longer stock. Supports the entire unsupported span. | Supports the workpiece directly at the point of cutting, ideal for reducing diameters or for long boring operations where rigidity is paramount. Prevents tool deflection. |
| Workpiece Suitability | Long spindles, shafts, table legs, bowls with long tenons, etc. | Long shafts being reduced in diameter, long boring operations, turning thin-walled tubes. |
| Setup Complexity | Can be simpler to position along the bed. | Requires precise alignment with the tool bit. |
Table: Steady Rest Pad Materials and Their Properties
The material of the steady rest’s contact points significantly impacts its performance and the finish of your workpiece. Here’s a look at common materials:
| Material | Pros | Cons | Best For |
|---|---|---|---|
| Brass/Bronze | Durable, good wear resistance, readily available. | Can be harder than softer woods, may cause some friction/heat, can potentially mar softer metals if too much pressure is applied. | General wood turning, some softer metals. |
| Nylon/Delrin | Self-lubricating properties, less likely to scratch or mar workpiece, good impact resistance. | Can wear faster than metal under heavy loads, may deform slightly with heat or pressure. | Wood turning, plastics, softer non-ferrous metals. |
| Roller Bearings | Extremely low friction, allows for higher speeds, minimal marking or marring, significantly reduces heat buildup. | More expensive, requires proper maintenance/lubrication, can be sensitive to dust/debris. | High-speed metal turning, precision work, plastics, and any application where minimizing friction and heat is critical. |
Tips for Success with Your Steady Rest
Beyond the basic setup, a few pro tips can make your experience with a steady rest even better.
- Center Hole is Key: Ensure the rollers/pads of the steady rest are perfectly centered on the axis of your workpiece. Off-center support will defeat its purpose and can introduce new problems.
- Pre-Drill for Support Points: For some materials and types of steady rests, it can be beneficial to drill shallow pilot divots where the pads/rollers will make contact. This helps them seat properly and prevents slippage for very hard or smooth materials.
- Consider the “Four Jaw” Effect: With a three-point steady rest, your workpiece is held by the chuck (or between centers) at one end and supported by three points at the other. Be aware that you’re essentially creating a four-jaw chuck situation. This can be great for rigidity, but can also hold the piece in a slightly distorted manner if not set up carefully.
- Adjustments During Machining: Don’t be afraid to make small adjustments while the lathe is running at a very slow speed, or even while stopped. If you notice vibration returning, a slight tweak to a pad/roller might be all that’s needed. Remember to re-lock adjustments if you make them.
- Workpiece Lubrication: For metal, always use appropriate cutting fluid not just for cooling but to lubricate the contact points. For wood, excessive friction can scorch the wood.
- Keep it Clean: Dust, chips, and debris can get into the mechanism of your steady rest, causing it to bind or operate unevenly. Regular cleaning is essential, especially if working with dusty materials like MDF or certain hardwoods.
- Understand Your Lathe’s Limits: Even with a steady rest, there are limits to what a lathe can do. Extremely long and thin stock may still be challenging. Always prioritize safety and listen to your machine.
Frequently Asked Questions (FAQ) about Steady Rests
Q1: Can I use a steady rest on any lathe?
A1: Most lathes are designed to accept a steady rest, but you need to ensure the steady rest you purchase is compatible with your lathe’s bed width and style. Always check the specifications before buying.
Q2: How tight should the steady rest pads/rollers be?
A2: They should be snug enough to provide support and prevent sag, but not so tight that they cause significant drag or binding. The workpiece should spin relatively freely. A slight, consistent drag is often the goal.
Q3: Will a steady rest damage my workpiece?
A3: If set up correctly with clean pads/rollers and appropriate pressure, a steady rest should not damage your