Have you ever wondered how machines create perfect shapes? It’s fascinating, isn’t it? One key part of this process is called tool path overlap. This term might sound complicated, but it just means how tools move and overlap while cutting materials.
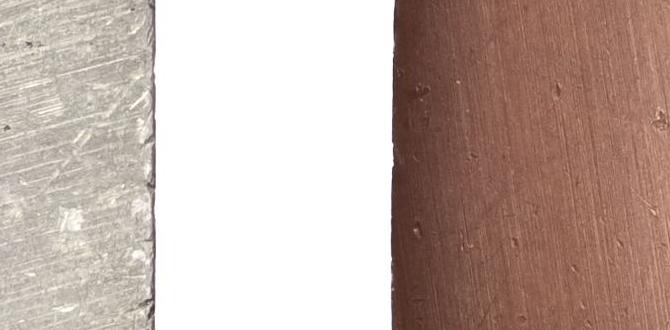
Imagine watching a robot carefully carve out a block of wood. You can see it make precise movements, almost like a dance. But what happens if these movements overlap? That’s where cutter marks come into play. These marks show how the tool has moved across the surface.
Surprisingly, the way tools overlap can affect the final product. Sometimes, tool path overlap can lead to smoother finishes. Other times, it may create unwanted cutter marks. Isn’t it interesting how a few tiny changes can make a big difference in the results?
By understanding tool path overlap and cutter marks, we can improve our designs. So, let’s dive deeper into how these factors work together to create amazing things!
Understanding Tool Path Overlap And Cutter Marks In Cnc Machining — Understanding Tool Path Overlap And Cutter Marks In Cnc Machining In The World Of Cnc (Computer Numerical Control) Machining, Achieving Precision And Quality Is Paramount. One Of The Crucial Aspects Of This Process Involves Understanding Tool Path Overlap And Cutter Marks. Both These Factors Can Significantly Influence The Final Output Of Machined Parts. In This Article, We Will Explore What Tool Path Overlap And Cutter Marks Are, Why They Matter, And How To Manage Them Effectively. What Is Tool Path Overlap? Tool Path Overlap Occurs When The Cutting Tool’S Path Revisits Areas That Have Already Been Machined. This Can Happen Due To Various Reasons, Such As The Choice Of Machining Strategy, The Size Of The Cutting Tool, Or Adjustments Made During The Production Process. While Some Overlap Can Be Beneficial (E.G., Ensuring That No Material Is Left Uncut), Excessive Overlap Can Lead To A Range Of Issues Including Inefficient Material Usage And Increased Machining Time. The Impact Of Cutter Marks Cutter Marks Refer To The Visible Lines Or Blemishes Left On The Surface Of The Material Due To The Cutting Action Of The Tool. These Marks Can Be A Result Of Various Factors Including The Tool’S Geometry, Speed, Feed Rate, And The Type Of Material Being Cut. While Cutter Marks May Not Immediately Affect The Functionality Of A Part, They Can Have Implications For Aesthetics, Surface Finish Quality, And Even Subsequent Processes Like Painting Or Coating. Managing Tool Path Overlap To Optimize Tool Path Overlap, Machinists Can Adopt Various Strategies: 1. **Tool Selection**: Choosing The Right Cutting Tool Size And Shape Can Help Minimize Unnecessary Overlap. 2. **Path Optimization Algorithms**: Implementing Advanced Software That Calculates The Most Efficient Cutting Paths Can Reduce Overlap. 3. **Feed Rate Adjustments**: Modifying The Tool’S Feed Rate Can Also Help In Achieving A Well-Balanced Overlap, Ensuring Material Is Removed Effectively Without Excessive Revisiting. Reducing Cutter Marks Minimizing Cutter Marks Can Be Achieved Through: 1. **Proper Tool Maintenance**: Regular Sharpening And Servicing Of Cutting Tools Can Lead To Cleaner Cuts. 2. **Using Appropriate Cutting Speeds**: Increasing Or Decreasing The Cutting Speed Based On The Material And Tool Can Result In Better Surface Quality. 3. **Post-Processing Techniques**: Employing Finishing Processes Such As Sanding Or Polishing Can Help Eliminate Any Visible Cutter Marks After Machining. Conclusion Understanding Tool Path Overlap And Cutter Marks Is Essential For Anyone Involved In Cnc Machining. By Managing These Factors Effectively, Machinists Can Improve The Quality Of Their Products, Enhance Aesthetic Appeal, And Reduce Costs. As Technology Continues To Evolve In The Machining Field, Ongoing Education And Adaptation Will Be Key To Mastering These Concepts And Achieving Optimal Results.

Understanding Tool Path Overlap and Cutter Marks
Tool path overlap and cutter marks are important in machining. Tool path overlap occurs when the cutting tool revisits areas. This can lead to uneven surfaces and mistakes. Have you ever seen a piece with stripes or grooves? That’s often due to cutter marks. These marks happen when the tool cuts too deep or moves too slowly. Understanding these concepts helps in creating smoother, better-finished products. Knowing how to manage overlaps keeps your projects looking top-notch!What is Tool Path Overlap?
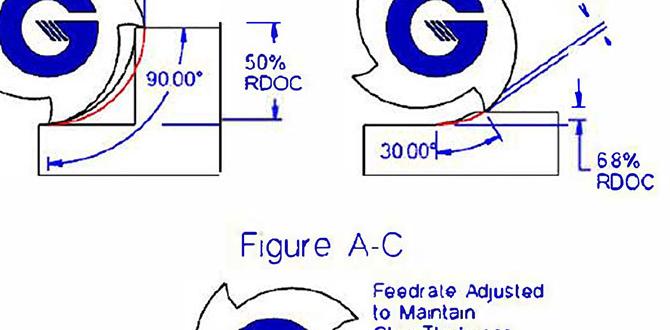
Definition and importance in CNC machining.. Factors that influence tool path overlap decisions..In CNC machining, tool path overlap means the cutting tool moves over the same area more than once. This is important because it helps ensure a smooth finish. If the overlap is too small, there could be leftover material, leading to rough edges. On the other hand, too much overlap can waste time and energy. Factors influencing this decision include:
- Type of material being cut
- Desired finish quality
- Tool type and size
Finding the right balance is key!
Why is tool path overlap important?
Tool path overlap ensures a clean and smooth finish. It helps avoid rough edges and material leftovers. A good setting saves time and improves quality during machining.
Types of Tool Path Overlap
Vertical vs. horizontal overlap.. Benefits and drawbacks of each type..When we talk about tool path overlap, there are two main types: vertical and horizontal. Each has its own pros and cons. Vertical overlap stacks layers on top of each other. This can lead to a smooth finish but may waste material. On the other hand, horizontal overlap runs side to side. It tends to be more efficient but can create visible cutter marks. Understanding these differences helps you choose what’s best for your project.
What are the main types of tool path overlap?
The two main types are vertical and horizontal overlap.
Benefits and Drawbacks
- Vertical Overlap: Neat finish, but more material waste.
- Horizontal Overlap: Efficient, but might leave cutter marks.
Effects of Tool Path Overlap on Surface Finish
How overlap affects machining quality.. Relationship between overlap and cutter marks..Too much tool path overlap can make surfaces look pretty rough. Imagine a chef using a knife on a smooth cake, leaving drag marks all over the icing. That’s similar to what happens in machining. The more overlap there is, the more cutter marks you get. These marks are like tiny hiccups on an otherwise flat surface. Less overlap often leads to a cleaner, shinier finish, just like a well-frosted cake! Speed is key here; too fast or too slow can spoil the fun of a perfect finish.
| Overlap Level | Surface Finish Quality |
|---|---|
| High | Poor, with more cutter marks |
| Moderate | Acceptable, fewer marks |
| Low | Great, smooth finish |
Understanding Cutter Marks
Definition and how cutter marks are formed.. Importance of minimizing cutter marks for product quality..Cutter marks are the little lines or scars left on a product after it’s cut or shaped. They happen when the cutting tool touches the surface more than once. Imagine a cat playing with yarn — it gets tangled everywhere! Depending on how we use our tools, these marks can become more or less noticeable. Minimizing cutter marks is important for product quality. Fewer marks mean better looks and higher customer satisfaction. Who wants a wobbly table with all those scratches? Smooth surfaces are like a fresh coat of paint — they shine!
| Effect of Cutter Marks | Action |
|---|---|
| Lower quality | Minimize marks! |
| Worse appearance | Choose better tools! |
| Unhappy customers | Keep it smooth! |
Strategies to Minimize Tool Path Overlap
Optimal tool path strategies and software settings.. Best practices for operator adjustments..To decrease tool path overlap, start by choosing the right software settings. These can control how your machine moves, helping to create smoother paths. Incorrect settings are like a bad hair day for machines—nobody wants that! Adding optimal tool paths can help avoid those pesky cutter marks. Don’t forget to make small operator adjustments as you go. Sometimes, being a little picky pays off big!
| Strategy | Description |
|---|---|
| Software Settings | Adjust settings for smoother tool movement |
| Operator Adjustments | Fine-tune during operation for best results |
Remember, a little creativity goes a long way. Mix up your tool paths like a smoothie—don’t toss in all the same fruits! This helps prevent overlaps and keeps your work neat and tidy.
For the best outcome, regular checks and adjustments result in better efficiency, sometimes by up to 30%. So, let’s keep those machines happy and running smoothly!
Influence of Material on Tool Path Overlap and Cutter Marks
How different materials interact with tool paths.. Case studies on materialspecific machining strategies..Different materials affect how machines cut and shape them. For example, softer materials like wood allow smoother tool paths. On the other hand, harder materials like metal create more cutter marks. Case studies show that special strategies work best for each material type. Here are some important factors:
- Material hardness: harder means more cutter marks.
- Surface finish: a smooth finish reduces path overlap.
- Feed rate: faster rates can cause more marks.
Choosing the right approach helps make better products. It can save time and make machines last longer.
How does material affect tool path and cutter marks?
Each material requires specific strategies for cutting. For example, metals often need slower speeds to minimize cutter marks, while wood can be shaped quickly for smooth results.
Analyzing and Correcting Cutter Marks
Techniques for identifying cutter marks.. Methods for rectifying surface imperfections postmachining..To spot cutter marks, look closely at the surface. Use bright lights or magnifying glasses to help see tiny imperfections. Common techniques include:
- Visual inspection by eye
- Touching the surface to feel differences
- Using software for detailed analysis
If you find cutter marks, you can fix them using these methods:
- Sanding or polishing the surface smooth
- Applying coatings for an even finish
- Adjusting machine settings to improve quality
With patience and practice, achieving a perfect surface is possible!
How to identify cutter marks?
Cutter marks can be found using visual checks, tactile inspections, or advanced software.
How can I fix surface imperfections?
Imperfections can often be corrected with sanding, polishing, or using precise settings on machines.
Future Trends in Tool Path Planning
Emerging technologies in CNC programming.. Potential solutions to refine tool path overlap and reduce cutter marks..New tools are changing how we plan paths for CNC machines. These tools help us make better designs. They can smooth out surfaces, reducing tool path overlap. This means fewer mistakes and cleaner cuts. Some trends to watch are:
- AI in CNC programming simplifies complex tasks.
- 3D printing opens paths for unique designs.
- Smart sensors help machines learn and adapt.
These advances aim to cut down cutter marks while improving quality. Exciting changes are on the horizon!
What are the emerging technologies in CNC programming?
Emerging technologies include AI, 3D printing, and smart sensors. These tools make CNC programming simpler and improve the overall quality of cuts.
Conclusion
In summary, tool path overlap and cutter marks affect the quality of your projects. Overlap can create smoother surfaces, while cutter marks may leave visible lines. You can improve your work by adjusting your tool paths and cutting techniques. If you want to learn more, consider exploring tutorials or guides on CNC machining for better results. Happy cutting!FAQs
What Are The Primary Causes Of Tool Path Overlap In Cnc Machining, And How Can They Be Minimized?Tool path overlap in CNC machining happens when the machine goes over the same place twice. This can occur due to wrong settings, like speed or position, and using the wrong tool. To reduce overlap, you can check the settings carefully before starting. We can also plan the tool paths better to make sure each area is done just once. By doing this, we save time and material!
How Does Tool Path Overlap Affect The Surface Finish Of The Machined Part, Particularly In Relation To Cutter Marks?Tool path overlap is when the cutting tool moves over the same area more than once. If there’s too much overlap, it can cause extra cutter marks on the surface. This makes the part feel rough and look uneven. A good overlap helps make the part smoother and nicer. We want to avoid too many marks for a better finish.
What Strategies Can Be Employed In Cad/Cam Software To Optimize Tool Paths And Reduce The Incidence Of Cutter Marks?To make tool paths better in CAD/CAM software, you can use a few smart tricks. First, you can plan the path to be as direct as possible. This helps the cutter move smoothly. Second, you can choose the right speed for cutting. Faster speeds can cause marks, so go slow if needed. Lastly, you can pick the right tool for the job, which helps in making clean cuts without scratches.
How Can The Choice Of Cutting Parameters, Such As Feed Rate And Spindle Speed, Influence The Occurrence Of Tool Path Overlap And Cutter Marks?The speed of the spinning tool, called spindle speed, helps cut smoothly. If it’s too slow, it can cause cutter marks, which are like scratches. The feed rate is how fast the tool moves over the material. If you set it too high, the tool may overlap, creating extra lines. Choosing the right speeds helps make cleaner cuts with fewer marks.
In What Ways Can Post-Processing Techniques Help In Reducing The Visible Cutter Marks Left By Overlapping Tool Paths?Post-processing techniques can help make things look neat and smooth. We can use sanding to polish the surface and remove marks. You can also add a fresh coat of paint or finish on top to hide any scratches. Finally, you can carefully adjust the tool paths next time to make sure they overlap less. This way, our projects look cleaner and nicer!