Wood lathe tool sharpening setup ideas make achieving a razor-sharp edge easy and repeatable. Invest in simple, effective jigs and a dedicated sharpening station to transform your turning experience, saving time and producing better results with confidence.
Has your wood lathe tool ever felt dull, making those beautiful cuts a struggle? It’s a common frustration for woodturners, especially when you’re just starting out. A dull tool can chatter, tear out wood, and even lead to dangerous catches. The good news is that mastering wood lathe tool sharpening doesn’t require a huge investment or complex machinery. With the right setup ideas, you can achieve professional-level sharpness right in your own workshop. Let’s dive into some genius, beginner-friendly ways to create an effective sharpening station that will make your tools sing.
Why Smart Sharpening Setups Matter
Sharpening your wood lathe tools isn’t just about making them cut better; it’s about making your woodworking safer and more enjoyable. A sharp tool requires less effort, giving you more control and reducing the risk of kickback or injury. Think of it like this: a sharp knife slices effortlessly, while a dull one forces you to push harder, increasing the chance of slipping. The same principle applies to turning tools.
Beyond safety, sharp tools produce cleaner cuts, which means less sanding later. This not only saves you time but also results in higher-quality finished pieces. A well-designed sharpening setup ensures consistency, so every time you sharpen, you achieve the same optimal bevel angle. This consistency is key to predictable tool performance. Let’s explore some practical and effective setup ideas that will banish dull tools from your workshop forever.
The Essential Components of a Sharpening Setup
Before we get to the genius ideas, let’s talk about what makes a sharpening setup work. You don’t need a lot, but each piece plays a vital role. The goal is efficiency, accuracy, and repeatability. Here are the core components to consider:
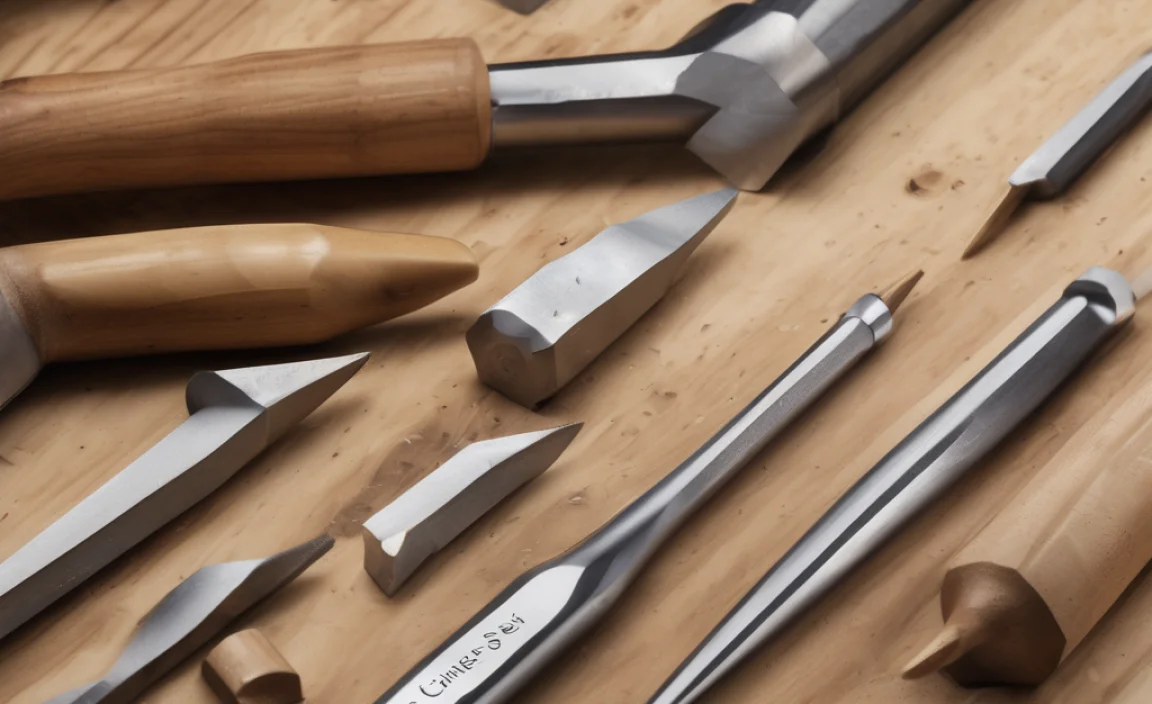
- Abrasives: This is the heart of sharpening. Options include sharpening stones (water stones, oil stones), diamond plates, or grinding wheels. For beginners, a combination of a medium grit and a fine grit abrasive is a great starting point.
- Tool Rest/Jig: This holds your tool at the correct angle against the abrasive. While some setups use a simple angled rest, specialized jigs offer much greater control and accuracy.
- Water/Lubricant: Depending on your abrasive, you’ll need water (for water stones) or oil (for oil stones) to keep the abrasive clean and prevent overheating. Diamond plates usually just need water.
- Magnification (Optional but Recommended): A magnifier or magnifying lamp helps you see the tiny wires and imperfections on the tool’s edge to know when it’s truly sharp.
- Safety Gear: Always wear safety glasses, and consider gloves for handling sharp tools.
- Dedicated Workspace: A stable bench or dedicated area keeps your sharpening tools organized and ready.
Genius Setup Idea 1: The All-in-One Sharpening Station
This setup is designed for maximum efficiency and minimal space. It consolidates your sharpening tools into a single, organized unit. Think of it as a dedicated “sharpening hub” for your workshop.
Building Your All-in-One Station
You can build this from scrap wood or purchase a versatile granite or steel sharpening block/base.
- The Base: Start with a sturdy base, about 12×18 inches. Plywood or a thick piece of melamine works well.
- Tool Rests: Mount a couple of different angled tool rests. A common angle for gouges is around 30-45 degrees. You can create these by cutting blocks of wood at an angle and attaching them to the base. A simple flat rest is essential for scrapers and skew chisels.
- Abrasive Mounting: Secure your sharpening stones or diamond plates to the base. For water stones, you might want a tray or a non-slip mat underneath. Diamond plates can often be screwed directly to the base or held with double-sided tape.
- Storage: Add small shelves or holders for your honing compounds, cleaning rags, and even a small spray bottle of water.
- Optional additions: A small vise can be mounted to hold specific jigs, and a dedicated spot for your magnifier adds to the convenience.
Pros and Cons of the All-in-One Station
This setup is fantastic for keeping everything tidy and accessible. It minimizes setup time between sharpening different tools. The main con is that it requires a bit of initial effort to build and takes up a dedicated space.
Genius Setup Idea 2: The Simple Workbench Sharpening Jig
If you have limited space or prefer a more minimalist approach, this setup focuses on using a single, effective jig that can be used on your existing workbench.
The Magic of the Grinding Jig
Many woodturners swear by dedicated sharpening jigs that allow you to precisely control the bevel angle. For gouges, a common jig is the “Grind-n-Hone” style jig, or you can buy specialized ones like the Oneway Wolverine grinding jig.
- Choose Your Jig: The Wolverine system (or similar) uses a unique post that swivels to maintain a consistent bevel angle as you move the tool. It’s incredibly effective for bowl gouges and spindle gouges.
- Workbench Setup: You’ll essentially mount your grinder (or use a sharpening stone) and attach the jig’s support arm to your workbench. A sturdy workbench is crucial here so the jig doesn’t move.
- Grinder or Wheel: If using a grinder, you’ll want slow-speed grinders (1750 RPM or less) often fitted with specialized sharpening wheels. For stones, you’ll place your sharpening stones in a holder that fits your jig.
- Angle Setting: These jigs often have adjustable stops or repeatable settings for common bevel angles (e.g., 40 degrees for bowl gouges, 30 degrees for spindle gouges).
Why This Jig is a Game-Changer
The key benefit is absolute consistency. Once set, you can sharpen multiple tools to the exact same angle every time. This leads to predictable tool performance on the lathe. The main drawback is the initial cost of a good jig and the learning curve to use it effectively. However, the results are usually well worth it.
Genius Setup Idea 3: The Portable Sharpening Kit
This setup is for the turner who might need to sharpen on the go, or who wants a very simple, space-saving solution. It’s ideal for smaller workshops or if you share tools.
What’s in the Kit?
This is less about a permanent fixture and more about a well-curated collection of portable sharpening tools.
- Sharpening stone/Diamond Plate: A good quality combination water stone (e.g., 1000/6000 grit) or a set of diamond plates that can be easily stored. Metal Diamond sharpening plates are very durable and work dry or with water.
- Honing Guide: A basic honing guide that clamps onto your tool and helps maintain a consistent angle against the stone. These are inexpensive and very effective for chisels and scrapers.
- Small Vise or Clamp: A small bench vise or a few C-clamps to hold the stone or plate steady on a table or workbench.
- Spray Bottle: For water or honing fluid.
- Leather Strop: For a final polish after sharpening, a leather strop with some honing compound will give your tools that buttery-smooth, hair-popping sharpness.
Advantages of Portability
The obvious benefit is taking your sharpening setup anywhere. It’s also incredibly space-efficient. The limitation is that it can be slower to set up and potentially less stable than a mounted system, especially when working with larger gouges. However, for smaller tools and touch-ups, it’s remarkably capable.
Sharpening Your Tools: A Step-by-Step Guide (Using an All-in-One Setup as Example)
Let’s walk through sharpening a common woodturning tool, like a bowl gouge. We’ll assume you have a setup with a grinder and a dedicated jig, or a stone with a good tool rest.
- Inspect Your Tool: Examine the cutting edge. Look for dullness, nicks, or a rounded-over edge. For a gouge, you’re looking at the flutes and the cutting edge formed by the wings.
- Set Up Your Abrasive: If using a grinder, ensure it’s clean and you have your sharpening jig positioned correctly. If using stones, soak your water stone according to manufacturer instructions or apply oil to your oil stone. Place it on a non-slip surface or in a holder.
- Secure the Tool and Jig: For a gouge, ensure the flute sits on the jig’s rest. The jig post will guide the tool. For other tools like scrapers or skew chisels, you’ll use the appropriate rest or jig setting.
- The Sharpening Motion:
- For Gouges: With a jig, you’ll typically rest the tool shank on the jig and let the cutting edge engage the grinding wheel or stone. Rotate the gouge slightly to ensure you’re sharpening both wings evenly. Move the gouge back and forth gradually, maintaining a consistent angle against the abrasive. Grind until a small burr forms along the entire cutting edge.
- For Scrapers/Skews: Rest the flat of the tool on the rest or jig, ensuring it’s perfectly flat. Advance the tool until the edge touches the abrasive. Move the tool side-to-side to sharpen the entire width of the edge.
- Check for the Burr: The burr is a tiny, raised edge of metal that signifies you’ve reached the apex of the cutting edge. You can feel it by carefully running your fingernail away from the edge. If you feel a wire, you’ve got a burr all the way across.
- Refine the Edge (Honing/Stropping): Once the burr is formed, remove the tool from the grinder/stone. For a truly sharp edge, you’ll want to hone or strop.
- Stropping: Use a leather strop charged with honing compound. For gouges, use the concave side of the flute against the strop, tilting slightly to catch the edge. For scrapers/skews, run them flat against the strop. Use light pressure and a few passes.
- Fine Grit Stone: Alternatively, use a very fine grit stone (e.g., 8000+ grit water stone) with minimal pressure to further refine the edge.
- Test the Edge: The best test is on a piece of scrap wood. A sharp tool will shave thin, feathery curls. You can also try holding it up to the light – a sharp edge will appear as a fine, consistent line. Magnification is very helpful here.
Choosing the Right Abrasives for Your Setup
The type of abrasive you use will significantly impact the sharpening process and the final edge. Here’s a quick look.
| Abrasive Type | Pros | Cons | Best For |
|---|---|---|---|
| Water Stones | Produce a very fine, sharp edge. Relatively fast cutting. | Require soaking. Can wear down and require flattening. | All woodturning tools, especially demanding high-quality edges. |
| Oil Stones | Durable, long-lasting. No soaking required, just oil. | Can be slower cutting than water stones. Can clog. | General purpose sharpening. Good for beginners. |
| Diamond Plates | Aggressive cutting. Extremely durable. Fast and efficient. No flattening needed. Work dry or wet. | Can be more expensive upfront. May not produce as mirror-like a finish as high-grit water stones without significant work or specialized finishing plates. | Quick sharpening, re-shaping edges, and tools that have seen heavy use. Excellent for keeping in a portable kit. |
| Grinding Wheels (Bench Grinder) | Fast material removal. Can be used for shaping and sharpening. | Can easily overheat and ‘blue’ the tool edge if not careful. Requires slow-speed grinder for wood tools. Sparks can be a hazard. | Aggressive metal removal, shaping tools, and quick sharpening. Wood Magazine has great tips on using grinders. |
Advanced Techniques & Jigs: Next Steps
Once you’re comfortable with the basics, you might consider exploring some more advanced options that can further refine your sharpening process:
- CBN Grinding Wheels: These are a significant investment but last virtually forever, cut cooler, and don’t require dressing. They offer an exceptionally smooth and consistent sharpening experience.
- Angle Gauges: While jigs help, dedicated angle gauges can be used to verify your bevel angles precisely, especially on scrapers and skew chisels.
- Variable Speed Grinders: Allowing you to control RPMs is beneficial for different abrasives and tool types, reducing heat buildup.
- Automated Sharpening Systems: For high-volume users or professional shops, fully automated systems exist, but they are typically beyond the scope of a beginner’s setup.
Maintaining Your Sharpening Station
A clean and well-maintained sharpening station is as important as the setup itself. Regular maintenance ensures your abrasives cut effectively and your tools remain precise.
- Flattening Stones: Water stones and oil stones can develop a dish over time. Use a flattening stone or silicon carbide grit on a flat surface to keep them perfectly flat. This is crucial for consistent sharpening.
- Cleaning Abrasives: Grinding wheels and stones can load up with metal dust. Clean them regularly with a brush or a specialized dressing tool. Diamond plates are usually easy to clean with water and a brush.
- Organize Tools: Keep your sharpened tools organized and protected. Tool rolls, individual sleeves, or dedicated tool holders can prevent edges from getting damaged in storage.
- Workspace Cleanliness: Keep your sharpening area clear of dust and debris. This not only makes for a safer environment but also prevents contaminants from getting onto your freshly sharpened edges. A good dust collection system in your workshop, even a smaller shop vac setup, can help keep abrasive dust to a minimum. For more on workshop safety and organization, resources like the Occupational Safety and Health Administration (OSHA) offer general guidance on safe workshop practices.
Safety First, Always!
Sharpening involves exposing extremely sharp edges. Always treat your tools with respect.
- Wear Safety Glasses: Always wear eye protection, even if you’re just honing. Small metal fragments can fly off.
- Avoid Rushing: Take your time. Rushing is when accidents happen.
- Know Your Tools: Understand how each tool should be sharpened and what its intended bevel angle is.
- Secure Your Setup: Ensure your grinder, stones, and jigs are stable and won’t move during sharpening.
- Keep Fingers Away: Be mindful of where your fingers are in relation to the cutting edge and the abrasive.
- Consider Gloves: For handling tools after sharpening, particularly when moving them, gloves can prevent nicks and cuts.
Frequently Asked Questions About Wood Lathe Tool Sharpening Setups
Q1: How often should I sharpen my wood lathe tools?
You should sharpen your tools whenever they feel dull or start to cut poorly. This can vary greatly depending on the wood type, the tool, and how much you’re using it. Many turners touch up their tools frequently, even after just a few turning sessions, to maintain peak performance.
Q2: What’s the most important angle to get right when sharpening?
For most turning tools like gouges and skew chisels, maintaining the correct bevel angle is crucial. This angle determines how the tool interacts with the wood. For bowl gouges, common angles are 40-45 degrees; for spindle gouges, 30-35 degrees. Consistency is key.
Q3: Can I use my regular bench grinder for woodturning tools?
You can, but it’s recommended to use a slow-speed grinder (1750 RPM or less) and specialized sharpening wheels. Fast grinders generate a lot of heat, which can easily overheat and ruin the temper of your tool’s edge, making it duller than before. It’s also highly recommended to use a jig and a spark guard.