Quick Summary:
Tired of wood lathe vibrations? Install a targeted wood lathe vibration control system to stabilize your machine. This guide shows beginners how to identify, address, and eliminate common causes like an unbalanced workpiece, worn drive centers, or an unstable lathe bed, ensuring smoother cuts and a safer workshop.
Wood Lathe Vibration Control System: Essential Fix for Smoother Turning
Does your wood lathe shake like a leaf in a storm? That constant shaking, or vibration, can be more than just annoying. It makes your cuts rough, your finishes less than perfect, and can even be downright dangerous if it gets bad enough. But don’t worry! Most lathe vibrations have simple causes and even simpler solutions. As Daniel Bates from Lathe Hub, I’m here to break down exactly why your lathe is vibrating and how to fix it with a solid wood lathe vibration control system. We’ll cover everything from making sure your turning piece is balanced to securing your machine properly. Let’s get your lathe running as smooth as butter!
Why Does My Wood Lathe Vibrate? Unpacking the Common Culprits
Vibration on a wood lathe is a common issue, especially for those new to turning. Think of your lathe as a finely tuned instrument. If any part of it is out of sorts, you’ll hear (and feel!) the discord. The good news is that these vibrations usually stem from a few key areas. Understanding these will point us directly to the solution for your wood lathe vibration control system.
Here are the main reasons your lathe might be shaking:
- Unbalanced Workpiece: This is the most frequent offender. If your wood isn’t perfectly centered or has a significant knot or irregular shape, it will wobble as it spins.
- Loose Drive or Tailstock Centers: The points that hold your wood need to be snug and properly seated. If they’re loose, they can cause a lot of movement.
- Damaged or Worn Tool Rest: A bent or improperly positioned tool rest can make contact with the spinning wood at the wrong times, creating jarring vibrations.
- Unstable Lathe Base: If your lathe itself isn’t firmly on the floor or is made of lightweight materials, it can amplify any existing wobbles.
- Bent Spindle or Faceplate: Though less common, a bent spindle or a warped faceplate can introduce significant vibration.
- Out-of-Balance Chuck Jaws: If you’re using a chuck for faceplate turning, unbalanced jaws can also be a source.
- Tool Engagement: Aggressively taking cuts, especially with dull tools, can shock the system.
The presence of vibration is a clear signal that something isn’t right. It’s your lathe’s way of telling you it needs a little attention. A well-designed wood lathe vibration control system starts with a thorough inspection of these potential issues.
Your Wood Lathe Vibration Control System: A Step-by-Step Blueprint
Let’s roll up our sleeves and build your wood lathe vibration control system, step by step. We’ll tackle the most common causes first, as they are usually the easiest to fix and make the biggest difference immediately.
Step 1: Inspect and Balance Your Workpiece
This is the number one reason for vibration. Even a slight imbalance in your wood blank can cause a noticeable wobble.
- Rough Turning: Before you start shaping, turn your blank down to a rough cylinder, even if it’s not perfectly round. This helps to establish a more consistent diameter initially.
- Check for Warping: Ensure your wood isn’t significantly warped or has large, protruding knots that are off-center. Sometimes, a piece of wood is just too irregular to start with.
- Secure Mounting: Double-check that your wood is firmly seated on both the drive spur (the driving force) and the live center (the support at the tailstock end).
Step 2: Verify Drive and Tailstock Centers
The points that hold your wood workpiece are critical. A worn or improperly seated center will transfer vibration directly into your work.
- Drive Spur Check:
- Ensure the drive spur is sharp and free of burrs that could impede a clean bite into the wood.
- Confirm it’s screwed or pressed securely into the headstock spindle.
- Live Center Check:
- The live center (the one that rotates with the bearing) should be the one you’re using. A dead center (which doesn’t spin) will create friction and heat, leading to vibration.
- Make sure the tailstock is properly aligned and the live center is snug against the wood.
- Apply a small amount of grease to the live center’s bearing.
- Mounting Technique: When mounting the wood between centers, first engage the tailstock center into the pre-drilled hole or indentation. Then, advance the tailstock to apply slight pressure, and then engage the live center into the wood. Finally, secure the tailstock. This prevents the wood from being forced off-center.
Step 3: Examine Your Tool Rest
A wobbly or poorly positioned tool rest can create a feedback loop of vibration.
- Stability: Ensure the tool rest post is securely inserted into the lathe bed. It should not wiggle or easily shift position. Tighten the clamp that holds the tool rest rigidly in place.
- Surface: Check that the top surface of the tool rest is smooth and free of deep gouges or burrs that could catch your turning tools or the workpiece.
- Positioning: The tool rest should be positioned close to the workpiece (about the thickness of a dime to a nickel away) but without touching it when spinning freely. It should also be positioned slightly below the centerline of the workpiece when you’re roughing, and at the centerline or slightly above for finishing cuts.
Step 4: Stabilize the Lathe Base
A light or unstable lathe will amplify even minor imbalances. This is a crucial part of any robust wood lathe vibration control system.
Consider these options:
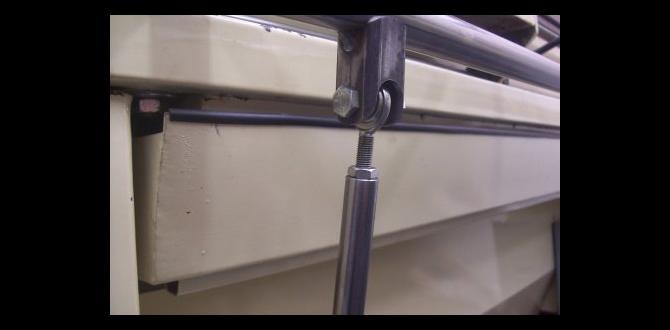
- Heavy Base: If your lathe has a lightweight stand, consider bolting it to a heavy workbench or building a more substantial base from thick plywood or lumber.
- Leveling Feet: Many professional lathes come with adjustable leveling feet. Use these to ensure the lathe sits perfectly flat on the floor. Shim if necessary on uneven concrete floors.
- Anti-Vibration Mats: Placing a thick rubber or specialized anti-vibration mat under the lathe can absorb a significant amount of shaking. Look for dense, fibrous materials that are designed for machinery. You can find these at industrial supply stores or online.
- Bolting Down: For maximum stability, especially with larger or more powerful lathes, consider bolting the lathe directly to the floor or a heavy workbench. Ensure you use appropriate anchors for your floor type.
Here’s a look at common materials used for anti-vibration pads:
| Material Type | Pros | Cons | Typical Use |
|---|---|---|---|
| Dense Rubber Matting (e.g., Home Depot Anti-Fatigue Mats) | Good dampening, readily available, relatively inexpensive. | Can compress over time, may offer less vibration isolation for very heavy machines. | Light to medium-duty lathes. |
| Cork Composite Mats | Excellent vibration absorption, durable, good grip. | Can be more expensive, may require specific fasteners if bolting down. | Medium to heavy-duty lathes. |
| Vibration Isolation Pads (e.g., Machinery Mounts) | Specifically engineered for machinery, highly effective, long-lasting. | Can be costly, requires careful selection based on machine weight and vibration frequency. | Heavy-duty, industrial, or high-precision lathes. |
Step 5: Check for Lathe Mechanical Issues
Less common, but if the above steps don’t solve it, you might have a mechanical issue with the lathe itself.
- Bent Spindle: Gently spin the headstock by hand. Does the spindle wobble noticeably? This is a more serious issue that might require professional repair or replacement.
- Faceplate/Chuck Runout: Mount a dial indicator to the tool rest and measure the runout (wobble) of your faceplate or chuck while it’s spinning slowly. Excessive runout suggests the mounting plate is bent or not seated correctly.
- Motor/Belt Drive: Ensure the belt is in good condition, not frayed, and properly tensioned. A worn belt can cause erratic spinning and vibration. Check that the pulleys are clean and free of debris.
Step 6: Refine Your Tooling and Cutting Technique
How you use your tools also impacts vibration.
- Sharp Tools: Dull tools require more force, leading to chattering and vibration. Keep your turning tools sharp. A keen edge glides through wood with less resistance.
- Cutting Depth: Take lighter, more controlled cuts, especially when first learning. Aggressive cuts shock the system. Gradually increase your cut depth as your lathe and your skills allow.
- Tool Presentation: Ensure your tool is presented to the wood at the correct angle. Consult your tool manufacturer’s recommendations or a good woodworking resource like Wood Magazine’s guide to lathe use. Proper tool presentation minimizes resistance and vibration.
Advanced Wood Lathe Vibration Control: Beyond the Basics
Sometimes, even after addressing the common culprits, a bit of residual vibration remains. For those looking to achieve that ultra-smooth finish and absolute stability, here are a few more advanced strategies.
Using Counterweights
This is a more specialized technique, often used when turning very unbalanced forms like large bowls or intricate shapes. The idea is to add a small amount of weight to the lathe’s motor pulley or headstock spindle that rotates in opposition to the unbalanced part of the workpiece. This requires careful calculation and dynamic balancing, which can be tricky for beginners. It’s usually reserved for experienced users dealing with extreme imbalances.
Dedicated Vibration Dampening Materials
Beyond simple rubber mats, specialized vibration dampening materials can be integrated into the lathe’s structure or its mounting. These can include:
- Viscoelastic Dampers: These materials are designed to absorb energy over a broad frequency range. They can be applied to the lathe bed or legs.
- Resonance Dampening Compound: Some advanced woodworkers use specialized compounds applied to the underside of the lathe bed to reduce resonant frequencies.
These methods often require a deeper understanding of physics and are typically for those seeking near-perfect finishes in demanding applications. For most home workshop users, mastering the basic steps will provide sufficient vibration control.
Understanding Lathe Resonance and Natural Frequencies
Every object has natural frequencies at which it will vibrate most easily. When a vibration from your workpiece or motor matches one of the lathe’s natural frequencies, the vibration can be amplified significantly. A good wood lathe vibration control system aims to avoid or dampen these resonant frequencies. This is why securing the lathe properly, using anti-vibration mats, and ensuring the workpiece is balanced is so important – they all help to shift the machine’s resonant characteristics or reduce the exciting forces that could match those frequencies.
The Environmental Protection Agency (EPA) offers resources on noise and vibration control that, while focused on industrial settings, can provide valuable perspective on the principles of dampening and isolation:
EPA Noise and Vibration Control Guidance
Troubleshooting Difficult Vibrations: What to Do When It Persists
If you’ve gone through all the steps and still feel that relentless shake, don’t despair. Here are some less common but still relevant points to investigate.
Warped Faceplate or Chuck Adapter
If you frequently mount workpieces to a faceplate or use a chuck adapter, a slight warp in these items can transfer vibration directly to the spindle and the workpiece. Remove the faceplate or chuck adapter and inspect it for flatness. A dial indicator is the best tool for this. You can sometimes correct minor warps by carefully filing or sanding, but significant warps might mean it needs replacement.
Loose Bearings in the Headstock or Tailstock
While rare, worn or loose bearings in your lathe’s headstock or tailstock can introduce play and vibration. You might notice a grinding noise or excessive wobble in the spindle when turning by hand. This is a more serious internal issue requiring disassembly and repair. Consult your lathe’s manual or a qualified technician.
Motor Mount Issues
The motor that drives your lathe needs to be securely mounted. Check that the motor itself is bolted tightly to its housing and that the housing is securely attached to the lathe frame. If the motor shaft is bent or the motor itself is unbalanced, it could be a source of vibration.
Belt Tension and Alignment
An incorrectly tensioned or misaligned belt can cause vibration. If the belt is too loose, it can slip and cause jerky movements. If it’s too tight, it can put undue stress on the motor and spindle bearings. Ensure the belt runs true on the pulleys and is not rubbing against any guides or guards.
Using a Dial Indicator: Your Best Friend for Precision
For anyone serious about minimizing vibration and achieving high-quality work, a dial indicator is an invaluable tool. It allows you to precisely measure runout (wobble) in your workpiece, faceplate, chuck, and even the spindle. By mounting the indicator on the tool rest and touching its probe to the spinning surface, you can quantify exactly how much wobble you have, helping you pinpoint the source of the problem much more effectively than just by eye.
Frequently Asked Questions (FAQ) about Wood Lathe Vibration
Here are answers to some common questions beginners have about wood lathe vibrations.
Q1: How can I tell if my lathe vibration is dangerous?
A: Vibration can become dangerous if it causes the lathe to move, if tools start to chatter violently, or if the workpiece feels unstable and threatens to break free. If your lathe is visibly “walking” across the floor, or if you experience severe, uncontrollable shaking, stop immediately and address the issue. Always prioritize safety.
Q2: My lathe vibrates more when I’m turning a large bowl. Why?
A: Larger and asymmetrical workpieces, especially those with significant removed material (like the inside of a bowl blank), are naturally more prone to imbalance. This is why securing the workpiece properly and ensuring the tool rest is stable are extra critical for larger projects.
Q3: I tried to balance my workpiece, but it still vibrates. What next?
A: If balancing the workpiece isn’t enough, the next most likely cause is an unstable lathe base or an issue with the drive/tailstock centers. Ensure your lathe is heavy, level, and on a solid surface. Re-check that your centers are sharp, clean, and properly seated in the wood and the lathe spindle.
Q4: Can I just put wedges under my lathe to stop vibration?
A: Wedges alone aren’t ideal for vibration control. They primarily serve to level the machine. While leveling is essential, true vibration dampening requires materials designed to absorb energy, like dense rubber mats or specialized isolation pads. Wedges might make the vibration worse if they aren’t perfectly placed and stable.
Q5: Is it normal for a wood lathe to vibrate a little?
A: A very small, almost imperceptible hum or gentle tremor might be normal, especially during aggressive cuts. However, significant shaking, chattering, or a loud rumbling sound is usually not normal and indicates a problem that needs