Wood lathe vibration is usually caused by an unbalanced workpiece, loose components, or dull tools. Addressing these common issues with simple checks and adjustments can quickly restore smooth operation and improve your turning results.
Hey everyone, Daniel Bates here from Lathe Hub! If you’re new to woodturning, you’ve likely encountered a shaky, vibrating lathe. It’s a common frustration that can make beautiful projects feel impossible. But don’t worry, it’s usually not a sign of a broken machine. Most of the time, a vibrating lathe is telling you something simple needs a tweak. We’re going to walk through the most common culprits and how to fix them, so you can get back to turning with confidence and precision. Let’s make that lathe purr again!
Why Does My Wood Lathe Vibrate? Understanding the Root Causes
A vibrating wood lathe is more than just annoying; it can be dangerous. Excessive shaking can lead to tool chatter, poor surface finish, and even cause the workpiece to fly off the lathe. Understanding why it’s vibrating is the first step to fixing it permanently. Think of it like a doctor diagnosing an illness – we need to find the source of the problem before we can treat it effectively.
At its core, vibration on a wood lathe stems from an imbalance somewhere in the system. This imbalance could be in the wood you’re turning, the way it’s attached, or even the lathe itself. We’ll break down these areas so you can systematically track down the source and apply the right fix.
Workpiece Imbalance: The Most Common Culprit
By far, the most frequent reason for a vibrating lathe is an unbalanced workpiece. This happens when the weight isn’t distributed evenly around the center axis you’re turning. Think of a car tire that needs balancing – an unbalanced wheel shakes your steering wheel uncomfortably. A wood workpiece is no different.
Here are the main reasons for workpiece imbalance:
- Roughly Shaped Stock: When you first mount a square or irregular piece of wood, it’s inherently unbalanced. As it spins, the heavier sections whip around, causing significant vibration. This is most noticeable at lower speeds.
- Uneven Density or Moisture: Woods can vary in density. If you have a piece with a knotty section on one side and solid wood on the other, or if one part is significantly wetter than another, it can throw off the balance.
- Cracked or Warped Wood: A piece of wood that’s cracked or has begun to warp will also create an imbalance as it spins. It’s not a perfect circle, and the lathe will let you know about it.
- Off-Center Mounting: If your workpiece isn’t mounted perfectly aligned with the lathe’s center, it will wobble and vibrate. This is crucial for faceplate turning or when using chucks.
Tooling and Techniques
While the workpiece is often the primary suspect, your tools and how you’re using them can also contribute to or exacerbate vibration:
- Dull Tools: A sharp tool cuts wood cleanly. A dull tool tears and snags. This inconsistent engagement with the wood creates pulsating forces that translate into vibration.
- Tool Rest Misalignment: If your tool rest is set too far from the workpiece, or if it’s not positioned correctly in relation to the cut, it can cause the tool to dig in or skip, leading to chatter and vibration.
- Incorrect Cutting Technique: Trying to take too much material off at once, or using the wrong angle for your cut, can also make the tool grab and cause vibration.
Lathe Mechanical Issues
While less common for beginners, mechanical issues with the lathe itself can cause vibration. It’s important to be aware of these potential problems:
- Loose Headstock or Tailstock: If the headstock (where the motor and primary spindle are) or the tailstock (the part that supports the other end of the workpiece) is not securely locked down, it can vibrate.
- Worn Bearings: Over time, the bearings in the headstock or tailstock can wear out, leading to a rumbling or knocking vibration.
- Bent Spindle or Drive Center: If the spindle or drive center (the point that engages your workpiece ends to spin it) has been hit or damaged, it might be bent, causing an eccentric spin.
- Motor or Belt Problems: An unbalanced motor pulley, a worn or damaged drive belt, or an improperly tensioned belt can also introduce vibration.
Step-by-Step Troubleshooting: Finding and Fixing the Wobble
Let’s get practical. We’ll go through a systematic approach to diagnosing and fixing wood lathe vibration. Follow these steps, and you’ll likely find the culprit quickly.
Step 1: Assess the Machine’s Basics
Before you even touch the workpiece, let’s ensure the lathe itself is solid.
- Check for Stability: Is the lathe bolted down or on a sturdy stand? Give the lathe bed and headstock a good shake. If the whole machine rocks, it needs to be stabilized. Use leveling feet or shims if it’s wobbly on its stand.
- Secure Headstock and Tailstock: Ensure the tailstock is locked firmly in place for the length of your bed. Check that the headstock is also securely mounted. On some lathes, you can adjust the gibs on the tailstock bed to dial out slop.
- Inspect Drive Belt and Pulleys: Look at the drive belt. Is it cracked, frayed, or excessively loose? A worn belt can cause inconsistent power delivery. Also, check the motor pulley and the headstock pulley for any visible damage or if they appear to be running true. A damaged pulley can’t be fixed easily, often requiring replacement.
Step 2: Examine the Workpiece
This is where most vibration issues originate.
- Visual Inspection: Look at the piece of wood you’re about to mount, or the one currently mounted and vibrating. Is it significantly out of round? Does it have large knots, cracks, or obvious warps? If so, you might need to trim it down or select a more suitable blank.
- Mounting Method:
- Faceplate/Screw Chuck: If using a faceplate or screw chuck to mount a blank for first-time turning (like for a bowl), ensure it’s screwed in straight. If the blank is crooked on the plate, it will magnify vibration. Try to center the blank as best as possible before screwing it in.
- Lathe Chuck: If using a scroll chuck, ensure the jaws are clean and properly seating the workpiece. A bit of sawdust or debris can cause the workpiece to grip unevenly. Make sure the jaws themselves are tightened securely and evenly.
- Drive Center/Spur Drive: When turning between centers (e.g., for spindles), ensure the tailstock center is properly aligned with the headstock center line. A slightly misaligned tailstock is a major cause of vibration. Also, make sure the spur drive is biting firmly into the wood, but not so deep it splits it. Don’t be afraid to tighten the tailstock pressure a bit if needed.
- Initial Roughing: When turning a square blank, the initial vibration will be severe as the corners hit the tool. This is normal. The goal is to round it out as quickly and smoothly as possible. Use a roughing gouge to begin shaping it into a cylinder. Don’t try to take fine cuts at this stage.
Step 3: Check Your Tools and Tool Rest
Your cutting tools and how you present them to the wood are critical.
- Sharpen Your Tools: This is non-negotiable. A dull tool will tear wood, creating rough surfaces and vibration. Regularly sharpen your gouges, scrapers, and chisels. A good rule of thumb is to sharpen when you feel the tool start to “grab” or leave a fuzzy surface. For quick touch-ups, a honing guide and a slip stone at your lathe can be very helpful.
- Tool Rest Positioning:
- Distance: The tool rest should be as close to the workpiece as possible without coming into contact with it during rotation. A gap of 1/8 inch (around 3mm) or less is ideal. Too large a gap allows the tool to pivot and dig in, causing chatter.
- Height: For most cuts with a spindle gouge or skew, the cutting edge should be aligned with the center of the workpiece. For scrapers, you might raise the rest slightly. Experimentation can help, but a good starting point is center height.
- Angle: The tool rest’s angle should generally be parallel to the workpiece’s surface where you are cutting.
- Tool Presentation: Hold your tool firmly and consistently. Let the tool do the cutting; don’t force it. For roughing, a steady sweep with a roughing gouge is best. For shaping, learn the proper angles for your gouges and skews.
Step 4: Turning Speed and Cuts
The speed at which you turn and the depth of your cuts play a big role.
- Start Slow: When turning a newly mounted, unbalanced blank, always start at the slowest speed your lathe offers. Gradually increase the speed as the workpiece becomes more rounded.
- Listen and Feel: Pay attention to the sound and feel of the lathe. If vibration increases significantly as you speed up, you may need to stick to a lower speed or check your workpiece balance again.
- Manage Cut Depth: Avoid taking excessively deep cuts, especially on larger or unbalanced pieces. Multiple light passes are almost always better than one heavy pass. This gives the tool and the lathe an easier time and results in a smoother finish.
Troubleshooting Table: Quick Fixes for Common Vibrations
Here’s a quick reference guide to help you pinpoint and resolve common lathe vibrations.
| Symptom | Likely Cause(s) | Essential Fixes |
|---|---|---|
| Severe shaking, especially noticeable when first turning on a round stock. | Unbalanced raw stock. | Use the slowest speed. Shape the blank into a rough cylinder using a roughing gouge. Gradually increase speed as it rounds out. Ensure workpiece is centrally mounted. |
| Intermittent “thumping” or “chugging” sound and feel. | Off-center mounting (faceplate, chuck), or workpiece not fully seated. | Re-mount the workpiece ensuring it’s perfectly centered and fully seated against jaw faces or chuck. Clean chuck jaws and workpiece seating area. |
| Buzzing or chattering when taking a cut. | Dull tool, tool rest too far away, incorrect tool angle, or taking too deep a cut. | Sharpen your tool. Move tool rest closer (1/8″ or less). Adjust tool angle for clean cutting. Take lighter passes. |
| Consistent, low-frequency rumble even on a rounded piece. | Loose tailstock, loose headstock, or machine not stable on its base. | Securely lock tailstock and headstock. Ensure lathe is stable and leveled on its stand. Check if any bolts holding the lathe together are loose. |
| Vibration that increases with speed, even on a rounded piece. | Bent drive center, bent spindle, or severely unbalanced workpiece (e.g., hidden crack). | Inspect drive center for bends. Carefully check headstock spindle for runout (using a dial indicator if possible). Re-examine workpiece for hidden defects. Consider lower speeds. |
| Vibration from motor/belt area. | Worn belt, unbalanced pulley, or motor mount issue. | Inspect belt for wear/damage. Check pulley alignment and mounting. Ensure motor is securely mounted. |
Advanced Checks and Maintenance for Longevity
Once you’ve mastered the basics, a few more advanced checks can ensure your lathe remains a smooth-running partner in your workshop.
Headstock and Tailstock Alignment
For accurate turning, especially on longer pieces, the center line of the headstock must align perfectly with the center line of the tailstock. Misalignment is a major contributor to vibration and tool stress.
- Checking Alignment: Mount a piece of scrap wood between centers. Turn it to a cylinder at a low speed, making a light pass from headstock to tailstock. Measure the diameter at both ends and in the middle. If the difference is significant, your tailstock is likely misaligned.
- Adjusting: Most lathes have a mechanism to adjust the tailstock’s position relative to the bed. Consult your lathe’s manual for specific instructions. Small adjustments can make a big difference. Often, the tailstock can be skewed slightly left or right.
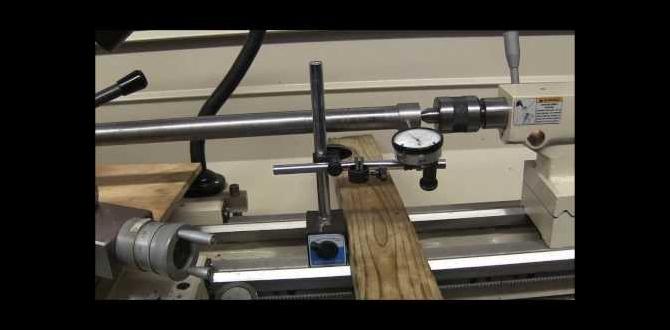
Spindle Runout
The main spindle of your lathe should be perfectly straight. Any bend will cause the entire chuck or faceplate to wobble, creating vibration regardless of your workpiece.
- Diagnosis: The best way to check for spindle runout is with a dial indicator. Mount the indicator in the tool post or tailstock, position its probe against the spindle nose, and rotate the spindle by hand. Any movement of the indicator needle shows runout. A common acceptable limit is often around 0.001 to 0.002 inches (0.025 to 0.05 mm), but check your lathe’s specifications.
- What to do: If your spindle has significant runout, it’s a serious mechanical issue. It might be due to damage from an accident or simply wear and tear on older machines. Repair or replacement of the spindle, or potentially the entire headstock assembly, may be required. Reputable machine shops can sometimes repair bent spindles.
Bearing Health
The bearings in your headstock (and sometimes tailstock) allow the spindle to rotate smoothly. Worn bearings can introduce a knocking, grinding, or rumbling vibration that gets worse with speed.
- Listening Test: With the belt removed, spin the headstock spindle by hand. Listen for any grinding, rough spots, or excessive play. Perform the same test for the tailstock if it has bearings.
- Maintenance: Many lathes have grease ports for their headstock bearings. Following the manufacturer’s recommendations for greasing is important preventative maintenance. If you hear or feel roughness, it’s often a sign the bearings need replacement. Replacing lathe bearings can be a moderate DIY job or a task for a professional. Websites like the Machinery Lubricants resource offer insights into proper bearing lubrication practices essential for machine longevity.
Motor and Drive System
The motor itself and its connection to the spindle can be sources of vibration.
- Motor Mounts: Ensure the motor is securely bolted to its mounting bracket and that the bracket is firmly attached to the lathe. Loose motor mounts can cause vibration.
- Drive Belt Tension: A belt that’s too tight can put undue stress on bearings, while a belt that’s too loose can slip and cause inconsistent power, contributing to chatter. Refer to your manual for the correct tension.
- Face Hardness and Flatness: The turning face of pulleys can wear down or become uneven over time. This is more common on older, well-used machines. Check that the faces of your headstock and motor pulleys are smooth and perpendicular to the shaft.
Safety First: Never Compromise on Security
I can’t stress this enough: Safety is paramount when working with any machinery, and a vibrating lathe is a serious safety concern. Always:
- Wear appropriate safety glasses or a face shield.
- Keep your work area clear of debris.
- Never leave a running lathe unattended.
- Ensure guards are in place.
- Stand to the side of the lathe when starting it up, especially with larger workpieces.
- Maintain good posture and don’t overreach.
If a vibration seems too severe or you can’t pinpoint the cause, it’s better to stop work and seek advice from experienced users or a professional. For more on safe workshop practices, resources like the Occupational Safety and Health Administration (OSHA) provide crucial guidelines for hazard recognition.
Frequently Asked Questions About Wood Lathe Vibration
Q1: How can I tell if my wood is balanced enough to start turning at higher speeds?
As you gradually increase speed, the vibration should diminish significantly. If you experience heavy shaking that returns as you speed up, your workpiece is likely still unbalanced. Stick to the slowest speed until it’s mostly rounded, then increase speed incrementally.