For fiberglass machining with tight tolerances, a carbide end mill, particularly a 1/8 inch with a 1/4 inch shank and stub length, is absolutely essential. Its hardness and precision allow for clean cuts without delamination, ensuring accurate, repeatable results for demanding projects.
Working with materials like fiberglass can sometimes feel tricky, especially when you need parts to fit together perfectly. You might notice that standard tools can leave rough edges or even cause the fiberglass layers to separate. This is super frustrating when you’ve put in a lot of effort! The good news is, there’s a specific tool that makes this job much, much easier and more precise. This article is all about the carbide end mill and why it’s your new best friend for getting those super-accurate cuts in fiberglass. We’ll explore why it’s so special, how to choose the right one, and how to use it effectively for elite tolerance. Get ready to feel confident handling fiberglass!
Why Fiberglass Needs Special Tools
Fiberglass, also known as glass-reinforced plastic (GRP), is a composite material made of a polymer matrix reinforced by glass fibers. While it’s strong, lightweight, and versatile, it presents unique machining challenges. The glass fibers, though strong, are abrasive and brittle. When cut with the wrong tools, these fibers can:
- Delaminate: The layers of fiberglass can pull apart, creating fuzzy or uneven edges.
- Chip: Small pieces can break off prematurely, leading to inaccurate dimensions.
- Overheat: Friction can generate heat, softening the resin matrix and making a gummy mess instead of a clean cut.
- Wear Down Tools Quickly: Standard bits can dull rapidly due to the abrasive nature of glass fibers.
Achieving “elite tolerance” means creating cuts that are incredibly precise, often within very small measurement allowances. This is crucial for applications where parts need to mate perfectly, such G-specific aerospace components, high-performance automotive parts, or intricate electronic enclosures. For these demanding jobs, a standard tool just won’t cut it. You need something that can handle the abrasion and maintain sharpness for clean, precise cuts.
Introducing the Carbide End Mill: The Fiberglass Hero
Enter the carbide end mill. This isn’t just any cutting tool; it’s designed to tackle tough materials with ease. When we talk about machining fiberglass for high precision, a carbide end mill stands out amongst its peers. Let’s break down why:
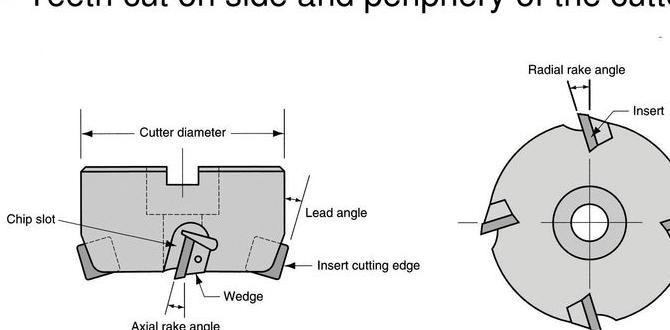
What is a Carbide End Mill?
An end mill is a type of milling cutter, basically a rotary cutting tool with cutting edges on its sides and end. They are used in milling machines, CNC machines, and even some drill presses with the right setup, to machine flat surfaces, slots, and contours. The “carbide” part refers to the material the cutting edges are made from – typically tungsten carbide.
Why Carbide is King for Fiberglass
Tungsten carbide is an extremely hard and dense composite material. It’s significantly harder than high-speed steel (HSS), which is what many standard drill bits and end mills are made from. This hardness translates to several key advantages for machining fiberglass:
- Superior Hardness: Carbide is highly resistant to wear and abrasion. This means it stays sharp for much longer when cutting through the glass fibers, crucial for maintaining cut quality and tool life.
- Heat Resistance: Carbide can withstand higher temperatures than HSS. While friction is still a factor, carbide tools are more likely to maintain their cutting ability without softening or becoming gummy in the cut.
- Edge Retention: Because it’s so hard, carbide can hold a very sharp cutting edge. This is vital for achieving the clean, straight cuts needed for tight tolerances in fiberglass.
- Higher Cutting Speeds: With its superior properties, carbide often allows for faster cutting speeds and feed rates, improving efficiency without sacrificing accuracy.
For fiberglass, this means fewer rough edges, less delamination, and the ability to achieve those extremely tight tolerances that are often the difference between a successful project and a costly failure.
Choosing the Right Carbide End Mill for Fiberglass
Not all carbide end mills are created equal, and for fiberglass, specific features make a big difference. When you’re aiming for “elite tolerance,” you need to be precise in your tool selection. The keywords here often point to a very specific type of tool: “carbide end mill 1/8 inch 1/4 shank stub length for fiberglass tight tolerance.” Let’s unpack that:
Key Specifications to Consider:
| Feature | Why it Matters for Fiberglass |
|---|---|
| Material: Tungsten Carbide | Essential for hardness, wear resistance, and heat tolerance against glass fibers. |
| Diameter: 1/8 inch (or 3.175 mm) | Smaller diameters are often necessary for intricate details, small features, and achieving high precision in precise cuts. They allow for finer movements. |
| Shank Diameter: 1/4 inch (or 6.35 mm) | This is the part that fits into your milling machine’s collet. A 1/4 inch shank is common and provides a good balance of rigidity and versatility. Ensure it matches your machine’s collet system. |
| Length: Stub Length | A “stub length” end mill is shorter and has a thicker shank relative to its diameter. This rigidity is crucial. Shorter tools are less prone to vibration and deflection, leading to straighter, more accurate cuts. For fiberglass, with its tendency to cause issues with chatter or deflection, a stub length is highly beneficial for maintaining tolerance. |
| Number of Flutes: 2 or 4 Flutes |
2 Flutes: Generally preferred for soft materials and composites like fiberglass. They provide better chip ejection, which is important to prevent the material from gumming up the flutes and causing heat buildup or poor surface finish. They can also cut with the end (plunge cutting) more effectively. 4 Flutes: Can be used but may require different speeds and feeds. They offer a smoother finish but chip clearance can be more of a concern with gummy materials. For fiberglass, 2-flute end mills are often the go-to for balance of cutting action and chip evacuation. |
| Coating: Uncoated or Specific Coatings |
Uncoated: Often sufficient for fiberglass, as the primary advantage comes from the carbide itself. They can be very sharp. Relevant Coatings: Some coatings, like ZrN (Zirconium Nitride), can offer additional lubricity and wear resistance, which might be beneficial for extremely demanding or high-volume work. However, for typical hobbyist or small-batch production, uncoated carbide is usually excellent. |
| End Cut Type: Flat or Ball Nose |
Flat End: For creating slots, pockets, and defined edges. Essential for precise, square features. Ball Nose: For creating rounded profiles, 3D contours, and achieving very fine surface finishes. Can be useful for certain complex fiberglass shapes. For achieving tight tolerances in standard machining operations like pocketing or profiling, a flat end mill is often the primary choice. |
The Sweet Spot: 1/8 Inch, 1/4 Shank, Stub Length
When the goal is “elite tolerance” in fiberglass, the combination of a 1/8-inch diameter, a 1/4-inch shank, and a stub length becomes exceptionally valuable. Here’s why this specific setup hits the mark:
- 1/8 Inch Diameter: This small diameter allows for very fine details, tight corner radii, and precise profiling. It’s perfect for intricate work where a larger tool would simply be too clumsy.
- 1/4 Inch Shank: A standard and robust size that fits most common milling machines and router collets. It provides sufficient grip and stability for a tool of this size.
- Stub Length: This is key for rigidity. A stub length means the tool isn’t excessively long relative to its diameter. Less overhang means less susceptibility to vibration, bending, or “chatter.” For accurate cuts in fiberglass, minimizing vibration is paramount. A stubby tool will stay straighter and truer to your programmed path, leading directly to better tolerance.
Think of it like trying to draw a very fine line. If you use a thick crayon, it’s hard to be precise. If you use a sharp pencil (the 1/8″ end mill) with a short, stiff grip (stub length shank), you have much more control over where the mark goes. This translates directly to achieving those tight tolerances.
Using Your Carbide End Mill for Optimal Fiberglass Machining
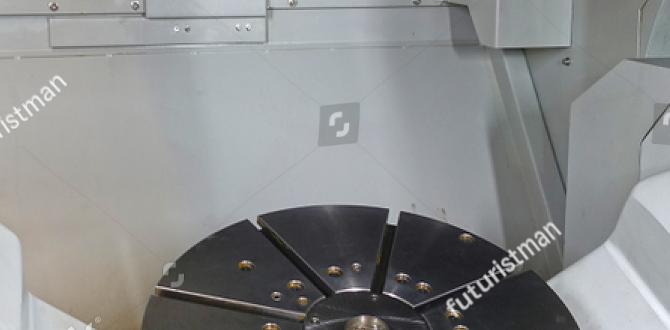
Having the right tool is only half the battle. Proper setup and technique are crucial for getting the best results when milling fiberglass, especially when aiming for high precision.
Preparation is Key:
- Secure the Workpiece: Fiberglass can be light, so ensure your workpiece is firmly clamped or held in a vice. Any movement during machining will ruin your tolerances. Use clamps that won’t damage the surface if appearance is critical.
- Dust Collection: Fiberglass dust is not only an irritant but also a respiratory hazard. Always use a robust dust collection system directly at the point of cut. Work in a well-ventilated area, and wear appropriate personal protective equipment (PPE), including a respirator, safety glasses, and gloves. For more information on safe machining practices, you can refer to resources from OSHA, such as their guidelines on machining plastics, which often apply to composites like fiberglass.
- Cleanliness: Ensure your milling machine and collet are clean. Any debris can affect the concentricity of the tool and lead to runout, compromising accuracy.
Machining Parameters: Speed and Feed Rate
Getting the speed and feed right is critically important for fiberglass. Too fast, and you risk melting or delaminating. Too slow, and you might not cut cleanly or will create excessive dust.
- Spindle Speed (RPM): For carbide end mills in fiberglass, spindle speeds can vary, but a good starting point for a 1/8-inch end mill might be in the range of 10,000 to 20,000 RPM. Always consult the tool manufacturer’s recommendations. The key is to find a speed that allows the carbide edge to cut cleanly without generating excessive heat.
- Feed Rate: This is how fast the tool moves through the material. For small diameter end mills and composites, a moderate to fast feed rate is often beneficial. This allows the flutes to slice through the material rather than rub, which helps with chip evacuation and minimizes heat. For a 1/8-inch tool, you might start with a feed rate of around 10-20 inches per minute (IPM) or 250-500 mm/min, adjusted based on chip formation.
- Depth of Cut (DOC): For best results and to avoid excessive load or heat, take light cuts. Start with a shallow depth of cut, perhaps 0.020 to 0.040 inches (0.5 to 1 mm), and increase if the finish is clean and chip evacuation is good. Multiple passes are better than one deep, problematic cut.
Important Note: These are general guidelines. The exact optimal settings will depend on the specific resin system of the fiberglass, the weave of the glass fibers, the type of end mill (e.g., specific flute geometry), and the rigidity of your machine. Always perform test cuts on scrap material first.
Cutting Strategies for Tight Tolerances:
- Climb Milling vs. Conventional Milling: For fiberglass, especially with a CNC, climb milling is often preferred. In climb milling, the cutter rotates in the same direction as its feed. This results in a shear-like cutting action, which can produce a cleaner surface finish and reduced tendency for chipping or delamination compared to conventional milling.
- Tab and Break Strategy: For CNC routing, especially when cutting out complete shapes, leave small “tabs” connecting the part to the surrounding material. This prevents the part from moving around as soon as it’s cut free, which is crucial for maintaining tolerance on the final edge. You can then gently break or cut these tabs off afterward.
- Coolant or Lubricant (Use with Caution): Some machinists use a mist coolant or a specialized cutting fluid designed for composites. While this can help with heat and chip evacuation, be very careful. Many lubricants can contaminate the fiberglass resin, affecting adhesion if you plan to bond or coat the part later. Water-based coolants or compressed air are often safer alternatives. Always research compatibility with your specific fiberglass resin.
Benefits of Using the Right End Mill for Fiberglass
Investing in the correct carbide end mill, like the 1/8 inch stubby with a 1/4 inch shank, for your fiberglass projects yields significant advantages, especially when precision is paramount.
Achieving Elite Tolerance
This is the headline benefit. A sharp, rigid carbide end mill designed for composites will:
- Maintain a precise cutting edge, leading to accurate dimensions.
- Minimize deflection and vibration, crucial for staying true to your design path.
- Provide clean cuts with less fiber pull-out, ensuring smooth, accurate edges that fit perfectly.
Improved Surface Finish
Instead of a fluffy, delaminated edge, you’ll achieve:
- Smooth, crisp edges.
- Reduced need for secondary finishing operations like sanding or deburring.
- A more professional and aesthetically pleasing result.
Extended Tool Life
While carbide is an investment, it will vastly outperform less suitable materials:
- Stays sharp for many more cuts through abrasive fiberglass.
- Reduces the frequency of tool changes, saving time and improving workflow continuity.
- More predictable wear means consistent cutting performance over its lifespan.
Increased Efficiency
With the right tool and settings, you can:
- Potentially use faster cutting speeds and feeds.
- Complete parts faster due to cleaner cuts and less rework.
- Reduce material waste from failed cuts or inaccurate dimensions.
For any critical application, from DIY electronics enclosures to high-performance hobby projects, this level of precision and efficiency is invaluable.
Common Fiberglass Machining Pitfalls and How to Avoid Them
Even with the best tools, fiberglass can be a tricky material. Here are common issues and how to prevent them:
Pitfall 1: Delamination and Chipping
Cause: Dull tools, wrong cutting direction (conventional milling), too much force, or inadequate support.
Solution: Use a sharp carbide end mill, favour climb milling, take light cuts, and ensure the material is firmly clamped. Consider a compression end mill for two-sided parts if your machine can handle it, as they help “push” material into place rather than pull it away.
Pitfall 2: Melting and Gumming
Cause: Excessive heat due to slow cutting speeds or dull tools. The resin melts instead of being cut cleanly.
Solution: Increase spindle speed (RPM) for carbide, ensure an adequate feed rate for chip formation, and take light cuts. Use compressed air to help cool the cutting zone and clear chips.
Pitfall 3: Excessive Dust and Poor Air Quality
Cause: Inadequate dust collection or ventilation.
Solution: Always use a dust extraction system directly at the point of cut. Wear a P100 respirator, safety glasses, and gloves. Good ventilation is non-negotiable. Consult resources like the NIOSH guide to dust control for general principles that apply to workshop environments.
Pitfall 4: Inaccurate Dimensions (Poor Tolerance)
Cause: Tool deflection, machine flex, workpiece movement, or imprecise toolpath programming.
Solution: Use a rigid tool (stub length), ensure the workpiece is securely clamped, and use a well-programmed toolpath. For very high precision, consider finishing passes with a very light depth of cut.
Pitfall 5: Tool Breakage
Cause: Taking cuts that are too deep or wide, feeding too slowly, or encountering unexpected hard spots or voids in the material.
Solution: Stick to light chip loads and appropriate depths of cut. Listen to the machine – if it sounds like it’s struggling, back off. Ensure the tool is properly seated in the collet.
Frequently Asked Questions (FAQ) About Carbide End Mills for Fiberglass
Q1: Can I use a regular drill bit for fiberglass?
A1: While you can make holes, a standard drill bit is not ideal for precise cuts or preventing delamination in fiberglass.