Quick Summary: Extend the life of your 1/8-inch carbide end mill when machining stainless steel by prioritizing proper feeds, speeds, coolant, and tool handling. Using a stub length, quality carbide, and understanding chip load are key to achieving pro-level tool longevity.
Hey everyone, Daniel Bates here from Lathe Hub! Ever find yourself a bit frustrated when your trusty little 1/8-inch carbide end mill seems to give up the ghost too quickly, especially when you’re working with tough materials like stainless steel? You’re not alone. It’s a common hiccup for many beginners setting up their milling machines. That sharp edge can dull faster than we’d like if we don’t give it a little love and attention. But don’t worry! Getting more mileage out of these small but mighty tools is totally achievable. We’ll walk through some simple, effective techniques together, turning those frustrating tool changes into productive machining sessions. Let’s dive in and learn how to get the most out of your 1/8-inch carbide end mills, especially on stubborn steel!
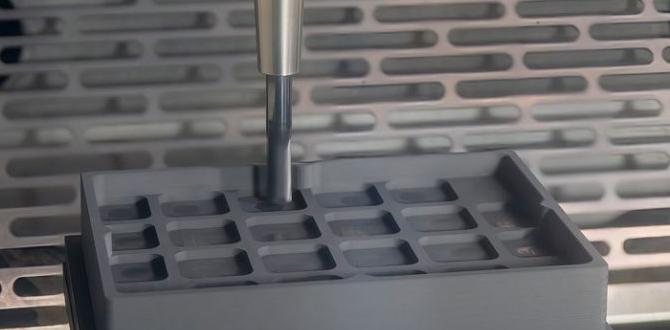
Getting the Most from Your 1/8-Inch Carbide End Mill in Stainless Steel
Working with stainless steel can be a rewarding experience, offering durability and a professional finish to your projects. However, this material also presents a unique challenge for machining tools, particularly for smaller end mills like the 1/8-inch variety. These tiny powerhouses are crucial for intricate detailing and creating precise features, but their small size means they can be prone to overheating and premature wear if not handled correctly. This guide is designed to demystify the process of extending the tool life of your 1/8-inch carbide end mill when cutting stainless steel, ensuring you get professional results and maximize your investment in these valuable cutting tools.
Why Stainless Steel is a Challenge for Small End Mills
Stainless steel, as its name suggests, is designed to resist corrosion and oxidation, which is a fantastic trait for the finished product. However, the alloying elements that provide this resistance, primarily chromium and nickel, also make it harder, tougher, and more prone to work hardening. This means stainless steel requires more cutting force and generates more heat than softer metals like aluminum or mild steel. For a small 1/8-inch end mill, which has less material to dissipate heat and is more susceptible to chipping or breaking under stress, these properties can be a recipe for rapid tool wear.
Understanding the Key Factors for Tool Life
Achieving “pro” tool life for any cutting tool, especially a small carbide end mill in stainless steel, isn’t about magic; it’s about understanding and controlling a few critical variables. Think of it like taking care of a precision instrument. When you treat it right, it performs beautifully for a long time.
- Speeds and Feeds: This is arguably the most critical factor. Getting these wrong is the fastest way to kill an end mill.
- Chip Load: Directly related to speeds and feeds, this is the amount of material each cutting edge removes per revolution.
- Coolant and Lubrication: Essential for managing heat and flushing chips away.
- Tool Material and Geometry: Not all end mills are created equal.
- Depth of Cut and Stepover: How much material you remove in a single pass.
- Workpiece Clamping: A stable workpiece prevents chatter and tool stress.
The Magic Numbers: Finding the Right Speeds and Feeds
This is where many beginners get intimidated. Speeds and feeds dictate how fast the tool spins (RPM) and how fast it moves through the material (feed rate). For stainless steel and a 1/8-inch carbide end mill, you generally want to run slower speeds and moderate feed rates compared to softer metals.
A good starting point often involves calculating your chip load. Chip load is the thickness of the chip that each cutting tooth removes. It’s crucial for efficient cutting and preventing tool damage. For a 1/8-inch carbide end mill in stainless steel, a common chip load range is between 0.001″ and 0.003″ per tooth. Stub length end mills, often used for increased rigidity with smaller diameters, might tolerate the higher end of this range.
Once you have a target chip load, you can calculate your feed rate (in inches per minute, IPM) using this formula:
Feed Rate (IPM) = Chip Load per Tooth × Number of Flutes × Spindle Speed (RPM)
Finding the right RPM is often done through trial and error or by consulting manufacturer charts. For stainless steel with a 1/8-inch carbide end mill, you might start in the range of 10,000 to 18,000 RPM, depending on your machine’s capabilities and the rigidity of your setup. Always err on the side of caution and start slower, then gradually increase if the cut is smooth.
Important Note: Always consult the end mill manufacturer’s recommendations for specific speeds and feeds. These are general guidelines, and the exact settings can vary based on the end mill’s coating, flute count, and specific stainless steel alloy.
Coolant: Your End Mill’s Best Friend
Heat is the enemy of carbide. When machining stainless steel, significant heat is generated. Without adequate cooling, the cutting edge can soften, leading to rapid wear. Coolant does two vital jobs:
- Cools the Cutting Edge: This prevents the carbide from overheating and losing its hardness.
- Lubricates the Cut: Reduces friction between the tool and the workpiece, leading to a smoother cut and less wear.
- Flushes Chips Away: Prevents chips from recutting, which can chip the tool or jam the cut.
For stainless steel, a good quality cutting fluid or a soluble oil mist system is highly recommended. Using a flood coolant system is even better if your machine is equipped. If you’re using a dry-milling setup, you’ll need to be extra diligent with your speeds, feeds, and taking frequent breaks to let the tool and workpiece cool. Compressed air can help, but it doesn’t offer the same cooling and lubricating benefits as a proper coolant.
You can learn more about the importance and types of cutting fluids from resources like Machinery Lubricants.
Tool Geometry and Material Matters
Not all 1/8-inch end mills are built the same, especially when it comes to tackling stainless steel. Here’s what to look for:
- Carbide Grade: For stainless steel, a fine-grain carbide grade (like C2 or C6) is generally preferred. These offer good hardness and wear resistance.
- Number of Flutes: For stainless steel, especially in smaller diameters, fewer flutes are often better. A 2-flute or 3-flute end mill is common. More flutes can lead to chip packing in tougher materials, while fewer flutes provide better chip evacuation and are less prone to clogging.
- Coating: Coatings like TiN (Titanium Nitride), TiCN (Titanium Carbonitride), or ZrN (Zirconium Nitride) can significantly improve tool life by adding hardness, reducing friction, and increasing heat resistance. For stainless steel, coatings that offer good lubricity and wear resistance are particularly beneficial.
- End Mill Type: For small diameter tools, using a “stub length” end mill offers increased rigidity because it has a shorter flute length relative to its diameter. This reduced stick-out helps minimize chatter and deflection, which are major contributors to premature tool failure, especially in stainless steel.
Depth of Cut and Stepover: Taking It Easy
When you’re working with a small 1/8-inch end mill in stainless steel, it’s crucial to avoid taking aggressive cuts. Aggressive cuts mean removing too much material at once, which can overload the tool, cause excessive heat, and lead to chatter or breakage.
- Depth of Cut (DOC): This is how deep each pass you make into the material is. For a 1/8-inch carbide end mill in stainless steel, you typically want to keep your axial depth of cut conservative. A common recommendation is to take a DOC that is no more than 50% of the tool diameter (0.0625″ or 1/16″ for a 1/8″ end mill). For tougher stainless grades or less rigid setups, consider even shallower depths.
- Stepover: This is how much the tool moves sideways from one cutting path to the next. For finishing passes, a small stepover (e.g., 10-20% of the diameter) will produce a smoother surface finish. For roughing, you can increase this to 40-50% of the diameter, but always prioritize tool health.
Using techniques like “high-efficiency machining” (HEM) or “adaptive clearing” in your CAM software can help manage chip load distribution, keeping the tool engaged at a consistent depth and width of cut, which is ideal for maximizing tool life.
Workpiece Clamping: No Wobbling Allowed!
This might seem obvious, but a securely clamped workpiece is non-negotiable for achieving good tool life. If your workpiece moves or vibrates during a cut, it leads to what machinists call “chatter.” Chatter is a destructive vibration that hammers the cutting edges of your end mill, chipping them and rapidly reducing their sharpness and effectiveness.
- Use appropriate clamps: Whether it’s vise jaws, toe clamps, or fixture plates, ensure your workpiece is held firmly.
- Minimize overhang: If you’re machining a thin part, try to support it as much as possible underneath.
- Check for looseness: Before starting a cut, give the workpiece a gentle nudge to ensure it’s absolutely secure.
Preventative Maintenance and Best Practices
Treating your end mill well before and after use can also contribute to its lifespan.
- Clean Rigorously: After each use, thoroughly clean your end mill to remove any coolant residue, chips, or metal particles. These can cause corrosion or interfere with seating in your collet.
- Proper Storage: Store your end mills in a protective container, such as a tool holder or a specialized case, to prevent damage to the cutting edges.
- Inspect Before Use: Always check your end mill for any visible chips, nicks, or signs of wear before starting a new operation. Don’t try to push a damaged tool.
- Use the Right Collet: Ensure you are using a high-quality collet that grips the shank of the end mill firmly and centrally. Runout (wobble) in the spindle or collet can lead to uneven cutting and premature wear.
A Comparison: Stub vs. Standard Length 1/8 Inch End Mills
When choosing your 1/8-inch end mill for stainless steel, the “stub length” variation is often a superior choice for beginners and experienced machinists alike. Here’s why:
| Feature | Stub Length 1/8″ End Mill | Standard Length 1/8″ End Mill |
|---|---|---|
| Rigidity | Higher. Shorter flute length means less cantilever, reducing deflection and chatter. | Lower. Longer flute length is more prone to bending under cutting forces. |
| Tool Life in Stainless | Generally longer due to reduced chatter and better stability. | Shorter if chatter or deflection occurs, leading to faster edge wear or breakage. |
| Application | Ideal for tougher materials, general milling, profiling, and pocketing where tool rigidity is paramount. | Can be used for light-duty tasks or when a longer reach is absolutely necessary, but often requires slower speeds/finer feeds. |
| Cost | May be slightly more expensive, but the increased tool life often justifies the cost. | Generally more common and can be less expensive. |
| Beginner Friendliness | Excellent. Its inherent rigidity makes it more forgiving and less prone to user error leading to tool failure. | Can be more challenging to use effectively in tough materials without experiencing issues like chatter. |
For projects involving stainless steel and a 1/8-inch end mill, prioritizing a stub length tool is a smart move for maximizing your chances of success and tool longevity. It’s a small detail that makes a big difference.
Common Pitfalls and How to Avoid Them
Even with the best intentions, things can go wrong. Here are some common mistakes and how to steer clear:
- Running Too Fast: Increasing RPMs hoping to cut faster often backfires, causing the tool to rub and overheat.
- Feeding Too Slowly: If you feed too slowly, the tool will rub instead of cutting, generating heat and dulling the edges. This is often called “work hardening” the material.
- Taking Too Deep of a Cut: Overloading the small end mill axially or radially can lead to breakage or rapid wear.
- Ignoring Chip Evacuation: Piled-up chips act as an abrasive, dulling the tool and causing excessive heat. Ensure good coolant flow or air blast.
- Not Using Enough Lubrication/Coolant: Stainless steel generates heat; without proper cooling, your tool will suffer.
- Using Dull Tools: Trying to “get by” with a slightly dull end mill is a false economy. It uses more power, generates more heat, and makes the situation worse.
Advanced Tip: Adaptive Clearing Strategies
If you’re using CAM software (Computer-Aided Manufacturing), explore “adaptive clearing” or “high-efficiency machining” (HEM) strategies. These toolpaths are designed to engage the tool with the material in a way that maintains a constant chip load and keeps the tool engaged with a consistent radial depth of cut. This dramatically reduces heat buildup and shock loads on the cutting edges, leading to significantly longer tool life, especially in tough materials like stainless steel. Many modern CAM packages offer this as a standard feature.
For more on adaptive machining, you can find useful information from resources like CNCCenterUSA, a reputable source for CNC machining knowledge.
FAQ: Your 1/16″ Carbide End Mill Questions Answered
What is the best cutter for stainless steel with a 1/8 inch shank?
For stainless steel, a 2-flute or 3-flute carbide end mill with a thick, wear-resistant coating (like TiCN or AlTiN) and often a stub length is ideal. The coating helps with heat and wear, and the stub length provides rigidity, which is crucial for stainless.
Can I machine stainless steel with a 1/8 inch end mill?
Yes, absolutely! It requires careful attention to speeds, feeds, and especially coolant to manage the heat and toughness of stainless steel. A stub length, coated carbide end mill is highly recommended for this application.
What RPM should I use for a 1/8 inch carbide end mill in stainless steel?
A common starting point for a 1/8 inch carbide end mill in stainless steel is between 10,000 and 18,000 RPM. Always begin at the lower end and listen to the cut. Adjust based on your machine, coolant, and the specific stainless alloy. Consult manufacturer specs for best results.
How deep can I cut in stainless steel with a 1/8 inch end mill?
For a 1/8 inch end mill in stainless steel, aim for a conservative axial depth of cut, typically no more than 50% of the tool diameter (0.0625 inches or 1/16 inch). For very tough grades or less rigid setups, you might need to go even shallower.
What is a good feed rate for a 1/8 inch end mill in stainless steel?
A good starting chip load is around 0.001″ to 0.003″ per tooth. Calculate your feed rate using: Feed Rate (IPM) = Chip Load per Tooth × Number of Flutes × Spindle Speed (RPM). For example, with a 2-flute end mill at 15,000 RPM and a 0.002″ chip load, your feed rate would be 60 IPM.
How do I prevent my 1/8 inch end mill from breaking in stainless steel?
Prevent breakage by ensuring rigid workpiece fixturing, using appropriate speeds and feeds to avoid chatter, taking shallow depths of cut, using sufficient coolant, and always using sharp, undamaged tools. A stub length end mill also helps by reducing deflection.
What kind of coolant is best for machining stainless steel?
For stainless steel, flood coolant or a mist coolant system with a good quality soluble oil or synthetic cutting fluid is highly recommended. These provide crucial cooling and lubrication to manage the