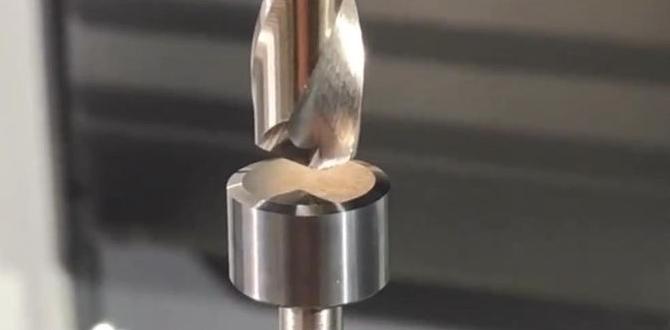
A 3/16-inch carbide end mill with a 3/8-inch shank is essential for machining HDPE. Its specific design, particularly when featuring a reduced neck, minimizes chatter and ensures clean, precise cuts in this unique plastic, making it a go-to tool for makers working with HDPE.
Hey there, fellow makers and workshop enthusiasts! Daniel Bates here, your guide from Lathe Hub. Ever found yourself staring at High-Density Polyethylene (HDPE) and wondering what tool will make those clean, smooth cuts you’re after? It’s a common spot to be in! HDPE can be a bit tricky – it’s tough yet can melt easily. That’s why choosing the right tool is super important for success, especially when you’re milling. Don’t worry, though! Today, we’re diving deep into a tool that’s become an absolute workhorse for HDPE: the carbide end mill, specifically the 3/16-inch size with a 3/8-inch shank. We’ll explore why it’s so effective and how you can use it to get those perfect results you’re aiming for.
Why the 3/16″ Carbide End Mill is a Hero for HDPE
When you’re working with materials like HDPE, the tool you choose can make all the difference between a clean, professional finish and a melted, messy disaster. The 3/16-inch carbide end mill, especially when designed with a particular focus on handling plastics, is one of those tools that just works. Let’s break down exactly why HDPE is a material that requires specific tooling and how this particular end mill shines.
Understanding HDPE: The Good and The Tricky
HDPE, or High-Density Polyethylene, is incredibly popular for countless applications – from cutting boards and food containers to industrial piping and 3D printing filament. Its appeal lies in its durability, chemical resistance, and ease of cleaning. However, when it comes to machining, HDPE presents a unique challenge. It’s a thermoplastic, meaning it softens and melts when heated. Machining processes, particularly milling, generate heat through friction. If your tool isn’t cutting efficiently, this friction can quickly turn your HDPE into a gummy, sticky mess, gumming up your tool and ruining your part. This is where the right end mill comes into play – it needs to cut cleanly and quickly to manage that heat.
The Magic of Carbide
Carbide, specifically tungsten carbide, is a super-hard material used for cutting tools. It’s far harder and more wear-resistant than High-Speed Steel (HSS). For machining plastics like HDPE:
- Heat Resistance: Carbide can withstand higher temperatures than HSS, which is crucial when dealing with a material that melts easily.
- Sharpness and Edge Retention: Carbide tools can be ground to a very sharp edge and hold that sharpness for a long time, ensuring cleaner cuts.
- Efficiency: Because they are harder and stay sharper, carbide end mills cut more efficiently, reducing the time the tool is in contact with the material and thus, reducing heat buildup.
The Role of the 3/16″ Size
The 3/16-inch diameter is often a sweet spot for many HDPE projects. It’s small enough to allow for intricate details and fine features, which is common in custom parts, jigs, or artistic designs. Yet, it’s substantial enough to remove material effectively without being overly aggressive. This size is versatile for tasks such as:
- Engraving text or logos
- Creating slots and pockets for joinery
- Profiling complex shapes
- Adding decorative patterns
The Importance of the 3/8″ Shank
The 3/8-inch shank on a 3/16-inch end mill is also significant. A larger shank diameter provides several benefits:
- Rigidity: A thicker shank is more rigid than a thinner one. This rigidity is essential for preventing deflection (the tool bending) during cutting. Less deflection means more accurate dimensions on your part.
- Vibration Dampening: The sturdier shank can help absorb some of the vibrations that occur during machining, leading to a smoother cut.
- Tool Holder Compatibility: Many common milling machine collets and tool holders are designed for standard shank sizes like 3/8 inch, making it readily compatible with most beginner-level milling setups.
Features to Look For in Your HDPE End Mill
Not all carbide end mills are created equal, especially when it comes to plastics. For HDPE, certain features can dramatically improve your machining experience. Think of these as the “secret sauce” that makes this tool ideal.
Reduced Neck (Crucial for Chatter Reduction)
This is a key feature that sets specialized end mills apart. A “reduced neck” means that the shank diameter is slightly smaller than the cutting diameter for a portion of the tool’s length, just above the cutting flutes. This design is incredibly beneficial for plastics like HDPE because:
- Clearance for Chips: The reduced neck provides extra room for chips to escape. If chips can’t clear, they can get recut, increasing friction and heat, leading to melting. More space means better chip evacuation.
- Reduced Friction: With less material rubbing against the workpiece as the tool feeds, friction is minimized.
- Less Drag: This design helps prevent the non-cutting portion of the tool from dragging, which can cause surface finish issues and overheating.
Flute Count and Geometry
For plastics, flute count and geometry are critical for aggressive, clean cutting and chip evacuation. When machining HDPE:
- Few Flutes (2 or 3): While four or more flutes are common for metals, plastics often benefit from fewer flutes. Two or three flutes provide ample space between them for chips to exit freely, reducing the risk of melting and chip recutting.
- High Rake Angle: A positive rake angle, where the cutting edge is angled forward, “bites” into the material more aggressively. This leads to lighter chip loads and less heat generation.
- Polished or Bright Flutes: End mills with polished flutes are excellent for plastics. These surfaces are smoother, which helps prevent melted plastic from sticking to the tool.
- Uncoated Carbide: For HDPE, an uncoated carbide end mill is often preferred. While coatings are great for metal, they can sometimes increase friction or heat in certain plastics. The natural sharpness and smoothness of polished carbide, without a coating, often performs best.
“O-Flute” or “Plastic Routing” End Mills
You might also see end mills specifically labeled for plastics, often called “O-flute” (meaning single flute) or “plastic routing” end mills:
- O-Flute (Single Flute): These are designed for maximum chip clearance and aggressive cutting. Perfect for soft plastics where you want to get the material out of the way quickly.
- Compression or Two-Flute Up/Down Cut: While less common for HDPE specifically, if you need a very clean top and bottom surface finish on thicker material, a specialized compression end mill might be considered. However, for general HDPE work and beginner-friendliness, a well-designed single or two-flute end mill is usually the go-to.
Setting Up Your Mill for Success with HDPE
Getting the right end mill is half the battle. The other half is setting up your milling machine correctly. This involves understanding spindle speed, feed rate, and how to properly secure your workpiece.
Workholding: Keeping HDPE Secure
HDPE can be flexible, so it’s important to secure it firmly. Your workholding strategy needs to support the material well and prevent it from moving during machining.
- Clamps: Use clamps that can grip the edges of the HDPE sheet. If possible, position clamps so they don’t interfere with the cutting path.
- Double-Sided Tape: For thin sheets or small parts that don’t require heavy milling, high-tack double-sided tape specifically designed for machining can be an effective way to hold the workpiece to a sacrificial spoilboard.
- Vacuum Fixturing: If you’re doing a lot of HDPE work, a vacuum table is an excellent investment. It provides even holding pressure across the entire surface of the workpiece.
- Sacrificial Spoilboard: Always mill into a sacrificial spoilboard. This protects your milling machine table and provides a flat, stable surface. HDPE can sometimes stick to metal tables.
Feeds and Speeds: The Balancing Act
This is where things can feel a bit intimidating, but it’s all about finding the sweet spot to cut efficiently without melting. For HDPE and a 3/16″ carbide end mill, you’re aiming for speeds and feeds that:
- Allow the cutting edge to engage and disengage quickly.
- Produce small, manageable chips.
- Minimize the time the tool spends rubbing against the material.
Here’s a general guideline, but always test on scrap material first! These figures are a starting point for plain milling (creating pockets, slots, or profiles).
| Tool Diameter | Shank Diameter | Material | Spindle Speed (RPM) | Feed Rate (IPM) | Depth of Cut (DOC) | Number of Flutes | Notes |
|---|---|---|---|---|---|---|---|
| 3/16″ (4.76 mm) | 3/8″ (9.5 mm) | HDPE | 15,000 – 20,000 | 20 – 40 | 0.050″ – 0.100″ (1.27 mm – 2.54 mm) | 2 or 3 | Use air blast or flood coolant for best results. A reduced neck is highly recommended. |
Key Considerations for Feeds and Speeds:
- Spindle Speed (RPM): Higher RPMs allow the end mill to cut faster. For plastics, you generally want higher spindle speeds than you would use for metals.
- Feed Rate (IPM – Inches Per Minute): This is how fast you push the material into the spinning tool. Too slow, and the tool will rub and melt the plastic. Too fast, and you risk breaking the tool or bogging down the spindle.
- Depth of Cut (DOC): For milling plastics like HDPE, take lighter cuts. This means you don’t try to cut too deep in a single pass. It’s better to take multiple shallow passes. For a 3/16″ end mill, a depth of cut around 0.050″ to 0.100″ is a good starting point.
- Chip Load: This is the thickness of the chip being removed per cutting edge. A good chip load is important for efficient cutting. You can calculate it with an online calculator if you want to get more precise, but for beginners, focusing on the IPM and DOC is often more practical.
- Air Blast: A stream of compressed air directed at the cutting zone is invaluable for HDPE. It blows chips away and helps cool the cutting area, preventing melting. Many hobbyist CNC machines have an air blast attachment.
Why are these numbers important? If your feed rate is too low for the spindle speed, the end mill will rub against the HDPE instead of cutting it. This friction generates heat, and HDPE melts easily. If your feed rate is too high, you can overload the spindle, break the flutes, or leave a rough surface. Taking shallow depths of cut also reduces the load on the tool and spindle, helping to keep temperatures down and ensure a cleaner cut.
Cooling and Chip Evacuation
As mentioned, heat management is paramount. Don’t underestimate the power of a good chip evacuation system.
- Air Blast: A blast of compressed air is usually sufficient for HDPE. Aim it directly at the point where the end mill is cutting.
- Coolant/Lubricant: For more demanding jobs or if you notice melting, a light mist of coolant or a specialized plastic machining lubricant can help. However, be aware that coolants can sometimes make plastic chips stickier, so an air blast is often preferred. Avoid flooding with liquid coolant, as it can create a mess and isn’t always necessary for plastics.
Step-by-Step: Milling HDPE with Your 3/16″ End Mill
Let’s walk through the process of milling a simple shape into an HDPE sheet using your 3/16-inch carbide end mill. This assumes you have a basic milling machine or CNC router.
- Prepare Your Design: Create your design in CAD (Computer-Aided Design) software. This could be a pocket, a slot, or an outline of a shape. Export your design as a G-code file if you are using a CNC machine.
- Secure the Workpiece: Firmly clamp or tape your HDPE sheet to your sacrificial spoilboard. Ensure it cannot shift during the machining process. Double-check that your clamps are out of the way of the tool path.
- Install the End Mill: Insert your 3/16-inch carbide end mill with a 3/8-inch shank into your milling machine’s collet. Tighten it securely. Ensure the collet is clean and free of debris.
- Set Your Zero Points: On your CNC, set the X, Y, and Z zero points. For Z-zero, it’s often best to use a touch plate or set it on the surface of your spoilboard.
- Set Up Chip Evacuation: Position your air blast nozzle to blow directly at the cutting area. Turn on the air before you start cutting.
- Perform a Test Cut: If possible, run your G-code or manually cut a small, non-critical area on a scrap piece of HDPE. Watch and listen. Is the tool cutting cleanly? Are chips being evacuated? Is there any sign of melting?
- Adjust Feeds and Speeds (If Needed): Based on your test cut, you might need to adjust your feed rate or depth of cut.
- If melting or smearing: Increase feed rate slightly, or decrease depth of cut. Ensure air blast is effective.
- If you hear chattering or rough cutting: Try a slightly slower feed rate, or ensure your workpiece and tool are rigidly held. In rare cases, a slight adjustment to spindle speed might help.
- Run the Main Cut: Once you’re confident with your test cut, start the main machining operation. Monitor the process closely, especially during the first few minutes. Listen for any unusual sounds and watch for chip formation.
- Clean Up: After machining, use a brush or vacuum to remove any dust or chips from your workpiece and machine. You can gently deburr any sharp edges with a deburring tool or a fine-grit sandpaper if necessary.
Common Problems and Solutions
Even with the right tool, you might run into a few hiccups when machining HDPE. Here are common issues and how to resolve them:
- Melting or Gumming: This is the most frequent issue.
- Cause: Too much friction, insufficient chip evacuation, incorrect speeds/feeds (feed rate too slow, depth of cut too deep).
- Solution: Increase feed rate, reduce depth of cut, improve air blast, ensure you’re using a high-quality plastic-specific end mill (like one with a reduced neck and polished flutes).
- Chatter (Vibration/Rough Surface):
- Cause: Tool deflection, workpiece not held rigidly, worn tool, incorrect speeds/feeds.
- Solution: Ensure workpiece is clamped very securely, use a stiffer end mill (the 3/8″ shank helps here), take lighter depths of cut, ensure the tool is sharp and not damaged. A reduced neck design on the end mill can also help reduce the tendency to chatter.
- Tool Breakage:
- Cause: Feeds too high, depth of cut too high, tool engages material too suddenly, worn or damaged tool.
- Solution: Reduce feed rate and depth of cut, program for smoother entry into the material (e.g., helical ramping), always use a sharp, undamaged tool.
- Poor Surface Finish:
- Cause: Worn tool, inconsistent feed rate, too much deflection, cutting too slowly, chip recutting.
- Solution: Use a sharp, high-quality tool. Ensure your feed rate is consistent. Take shallower depths of cut. Make sure chips are being cleared effectively from the flutes.
Best Practices for Using End Mills on Plastics
To get the best results and extend the life of your tools, follow these best practices specifically for plastic machining:
- Start with Scrap: Always test your settings on a scrap piece of the same material before cutting your final part.
- Use Air Blast: This is non-negotiable for most plastics. It’s your primary cooling and chip removal method.