Quick Summary:
For machining stainless steel, using the right carbide end mill is crucial. It needs excellent chip evacuation capabilities to prevent overheating and tool wear, ensuring clean cuts and long tool life. This guide explains why and how to choose the best one for your projects.
Hey there, fellow makers! Daniel Bates here from Lathe Hub. Ever found yourself wrestling with stubborn stainless steel on your mill, battling melted chips that cling like superglue? It’s a common frustration, especially for us beginners. Stainless steel is tough to machine, and if those hot, stringy chips don’t get out of the way fast, they can ruin your workpiece and your tool. But don’t worry, there’s a simple, effective solution: the right carbide end mill designed for this very challenge. In this guide, we’ll break down why chip evacuation is so important when milling stainless steel and how a specialized carbide end mill is your secret weapon. Let’s get those tough materials behaving!
Why Chip Evacuation is King When Milling Stainless Steel
Milling stainless steel is a bit like trying to sculpt with a very sticky dough. Unlike softer metals, stainless steel tends to be gummy. When you cut it, it produces long, stringy chips that love to stick to the cutting edges of your end mill. This is where chip evacuation becomes more than just a nice-to-have; it’s absolutely essential for success. If those chips can’t escape, they build up, getting recut and essentially welding themselves to the tool.
This has a cascade of negative effects:
- Increased Heat: Friction from recutting chips generates excessive heat. Stainless steel has poor thermal conductivity, meaning it doesn’t dissipate heat well. This trapped heat can lead to tool breakage, workpiece distortion, and a poor surface finish.
- Tool Wear: Heat and friction are the enemies of cutting tools. When chips lodge in the flutes, they cause abrasive wear, dulling the cutting edges prematurely. This means you’ll need to replace your end mill much sooner than you’d like.
- Poor Surface Finish: Those stuck chips can gouge and tear the material being cut, leaving a rough, uneven surface that’s difficult, if not impossible, to clean up without significant extra work.
- Chip Welding: This is where the chips essentially melt and fuse onto the cutting tool’s edges. It’s one of the biggest headaches when milling stainless steel and can quickly render your tool unusable.
- Increased Cutting Forces: A clogged flute requires more force to push through the material, which can lead to chatter, vibration, and potential damage to your machine.
So, what’s the solution? It starts with the cutting tool itself. We need an end mill specifically designed to help clear those pesky chips.
Enter the Carbide End Mill: Your Stainless Steel Superhero
When we talk about tackling materials like stainless steel, carbide end mills are the workhorses. Why carbide? It’s incredibly hard and can withstand the higher temperatures generated during machining far better than high-speed steel (HSS). This hardness means it stays sharp longer, even under demanding conditions.
However, not all carbide end mills are created equal, especially when it comes to stainless steel. The key lies in their geometry and flute design, which are optimized for something called “chip evacuation.” This is where specialized carbide end mills shine.
What Makes a Carbide End Mill Great for Chip Evacuation?
When choosing a carbide end mill for stainless steel, look for these specific features that directly address chip evacuation:
- High Helix Angle: Think of the helix angle as the “twist” of the flutes. A higher helix angle (often 30 degrees or more) helps to curl and eject chips more aggressively away from the cutting zone. This is a major factor in preventing chip buildup.
- Increased Chip Gullet (Flute Volume): The chip gullet is the space between the flutes. End mills designed for gummy materials like stainless steel often have a larger, deeper flute or “gullet” to provide more room for chips to collect and be carried away. This reduces the chance of them getting jammed.
- Polished or Bright Flutes: Coated or polished flutes are smoother. This smoothness reduces friction between the chips and the tool, making it easier for chips to slide out rather than stick. Some coatings, like TiAlN (Titanium Aluminum Nitride), are excellent for high-heat applications like stainless steel and also help with chip evacuation.
- Center Cutting vs. Non-Center Cutting: For most operations where you’ll be plunging into the material or doing slotting, a center-cutting end mill is preferred. These have cutting edges on the end, allowing you to feed straight down.
- Number of Flutes: While 2-flute end mills are often recommended for stainless steel to maximize chip room, 4-flute versions with optimized chip breaker geometries and large gullets can also perform very well, offering better surface finishes and faster material removal rates when conditions are right. We’ll dive into this more.
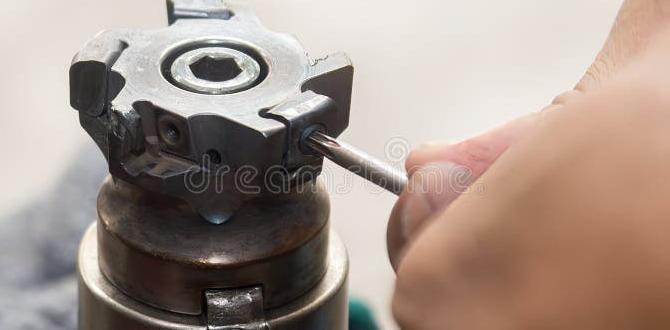
Let’s consider a common scenario: you need to mill a slot in a piece of 316 stainless steel and are looking for a good tool. You might search for something like a “carbide end mill 3/16 inch 8mm shank extra long for stainless steel 316 chip evacuation.” This specific description hits on several key optimization points.
Why “3/16 inch 8mm shank”? This tells you the cutting diameter (3/16″) and the diameter of the part that goes into your machine’s collet (8mm shank). Standardizing on common shank sizes like 8mm or 1/4 inch makes tool holding easier.
Why “extra long”? An extra-long end mill (also called an extended reach) can be beneficial for reaching into pockets or for operations where you need a bit more clearance, but it also means the flutes are longer, potentially helping with chip evacuation if designed correctly.
Why “for stainless steel 316”? This highlights the material you’re cutting. Grade 316 stainless steel is known for being particularly tough and gummy, making it a prime candidate for specialized tools. Specifying the grade helps manufacturers design for its unique properties.
Why “chip evacuation”? This directly calls out the critical feature we’re discussing. You want a tool explicitly engineered to handle those sticky chips.
Choosing the Right Carbide End Mill: Key Features to Look For
When you’re at the tool supplier’s website or in a shop, don’t just grab the first carbide end mill you see. Pay attention to the details. Here’s what to focus on for stainless steel chip evacuation:
1. Number of Flutes
For stainless steel, you often have a choice between 2-flute and 4-flute end mills. Both have their pros and cons, but understanding them is key to maximizing chip evacuation.
- 2-Flute End Mills: These generally offer the largest chip void (gullet) between flutes. This means more space for chips to collect and be expelled. They are excellent for slotting and roughing operations where chip removal is the top priority. The reduced number of cutting edges also means less tool pressure on the workpiece.
- 4-Flute End Mills: While they have less chip room per flute, these are often designed with specialized geometries. Many modern 4-flute end mills designed for stainless steel feature “chip breakers.” These are small serrations or notches ground into the cutting edge that break up long chips into smaller, more manageable pieces. This significantly improves evacuation and can prevent welding. 4-flute mills can also provide a better surface finish and allow for higher material removal rates in some finishing applications.
Beginner Tip: If you’re unsure, a 2-flute is a very safe bet for pure chip evacuation in stainless steel. If you see a 4-flute explicitly marketed for stainless steel with chip breakers, it’s also a strong contender.
2. Helix Angle
The helix angle dictates how steeply the cutting edges are twisted around the end mill’s axis. For gummy materials like stainless steel, a higher helix angle is generally better for chip evacuation.
- Low Helix Angles (0-15 degrees): These are typically used for harder materials or where chip control is less of an issue. They don’t twist chips out as effectively.
- Standard Helix Angles (20-30 degrees): A good all-around choice for general machining.
- High Helix Angles (30-45 degrees): These are excellent for softer, gummier materials like aluminum and stainless steel. The steeper twist helps to lift and throw chips away from the workpiece more forcefully. This is a critical feature for preventing those sticky chips from re-entering the cut.
When looking for an end mill for stainless steel, aim for one with a helix angle of 30 degrees or higher.
3. Flute Design & Coatings
The shape and finish of the flutes play a vital role. Modern end mills often incorporate advanced features here.
- Large Gullet/Chip Pocket: As mentioned, this is the space for chips. Look for end mills where the space between the cutting edges is deep and open.
- Polished Flutes: Smoother flutes create less friction. Chips are less likely to adhere to a polished surface, allowing them to slide out more easily. Many end mills for stainless steel come with highly polished or bright flutes.
- Specialized Coatings: Coatings add a layer of protection and lubricity. For stainless steel, the following are popular and beneficial for chip evacuation and heat resistance:
- TiAlN (Titanium Aluminum Nitride): This is a workhorse coating for stainless steel. It’s dark purple/black and forms a very hard layer with excellent thermal resistance. It helps reduce friction and prevents chip welding.
- AlTiN (Aluminum Titanium Nitride): Similar to TiAlN but can often withstand even higher temperatures.
- ZrN (Zirconium Nitride): A gold-colored coating that offers good lubricity and some heat resistance.
- Uncoated (Bright/Honed): Sometimes, plain polished carbide without a coating is preferred for very gummy materials and low-speed applications, as the coating can occasionally contribute to welding if not applied perfectly. However, this is less common now with advanced coating technologies.
- Chip Breakers (Geometric Features): Some end mills have small, repeating notches or serrations ground into the cutting edge. These are designed to intentionally fracture long, stringy chips into shorter segments. This makes them much easier to evacuate from the flutes and prevents them from wrapping around cutters.
4. Corner Radius or Chamfer
The tip of your end mill can be sharp (square) or have a slight radius or chamfer. For stainless steel, a small corner radius can add strength and help prevent chipping at the tip, but the primary concern for chip evacuation remains the flute design.
5. Material Grade of Carbide
While most end mills are made from tungsten carbide, the specific grade and grain size can affect toughness and wear resistance. For general machining of stainless steel, standard micro-grain carbide is usually sufficient. Advanced grades might offer marginal benefits but are less critical than flute geometry for chip evacuation.
A Practical Guide to Milling Stainless Steel with Your Carbide End Mill
Now that we know what to look for in an end mill, let’s talk about how to use it effectively. Proper machining practices are just as important as the tool itself for successful chip evacuation.
Step-by-Step Milling Process for Stainless Steel:
This guide focuses on taking a basic pocket or slot. Always refer to your machine’s manual for safety and operation instructions.
- Secure Your Workpiece: Clamp your stainless steel workpiece extremely firmly to the milling machine table. Stainless steel can exert significant forces, and any movement can lead to tool breakage or poor results. Use sturdy clamps and ensure they don’t interfere with the tool path.
- Select Your Carbide End Mill: Based on our discussion, choose a carbide end mill optimized for stainless steel, featuring high helix angles, large chip gullets, polished flutes, and potentially chip breakers. For a 3/16 inch cutting diameter for stainless steel, an 8mm shank is common. Consider a 2-flute for maximum chip clearance, or a 4-flute with chip breakers if you prioritize surface finish and material removal rate.
- Set Up Your Machine:
- Collet/Tool Holder: Ensure your collet or tool holder is clean and properly sized for the end mill’s shank (e.g., an 8mm collet for an 8mm shank). Tighten it securely.
- Spindle Speed (RPM): Stainless steel requires slower spindle speeds than softer metals. A good starting point for a 3/16” carbide end mill in 300-series stainless steel might be between 300-600 RPM. Always consult a machining calculator or manufacturer’s recommendations, as this varies greatly with the specific alloy and tooling. Sandvik Coromant’s machining calculators are a great resource for finding optimal speeds and feeds.
- Feed Rate (IPM or mm/min): This is how fast the tool moves into the material. For stainless steel, a moderate feed rate is usually best. Too slow, and you risk rubbing and excessive heat; too fast can overload the tool. A starting point for a 3/16″ end mill might be between 3-10 IPM (inches per minute). Again, use calculators and manufacturer data.
- depth of cut (DOC): For roughing, aim for a depth of cut that is no more than 25-50% of the end mill’s diameter. For finer finishing passes, this can be reduced. Overly deep cuts will overload the tool and hinder chip evacuation.
- Stepover: This is the distance the tool moves sideways between passes (for pocketing). For roughing, a 50-75% stepover is common. For finishing, you’ll want a much smaller stepover (e.g., 10-25%) for a smooth surface.
- Apply Lubrication/Coolant: This is crucial for stainless steel! Use a good quality cutting fluid or coolant. Mist coolants or flood coolants work best to keep the cutting zone cool and flush chips away. For manual machining, a cutting paste or oil applied judiciously can help. Never machine stainless steel dry!
- Perform Dry Run (Optional but Recommended): Before engaging the material, jog the tool close and run the spindle to ensure everything is clear and moves freely. Then, set your Z-zero and perform a “dry run” at a safe height to check the programmed tool paths.
- Engage the Material:
- Ramping In: Instead of plunging straight down (which can shock the tool), try to ramp into the material if possible. This means the end mill enters the material at an angle, distributing the cutting load gradually.
- Conventional Milling vs. Climb Milling:
- Conventional Milling: The cutter rotates against the direction of feed. It’s generally more forgiving and less likely to dig in, making it safer for beginners. It tends to produce more upward chip load, which can be helpful.
- Climb Milling: The cutter rotates in the same direction as the feed. This provides a smoother cut, better surface finish, and reduces cutting forces, but requires a rigid machine with no backlash. For stainless steel, climb milling is often preferred when possible for its benefits, but conventional milling is a safer starting point.
- Monitor Chip Evacuation: This is your primary indicator! Watch the chips as they are produced. Are they small and curly? Are they being thrown clear of the flute? Or are they long, stringy, and building up? If you see buildup, stop the machine immediately.
- Adjust as Needed: If chips are packing, you might need to:
- Slower the feed rate slightly.
- Reduce the depth of cut.
- Increase spindle speed (if you are running too slow and rubbing).
- Improve coolant flow.
- Use a tool with a higher helix angle or larger gullet.
If the cut seems too light and you’re not getting good chip formation, you might be able to increase the feed rate or depth of cut.
- Finishing Passes: Once roughing is complete, consider taking one or more light finishing passes with a reduced depth and stepover to achieve a good surface finish.
Consistent monitoring and adjustment are key. It’s a learning process, and observing how the tool and material interact will teach you more than any manual.
Types of End Mills and Their Chip Evacuation Suitability for Stainless Steel
Understanding the different end mill types and how they perform with stainless steel can help you make the best choice. While we focus on carbide, it’s useful to know where others stand.
Here’s a quick comparison:
| End Mill Type | Material | Pros for |
|---|