Have you ever watched a milling machine change its tools? It’s quite a sight! A milling machine is a powerful tool used in factories and workshops. When it needs to switch tools, it follows a special procedure. This process is called the tool change procedure. But why is this so important?
Changing tools correctly keeps the machine working smoothly. Imagine trying to build a toy with the wrong tool. It would be frustrating, right? Similarly, a milling machine needs the right tools to create precise parts.
Did you know that improper tool changes can lead to accidents? Many workers face challenges if they don’t know the procedure. That’s why understanding the milling machine tool change procedure is crucial. It helps improve safety and productivity. In this article, we will explore the steps and tips for changing tools safely and effectively. Are you ready to dive in?
Milling Machine Tool Change Procedure: A Step-By-Step Guide

Milling Machine Tool Change Procedure
Ever wondered how a milling machine works? The tool change procedure is key. First, you must stop the machine and ensure safety. Then, carefully release the old tool and insert the new one. Tighten the tool properly before starting again. This process helps maintain accuracy in shaping materials. Did you know that a well-executed tool change can enhance production speed? Understanding these steps can make you a pro in no time!Understanding the Milling Machine
Definition and purpose of milling machines. Types of milling machines and their applications.Milling machines are like the Swiss Army knives of the machining world! They help shape materials like wood or metal into precise parts. The main purpose? To craft pieces that fit together perfectly, turning an idea into reality. There are various types of milling machines. Some are smaller and best for home projects, while others are big and strong, perfect for factories. Each type has special uses, so think before you choose! Below is a quick table to show different types:
| Type of Milling Machine | Application |
|---|---|
| Vertical Milling Machine | Used for precise cutting; great for smaller parts |
| Horizontal Milling Machine | Perfect for larger pieces; can handle heavy workloads |
| CNC Milling Machine | Computer-controlled for precision; great for complex shapes |
So next time you see a project come together, remember the magic of milling machines!
Importance of Tool Change Procedures
Impact on machining accuracy and quality. Time efficiency and workflow optimization.Changing tools correctly is a big deal! It affects how well your machine works. A proper tool change improves machining accuracy and quality. Think of it like changing gears in a bike. If you don’t do it right, you might end up going uphill with the brakes on! Also, efficient tool changes save time and keep things moving smoothly. This helps in workflow optimization. Less waiting means more creating! So, let’s keep those tools ready and shining!
| Benefit | Impact |
|---|---|
| Accuracy | Better quality products |
| Time Efficiency | Faster production |
| Workflow | Smoother operations |
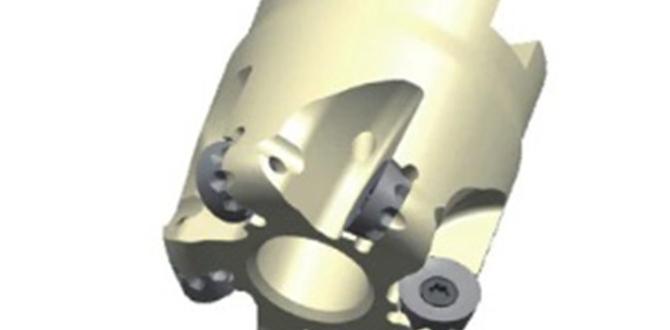
Tools Required for Tool Change
List of essential tools for changing milling machine tools. Safety equipment and measures.Changing tools on a milling machine requires specific tools to keep everything running smoothly. First, grab a tool wrench to loosen those stubborn screws. You’ll also need a cleaning brush to brush away the metal shavings that sneak in. Don’t forget your safety goggles! They prevent surprises, like shavings in your eyes. Finally, a trusty manual helps guide you. Here’s a quick table for a handy checklist:
| Tool | Purpose |
|---|---|
| Tool Wrench | Loosens and tightens screws |
| Cleaning Brush | Removes metal shavings |
| Safety Goggles | Protects eyes from hazards |
| Manual | Guides through tool change |
Remember, safety first! No one wants a trip to the eye doctor for a tool mishap.
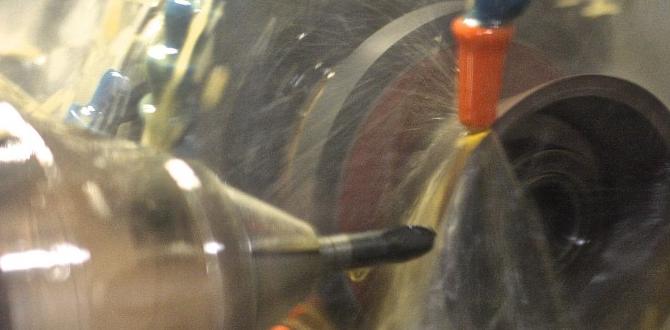
Step-by-Step Tool Change Process
Preparing the milling machine for tool change. Detailed instructions for removing and replacing tools.First, let’s set the stage for the tool change. Turn off the milling machine and unplug it. Safety first! Next, clear your workspace. You don’t want ninja tools flying everywhere. Now, follow these steps:
| Step | Action |
|---|---|
| 1 | Open the tool holder. |
| 2 | Carefully remove the old tool. |
| 3 | Take the new tool and insert it. |
| 4 | Tighten the holder securely. |
| 5 | Check everything twice. You never know! |
And there you have it! It’s like changing a tire, but for tools! Remember, always double-check your work, or you might accidentally create a modern art piece instead of a perfect cut.
Common Challenges During Tool Changes
Identifying issues that may arise during the procedure. Solutions for troubleshooting tool change problems.During tool changes, some problems can happen. First, tools may get stuck. This can slow down work. Next, the wrong tool might be selected. This leads to mistakes. Lastly, parts can get damaged if not handled right. To solve these, keep a few tips in mind:
- Check tools before starting.
- Use the right size tools.
- Clean the machine regularly.
Staying organized helps everyone work faster and better.
What are common issues in tool changes?
Common issues include stuck tools, wrong tool selection, and damaged parts. These challenges can delay the process and cause errors.
Ways to fix tool change problems:
- Inspect tools before use.
- Follow the right setup steps.
- Always handle parts carefully.
Maintenance and Care of Milling Tools
Best practices for maintaining milling tools. Importance of regular inspections and preventive measures.Taking care of milling tools is like giving them a spa day! Regularly checking them keeps them sharp and happy. Here are some best practices:
| Practice | Description |
|---|---|
| Inspect Regularly | Look for wear and tear before it becomes a disaster! |
| Clean After Use | No dirt allowed! Keep tools shiny as a new penny. |
| Store Properly | Give your tools a cozy, dry home. |
Regular inspections and preventive care save you from unexpected hiccups, like when your favorite snack goes missing! Remember, a well-kept tool can last up to twice as long as a neglected one. So, keep them happy and they’ll keep doing amazing work!
Safety Tips for Tool Changes
Key safety guidelines to follow during tool changes. Importance of awareness and training.Changing tools on a milling machine can be tricky, but safety should always come first! Here are some key tips to keep in mind:
| Safety Tip | Description |
|---|---|
| Wear Protective Gear | Always use safety goggles and gloves. They won’t make you look cool, but they will keep you safe! |
| Clear Area | Make sure the workspace is tidy. No one wants to trip over their own shoelaces while changing tools! |
| Follow Training | Be aware of the procedures and best practices. Ignorance is not bliss when it comes to machines! |
Awareness is crucial. Knowing the right steps helps prevent accidents. Training helps you understand what to do and what not to do. Remember, it’s better to be safe than sorry. Keep these tips in mind, and tool changes will be a breeze!
Best Practices for Efficient Tool Management
Techniques for organizing and storing milling tools. Implementing a tool tracking system.Keeping milling tools organized can save time and headaches. Use labeled containers for easy access; you wouldn’t want to search for that missing tool like it’s gone on a vacation! A tool tracking system helps too. By tracking your tools, you’ll know where they are at all times. It’s like having a GPS for your milling tools. Here’s a simple table to get you started:
| Tool Type | Storage Location | Status |
|---|---|---|
| End Mill | Drawer 1 | Available |
| Drill Bit | Drawer 2 | In Use |
| Face Mill | Drawer 3 | Available |
Conclusion
In conclusion, the milling machine tool change procedure is essential for precision and efficiency. You should always follow proper steps to change tools safely. Remember to check settings and secure tools firmly. This practice helps avoid mistakes and improves your results. For more information, consider reading guides or watching videos on milling machines. Happy milling!FAQs
Here Are Five Related Questions On The Topic Of Milling Machine Tool Change Procedure:Sure! When we change tools on a milling machine, we need to be safe. First, we turn off the machine. Then, we use the right tool to remove the old one. Next, we pick the new tool and put it in place. Finally, we double-check everything and turn the machine back on!
Sure! Please provide the question you would like me to answer.
What Are The Steps Involved In Safely Changing A Tool On A Cnc Milling Machine?To change a tool on a CNC milling machine safely, you follow these steps: First, turn off the machine. Then, make sure the tool and work area are clean. Next, use the proper tools to remove the old tool carefully. After that, place the new tool in the right spot and tighten it securely. Finally, turn the machine back on and check that everything works well.
How Can You Ensure Proper Tool Alignment And Calibration After A Tool Change In A Milling Machine?After changing a tool in a milling machine, you can check if it’s lined up correctly. First, we can use a piece of paper to touch the tool and the part it will cut. If they touch just right, we know it’s good. Next, we can run a test cut on a scrap piece of material. This helps us see if everything is working smoothly. If not, we adjust the tool again until it is perfect.
What Safety Precautions Should Be Taken During A Tool Change On A Milling Machine?When changing tools on a milling machine, first, always turn off the machine. Make sure the area is clear of people. Wear safety glasses to protect your eyes. Use gloves to keep your hands safe. Finally, double-check that the new tool is secured before starting the machine again.
How Often Should Tools Be Changed On A Milling Machine To Maintain Optimal Performance And Accuracy?You should change the tools on a milling machine regularly to keep it working well. If you notice any wear or damage, it’s time for a new tool. Generally, change tools after a few hours of use, depending on how hard the material is. Keeping an eye on the tools helps you make sure your machine stays accurate and efficient. Always check them before starting a new job!
What Are The Common Signs That Indicate A Milling Tool Should Be Replaced During Operation?If you notice strange sounds from the tool, it’s a sign it might need replacing. Look for rough cuts; they mean the tool isn’t working well anymore. If the tool gets too hot, that’s another clue. Finally, check for visible damage like chips or cracks. These signs tell you it’s time for a new tool!
{“@context”:”https://schema.org”,”@type”: “FAQPage”,”mainEntity”:[{“@type”: “Question”,”name”: “Here Are Five Related Questions On The Topic Of Milling Machine Tool Change Procedure:”,”acceptedAnswer”: {“@type”: “Answer”,”text”: “Sure! When we change tools on a milling machine, we need to be safe. First, we turn off the machine. Then, we use the right tool to remove the old one. Next, we pick the new tool and put it in place. Finally, we double-check everything and turn the machine back on!”}},{“@type”: “Question”,”name”: “”,”acceptedAnswer”: {“@type”: “Answer”,”text”: “Sure! Please provide the question you would like me to answer.”}},{“@type”: “Question”,”name”: “What Are The Steps Involved In Safely Changing A Tool On A Cnc Milling Machine?”,”acceptedAnswer”: {“@type”: “Answer”,”text”: “To change a tool on a CNC milling machine safely, you follow these steps: First, turn off the machine. Then, make sure the tool and work area are clean. Next, use the proper tools to remove the old tool carefully. After that, place the new tool in the right spot and tighten it securely. Finally, turn the machine back on and check that everything works well.”}},{“@type”: “Question”,”name”: “How Can You Ensure Proper Tool Alignment And Calibration After A Tool Change In A Milling Machine?”,”acceptedAnswer”: {“@type”: “Answer”,”text”: “After changing a tool in a milling machine, you can check if it’s lined up correctly. First, we can use a piece of paper to touch the tool and the part it will cut. If they touch just right, we know it’s good. Next, we can run a test cut on a scrap piece of material. This helps us see if everything is working smoothly. If not, we adjust the tool again until it is perfect.”}},{“@type”: “Question”,”name”: “What Safety Precautions Should Be Taken During A Tool Change On A Milling Machine?”,”acceptedAnswer”: {“@type”: “Answer”,”text”: “When changing tools on a milling machine, first, always turn off the machine. Make sure the area is clear of people. Wear safety glasses to protect your eyes. Use gloves to keep your hands safe. Finally, double-check that the new tool is secured before starting the machine again.”}},{“@type”: “Question”,”name”: “How Often Should Tools Be Changed On A Milling Machine To Maintain Optimal Performance And Accuracy?”,”acceptedAnswer”: {“@type”: “Answer”,”text”: “You should change the tools on a milling machine regularly to keep it working well. If you notice any wear or damage, it’s time for a new tool. Generally, change tools after a few hours of use, depending on how hard the material is. Keeping an eye on the tools helps you make sure your machine stays accurate and efficient. Always check them before starting a new job!”}},{“@type”: “Question”,”name”: “What Are The Common Signs That Indicate A Milling Tool Should Be Replaced During Operation?”,”acceptedAnswer”: {“@type”: “Answer”,”text”: “If you notice strange sounds from the tool, it’s a sign it might need replacing. Look for rough cuts; they mean the tool isn’t working well anymore. If the tool gets too hot, that’s another clue. Finally, check for visible damage like chips or cracks. These signs tell you it’s time for a new tool!”}}]}