Have you ever watched a machine work its magic, cutting shapes into metal or wood? These machines use special tools called milling tools. But what happens when it’s time to change them? Imagine needing to switch tools while baking cookies or building a LEGO set. If you change pieces incorrectly, the results can be unexpected. It’s the same with machines. The milling tool change procedure is crucial for this reason.
Consider this: a famous inventor once said, “The right tool at the right time can change everything.” That’s true for milling too. If machines don’t get their tools changed properly, it might spell trouble. They could break, or the project won’t turn out right. So, understanding how to change these tools safely and correctly matters a lot to get that perfect finish.
Did you know that some tools spin faster than a race car? That’s impressive! But, it also means mistakes can be costly. This simple yet detailed milling tool change procedure keeps everything on track. It’s a little like getting ready for school, where preparing well makes for a good day.
Understanding The Milling Tool Change Procedure

Milling Tool Change Procedure
Ever wonder how machinists keep their tools sharp? The milling tool change procedure may seem complex, but it’s as easy as tying a shoelace. When a milling tool wears out, swapping it ensures smooth operations. Picture a race car pit stop for machines! Keeping tools steady is key, like how you hold a pencil. Did you know this dance of parts helps create the gadgets we love? Fascinating, right? Dive in and discover more!Understanding Milling Tools
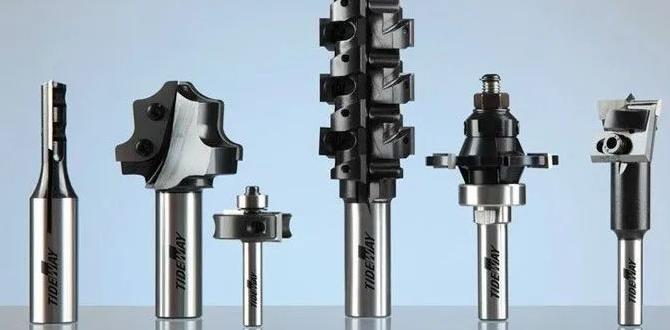
Definition of milling tools. Types of milling tools and their applications.Milling tools are the superheroes of the machining world. They’re like magical pens but for metal and wood. Each tool has its superpower. For example, end mills help to cut sideways, and drills make perfect circles. Knowing which tool to use is a bit like choosing the right hero for a mission. To make things clearer, here’s a simple table below showing some common types and their super abilities!
| Tool Type | Applications |
|---|---|
| End Mills | Side cutting and shaping |
| Drills | Making deep holes |
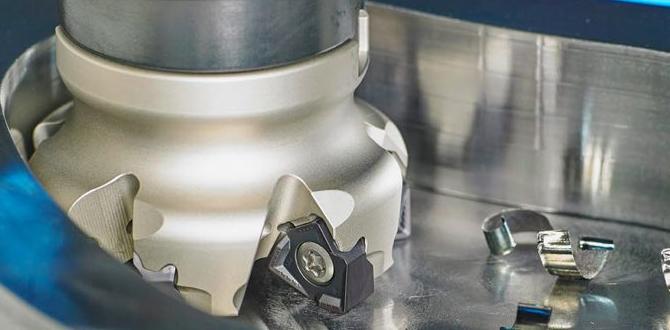
| Face Mills | Smoothing surfaces |
| Boring Bars | Widening holes |
Importance of Proper Tool Changing Procedures
Impact on machine performance. Extending the life of tools and equipment.Changing tools the right way is a big deal. If done correctly, it can really boost how well a machine runs. Imagine trying to bake a cake with the wrong size pan—chaos! Proper procedures also help tools and machines last longer. Keeping tools in shape means they can work harder without breaking. That saves money and creates less waste. Here’s a quick look at the benefits:
| Benefit | Impact |
|---|---|
| Better Performance | Improves speed and accuracy. |
| Tool Longevity | Reduces the need for replacements. |
Preparation Before Tool Change
Safety precautions to take. Checking the machine’s readiness. Required tools and equipment for a successful change.Before changing a tool, it’s important to follow safety rules. Always wear protective gear, like gloves and goggles. Check if the machine is off and safe to touch. Make sure all parts are secure and ready to go. Prepare these items for a smooth change:
- Wrenches
- Screwdrivers
- New tool ready for installation
- Lubricants if needed
Being careful helps everyone stay safe. It also makes the job easier!
What safety precautions should I take before a tool change?
Always wear safety gear and ensure the machine is turned off before starting any tool change. Check that tools and equipment are prepared.Detailed Milling Tool Change Procedure
Stepbystep guide on how to remove the old tool. Instructions on selecting the correct new tool. Process for securing the new tool in the spindle.First, let’s get ready to swap out that old milling tool! Start by turning off the machine to avoid any surprises. Next, loosen the tool holder using the correct wrench. Pull out the old tool like you’re yanking a stubborn tooth! Now, it’s time for the new star of the show. Select the right tool by checking its size and type – it should match your project needs. Finally, insert the new tool into the spindle. Tighten it securely, like a bear hug but without the growl!
| Step | Action |
|---|---|
| 1 | Turn off the machine |
| 2 | Loosen the old tool holder |
| 3 | Remove the old tool |
| 4 | Select the new tool |
| 5 | Secure the new tool |
By following these steps, you can make tool changes as easy as pie! Well, almost. Happy milling!
Common Challenges and Troubleshooting Tips
Identify common issues during the tool change process. Solutions and best practices for addressing these challenges.Changing tools can be tricky. Sometimes, a tool gets stuck or isn’t properly calibrated. This can lead to errors in your milling machine. One common issue is damaging the tool holder while trying to remove it. Always check the manufacturer’s instructions! To solve this, use the correct tool for the job and keep everything clean. Here’s a quick table of solutions for common problems:
| Common Issue | Solution |
|---|---|
| Stuck tool holder | Try using a gentle tapping motion to dislodge it! |
| Incorrect tool alignment | Double-check your settings and make adjustments. |
| Dirty machine parts | Keep it clean with regular maintenance! |
Remember, even a small mistake can lead to big headaches, so laugh it off and keep practicing!
Regular Maintenance and Monitoring
Importance of routine checks post tool change. Signs that indicate possible tool or equipment issues.Keeping a close eye on tools after a change is super important! Regular checks help catch any sneaky problems early. Look out for signs like unusual noises or vibrations. These could mean something is off. Don’t ignore them. It’s like your tool is trying to tell you a joke, but it’s a bad one!
Here’s a quick table of signs to watch for:
| Signs | What It Means |
|---|---|
| Noisy operation | Worn-out parts? |
| Inconsistent cuts | Tool may be dull! |
| Strange vibrations | Possible misalignment! |
Remember, a tool that’s not happy can’t do its job well. Check often, and you’ll save yourself from a lot of headaches!
Best Practices for Efficient Tool Management
Organizing and storing tools effectively. Tracking tool usage and performance data.Storing tools in a neat way helps everyone find what they need. Keep tools in labeled boxes or on shelves. This saves time and makes working easier. Tracking tool use is also important. You can monitor how often each tool is used. This helps you know when to replace or repair them. Here are some key tips:
- Organize tools by type and size.
- Use charts to track tool performance.
- Check tools regularly for wear and tear.
How can I track tool usage effectively?
You can track tool usage by regularly logging usage data and monitoring performance metrics. This keeps you informed about when to change tools. Use a simple spreadsheet or software to make it easy!
Conclusion
Changing a milling tool is crucial for precision in projects. First, always ensure safety. Follow clear steps: turn off the machine, loosen the tool, and replace it carefully. This keeps the machine running well and your projects accurate. For more details, check guides or watch videos online to master this skill.FAQs
Sure! Here Are Five Related Questions On The Topic Of Milling Tool Change Procedures:Milling tool change procedures are steps we follow to switch tools on a milling machine. First, we safely turn off the machine. Then, we remove the old tool and put in the new one. After that, we secure it tightly. Finally, we check everything before turning the machine back on.
Sure! Please provide me with a question that you would like me to answer.
What Are The Standard Steps Involved In A Milling Tool Change Procedure To Ensure Safety And Accuracy?To change a milling tool safely, first, turn off the machine. Next, unplug it to avoid any accidents. Then, wear safety goggles to protect your eyes. Carefully follow the steps in the machine’s manual to remove the old tool and put in the new one. Finally, check everything again to make sure it’s secure before plugging the machine back in and turning it on.
How Do You Determine When A Milling Tool Needs To Be Changed During Operation?You can tell when a milling tool needs to be changed by looking for signs. If the tool makes more noise than usual, it might be dull. You can also check the quality of the pieces you’re working on. If they look rough or uneven, that’s a clue. Lastly, if the tool gets too hot, it’s time for a change.
What Types Of Tools Are Commonly Used In Milling Operations, And How Do Their Change Procedures Differ?In milling operations, we commonly use tools like end mills, face mills, and drills. End mills are great for cutting shapes, while face mills work on flat surfaces. Changing tools depends on the type; some can be swapped quickly, while others need special steps. For example, we may need to loosen a screw for some tools, while others just pop out. Each tool has its own way to be changed, but it’s pretty easy once you get used to it!
What Safety Precautions Should Be Taken When Changing Milling Tools On A Cnc Machine?When changing milling tools on a CNC machine, you should always turn off the machine first. Make sure to wear safety gloves and goggles to protect yourself. Keep your hands clear of moving parts. It’s also good to clean the area around the machine to avoid accidents. Always double-check that the tool is securely attached before turning the machine back on.
How Does Improper Tool Changing Affect Machining Quality And Tool Lifespan In Milling Operations?Improper tool changing can lead to bad cuts and mistakes in your work. If you don’t change tools correctly, they can wear out faster. This means you might need to buy new tools more often. Also, it can make your finished pieces look rough or uneven. Taking your time to change tools right helps everything last longer and work better.