Have you ever wondered how to make your projects look more professional? One great way to do that is by using a knurling tool on a lathe. Knurling adds cool patterns and grips to metal pieces. It’s a simple technique, but it makes a big difference.
Imagine holding a metal tool that feels slippery. Now, think about how much better it would feel with awesome ridges. That’s the magic of knurling! This tool helps create those tiny, textured designs that not only look good but are also useful.
Using a knurling tool on a lathe requires some practice. But don’t worry! With the right tips, you’ll be turning out fun projects in no time. Ready to learn more about this exciting technique? Let’s dive in and explore how to get started!
Using A Knurling Tool On A Lathe: A Comprehensive Guide

Using a Knurling Tool on a Lathe
Knurling tools add a unique texture to metal surfaces. Have you ever wondered how those cool patterns on handles and knobs are made? By using a knurling tool on a lathe, you can create practical grips that enhance functionality. The tool presses into the metal, forming raised patterns. This technique not only improves the appearance but also provides better grip. Learning to use this tool can lead to amazing projects, making your lathe skills even more valuable!What is Knurling?
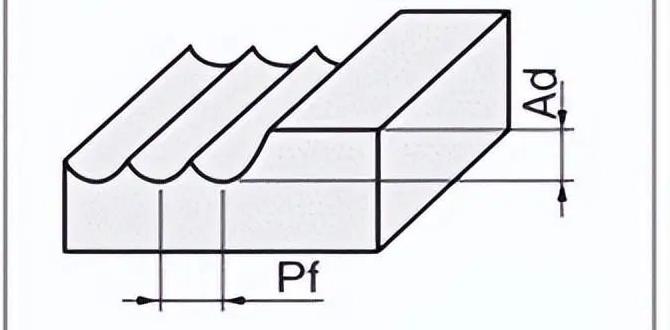
Definition and purpose of knurling. Different types of knurling patterns.Knurling is a process that creates textured patterns on metal surfaces, usually for better grip. This makes tools easier to hold and use. It also adds strength to these parts. Common types of knurling patterns include:
- Straight: Simple lines running parallel.
- Diamond: Crisscross shapes that form diamonds.
- Crosshatch: Overlapping lines that create varied textures.
These patterns serve different purposes, enhancing the function and look of items.
What does a knurling tool do?
A knurling tool shapes the surface of materials. It adds grip and a decorative finish. This is useful in many projects, from tools to art.
Preparing Your Lathe for Knurling
Adjusting the lathe settings for knurling. Essential safety precautions to take before starting.Before using a knurling tool, set your lathe correctly. Adjust the speed and depth to fit the job. Each project needs different settings for the best results. Safety is key. Always wear goggles and gloves. Make sure the area is clear of any clutter. Keep your hands away from moving parts. Knurling can be tough, so focus on your task.
- Wear safety goggles to protect your eyes.
- Use gloves to ensure a good grip.
- Check that your workspace is tidy.
- Keep hair and clothing away from the machine.
What should I check on the lathe before knurling?
Make sure to check the speed settings, tool sharpness, and workpiece stability. These factors are all important for a successful knurling process.
Step-by-Step Guide to Using a Knurling Tool
Detailed instructions for setting up the tool. Techniques for proper alignment and feed rate during operation.First, set your knurling tool on the lathe and tighten it securely. Make sure it’s straight. A crooked tool creates crooked knurls, and nobody wants that! Next, adjust the feed rate. A slower feed gives better results, like making sure your ice cream doesn’t melt too fast.
For proper alignment, check the tool’s position with the workpiece. Use a dial indicator if you have one—it’s like giving your tool a mini check-up! Don’t forget to start with light pressure. If your lathe had feelings, it’d appreciate a gentle touch. Ready to make some awesome knurls? You got this!
Common Mistakes to Avoid When Knurling
Typical pitfalls in setup and execution. Tips for troubleshooting issues during the knurling process.Knurling can be tricky. Many people make common mistakes that hurt their work. For example, using the wrong pressure can ruin the pattern. It’s crucial to set your tool correctly. Double-check the tool’s alignment before starting. If you face issues, here are some tips:
- Make sure the lathe speed is right.
- Use enough lubricant to avoid friction.
- Check your tool angle for a better grip.
Pinpointing these problems can lead to better results when using a knurling tool on a lathe.
What is the best way to troubleshoot knurling issues?
To fix knurling issues, always check the tool setup and speed. Adjusting these can make a big difference.
Maintenance and Care for Knurling Tools
Best practices for cleaning and maintaining your knurling tool. Signs of wear and when to replace your knurling tool.Keeping your knurling tool in top shape is key to great work. Start by cleaning it regularly. Use a soft brush to get rid of chips and debris. Inspect it often for signs of wear, like dull edges or cracks. If it looks tired, it might be time to say goodbye. A good rule is to replace it when it stops making clean grooves. It’s like saying farewell to an old friend—hard but necessary!
| Maintenance Tip | Signs of Wear | Action |
|---|---|---|
| Clean after each use | Dull edges | Replace tool |
| Store properly | Visible cracks | Replace tool |
With a little care, your knurling tool will help you create amazing parts while keeping your workshop in tip-top shape!
Applications of Knurling in Machining
Examples of projects and industries that utilize knurling. Benefits of incorporating knurling into your machining processes.Knurling adds a rough surface to parts, making them easier to grip. It’s used in various projects, from making knurled handles for tools to fasteners in machines. Industries like automotive and electronics love knurling because it prevents slipping and increases safety. Plus, it looks cool! Imagine a shiny knob that feels great in your hand. That’s knurling magic at work! Check out its benefits:
| Benefit | Description |
|---|---|
| Improved Grip | Knurling makes surfaces easier to hold. |
| Enhanced Safety | Reduces the chance of slipping and accidents. |
| Cost-Effective | Saves time and money during production. |
This simple technique can really boost the quality of your projects! Who knew adding some bumps could make such a difference?
Comparing Knurling to Other Texturing Techniques
Differences between knurling, grooving, and engraving. Situations where knurling is preferable to other methods.Knurling, grooving, and engraving are all ways to add texture. Each method serves different purposes. Knurling creates patterns for better grip. It is strong and durable. Grooving cuts a channel, often for fits or seals. This method is more precise for parts that need to fit snugly. Engraving leaves a mark on the surface, usually for design or identification. Knurling is best when making parts like handles or tools where grip matters most.
What are knurling, grooving, and engraving used for?
Knurling is used for making surfaces easier to grip. Grooving helps fit two parts together tightly. Engraving is great for adding designs or labels.Key Differences:
- Knurling: Creates a textured surface for better grip.
- Grooving: Cuts a channel for fitting parts together.
- Engraving: Designs or marks the surface for identification.
Conclusion
In conclusion, using a knurling tool on a lathe helps create grips and patterns on metal. We learned it’s important to set the right speed and pressure. You can enhance your projects and improve your skills with practice. Try using a knurling tool on your next project. For more tips, explore beginner lathe guides or watch instructional videos!FAQs
Certainly! Here Are Five Related Questions Regarding The Use Of A Knurling Tool On A Lathe:Knurling tools help to make patterns on metal pieces using a lathe. You can make surfaces rough so tools grip better. To use a knurling tool, we hold it against the spinning metal. Turn it slowly to create a nice design. This is useful for making handles or grips.
Sure! Just let me know what question you want me to answer, and I’ll help you with a simple response.
What Is The Purpose Of Using A Knurling Tool On A Lathe, And What Types Of Patterns Can Be Created?A knurling tool is used on a lathe to create cool patterns on metal or plastic. These patterns help people grip the object better. You can make different designs, like cross-hatch or straight lines. Using this tool can make things look nice and be easier to hold. It’s like adding a texture to a smooth surface!
How Do You Properly Set Up A Knurling Tool On A Lathe To Ensure Accurate And Consistent Results?To set up a knurling tool on a lathe, first, you need to secure the tool holder tightly. Then, adjust the tool’s height so it touches the part you’re working on. Next, lock the lathe spindle in place so it won’t move. Finally, slowly lower the knurling tool and turn on the machine. You can press down gently and feed it evenly for nice, even patterns.
What Factors Should Be Considered When Selecting The Appropriate Feed Rate And Spindle Speed For Knurling Operations?When choosing feed rate and spindle speed for knurling, you should think about the material you’re using. Softer materials need a different speed than harder ones. You also want to consider the size of the knurling tool. A bigger tool might need a slower speed. Lastly, make sure your machine can handle the settings you choose.
What Are The Common Mistakes To Avoid When Using A Knurling Tool, And How Can They Affect The Final Finish Of The Workpiece?When using a knurling tool, avoid pressing too hard. If you do, it can ruin your workpiece. Also, make sure to keep the tool straight. If it’s angled, the pattern will look uneven. Finally, don’t rush the process. Taking your time helps create a nice, smooth finish.
How Do You Maintain And Care For A Knurling Tool To Prolong Its Life And Ensure Optimal Performance?To take care of a knurling tool, you should clean it after every use. Use a soft cloth to wipe off dirt and oil. Store it in a dry place to avoid rust. Also, check the sharpness regularly, and sharpen it if necessary. This will help the tool last longer and work better!
{“@context”:”https://schema.org”,”@type”: “FAQPage”,”mainEntity”:[{“@type”: “Question”,”name”: “Certainly! Here Are Five Related Questions Regarding The Use Of A Knurling Tool On A Lathe:”,”acceptedAnswer”: {“@type”: “Answer”,”text”: “Knurling tools help to make patterns on metal pieces using a lathe. You can make surfaces rough so tools grip better. To use a knurling tool, we hold it against the spinning metal. Turn it slowly to create a nice design. This is useful for making handles or grips.”}},{“@type”: “Question”,”name”: “”,”acceptedAnswer”: {“@type”: “Answer”,”text”: “Sure! Just let me know what question you want me to answer, and I’ll help you with a simple response.”}},{“@type”: “Question”,”name”: “What Is The Purpose Of Using A Knurling Tool On A Lathe, And What Types Of Patterns Can Be Created?”,”acceptedAnswer”: {“@type”: “Answer”,”text”: “A knurling tool is used on a lathe to create cool patterns on metal or plastic. These patterns help people grip the object better. You can make different designs, like cross-hatch or straight lines. Using this tool can make things look nice and be easier to hold. It’s like adding a texture to a smooth surface!”}},{“@type”: “Question”,”name”: “How Do You Properly Set Up A Knurling Tool On A Lathe To Ensure Accurate And Consistent Results?”,”acceptedAnswer”: {“@type”: “Answer”,”text”: “To set up a knurling tool on a lathe, first, you need to secure the tool holder tightly. Then, adjust the tool’s height so it touches the part you’re working on. Next, lock the lathe spindle in place so it won’t move. Finally, slowly lower the knurling tool and turn on the machine. You can press down gently and feed it evenly for nice, even patterns.”}},{“@type”: “Question”,”name”: “What Factors Should Be Considered When Selecting The Appropriate Feed Rate And Spindle Speed For Knurling Operations?”,”acceptedAnswer”: {“@type”: “Answer”,”text”: “When choosing feed rate and spindle speed for knurling, you should think about the material you’re using. Softer materials need a different speed than harder ones. You also want to consider the size of the knurling tool. A bigger tool might need a slower speed. Lastly, make sure your machine can handle the settings you choose.”}},{“@type”: “Question”,”name”: “What Are The Common Mistakes To Avoid When Using A Knurling Tool, And How Can They Affect The Final Finish Of The Workpiece?”,”acceptedAnswer”: {“@type”: “Answer”,”text”: “When using a knurling tool, avoid pressing too hard. If you do, it can ruin your workpiece. Also, make sure to keep the tool straight. If it’s angled, the pattern will look uneven. Finally, don’t rush the process. Taking your time helps create a nice, smooth finish.”}},{“@type”: “Question”,”name”: “How Do You Maintain And Care For A Knurling Tool To Prolong Its Life And Ensure Optimal Performance?”,”acceptedAnswer”: {“@type”: “Answer”,”text”: “To take care of a knurling tool, you should clean it after every use. Use a soft cloth to wipe off dirt and oil. Store it in a dry place to avoid rust. Also, check the sharpness regularly, and sharpen it if necessary. This will help the tool last longer and work better!”}}]}