Have you ever watched a lathe in action? It’s fascinating how it transforms a simple piece of metal into a perfect shape. But the magic starts with proper lathe chuck installation. If you’ve ever faced trouble with your lathe chuck, you’re not alone!
Installing a lathe chuck properly can be the difference between a great project and a frustrating one. Imagine starting a project excited, only to find out things aren’t aligned because of a poor installation. That can be disappointing! But don’t worry. In this article, we will cover easy steps for lathe chuck installation that anyone can follow.
Did you know that a well-installed lathe chuck can improve safety? It keeps your workpiece secure while you shape it. Safety is always a good reason to learn these steps. So, let’s dive into the straightforward process of getting your lathe chuck installed correctly!
Essential Lathe Chuck Installation Steps Guide For Beginners

Lathe Chuck Installation Steps
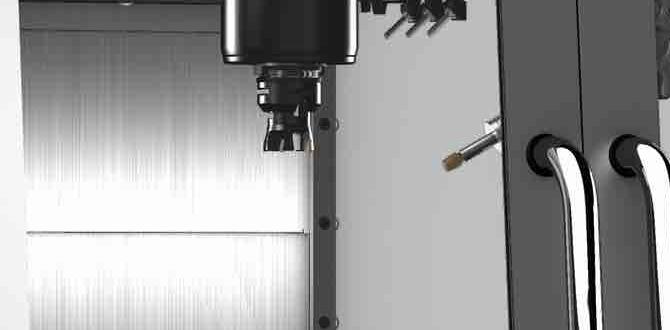
Installing a lathe chuck might seem tricky, but it’s straightforward with the right steps. First, ensure you have a clean work area and the necessary tools. Next, attach the chuck to the lathe spindle, aligning the keyways. Tighten the locking screws carefully to prevent wobbling. Did you know that a properly installed chuck can make your projects smoother? Following these simple steps can lead to better results in your machining tasks. Enjoy the satisfaction of a job well done!Understanding Lathe Chucks
Definition and function of a lathe chuck. Types of lathe chucks (threejaw, fourjaw, collet chucks).A lathe chuck is a handy tool used to hold materials while they spin. Think of it as a vice for your lathe! It keeps your workpiece secure, making it easier to shape and cut. There are different types of chucks for various tasks. The three-jaw chuck is great for round objects. The four-jaw chuck can grab irregular shapes, while collet chucks work wonders for small, detailed pieces. Now, let’s dive into some chuck types in the table below!
| Chuck Type | Best For |
|---|---|
| Three-Jaw Chuck | Round objects |
| Four-Jaw Chuck | Irregular shapes |
| Collet Chuck | Small, detailed work |
Choosing the right chuck is key! Using a three-jaw chuck is like using a spoon to eat soup—very effective! While a four-jaw chuck lets you be an artist, shaping odd pieces like a sculptor. Lastly, collet chucks are perfect for precision work. It’s all about finding your perfect fit!
Tools Required for Installation
List of essential tools for lathe chuck installation. Safety equipment and precautions.To install a lathe chuck, you need the right tools and safety gear. Here’s a list to help you get started:
- Wrenches or socket set
- Screwdriver
- Safety goggles
- Work gloves
- Chuck key
Always prioritize safety. Wear your gloves and goggles before starting. This keeps you protected from any flying debris during installation. Choosing the right tools makes your work easier and safer.
What are some important safety tips for lathe chuck installation?
Wear goggles and gloves to protect yourself. Always remove loose items near the lathe, and check your tools for any damage. Safety helps you work better.
Preparing the Lathe for Chuck Installation
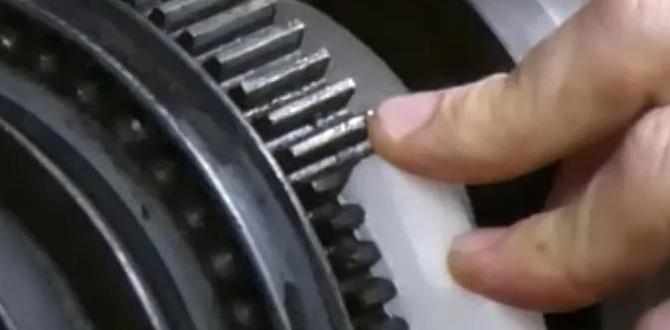
Steps to clean and inspect the lathe spindle. Importance of checking alignment and suitability of the chuck.Before installing a chuck, it’s important to clean and check your lathe. Start by removing dust and grime from the spindle. This helps everything fit right. Next, inspect the spindle for damage or wear. A damaged spindle can cause problems. Then check the alignment with a level. If it’s not straight, the chuck could wobble. Lastly, make sure the chuck fits your spindle type. Using the wrong chuck can lead to accidents.
Why is it important to check the lathe before installation?
Cleaning and checking the lathe ensures safe and smooth operation. A clean machine runs better. This reduces errors and increases safety. Plus, a well-aligned chuck helps create precise cuts.
- Keep the spindle clean.
- Check for any visible damage.
- Align the spindle with a level tool.
- Confirm chuck compatibility with the spindle.
Steps for Installing a Three-Jaw Chuck
Detailed stepbystep guide. Common pitfalls and how to avoid them.Installing a three-jaw chuck can be simple if you follow these steps carefully. First, clean the lathe spindle so it’s free of dust. Next, fit the chuck on the spindle and secure it tightly. Remember to align the jaws correctly for a snug fit. Here are common pitfalls and how to avoid them:
- Not cleaning: Always clean before installation.
- Loose fittings: Make sure everything is tight to avoid wobbling.
- Misalignment: Double-check jaw alignment before tightening.
By following these steps, your chuck will work well and last longer.
What should I check before installing a three-jaw chuck?
Before you start, check the spindle size and ensure it matches the chuck. Also, inspect the chuck for any damage.
Steps for Installing a Four-Jaw Chuck
Detailed stepbystep guide. Tips for accurate setup and adjustments.Ready to install your four-jaw chuck? Let’s dive into simple steps! First, ensure your lathe is turned off. Safety first, right? Next, gently clean the mounting surface to avoid dust parties. Now, place the chuck on the spindle. Here comes the fun part—tighten the bolts evenly. Think of it as giving your chuck a nice hug!
| Step | Action |
|---|---|
| 1 | Turn off the lathe. |
| 2 | Clean the mounting surface. |
| 3 | Place the chuck on the spindle. |
| 4 | Tighten the bolts evenly. |
For precise adjustments, check that the jaws are parallel to the workpiece. If they aren’t, you might end up creating a masterpiece that looks like a roller coaster! A small adjustment can make a big difference. Follow these tips, and you’ll be a chuck installation pro in no time!
Installing Collet Chucks
Process for installing collet chucks on a lathe. Differences between collet chucks and jaw chucks.Installing collet chucks is a simple process to securely hold your workpiece on a lathe. First, clean the spindle and check for any damage. Next, align the collet with the taper of the spindle and push it in gently. Turn the locking mechanism to secure it in place. Collet chucks hold round objects better than jaw chucks but require specific sizes. Jaw chucks can hold irregular shapes, making them more versatile.
What are the steps to install a collet chuck?
To install a collet chuck:
- Clean the spindle.
- Align the collet with the spindle.
- Push it in firmly.
- Lock it in place.
What is the difference between collet chucks and jaw chucks?
Collet chucks hold round pieces tightly and need a specific size. Jaw chucks are better for oddly shaped items.
Testing the Chuck after Installation
Methods to check for accuracy and secure fit. Troubleshooting common issues.After installing your lathe chuck, it’s time for a little test run. First, check if it spins straight. You can do this by using a dial indicator. Place it near the chuck face and watch for any wobbling. If it wobbles, your installation might need a redo. Next, make sure the chuck fits tightly. Give it a gentle tug. If it feels loose, tighten those bolts! Common issues include uneven wear and vibrations, but don’t worry—those can often be fixed!
| Issue | Solution |
|---|---|
| Wobbling Chuck | Check alignment; adjust as necessary. |
| Loose Fit | Tighten all bolts securely. |
| Vibration | Inspect for balanced load; re-adjust. |
Remember, a well-checked chuck makes for a happy lathe and a joyful woodworker—or metalworker! So, keep things snug because nobody wants a chuck that can’t take a joke!
Maintenance Tips for Longevity
Regular maintenance practices for lathe chucks. Importance of lubrication and care.Keeping your lathe chuck happy helps it last longer! Regular checks can prevent surprises later. Clean it regularly to keep dust away; nobody likes a dirty workspace. Lubrication is key! It keeps everything moving smoothly and loud grinding noises at bay. Over time, a well-cared chuck works better and looks snazzier. A little care goes a long way!
| Maintenance Tip | Importance |
|---|---|
| Regular Cleaning | Prevents buildup and ensures smooth operation |
| Proper Lubrication | Reduces wear and tear, making it last longer |
| Frequent Inspections | Detects issues early, avoiding costly repairs |
Remember: Treat your lathe chuck right, and it will return the favor!
Frequently Asked Questions
Addressing common queries related to lathe chuck installation. Additional resources for further learning.Many people have questions about installing a lathe chuck. Here are some answers to common queries:
How do I choose the right lathe chuck?
Look for a chuck that fits your lathe size and holds your workpiece securely.
What tools do I need for installation?
You will need a wrench, possibly an Allen key, and safety goggles.
Additional Resources:
- Online tutorials and videos
- Manufacturer’s manuals
- DIY forums for tips and advice
These resources help deepen your understanding. Installing a lathe chuck can be easy and fun with the right knowledge!
Conclusion
In summary, installing a lathe chuck is simple with careful steps. First, select the right chuck for your lathe. Then, securely attach it to the spindle. Lastly, check for tightness before use. Follow these steps, and you’ll be ready to start your projects. For more details, you can explore guides or videos online. Happy turning!FAQs
Sure! Here Are Five Related Questions On The Topic Of Lathe Chuck Installation Steps:To install a lathe chuck, first, make sure the lathe is off and unplugged. Then, you need to take off the old chuck if there is one. Next, place the new chuck onto the spindle and line it up. Finally, tighten the screws or bolts to hold it in place. Remember to double-check that everything is secure before using the lathe!
Sure! Please provide the question you’d like me to answer.
What Tools Are Required For Installing A Lathe Chuck?To install a lathe chuck, you need a few simple tools. First, you need a wrench to tighten the screws. A screwdriver can also help if there are screws to adjust. A clean cloth is useful to wipe off any dust or dirt. Finally, check if you need a special key to open or close the chuck.
How Do You Determine The Correct Alignment When Mounting A Lathe Chuck?To align a lathe chuck, you need to check its center carefully. First, you put a piece of material in the chuck. Then, you use a dial indicator to see if it’s straight. If it wobbles, you need to adjust the chuck until it spins correctly. Finally, tighten everything and double-check to make sure it’s perfect!
What Safety Precautions Should Be Taken Before Installing A Lathe Chuck On A Lathe Machine?Before you put a lathe chuck on a lathe machine, make sure it’s turned off and unplugged. Always wear safety goggles to protect your eyes. Check that your hands are clean and dry. Make sure the chuck and lathe are free from dirt or metal shavings. Finally, follow the instructions carefully to keep everything safe.
How Do You Properly Torque The Chuck Screws During Installation?To properly torque the chuck screws, you first need a torque wrench. This tool helps you apply the right amount of tightness. Start by placing the chuck in the right position. Then, slowly tighten each screw. Make sure you follow the order given in the instructions. Check the tightness again to ensure they’re secure.
What Are The Common Mistakes To Avoid When Installing A Lathe Chuck?When you install a lathe chuck, you should avoid a few common mistakes. First, make sure the chuck is clean. Dirt can cause it to work wrongly. Next, check that you tighten the screws evenly. If they are too loose or too tight, the chuck can break. Lastly, always double-check that you’ve put it on the right way. This keeps everything safe and working well!
{“@context”:”https://schema.org”,”@type”: “FAQPage”,”mainEntity”:[{“@type”: “Question”,”name”: “Sure! Here Are Five Related Questions On The Topic Of Lathe Chuck Installation Steps:”,”acceptedAnswer”: {“@type”: “Answer”,”text”: “To install a lathe chuck, first, make sure the lathe is off and unplugged. Then, you need to take off the old chuck if there is one. Next, place the new chuck onto the spindle and line it up. Finally, tighten the screws or bolts to hold it in place. Remember to double-check that everything is secure before using the lathe!”}},{“@type”: “Question”,”name”: “”,”acceptedAnswer”: {“@type”: “Answer”,”text”: “Sure! Please provide the question you’d like me to answer.”}},{“@type”: “Question”,”name”: “What Tools Are Required For Installing A Lathe Chuck?”,”acceptedAnswer”: {“@type”: “Answer”,”text”: “To install a lathe chuck, you need a few simple tools. First, you need a wrench to tighten the screws. A screwdriver can also help if there are screws to adjust. A clean cloth is useful to wipe off any dust or dirt. Finally, check if you need a special key to open or close the chuck.”}},{“@type”: “Question”,”name”: “How Do You Determine The Correct Alignment When Mounting A Lathe Chuck?”,”acceptedAnswer”: {“@type”: “Answer”,”text”: “To align a lathe chuck, you need to check its center carefully. First, you put a piece of material in the chuck. Then, you use a dial indicator to see if it’s straight. If it wobbles, you need to adjust the chuck until it spins correctly. Finally, tighten everything and double-check to make sure it’s perfect!”}},{“@type”: “Question”,”name”: “What Safety Precautions Should Be Taken Before Installing A Lathe Chuck On A Lathe Machine?”,”acceptedAnswer”: {“@type”: “Answer”,”text”: “Before you put a lathe chuck on a lathe machine, make sure it’s turned off and unplugged. Always wear safety goggles to protect your eyes. Check that your hands are clean and dry. Make sure the chuck and lathe are free from dirt or metal shavings. Finally, follow the instructions carefully to keep everything safe.”}},{“@type”: “Question”,”name”: “How Do You Properly Torque The Chuck Screws During Installation?”,”acceptedAnswer”: {“@type”: “Answer”,”text”: “To properly torque the chuck screws, you first need a torque wrench. This tool helps you apply the right amount of tightness. Start by placing the chuck in the right position. Then, slowly tighten each screw. Make sure you follow the order given in the instructions. Check the tightness again to ensure they’re secure.”}},{“@type”: “Question”,”name”: “What Are The Common Mistakes To Avoid When Installing A Lathe Chuck?”,”acceptedAnswer”: {“@type”: “Answer”,”text”: “When you install a lathe chuck, you should avoid a few common mistakes. First, make sure the chuck is clean. Dirt can cause it to work wrongly. Next, check that you tighten the screws evenly. If they are too loose or too tight, the chuck can break. Lastly, always double-check that you’ve put it on the right way. This keeps everything safe and working well!”}}]}