Quick Summary: A lathe is an excellent tool for making rings, especially for hobbyists and jewelers. For beginners, a small, variable-speed wood or metal lathe with appropriate attachments is ideal for safely and precisely shaping materials into beautiful, custom rings. This guide covers everything you need to get started.
Welcome! Ever looked at a unique ring and wondered if you could craft one yourself? Making rings on a lathe might seem a bit intimidating at first, but it’s a rewarding project that many DIY enthusiasts and aspiring jewelers find surprisingly accessible. The key is understanding the right tools and techniques. Don’t worry if you’re new; we’ll walk through it step-by-step, making sure you feel confident and safe as you turn raw materials into wearable art. Let’s get started on shaping your first stunning ring!
What Kind of Lathe Do You Need for Ring Making?
Choosing the right lathe is the first big step in your ring-making journey. You don’t necessarily need a massive, industrial machine. For most hobbyists and beginners, a smaller, more manageable lathe will do the trick beautifully. Think of it as starting with the right tools for the job – it makes everything else much easier.
Wood Lathes vs. Metal Lathes for Rings
The material you plan to work with will heavily influence your choice between a wood lathe and a metal lathe.
- Wood Lathes: These are generally more affordable and easier to operate for beginners. They are perfect if you’re interested in making wooden rings, resin rings with wood elements, or even rings that incorporate other materials like stone or metal accents within a wooden body. Wood lathes typically have lower speeds and less power, which is ideal for softer materials.
- Metal Lathes: If you dream of crafting rings from sterling silver, gold, titanium, or even steel, you’ll need a metal lathe. These machines are more robust, offer higher precision, and can handle the tougher materials. However, they come with a steeper learning curve and a higher price tag. For pure metal ring making, a small benchtop metal lathe is a great starting point.
Key Features to Look For in a Ring-Making Lathe
Regardless of whether you choose a wood or metal lathe, certain features will make the ring-making process smoother and safer:
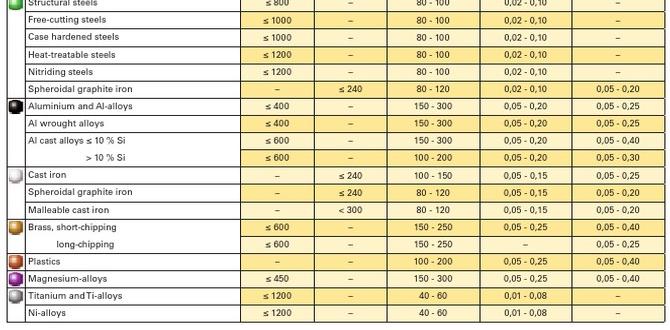
- Variable Speed Control: This is crucial. Being able to adjust the lathe’s speed is vital for working with different materials and for safety. Slower speeds are safer for initial shaping and for beginners, while higher speeds can be used for finishing. Look for a lathe that offers a wide range of RPM (revolutions per minute).
- Size and Footprint: Consider your workshop space. Benchtop models are excellent for small spaces and are often more affordable. They provide enough capability for ring making without taking over your entire workspace.
- Power: While you don’t need a powerhouse for most rings, ensure the motor has enough torque to handle the material smoothly without bogging down, especially if working with denser woods or metals.
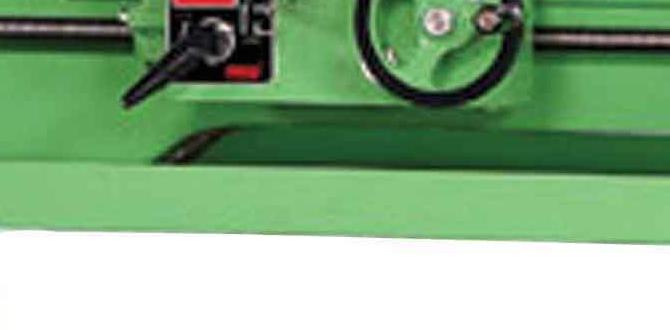
- Bed and Tailstock Alignment: For precision work, especially with metal, ensure the lathe’s bed is stable and the tailstock can be precisely aligned with the headstock. This helps create concentric shapes.
- Jaw Chuck System (for Metal Lathes): Metal lathes often use chucks to hold the workpiece. A three-jaw or four-jaw chuck is essential for securely gripping the stock material (like a metal rod or bar).
- Included Accessories: Some lathes come with basic tool rests or chuck mountings. Check what’s included and what you might need to purchase separately.
Essential Tools and Accessories for Ring Making
Once you have your lathe, you’ll need some specialized tools and accessories to actually make the rings. Think of these as your artist’s brushes and palette.
For Wood and Resin Rings:
- Ring Mandrels: These are tapered rods that act as the core shape for your ring. You’ll need one that matches the internal diameter you desire.
- Wood Turning Tools: For wood, you’ll use specialized chisels like:
- Roughing Gouge: To quickly remove material and get the basic shape.
- Spindle Gouge: For more detailed shaping and hollowing.
- Parting Tool: To cut off the finished ring from the main stock.
- Scrapers: For smoothing and refining the shape.
- Drill Bits: You’ll need appropriately sized drill bits to create the initial hole for the ring’s interior.
- Sandpaper: A range of grits, from coarse to very fine, is essential for sanding and polishing the ring to a smooth finish.
- Varnishes or Finishes: To protect and enhance the look of your wooden rings. Polishing compounds are also useful.
- CA Glue (Cyanoacrylate): Often used in woodturning to stabilize wood, fill gaps, and achieve a high-gloss finish. Some people even use it to bond layers of wood or resin.
- Resin Casting Supplies: If you’re making resin rings, you’ll need epoxy resin, hardener, pigments, molds, and mixing tools.
For Metal Rings:
Metal ring making on a lathe requires more precision and specialized tooling compared to wood.
- Metal Lathe Chuck: As mentioned, a good quality chuck (3-jaw or 4-jaw) is essential to hold solid metal stock securely.
- Metal Turning Tools (Inserts or HSS bits):
- Parting Tool: A narrow blade used to cut the ring cleanly from the stock.
- Boring Bar: Used to create the precise inner diameter of the ring.
- Knurling Tool (Optional): To add texture.
- Threading Tools (Optional): For decorative threads.
- Carbide Inserts vs. High-Speed Steel (HSS): Carbide inserts are common for their durability and precision, while HSS can be resharpened but may require more frequent changes.
- Drill Bits (Silver & Deming, or Jobber): For creating the initial hole in the metal stock.
- Cutting Fluid/Lubricant: Crucial for cooling the workpiece and tool, and for extending tool life when cutting metal.
- Files and Deburring Tools: To clean up sharp edges after cutting.
- Sanding and Polishing Supplies: Various grits of sandpaper, polishing compounds, and buffing wheels designed for metal.
Specialized Ring Turning Jigs and Adapters
Some wood lathes have specialized attachments designed specifically for ring turning that can hold both the outside material and the inner ring shape simultaneously. These can simplify the process significantly and improve accuracy. For metal lathes, adapters for specific ring-making chucks or faceplates might be available from specialized suppliers.
Safety First: Essential Precautions for Lathe Work
Working with a lathe involves moving parts and sharp tools. Safety is paramount. Always treat your lathe with respect and never rush. A few simple rules will keep you safe and allow you to focus on creativity.
General Safety Guidelines:
- Read Your Lathe’s Manual: Every lathe is different. Understand its controls, safety features, and operating procedures. You can often find downloadable manuals from manufacturers or through resources like OSHA’s safety guidelines for workshops.
- Wear Appropriate Safety Gear:
- Eye Protection: ALWAYS wear safety glasses or a full face shield. Wood chips, metal shavings, or even small fragments can fly off unexpectedly.
- Hearing Protection: Lathes can be noisy. Use earplugs or earmuffs, especially during longer work sessions.
- No Loose Clothing or Jewelry: Anything that can get caught in the spinning workpiece or the lathe itself is a hazard. Tie back long hair.
- Closed-Toe Shoes: Protect your feet.
- Secure Your Workpiece: Ensure the material is firmly held in the chuck or between centers. A loose workpiece can be thrown from the lathe, causing serious injury.
- Keep the Area Clean: Remove scrap material, tools, and dust from the lathe and the surrounding floor. Clutter is an invitation to accidents.
- Never Force a Tool: If a tool is not cutting smoothly, check its sharpness, the workpiece material, or the cutting speed. Forcing can break tools or cause kickback.
- Use the Tool Rest Correctly: Position the tool rest close to the workpiece (about a pencil-width away) and at the correct angle for the tool you are using. Never move the tool rest while the lathe is running.
- Understand Kickback: This is when the tool digs into the workpiece and suddenly jerks the tool and your hands towards the headstock. Be prepared by holding tools firmly and cutting with controlled, smooth movements.
- Turn Off the Lathe When Not in Use: Always turn the machine off before making adjustments, changing tools, or cleaning.
Specific Safety Tips for Ring Making:
- Start Slow: When beginning a new project, always start at the lowest speed setting and gradually increase if needed.
- Small Cuts: Take light, consistent passes. Don’t try to remove too much material at once.
- Watch Your Fingers: Keep your hands and fingers well clear of the cutting edge and the spinning workpiece.
- Use the Right Tool for the Job: Don’t try to cut metal with wood tools or vice-versa.
Step-by-Step: Making a Wooden Ring on a Lathe
This guide focuses on a common method for making a simple wooden ring. Resin rings or more complex composite rings will have variations, but the core principles of lathe work apply.
Materials & Tools Recap:
- Small wood lathe with variable speed
- Pen turning mandrel (or a specialized ring turning mandrel)
- Drill bits (sized for the inside of your ring)
- Wood blanks (or a pre-drilled ring blank)
- Woodturning chisels (spindle gouge, parting tool, scrapers)
- Sandpaper (various grits, e.g., 120, 220, 320, 400, 600)
- Finishing supplies (e.g., CA glue, friction polish, oil)
- Safety glasses and hearing protection
The Process:
- Prepare the Wood Blank: If not using a pre-made blank, you’ll need to prepare your wood. For a simple ring, you can use a small block of hardwood. If using a pen blank, ensure it’s hollowed out to the correct diameter for your mandrel. Some ring makers use pre-cast resin blanks or multi-wood laminates.
- Mount the Blank on the Mandrel:
- For a new blank, drill a hole through the center that’s a snug fit for your mandrel.
- Slide the blank onto the pen mandrel (or ring mandrel). Ensure it’s centered.
- If using a pen mandrel, you might need to use bushings that fit inside the expected ring profile to support the blank evenly.
- Secure the Mandrel in the Lathe: Mount the mandrel into the lathe, typically using the headstock and tailstock centers. Ensure it’s secure and runs true.
- Set Lathe Speed: Start at a very low speed, around 500-800 RPM, especially if you’re new. You can gradually increase it as you become more comfortable and the shape refines, but avoid very high speeds which can cause tear-out or vibration.
- Shape the Outer Diameter:
- Using your spindle gouge or a scraper, begin removing material from the outside of the blank.
- Start by making it cylindrical, then begin working towards the desired outer profile. Think about the width and the outer curve of the ring.
- Take light cuts. Let the tool do the work.
- Refine the Shape and Add Details:
- Use your gouge or scraper to create the desired contour. You can make it flat, rounded, or add decorative elements.
- Constantly check the diameter as you go. Use calipers for accuracy if you have them.
- If adding an inlay channel or decorative groove, a small scraper or a specialized parting tool can be used.
- Cut the Ring Free (Parting Off):
- This is a critical step. As you approach the final diameter, use a narrow parting tool to cut a groove on either side of where you want the ring to be.
- Gradually deepen these grooves, taking extremely light cuts. The goal is to cut the ring away from the main blank without letting it spin loose.
- A common technique is to leave a small “tenon” connecting the ring to the blank, and then carefully cut that tenon through from the inside or outside.
- Alternatively, you can part off a small disc and then mount it for internal hollowing, but this requires more setup.
- Sand and Polish:
- Once the ring is free, turn off the lathe. Carefully remove the ring.
- You can sand it on the lathe by mounting it on a small dowel or using a sanding stick, or you can sand it by hand.
- Start with a coarser grit (120-220) and work up to finer grits (600+). Ensure smooth transitions between grits.
- For a high-gloss finish, apply CA glue to the sanded surface and sand it through progressively finer grits (up to 12000 grit if available), then use a plastic polish or buffing compound.
- Apply Finish: Apply your chosen finish (friction polish, oil, wax) to protect the wood and give it a pleasant feel and sheen. Let it cure according to the product instructions.
Step-by-Step: Making a Simple Metal Ring on a Lathe
Crafting a metal ring on a lathe is an advanced technique, often found in jewelers’ workshops. It requires a metal lathe and precise control. This is a simplified overview.
Disclaimer: Metalworking generates sharp chips and requires strict safety protocols. This is an overview; further detailed instruction and practice are recommended before attempting.
Materials & Tools Recap:
- Metal lathe (benchtop model is suitable)
- 3-jaw or 4-jaw chuck
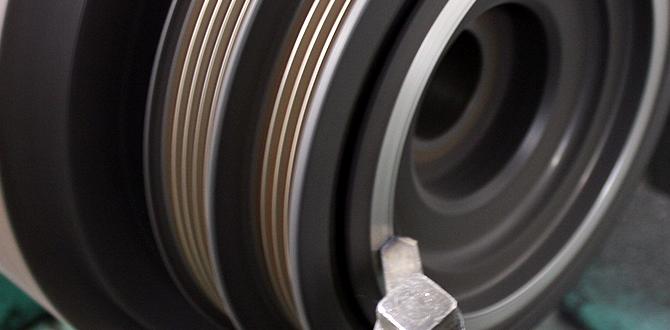
- Solid metal stock (e.g., brass rod, aluminum rod, or pre-made ring tubing)
- Metal turning tools: Parting tool, boring bar, possibly a HSS bit or carbide inserts.
- Drill bits (sized for the inside of your ring)
- Cutting fluid/lubricant
- Files, deburring tool
- Sandpaper (various grits for metal)
- Polishing compounds (e.g., Tripoli, Rouge) and buffing attachments
- Calipers for precise measurement
- Safety glasses (full face shield recommended), gloves, apron.
The Process:
- Secure Metal Stock in Chuck: Mount your metal rod or tubing firmly in the metal lathe’s chuck. Ensure it’s centered and protrudes a sufficient length for the ring plus some extra for gripping.
- Set Lathe Speed and Feed: Metal lathes often run at higher RPMs than wood lathes. Consult your lathe’s manual for recommended speeds for the material you are using. Start conservatively. Use appropriate feed rates for the metal.
- Face Off the End: Use a turning tool to create a flat, smooth surface at the end of the rod. This is the “face” of your ring blank.
- Drill the Inside Diameter:
- Using a sharp drill bit appropriate for the metal, drill a hole into the center of the rod.
- Use cutting fluid generously.
- Take shallow passes, clearing chips frequently to prevent binding and overheating.
- Use a boring bar to precisely finish the internal diameter to your target size. This is critical for consistency.
- Shape the Outer Diameter:
- Use a turning tool or inserts to reduce the outer diameter of the rod to match your desired ring size.
- Take light, consistent cuts. Observe the chip formation for signs of overheating or dulling tools.
- You can create simple flat bands or shape more complex profiles by angling the tool or using different insert geometries.
- Define the Ring Edges: Use a narrow parting tool or a knifing tool to create slight bevels or chamfers on the inner and outer edges of the ring band. This smooths sharp edges and improves the ring’s comfort and appearance.
- Part Off the Ring:
- This is one