Mini wood lathe projects easy are achievable creations like simple spindles, bowls, and pens that build confidence and skills for beginners. This guide offers beginner-friendly project ideas and step-by-step tips to get you turning successfully and safely.
Feeling a bit daunted by your new mini wood lathe? It’s totally understandable. Seeing all those fancy turning techniques can make your head spin, and you might be wondering where to even start. Many beginners get stuck thinking they need advanced skills for cool projects, but that’s not true! With the right approach, you can create impressive pieces that will make you proud. At Lathe Hub, we believe in making machining accessible and fun for everyone. Let’s dive into some super easy mini wood lathe projects that are practically effortless to create while building a solid foundation for your turning journey.
Why Mini Wood Lathes Are Perfect for Beginners
Mini wood lathes are fantastic starting points for several reasons. They are typically less expensive, take up less space, and have a gentler learning curve than their larger counterparts. The materials they work with are often smaller and easier to handle. This combination means you can get hands-on quickly, experiment without a huge investment, and build your confidence with each successful project.
Safety First: Your Essential Toolkit
Before we even think about turning wood, let’s talk safety. It’s the most important part of any workshop activity, especially with rotating machinery. Always wear your safety glasses. A full face shield is even better. Dust masks protect your lungs. And never wear loose clothing, jewelry, or long hair that could get caught. Make sure your lathe is stable and all guards are in place.
Here’s a rundown of the essential safety gear and basic tools you’ll want:
- Safety Glasses or Face Shield: Non-negotiable. Protects your eyes from flying wood chips.
- Dust Mask/Respirator: Keeps wood dust out of your lungs.
- Hearing Protection: Lathes can be noisy.
- Appropriate Clothing: No loose sleeves, ties, or dangling accessories.
- Workbench/Stand: A stable, solid base for your lathe is crucial. Look for stands designed for wood lathes to absorb vibration.
- Basic Woodturning Tools: For most beginner projects, you’ll need a few core tools:
- Spindle Gouge: For shaping and coves.
- Roughing Gouge: To quickly round and shape the initial workpiece.
- Scraper (Flat or Round Nose): For smoothing surfaces after gouges.
- Parting Tool: For cutting off finished pieces or creating grooves.
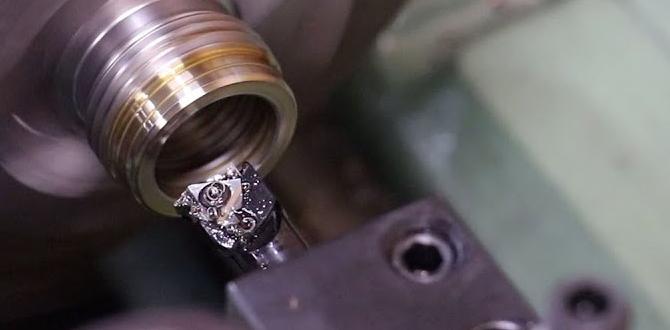
- Chuck (Optional but Recommended): A chuck securely holds your workpiece, making many projects easier and safer. A Jacobs chuck or a screw chuck are great beginner options.
- Sharpening System: Keeping your tools sharp is vital for safe and clean cuts. A diamond stone or a sharpening jig is a good start.
You can find more detailed safety guidelines on the Occupational Safety and Health Administration (OSHA) website, which offers general guidance on workshop safety that applies broadly to all woodworking machinery.
Effortless Mini Wood Lathe Project 1: The Simple Spindle
The spindle is the quintessential beginner project. It teaches you fundamental turning techniques like squaring stock, rounding it over, and basic shaping. It’s the foundation for almost everything else you’ll turn.
Why It’s Easy:
- Small, manageable piece of wood.
- Fewer complex cuts needed.
- Directly applies basic tool skills.
Materials You’ll Need:
- A square-edged piece of softwood, like pine or poplar, roughly 1″ x 1″ x 8″.
- Your basic tool set (see above).
- Sandpaper (various grits: 120, 220, 320).
Step-by-Step Guide to Turning a Simple Spindle:
- Prepare Your Wood: If your wood isn’t perfectly square, use a hand saw or power saw to make it as close to square as possible. Mark the center on each end.
- Mount the Wood:
- If no chuck: Mount a screw chuck into your tailstock or directly into the wood if it’s soft enough. Alternatively, you can mount a spur drive into the headstock and a live center into the tailstock to support your workpiece.
- With a chuck: Mount your chuck to the headstock and then secure the wood in the chuck.
- Face Off the Ends: With the spindle on the lathe, start it at a slow speed (around 500-1000 RPM for a mini lathe, depending on size). Use your roughing gouge to carefully turn the square ends down into a rough cylinder. Don’t worry about perfection yet; just get it round.
- Shape the Spindle: Now, using your lathe at a slightly higher speed if comfortable (around 1000-2000 RPM), use your spindle gouge to create your desired shape. For a simple spindle, you can make a few gentle curves and tapers.
- Be Cautious: Always let the tool do the work. Don’t force it. Make light, shearing cuts.
- Smooth Transitions: Aim for smooth transitions between different sections of your spindle.
- Sand It Smooth: Once you’re happy with the shape, turn the lathe speed down to a slow setting (around 500-800 RPM). Start with 120-grit sandpaper to remove tool marks. Move up to 220-grit, then 320-grit for a smooth finish. Hold the sandpaper gently against the spinning wood. Don’t wrap it completely around; this can catch and cause tear-out.
- Part Off: Use your parting tool to cut the spindle off close to the headstock and tailstock supports. Leave a small amount of material so you don’t tear the wood.
- Clean Up: You’ll have a small knob left where the tool was. You can often remove this by hand or with a chisel on a workbench, or carefully with the parting tool on the lathe.
And there you have it – your first turned spindle! This project hones essential skills like tool control, speed management, and sanding techniques crucial for all future projects.
Effortless Mini Wood Lathe Project 2: The Classic Pen
Turning a pen is incredibly satisfying because you end up with a functional, beautiful item. The key to a beginner-friendly pen project is using a pen kit, which provides the hardware and ensures a good fit.
Why It’s Easy:
- Small scale means less material and shorter turning times.
- Pen kits simplify the design and finishing.
- Great for practicing precise cuts on a small scale.
Materials You’ll Need:
- A pen turning kit (available at most craft stores or online woodworking suppliers). These kits come with the pen hardware and usually instructions.
- A piece of hardwood or attractive softwood (e.g., maple, walnut, cherry, or even a stabilized burl piece) that’s at least 3″ long and slightly larger than the final pen body diameter. Many kits recommend specific blank sizes.
- Drill bits matching the size specified in your pen kit instructions.
- Wood glue.
- Your lathe and basic turning tools.
- Sandpaper.
- Lubricant/Finish for the pen hardware (often included in kits or recommended).
Step-by-Step Guide to Turning a Pen:
- Prepare the Blank: Cut your wood blank to the length recommended by your pen kit instructions. You’ll need two pieces, one for each half of the pen.
- Drill the Holes: Carefully drill a straight hole through the center of each wood blank. This is critical! A drill press is ideal for ensuring straighter holes. The diameter of the hole should match the brass tubes that come with your pen kit.
- Glue in the Tubes: Apply wood glue around the inside of the drilled hole in one blank and insert one of the brass tubes. Repeat for the second blank and tube. Clean off any excess glue. Let the glue cure completely according to the manufacturer’s instructions.
- Turn the Blank to Shape: Once the glue is dry, you’ll need to turn the wood blanks down to the diameter of the brass tubes. Mount the blanks on a pen mandrel (a specialized tool for holding pen blanks on the lathe) or use a chuck with a suitable jaw.
- Slow Speed: Start at a slow lathe speed (around 1000-1500 RPM).
- Roughing Gouge: Use your roughing gouge to carefully remove wood, bringing the blank down to the diameter of the brass tube. Be careful not to go too deep and hit the tube.
- Spindle Gouge: Once close to the tube diameter, use your spindle gouge or a scraper to refine the shape. You can create gentle curves or straight sections.
- Sand and Finish: Move through your sandpaper grits (120, 220, 320, and possibly finer like 400 or 600) to get a very smooth finish. You can sand on the lathe at a medium speed (around 1500-2000 RPM). Once sanded, apply a finish according to your pen kit’s instructions (e.g., CA glue, friction polish, or specialized pen finishes).
- Assemble the Pen: After the finish has cured, use the assembly tool that comes with your pen kit to insert the pen’s internal mechanisms and clip. This usually involves pressing the components into their respective ends of the turned wood tubes.
Turning a pen is a rewarding process that results in a practical and personal item. It’s an excellent way to get comfortable with higher spindle speeds and precise sanding.
Effortless Mini Wood Lathe Project 3: The Basic Bowl or Pot
Turning a small bowl or pot is a fantastic next step after spindles and pens. It introduces you to working with chucks and hollowing out material.
Why It’s Easy:
- Focuses on external shaping initially, reducing the complexity of internal hollowing.
- Small bowls are forgiving and don’t require massive amounts of material.
- Teaches basic chuck mounting and faceplate work.
Materials You’ll Need:
- A sturdy piece of wood, preferably with good grain like a maple burl or a piece of oak, roughly 4-6 inches in diameter and 3-4 inches thick.
- A faceplate or a chuck with a bowl jaw set.
- A bowl gouge (essential for efficient bowl turning).
- Sandpaper.
- Optional: A parting tool for creating a tenon for chuck mounting.
Step-by-Step Guide to Turning a Small Bowl:
- Prepare the Wood: If your wood isn’t round, use a bandsaw to cut it into a rough circle. Mark the center.
- Mount the Wood for External Shaping:
- Faceplate Method: Screw a faceplate securely to the center of one flat side of your wood. Mount this faceplate onto the lathe’s headstock.
- Chuck Method (with tenon): You can turn a tenon on your wood blank first, mount it in a chuck, and then turn a recess for a secondary jaw chuck connection if you plan to do any internal hollowing later. For a primarily external-shaped bowl, a faceplate is often simpler to start.
- Round the Blank: Start the lathe at a slow speed (around 500-800 RPM). Use your roughing gouge to turn the block into a rough cylinder, then progressively into a more defined bowl blank shape. Shape the outside first.
- Shape the Outer Profile: Use your bowl gouge to create the desired outer curve of your bowl. Take light, scraping or shearing cuts. Aim for a smooth, flowing profile.
- Create a Tenon (for Chuck Mounting): For easy removal and remounting, you’ll want to create a tenon on the bottom of the bowl. Use your parting tool or tailstock-mounted tenon cutter to shape a small, sturdy tenon that will fit securely into your chuck jaws.
- Sand the Exterior: Sand the entire exterior of the bowl smooth, working through your sandpaper grits.
- Remount for Hollowing: Remove the bowl from the faceplate/chuck. Mount your chuck on the headstock. Find or create a suitable recess on the bottom of the bowl for your chuck jaws to grip. Carefully grip the tenon with your chuck jaws.
- Hollow the Bowl Interior:Start at a slow speed (around 800-1200 RPM). Using your bowl gouge, begin hollowing out the inside of the bowl. Start from the center and work outwards, leaving a rim of the desired thickness.
- Depth Control: Be mindful of the thickness of your bowl walls. You don’t want to turn too thin, especially on a mini lathe with less power.
- Smooth Upward Cuts: Use upward, scooping cuts with the bowl gouge to remove material efficiently.
- Sand the Interior: Once you have the desired shape and thickness, sand the inside of the bowl smooth, again working through your grits.
- Part Off/Recess: You can either part off the bowl completely if you’re happy with the tenon as a base, or you can turn a recess into the bottom to remove the tenon and leave a flat base.
Small bowls and pots are incredibly versatile and make beautiful decorative items or functional storage. This project is a major confidence booster and opens the door to more intricate bowl turning.
Project Ideas for Next Level Beginners
Once you’ve gained confidence with the basic spindle, pen, and bowl projects, here are a few ideas to build upon those skills:
- Bottle Stoppers: Similar to pens, but with a cork or plastic stopper. Great for using small, interesting wood scraps.
- Hollow-Form Ornaments: Small, hollow spheres or teardrop shapes perfect for Christmas decorations or display.
- Candlesticks: Building on spindle techniques, these require a bit more stability and precise fit for the candle.
- Small Vases/Bud Vases: Larger than a bowl, these require more careful wall thickness management and often a more elegant profile.
Choosing the Right Wood for Mini Lathe Projects
The type of wood you choose can significantly impact your turning experience. For beginners, it’s often best to start with softwoods or stable hardwoods.
| Wood Type | Pros for Beginners | Cons for Beginners | Common Projects |
|---|---|---|---|
| Pine/Poplar | Inexpensive, readily available, easy to cut, forgiving. | Can be prone to tear-out, softer grain, not ideal for fine detail. | Spindles, practice pieces, simple decorative items. |
| Cherry/Maple | Smooth grain, takes a good finish, moderately hard, good for detail. | Slightly harder to turn than pine, can be more expensive. | Pens, small bowls, spindles, candle holders. |
| Oak/Ash | Strong, durable, beautiful grain patterns. | Can be very hard, requires sharp tools, more prone to tear-out if dull tools are used. | Sturdier bowls, larger spindles, practical items. |
| Walnut | Beautiful dark color, easy to turn, takes a great finish. | Can be more expensive, sometimes brittle if very dry or figured. | Pens, bowls, decorative items, boxes. |
For more information on wood properties and suitability for turning, resources like Woodbin provide extensive databases on wood characteristics.
Troubleshooting Common Beginner Issues
Even with simple projects, you might run into a few hiccups. Here are some common problems and how to fix them:
- Chatter/Vibration: This is often caused by dull tools, too fast a speed, or an unstable lathe. Ensure your tools are sharp